Console connection to a cloud instance on the OpenStack platform is made using the VNC (Virtual Network Computing) system.
In order to open the VNC console, go to the COMPUTE — INSTANCES section, then select CONSOLE in the drop-down menu next to the desired instance.
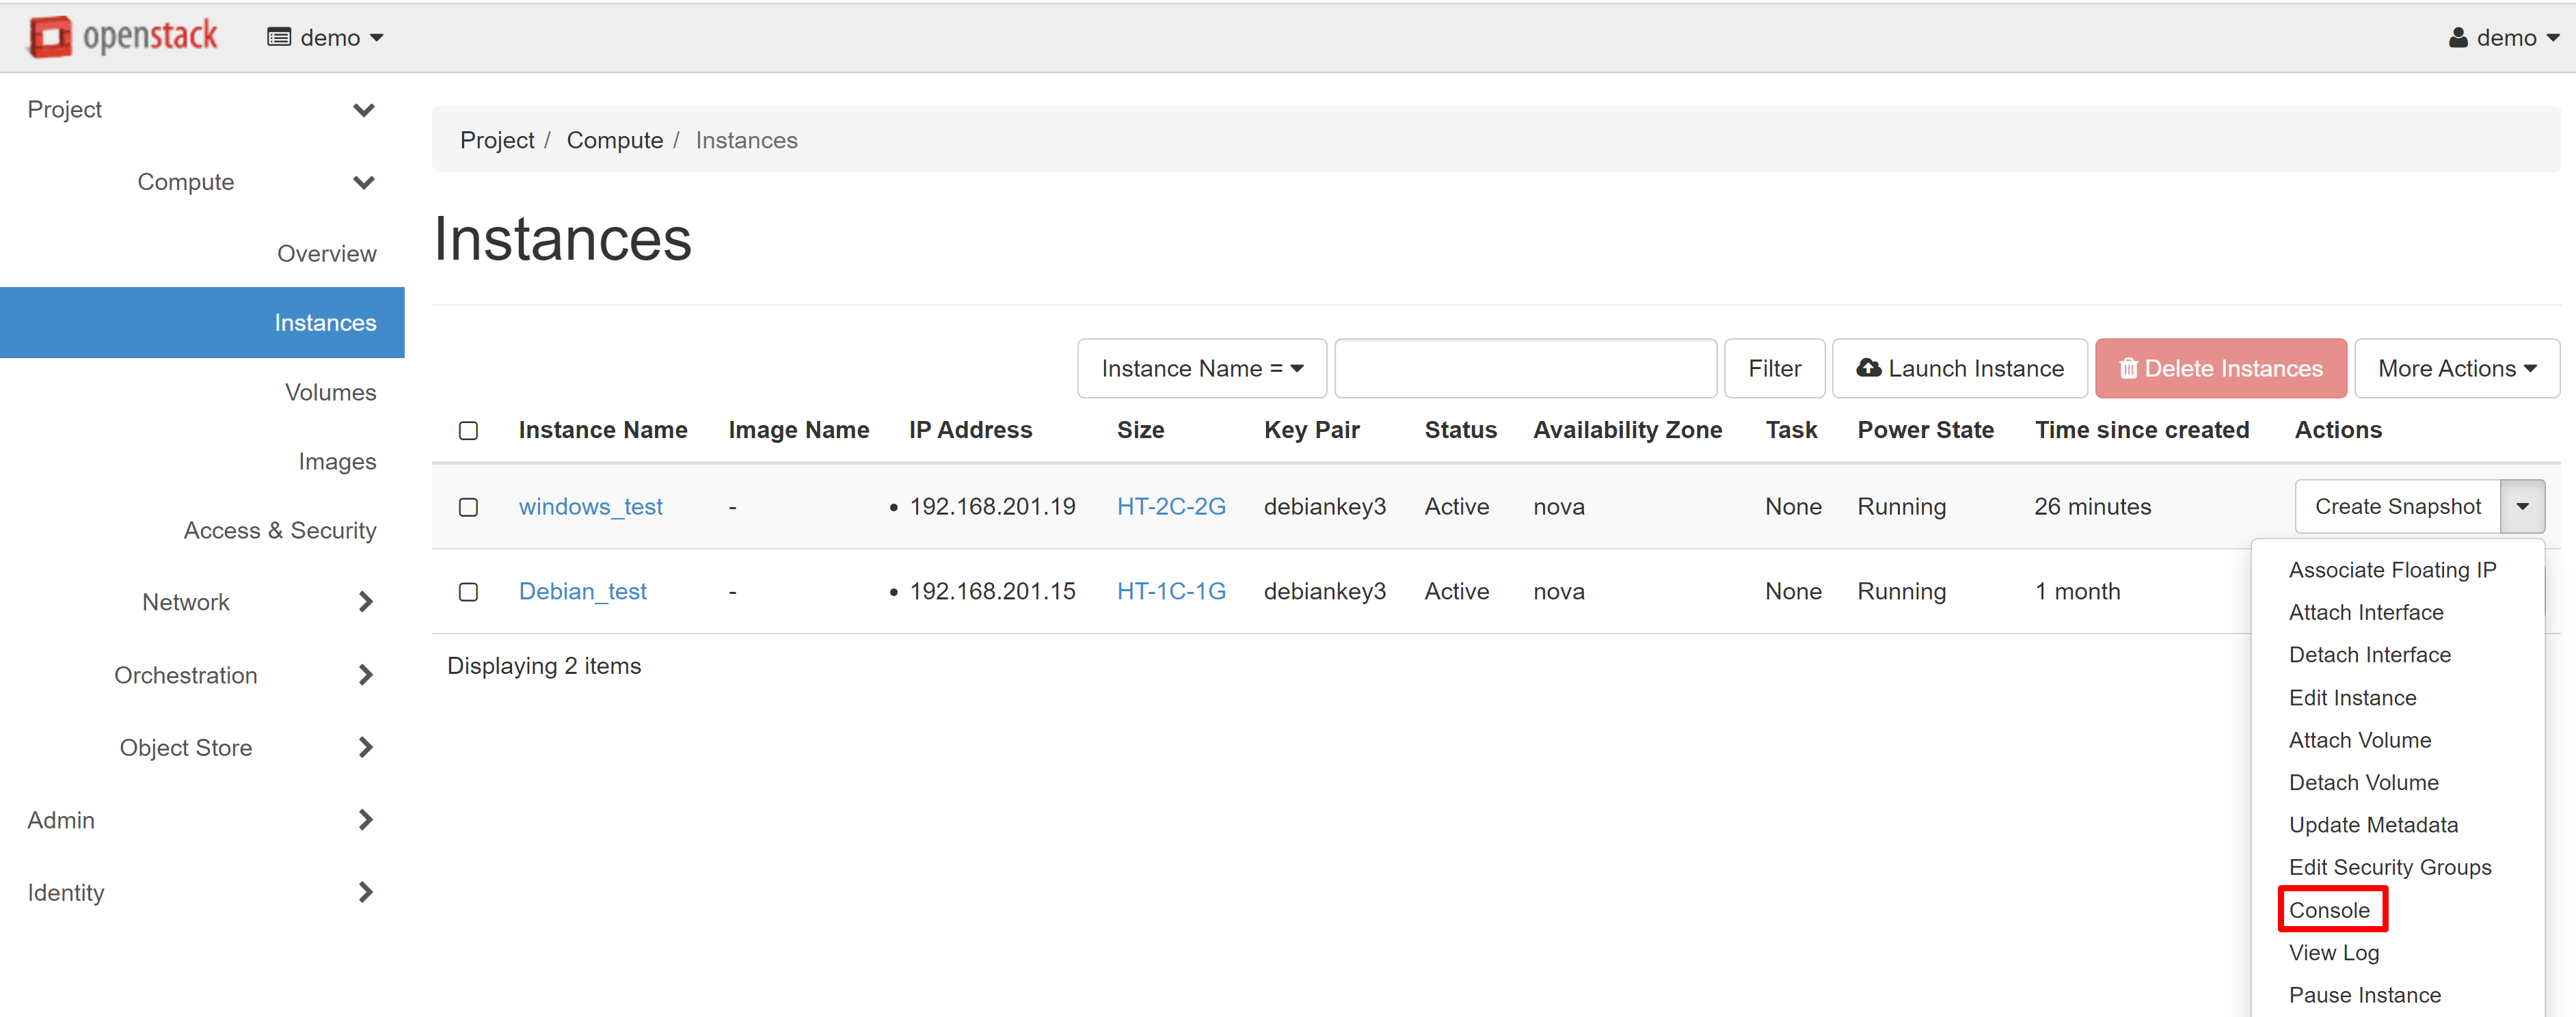
This will transfer you to the CONSOLE tab of your instance, where the remote access screen opens. Alternatively, you can click on the name of the required instance and then go to the CONSOLE tab on the page that opens.
In order to make it easier to work with the console, you can open it in a separate window. To do this, follow the link CLICK HERE TO SHOW ONLY CONSOLE. In order to exit the full-screen mode, click the BACK arrow in your browser.

If you wish to connect to an instance with a Linux/Unix-based operating system, keep in mind that there is no password access in standard images, and for login, the SSH protocol with the creation of a key pair is used.
You can only link SSH keys to a specific instance at the VM creation stage, and this cannot be changed later. This is why it is highly recommended to keep your private key safe and secure.
In order to create an SSH key pair, go to COMPUTE — ACCESS & SECURITY and open the KEY PAIRS tab. Click CREATE KEY PAIR.
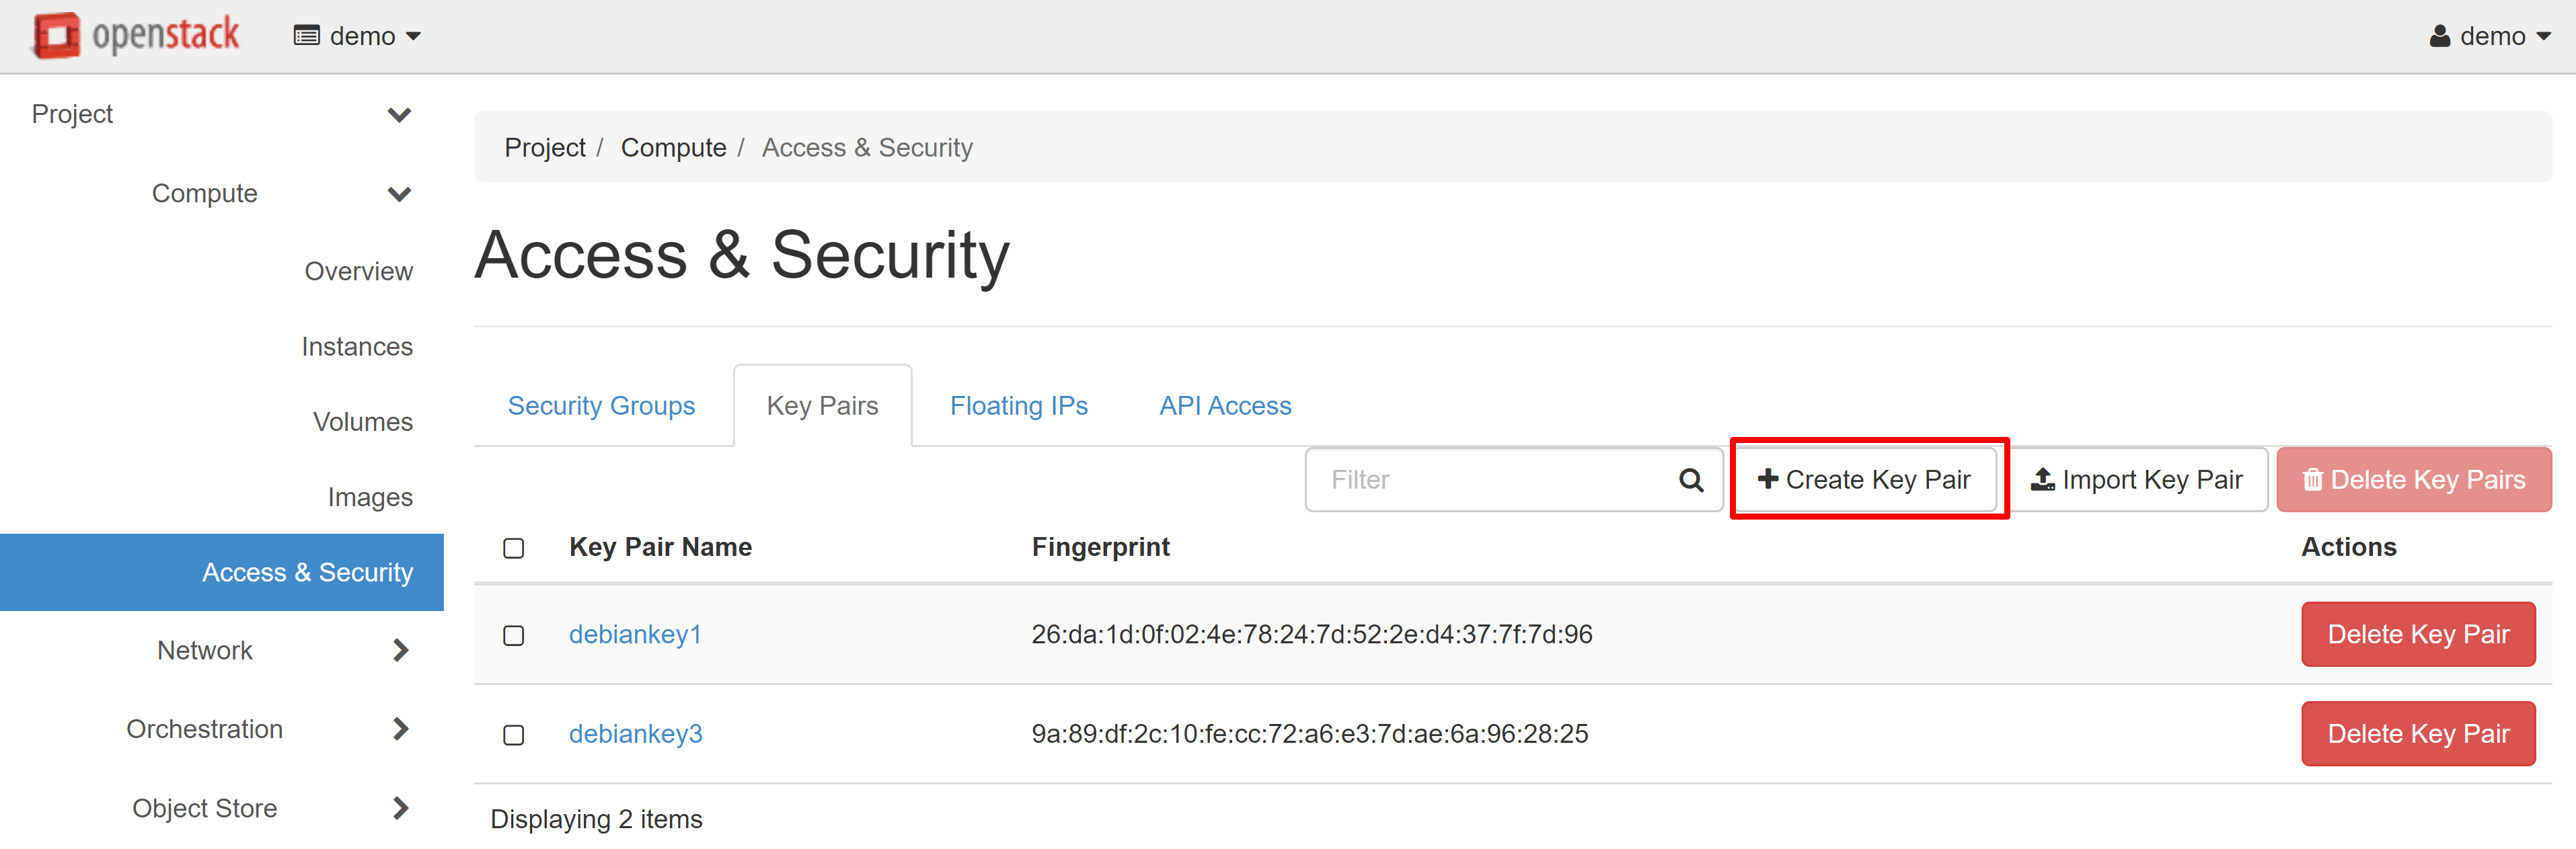
In the window that opens, enter a name for your key pair and confirm its creation.
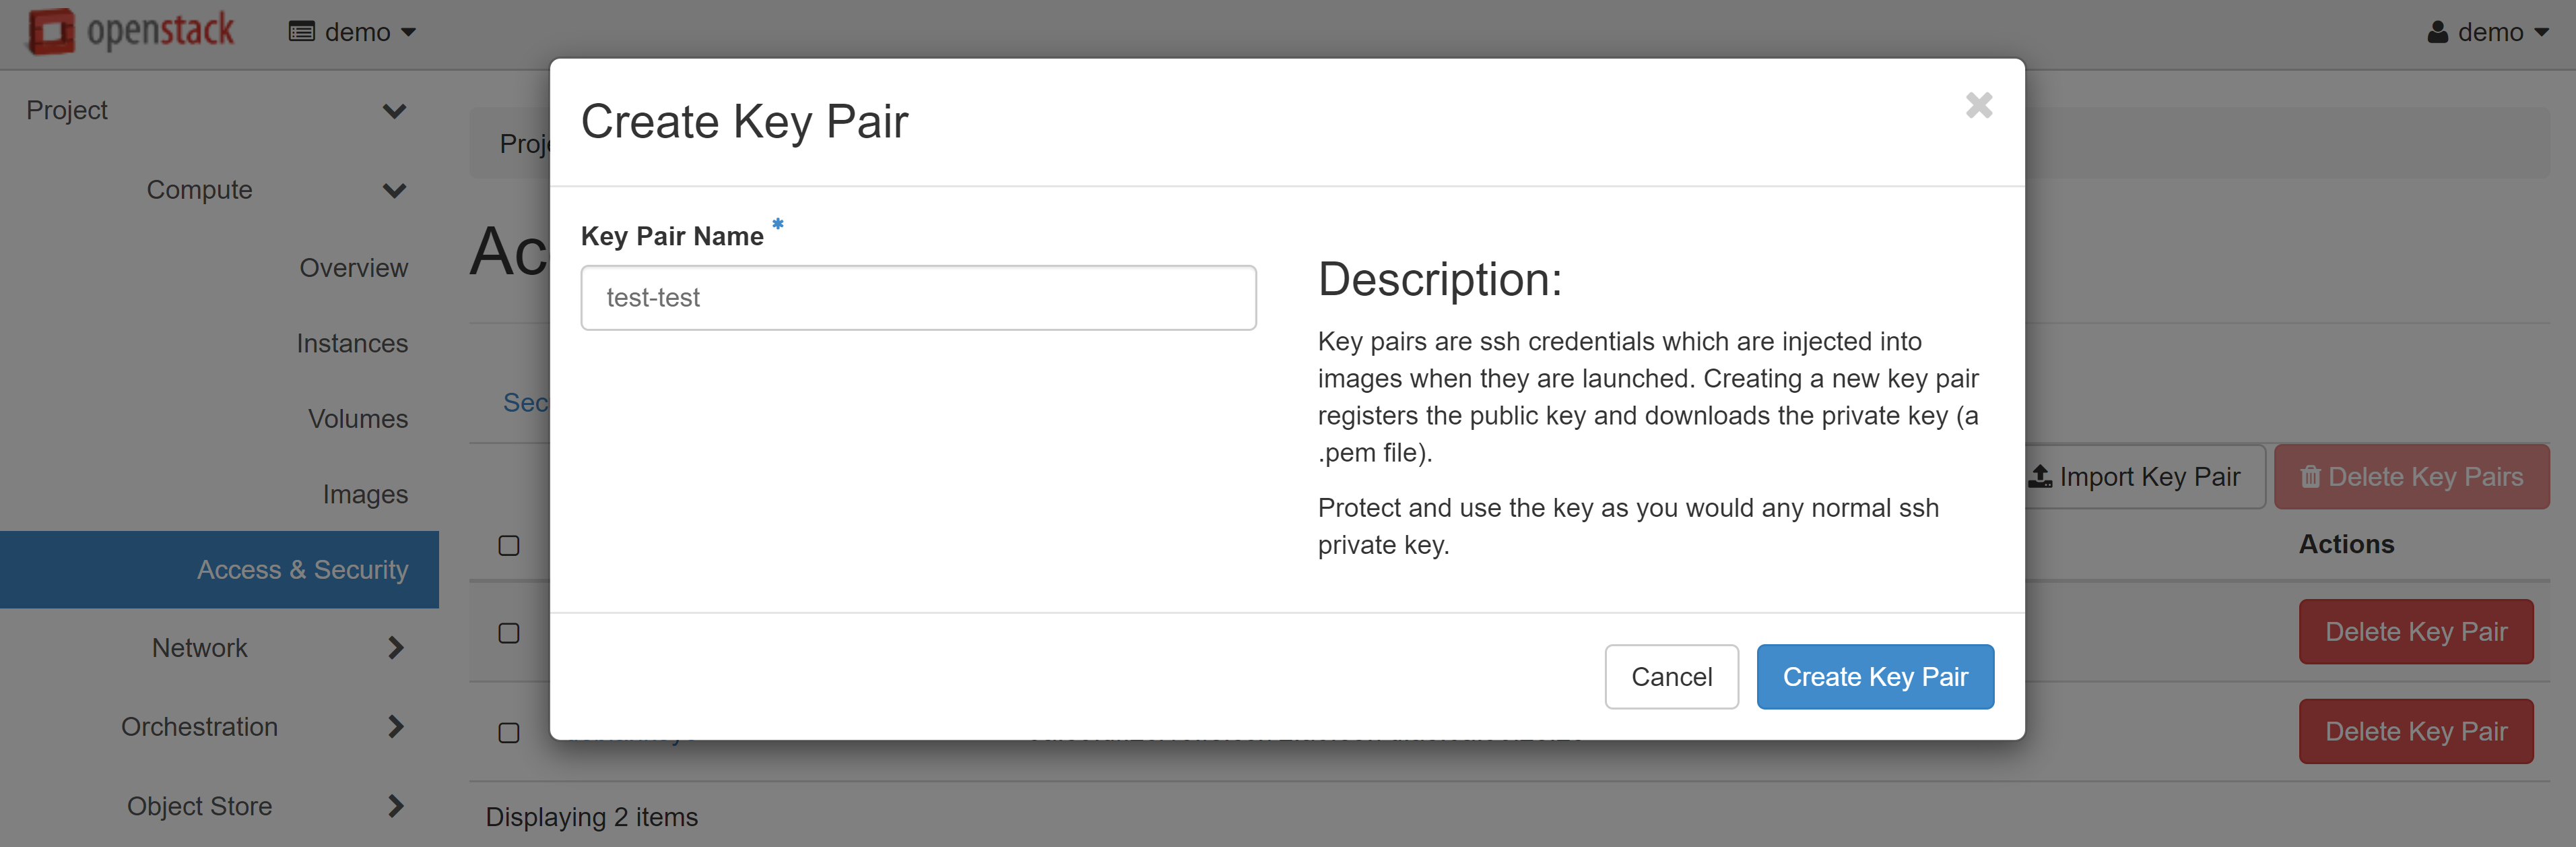
The browser will prompt you to automatically download the SSH private key.
In order to assign keys already created to an instance, when creating a new VM, go to the KEY PAIR menu section and click ‘+’ next to the desired key pair in the list of available ones. You can also import a key pair from your device here.
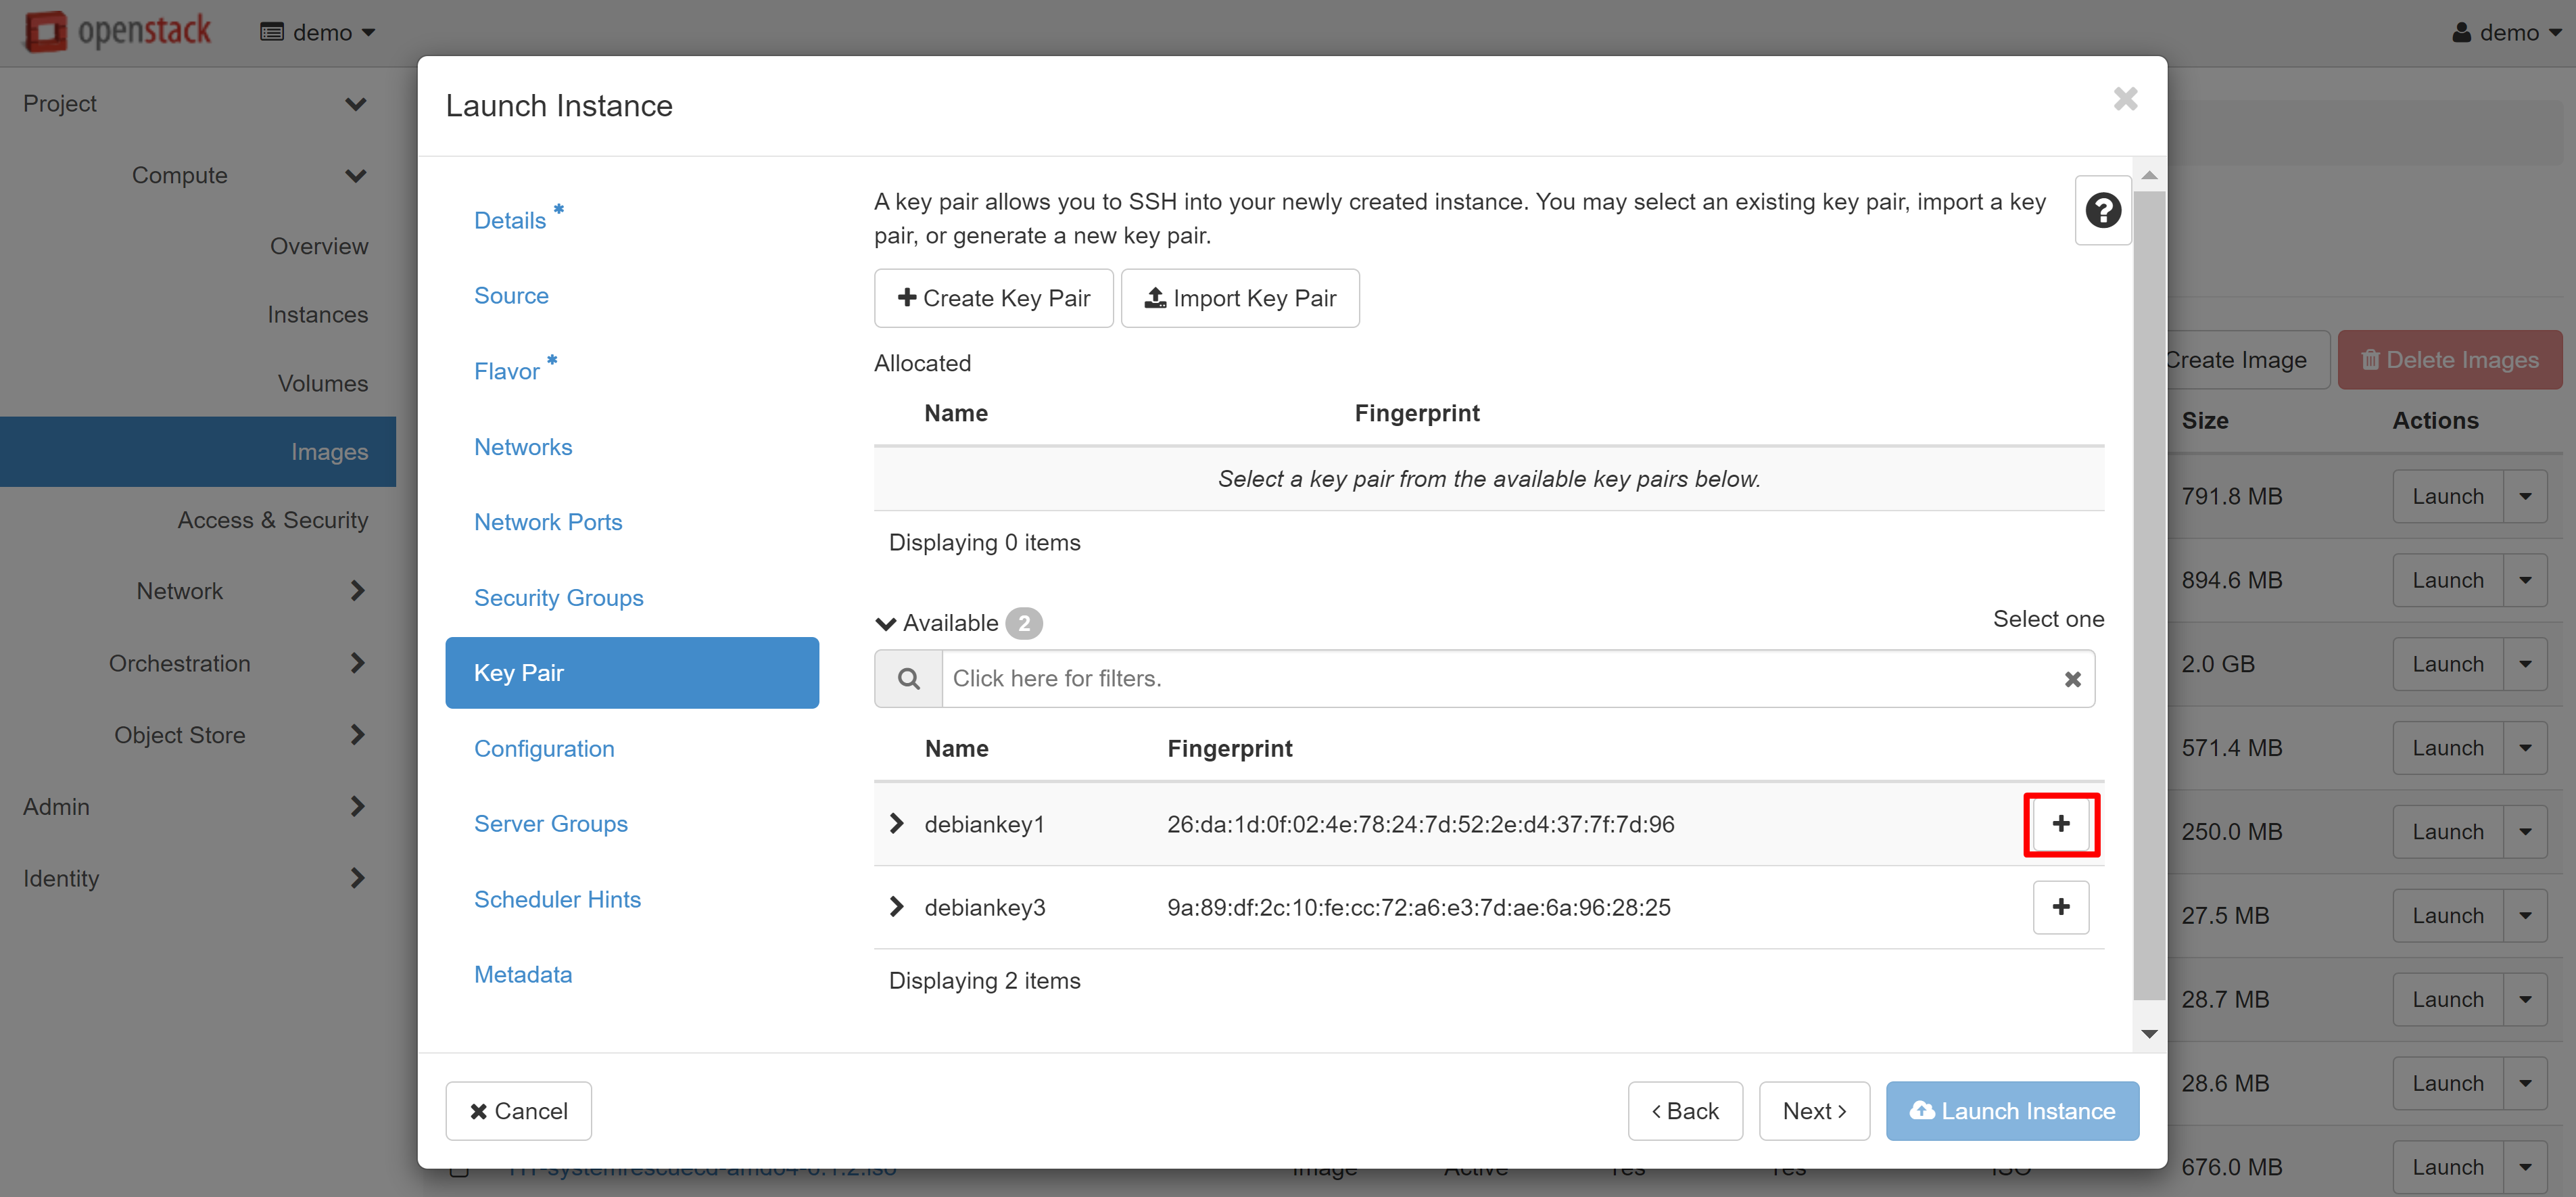
New key pairs may also be added directly when creating the instance. Read more about this in our manual “Virtual Data Center: Getting Started”.
You can clone your cloud VM without stopping it. There are several ways to do this.
1. Take A Snapshot
This method is suitable for cases where you do not need to delete the source instance.
To create a snapshot, select CREATE SNAPSHOT in the drop-down menu next to the VM being cloned.
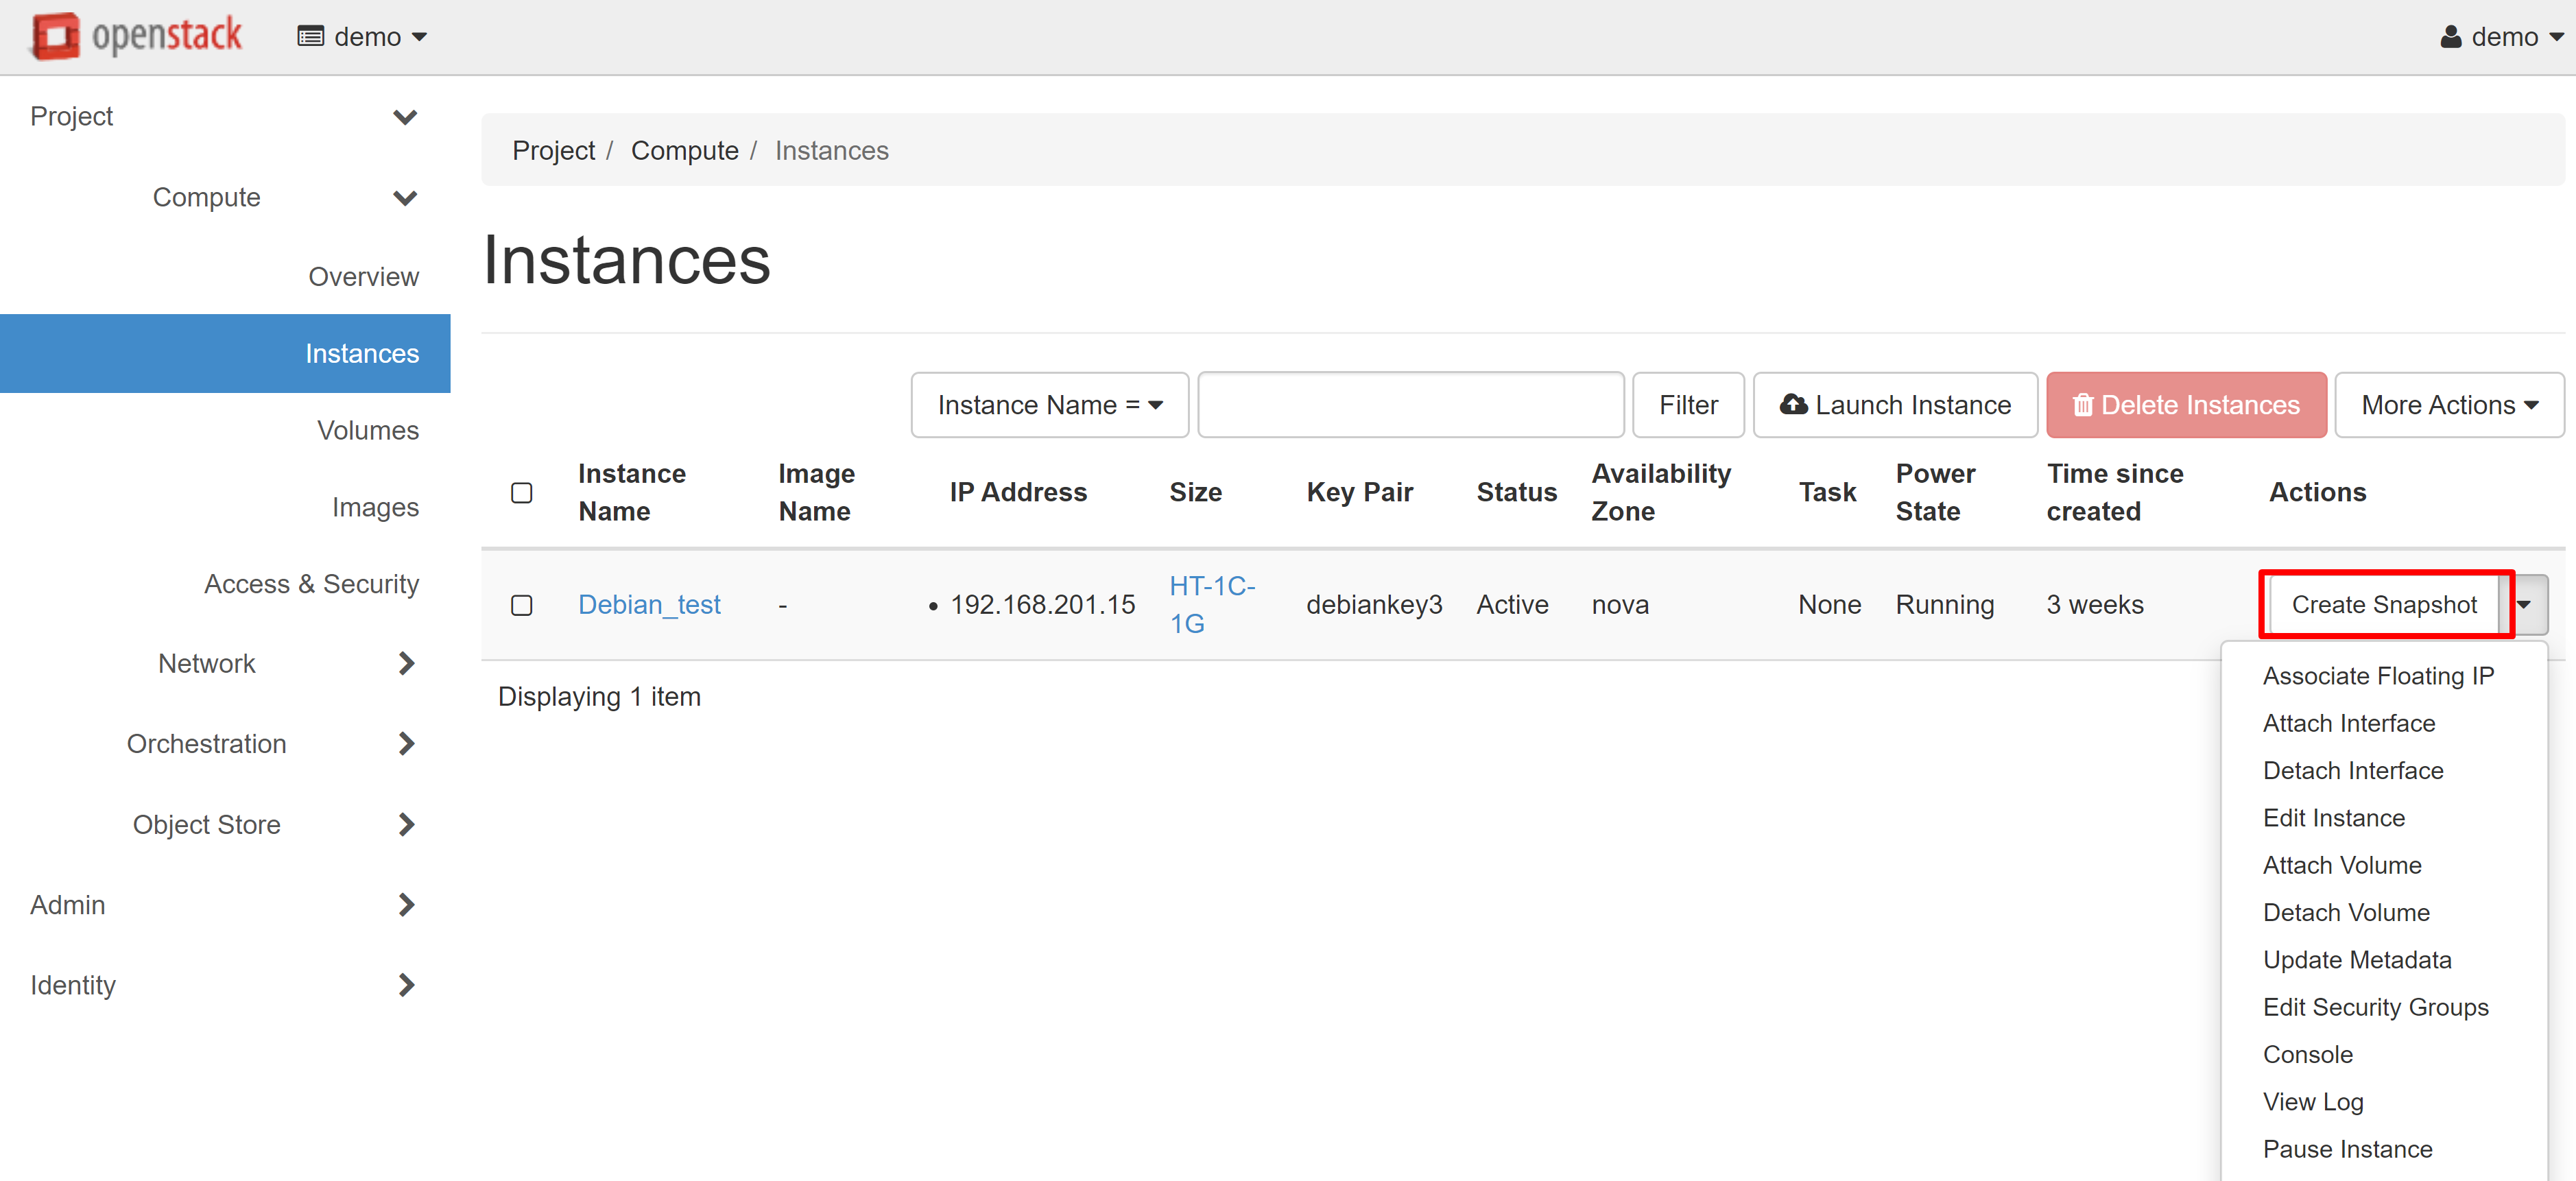
In the window that opens, enter the name of the snapshot, then click CREATE SNAPSHOT.

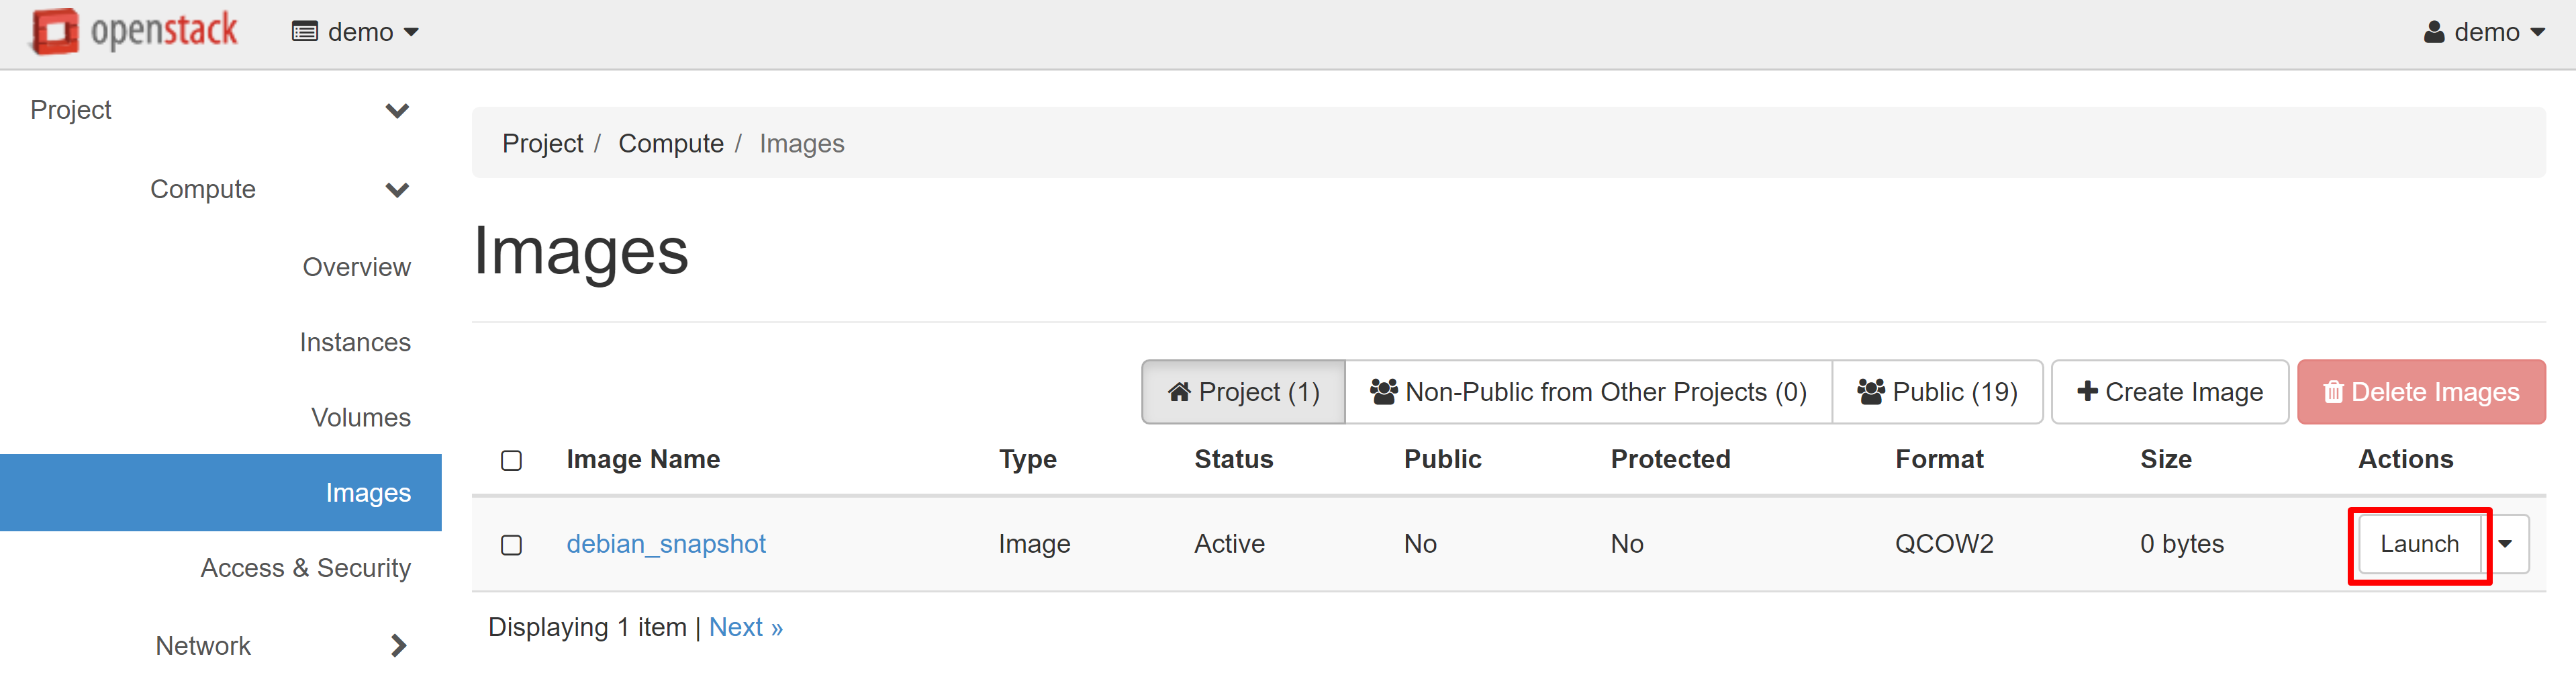
This will automatically redirect you to COMPUTE — IMAGES. A snapshot of your instance will appear on the PROJECT tab. Select LAUNCH in the drop-down menu next to the instance name.
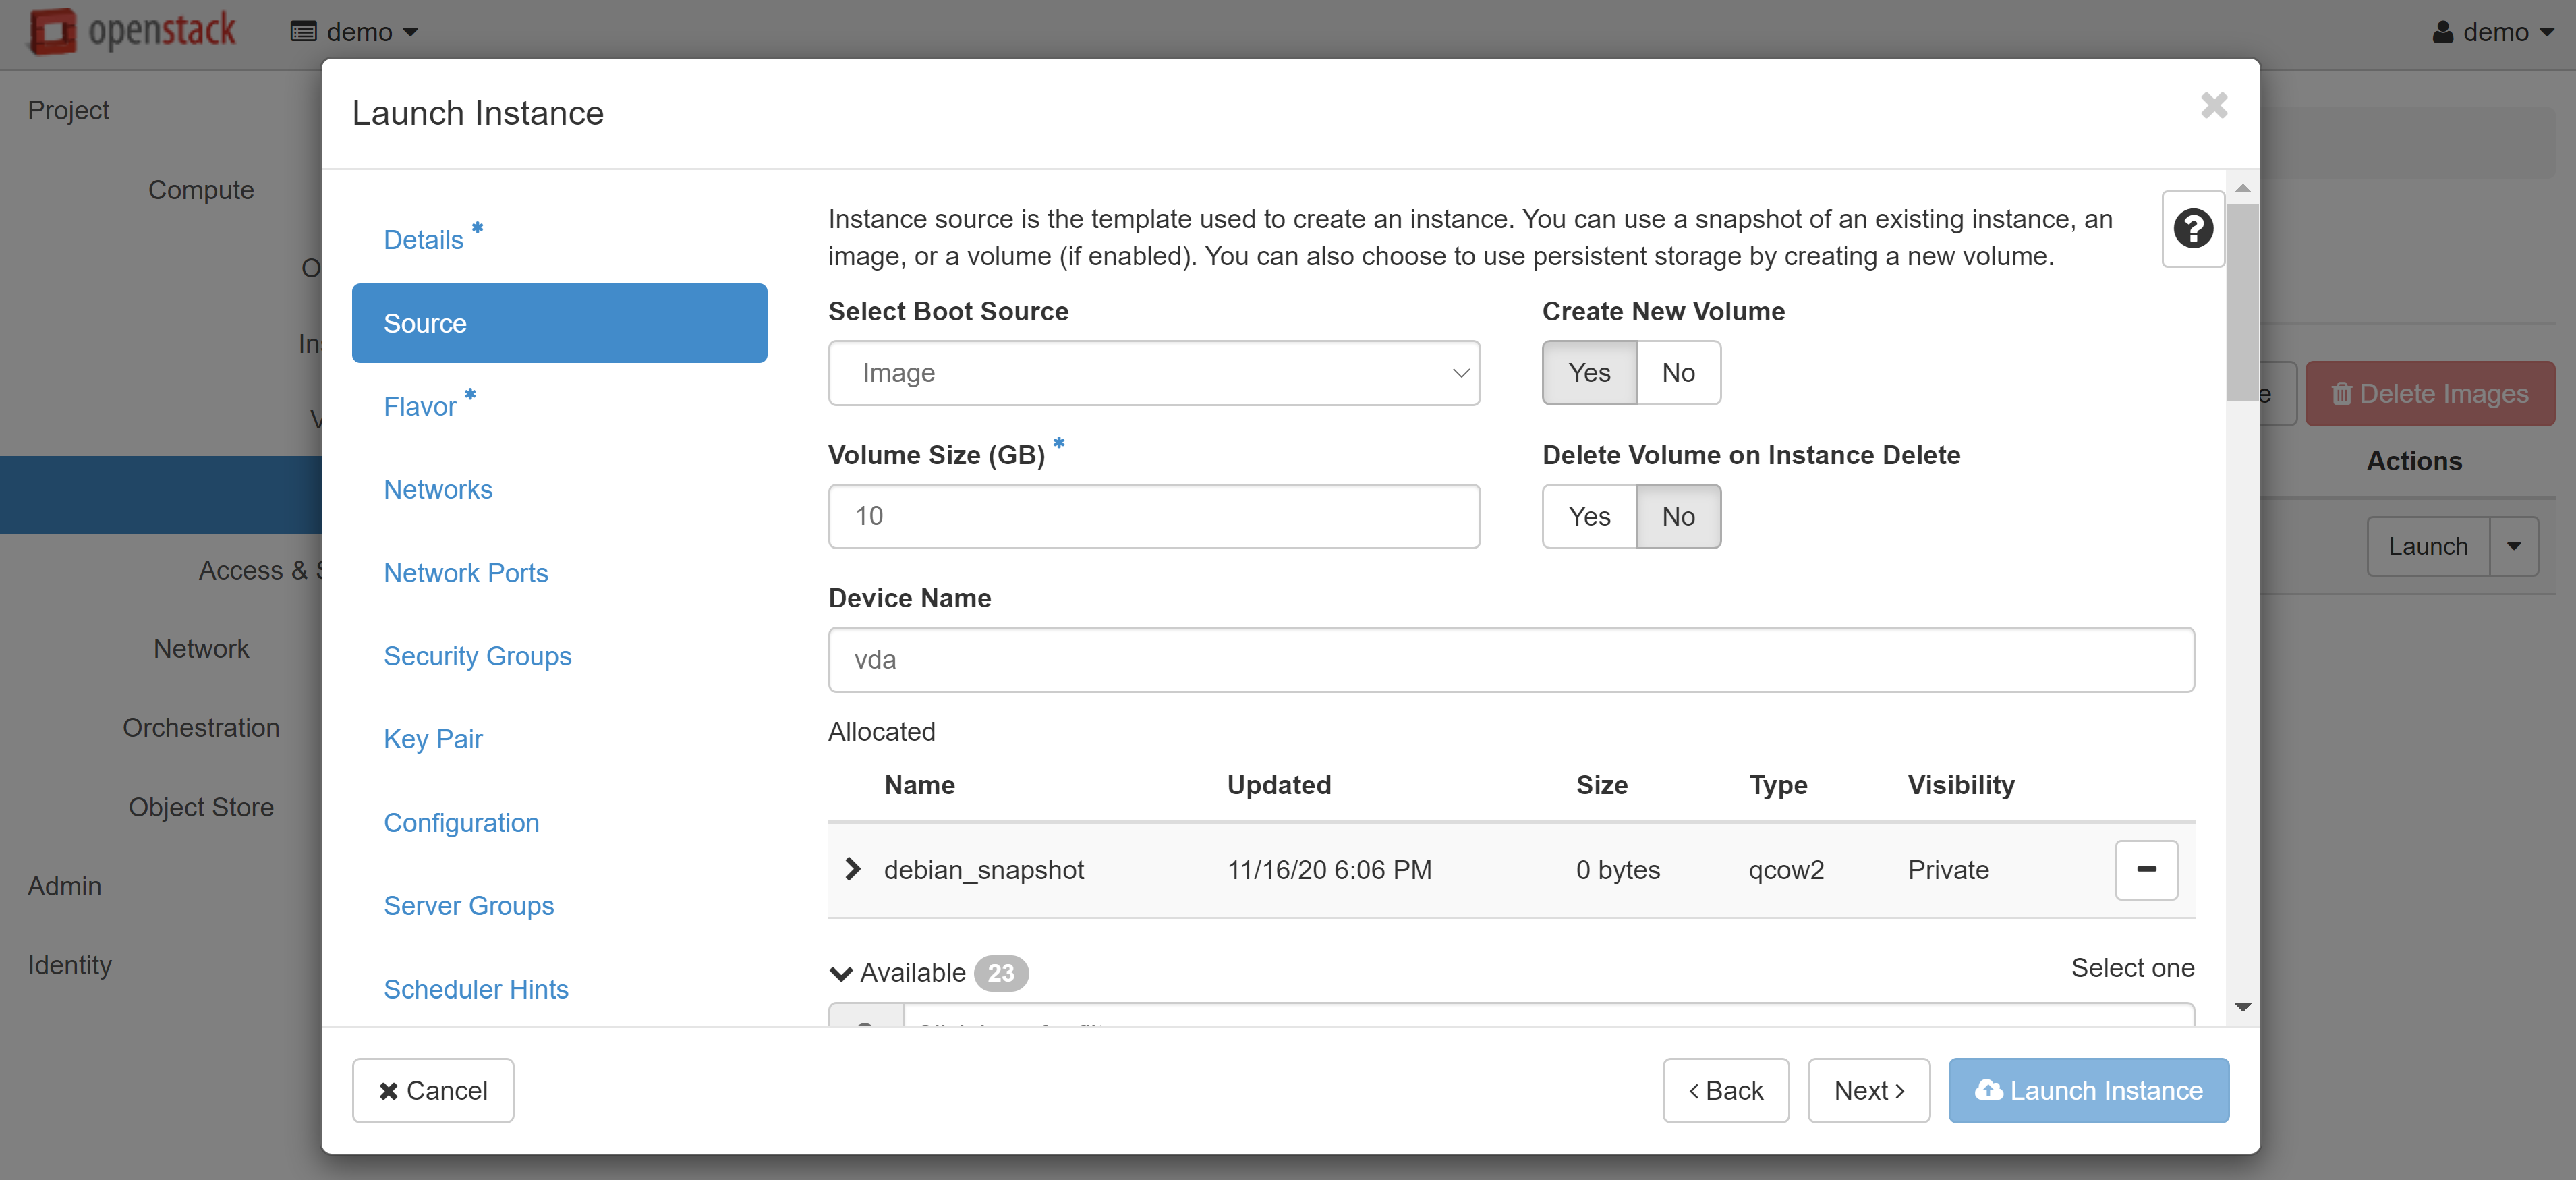
The Launch Instance window will open, where you can create a VM based on the snapshot you just took.
Read more about creating and configuring instances from images here.
Attention! You will not be able to delete the source volume and the snapshot itself whilst there are other volumes based on this snapshot. If you wish to delete the source volume, use the following method.
2. Using The Image
This method is suitable for cases when you need to delete the original VM. It involves unloading the volume as an image or backup.
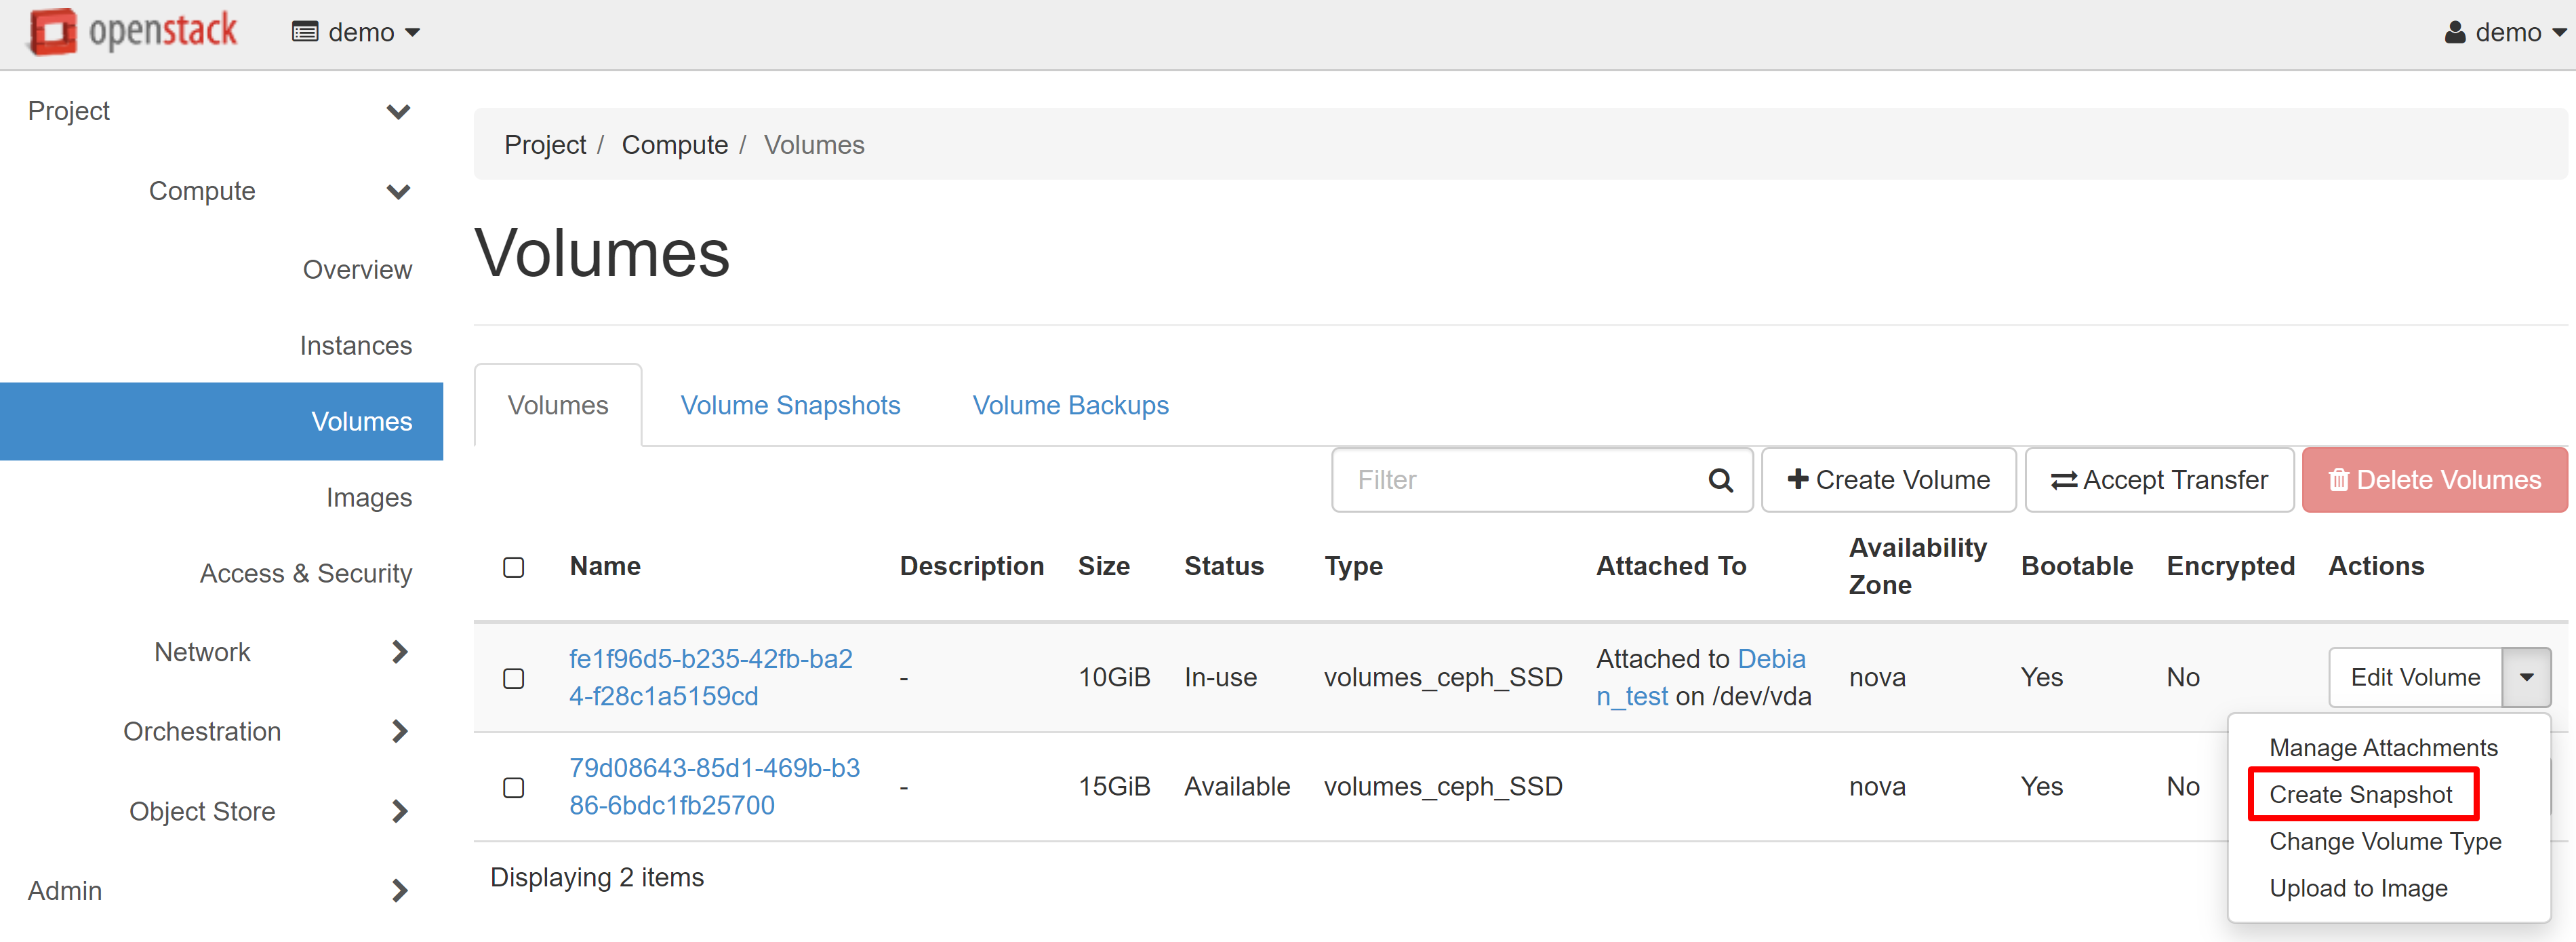
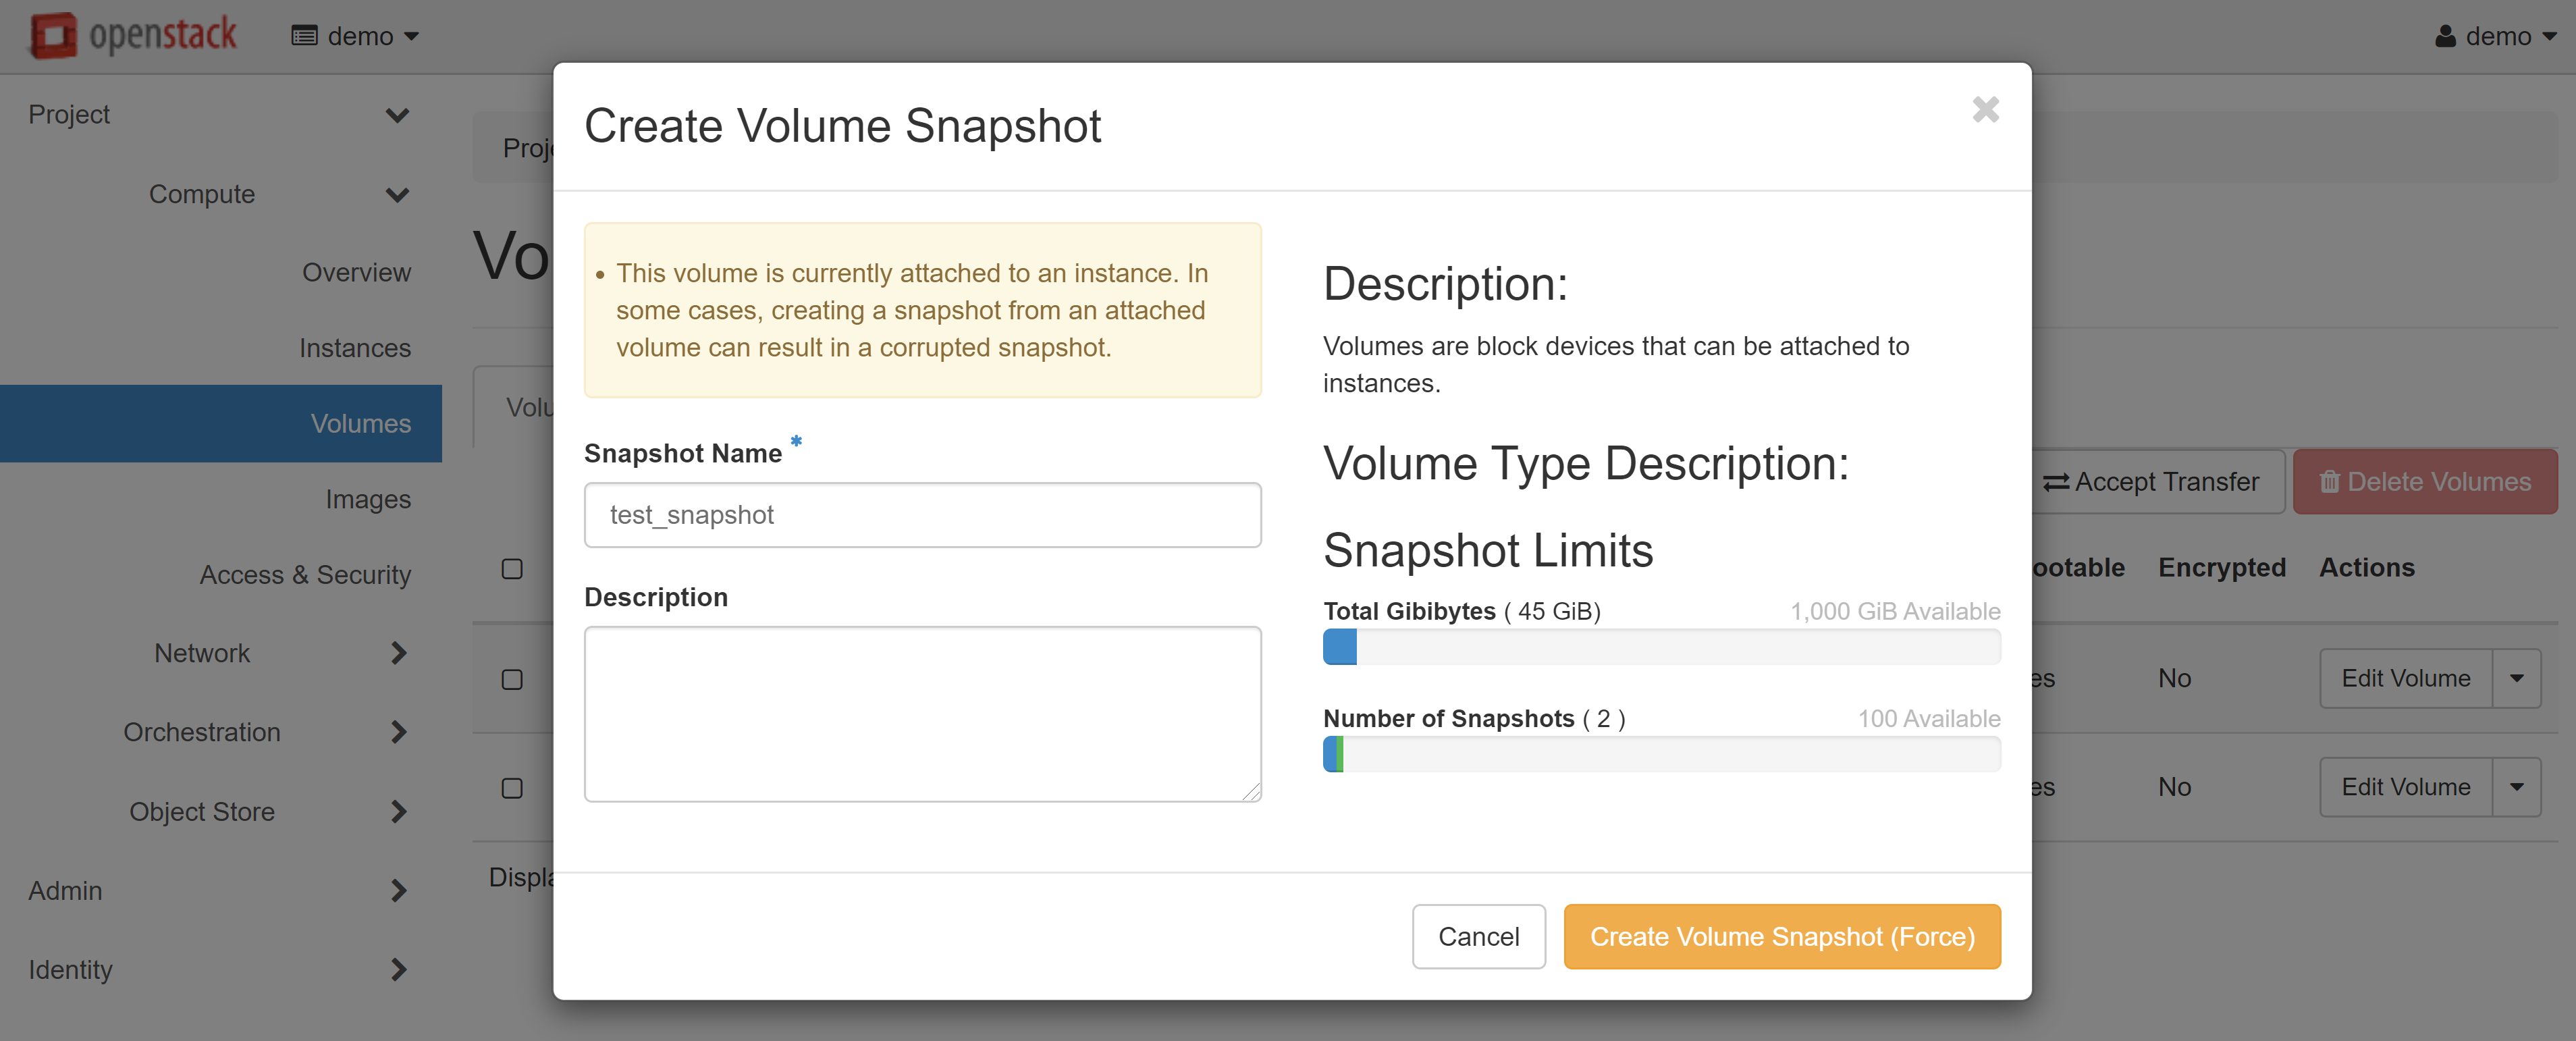
Go to COMPUTE — VOLUMES, next to the desired volume in the drop-down menu, then select CREATE SNAPSHOT.
In the window that opens, enter the name of the volume and click CREATE VOLUME SNAPSHOT (FORCE).
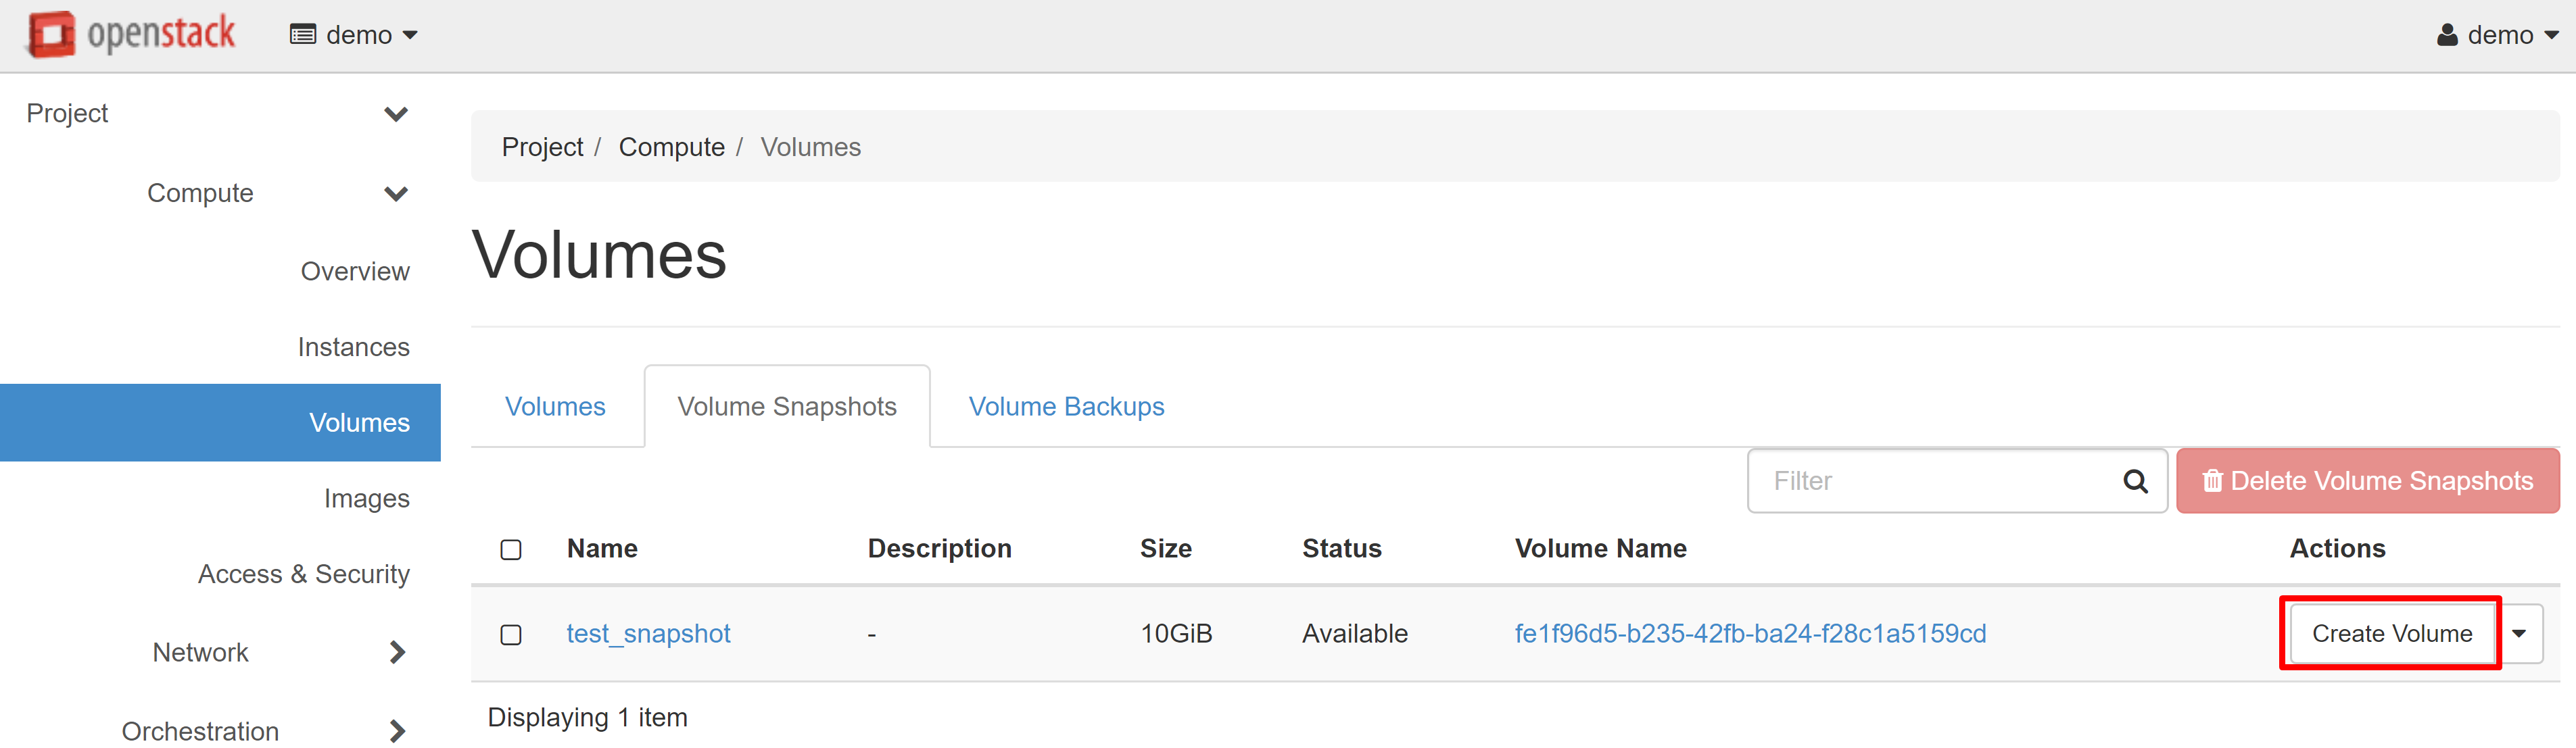
You will automatically be referred to the VOLUME SNAPSHOTS tab in COMPUTE — VOLUMES and the snapshot you have just created will appear in the list. Select CREATE VOLUME in the drop-down menu next to your snapshot.
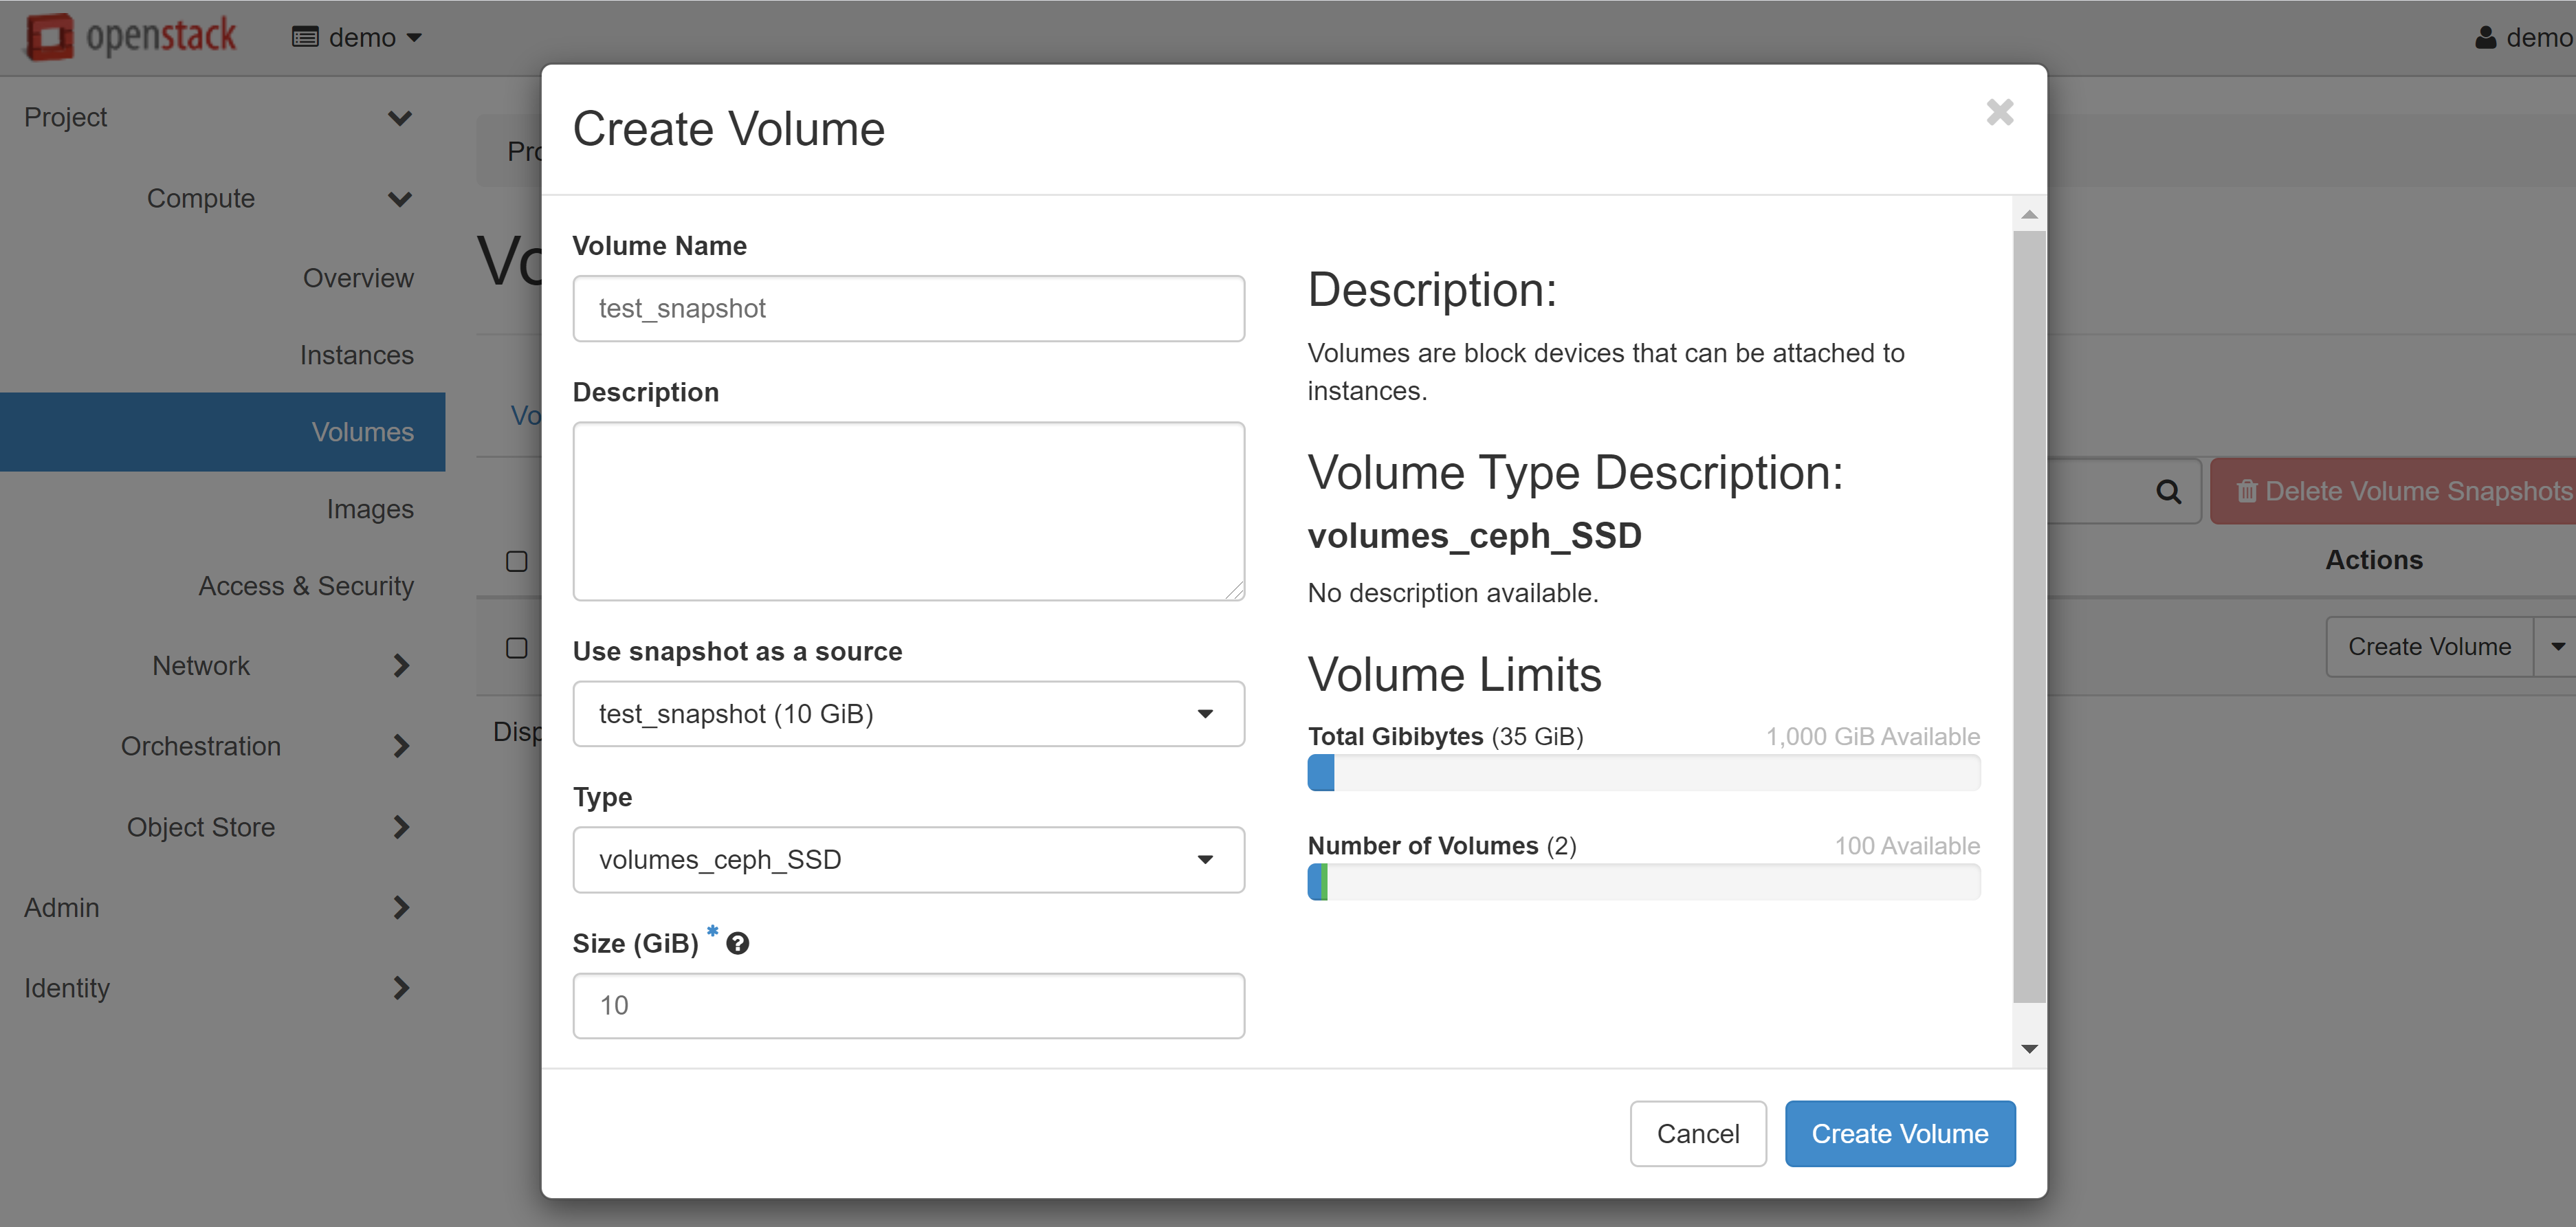
In the window that opens, fill in the required fields, and click CREATE VOLUME.
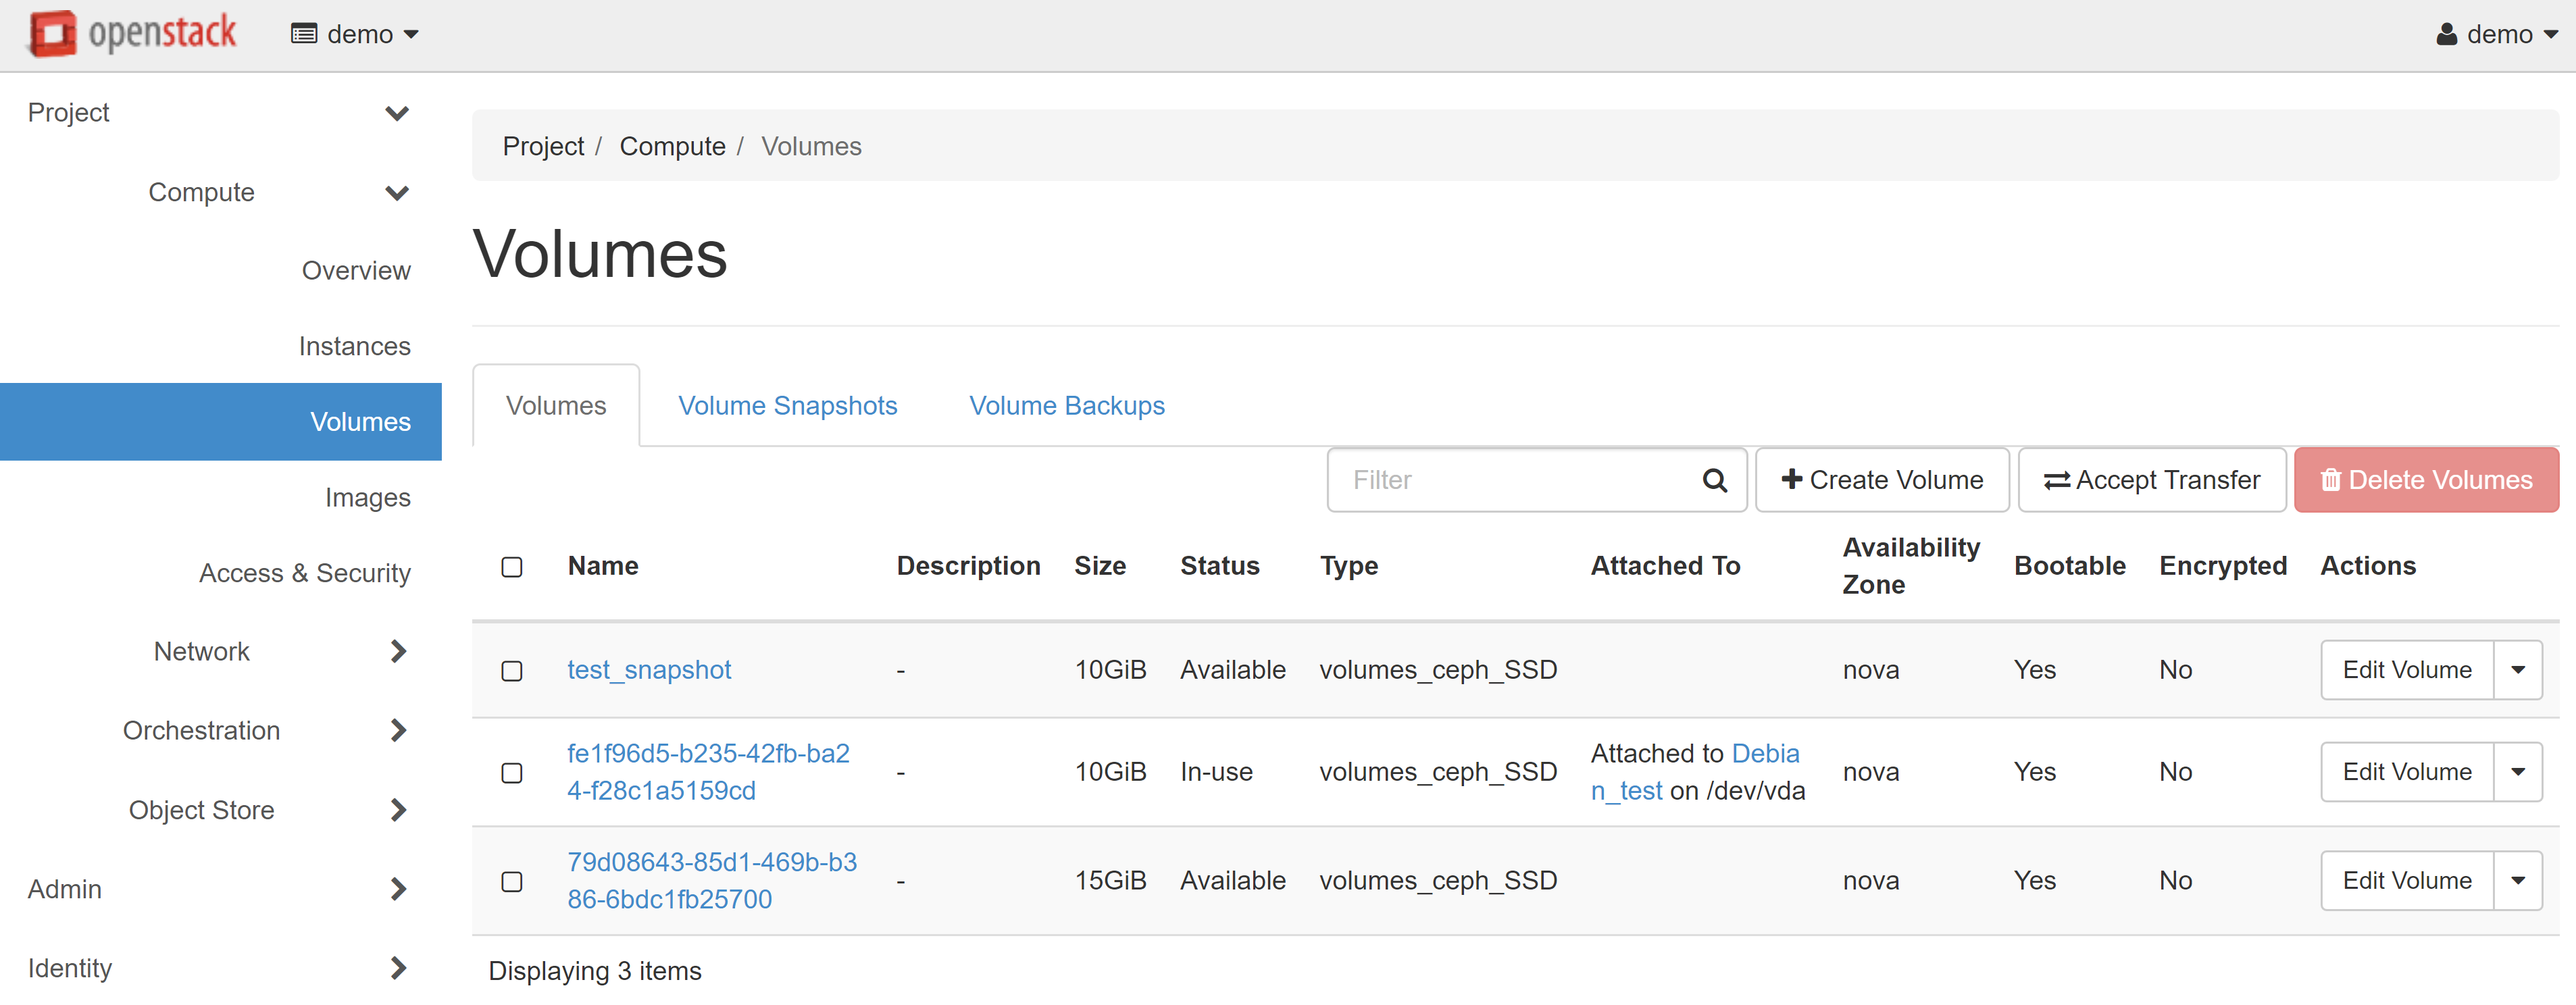
The volume you created will appear on the VOLUMES tab with the AVAILABLE status.
If you wish to create a large number of clones, you must save the created volume as an image. To do this, select the UPLOAD TO IMAGE drop-down menu item next to the selected volume.
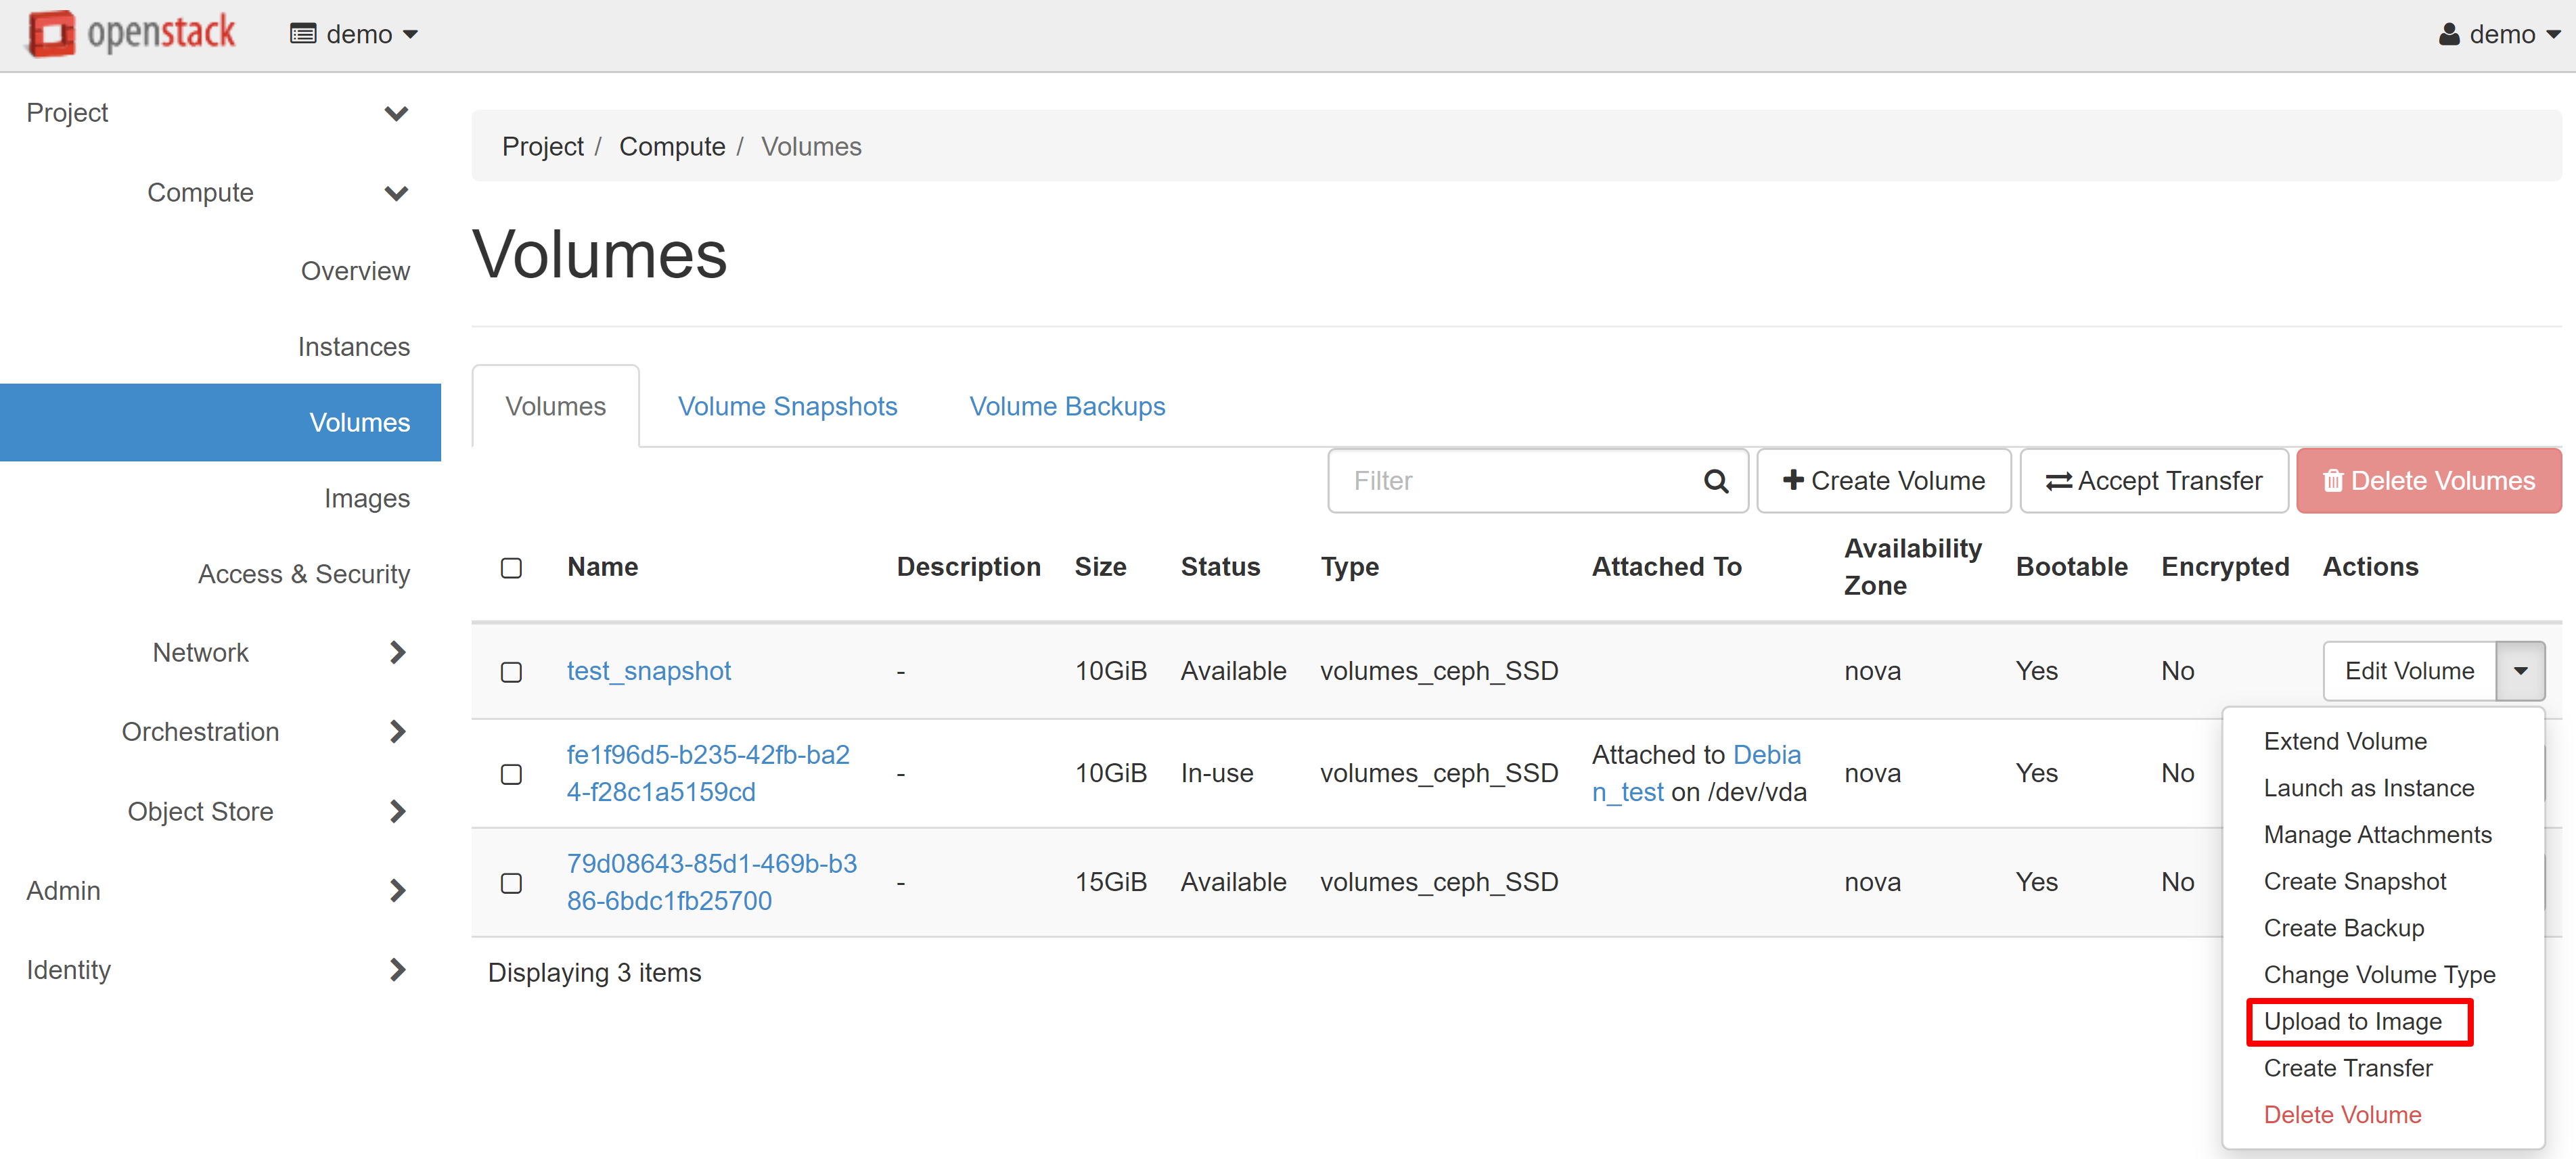
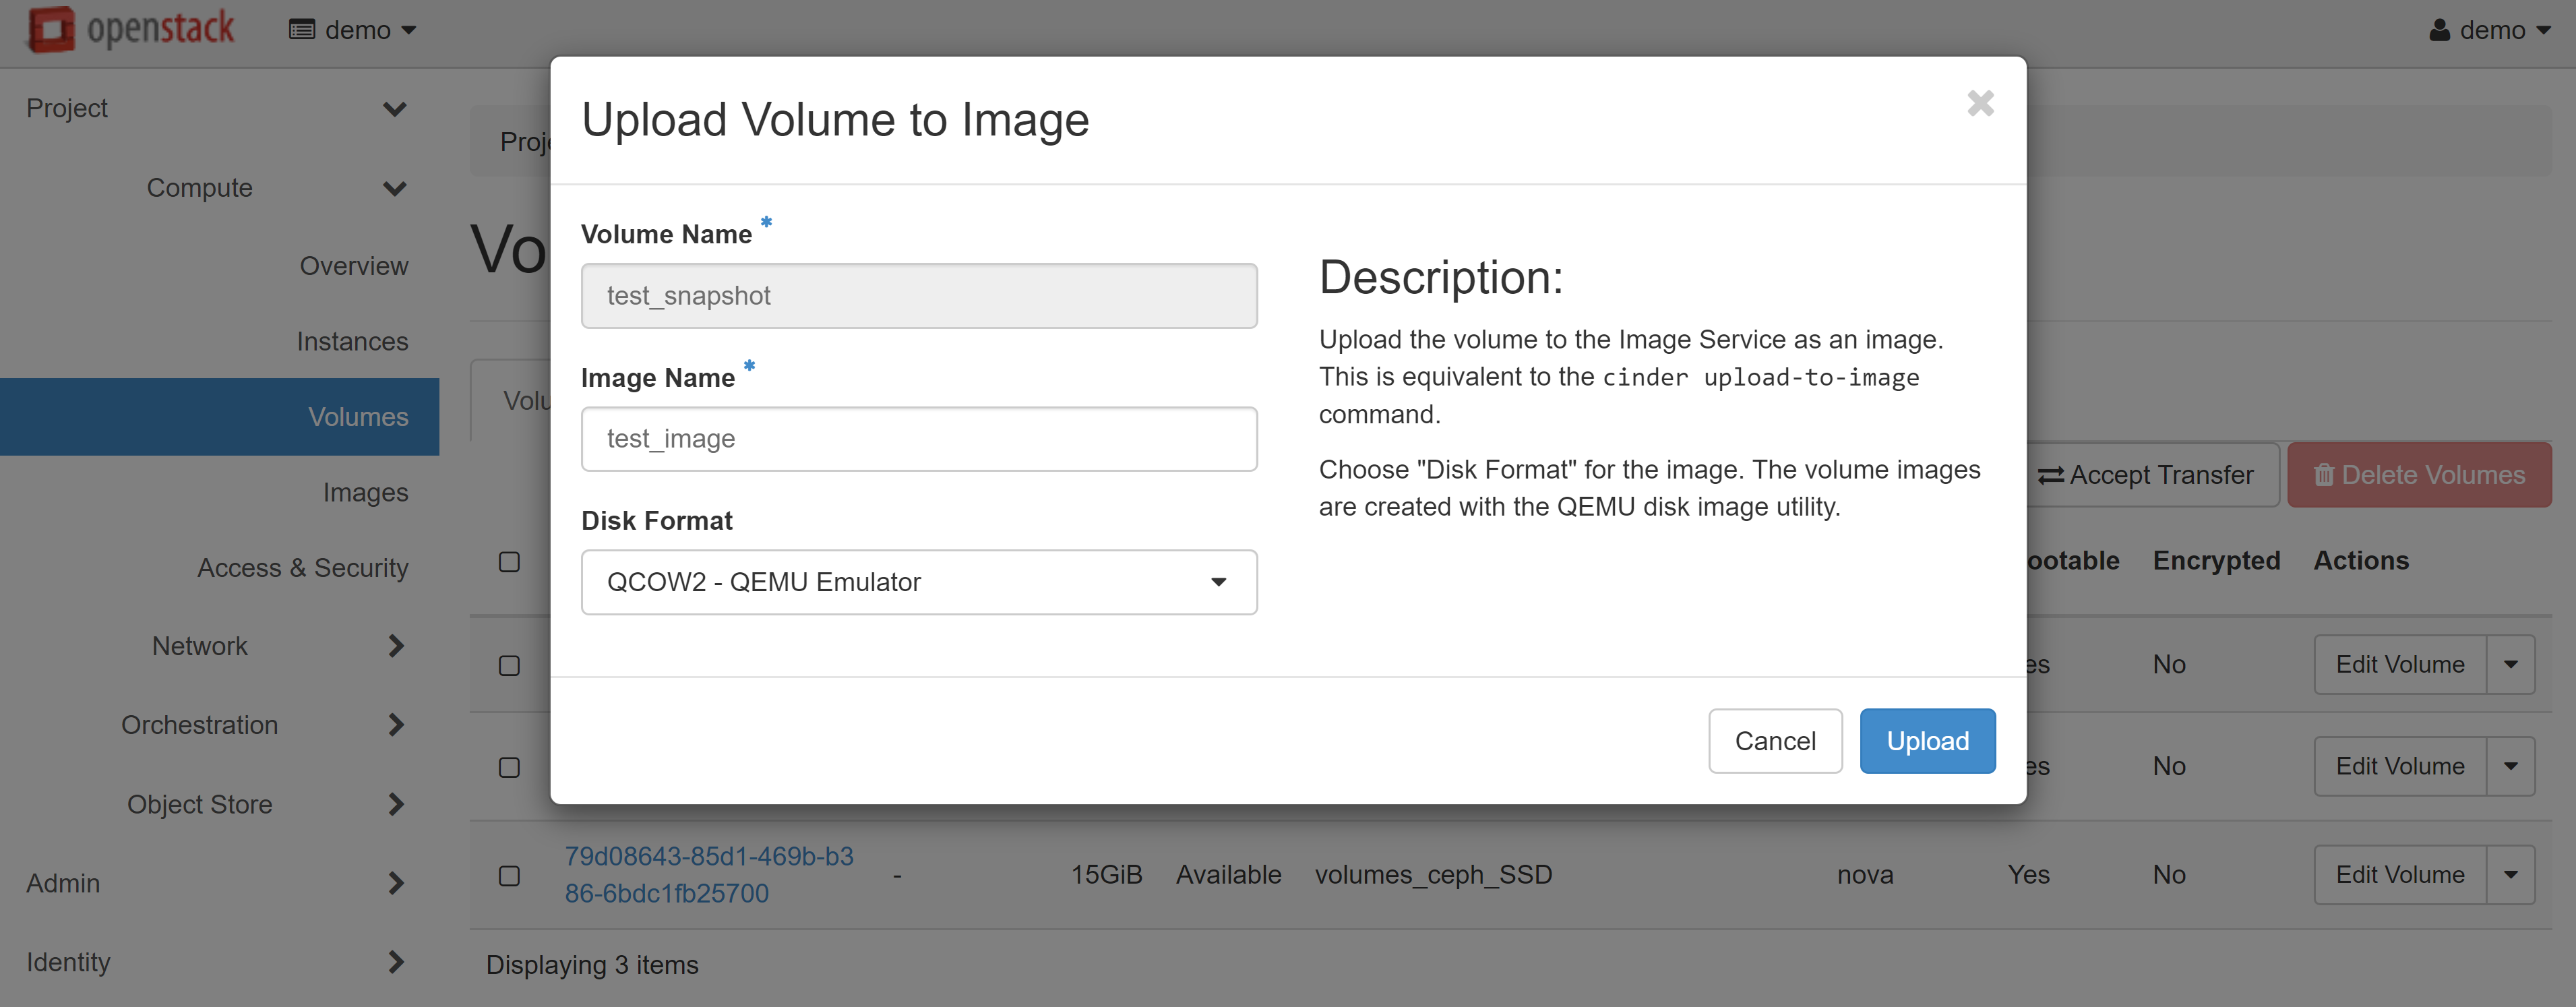
In the image upload window that opens, enter the image name and specify the volume format. We recommend that you choose the QCOW2 — QEMU Emulator disk format — in order to slightly reduce the space used in your image storage.
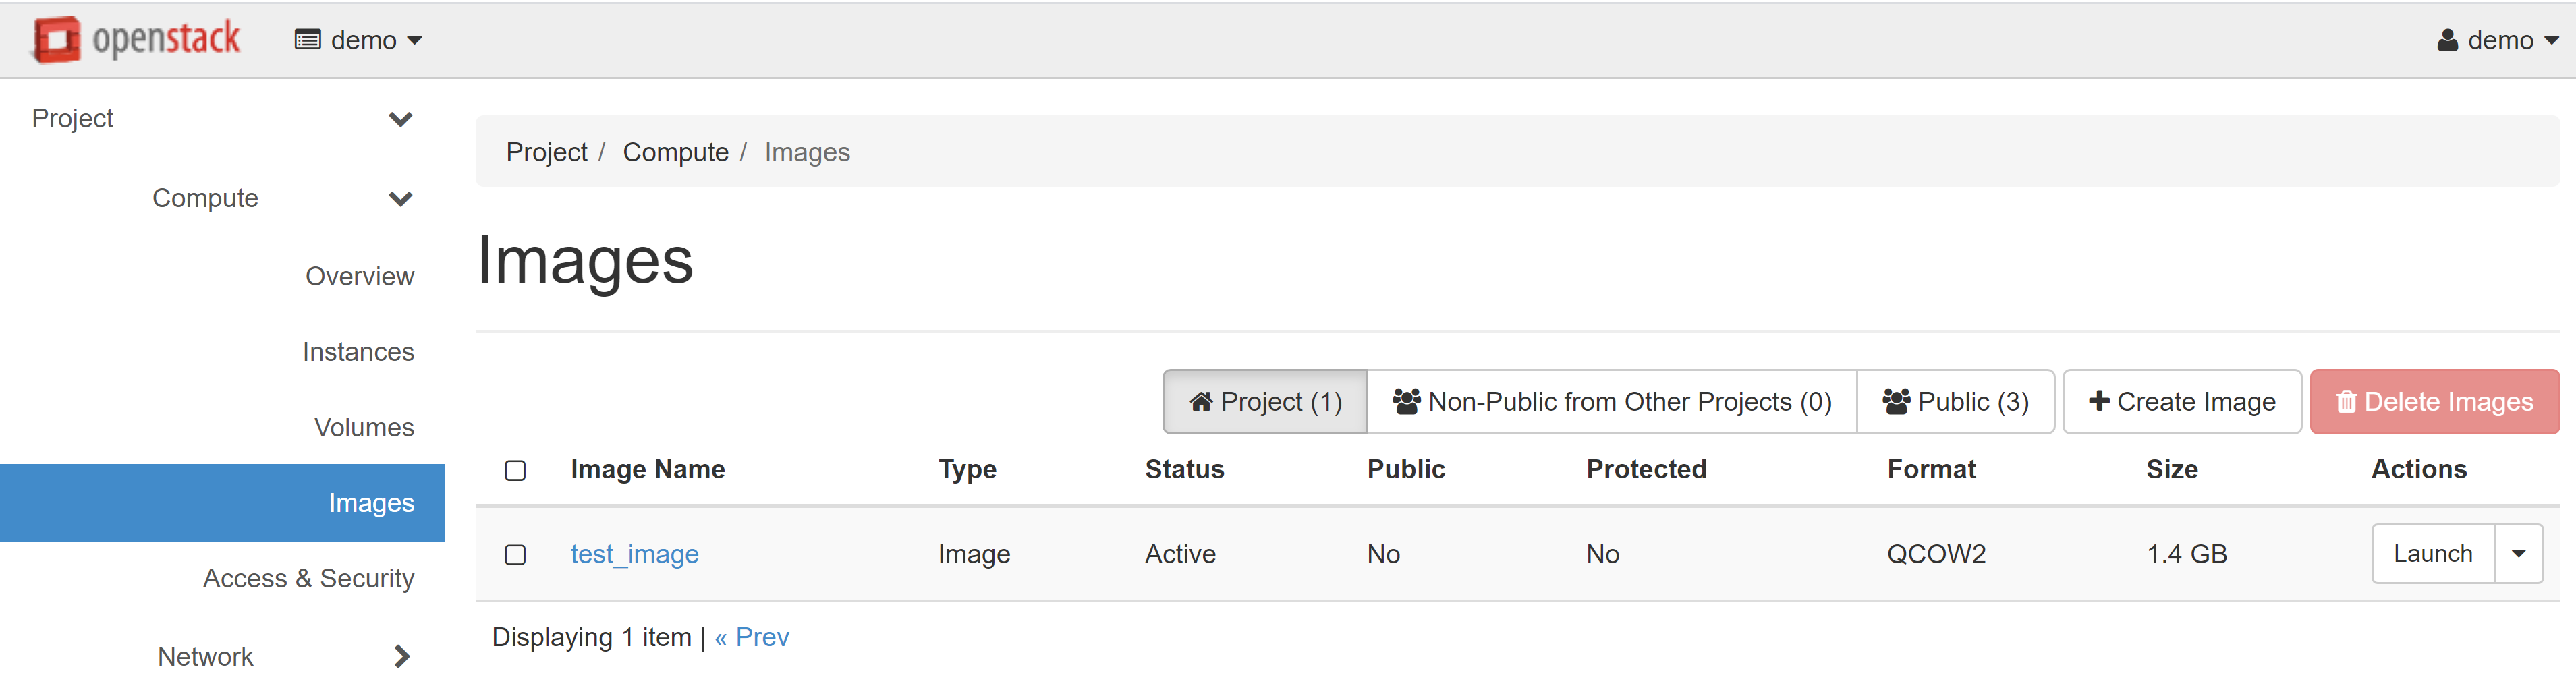
In COMPUTE — IMAGES, within the PROJECT tab, you will see an image of your instance that you can use to create your VMs. Read more about creating instances from images in our guide.
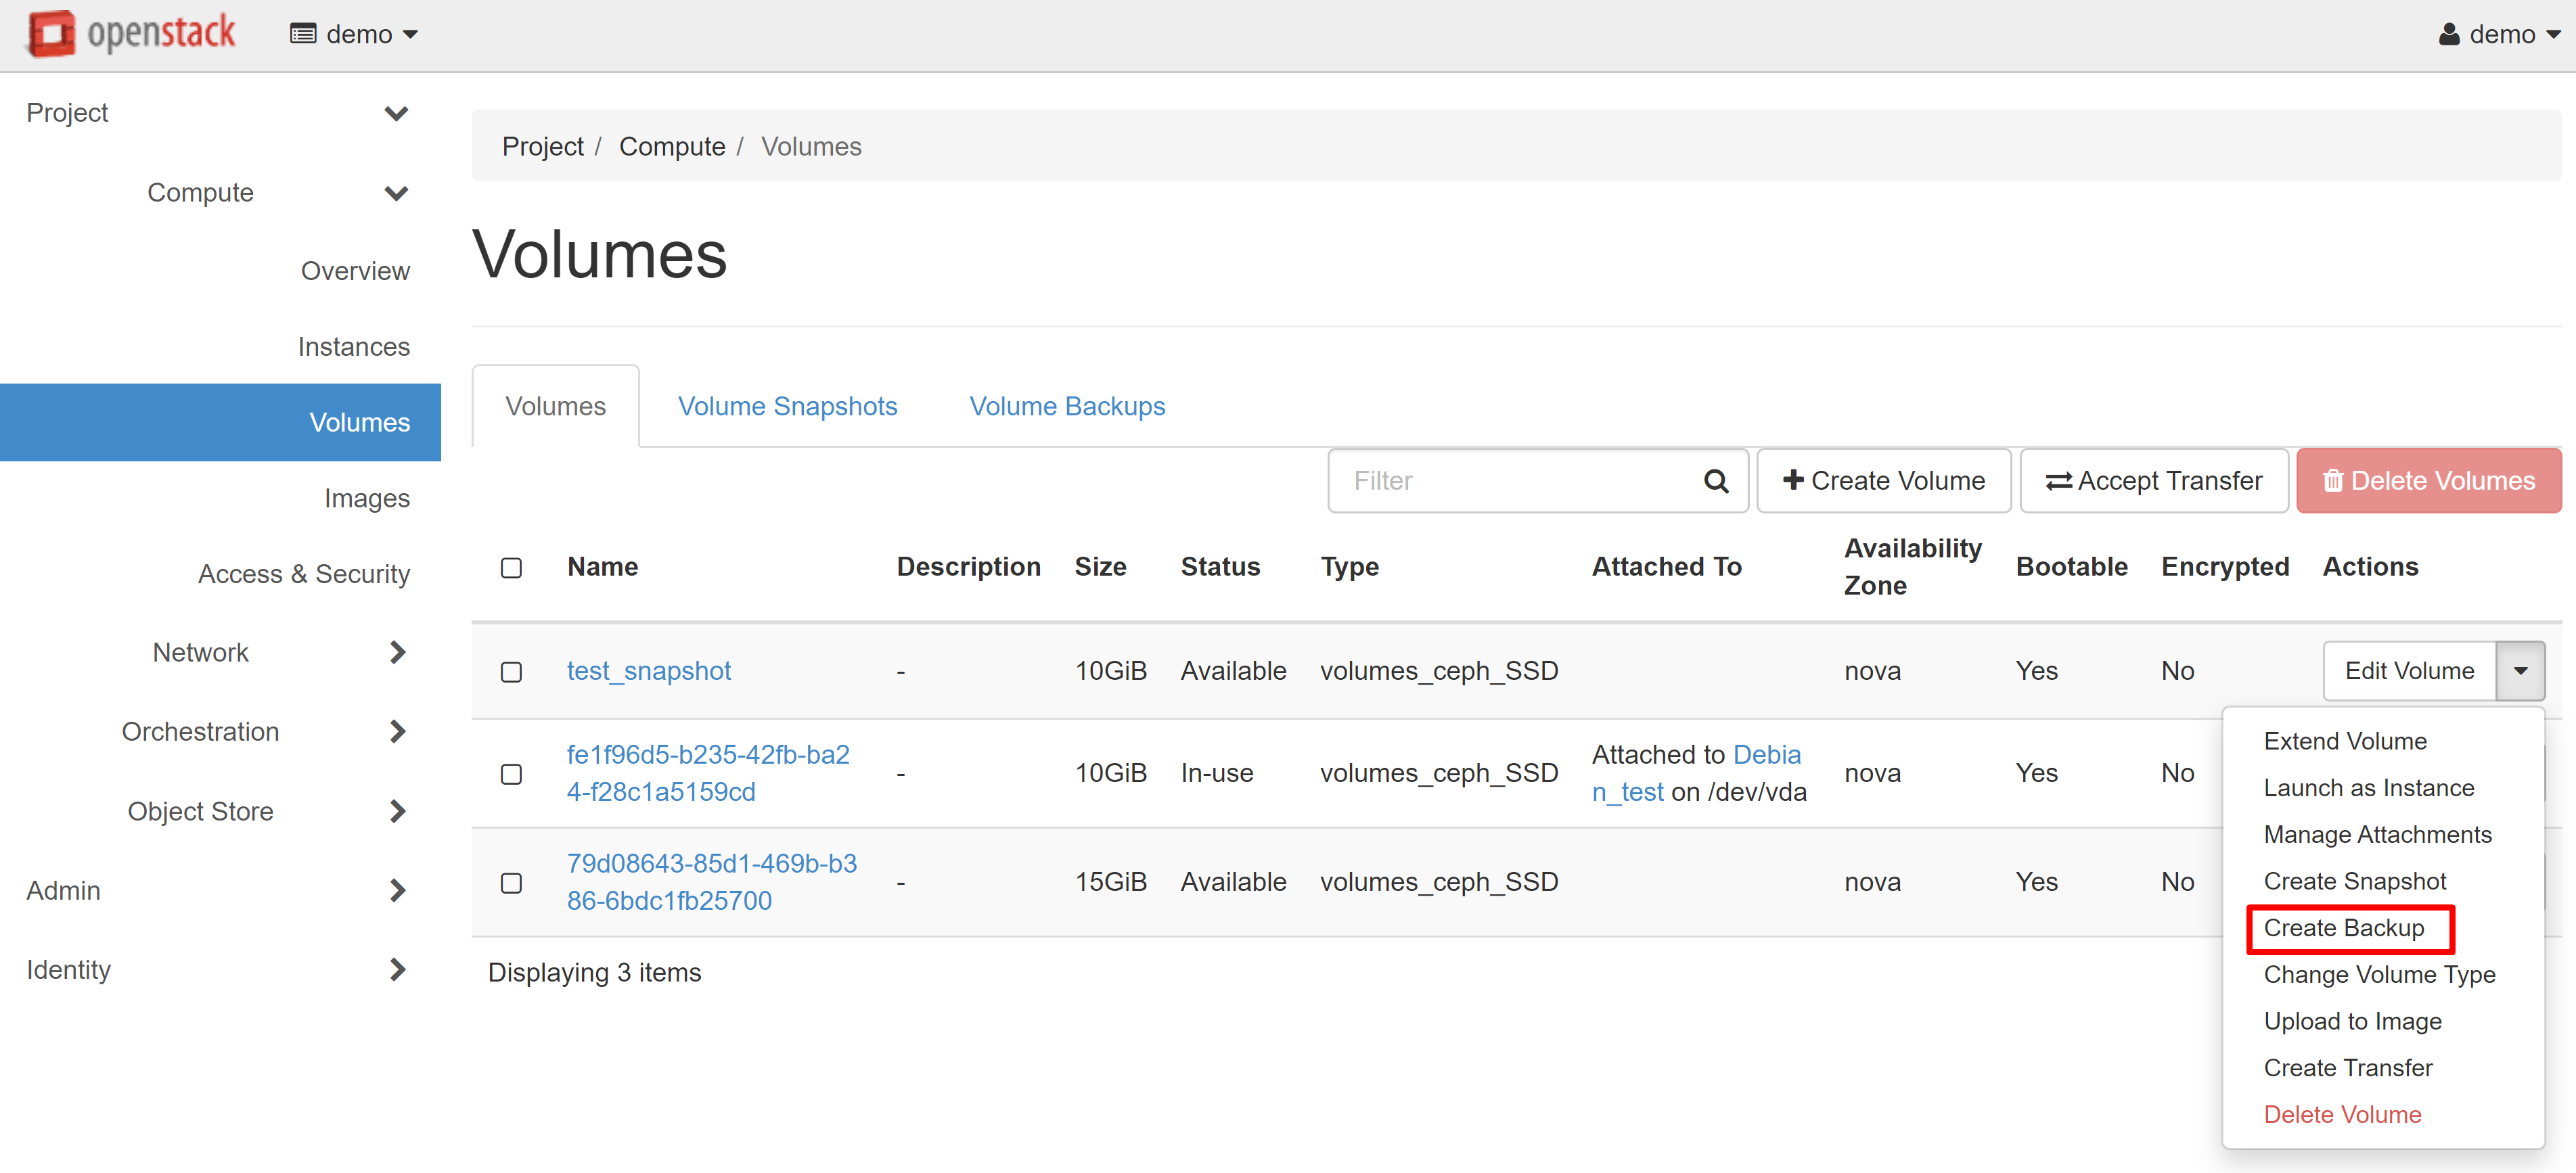
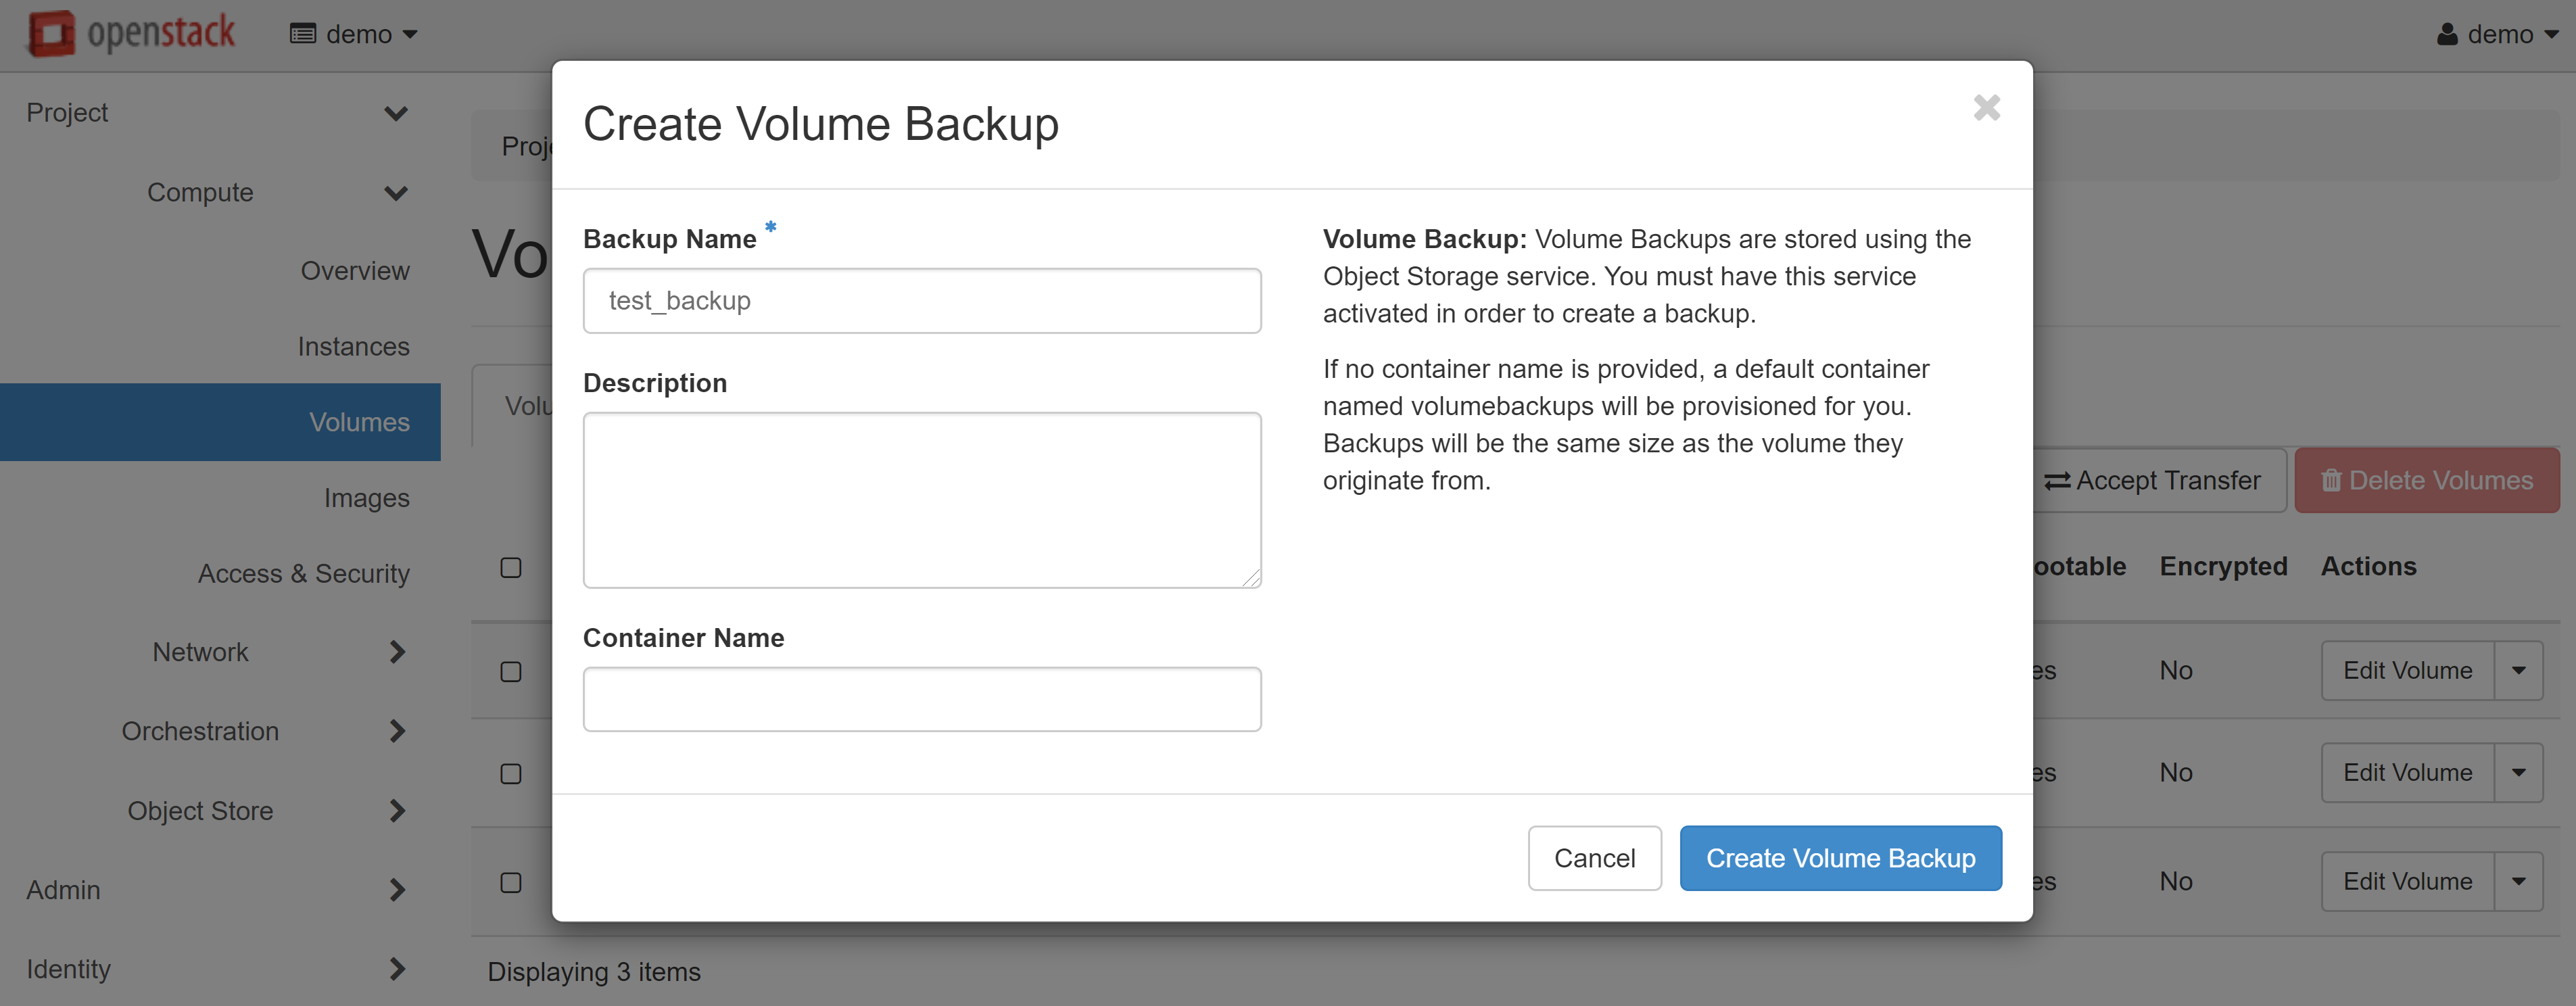
You can also create a backup through the CREATE BACKUP menu item opposite the volume you created.
In the window that opens, enter the name of the backup and click CREATE VOLUME BACKUP.
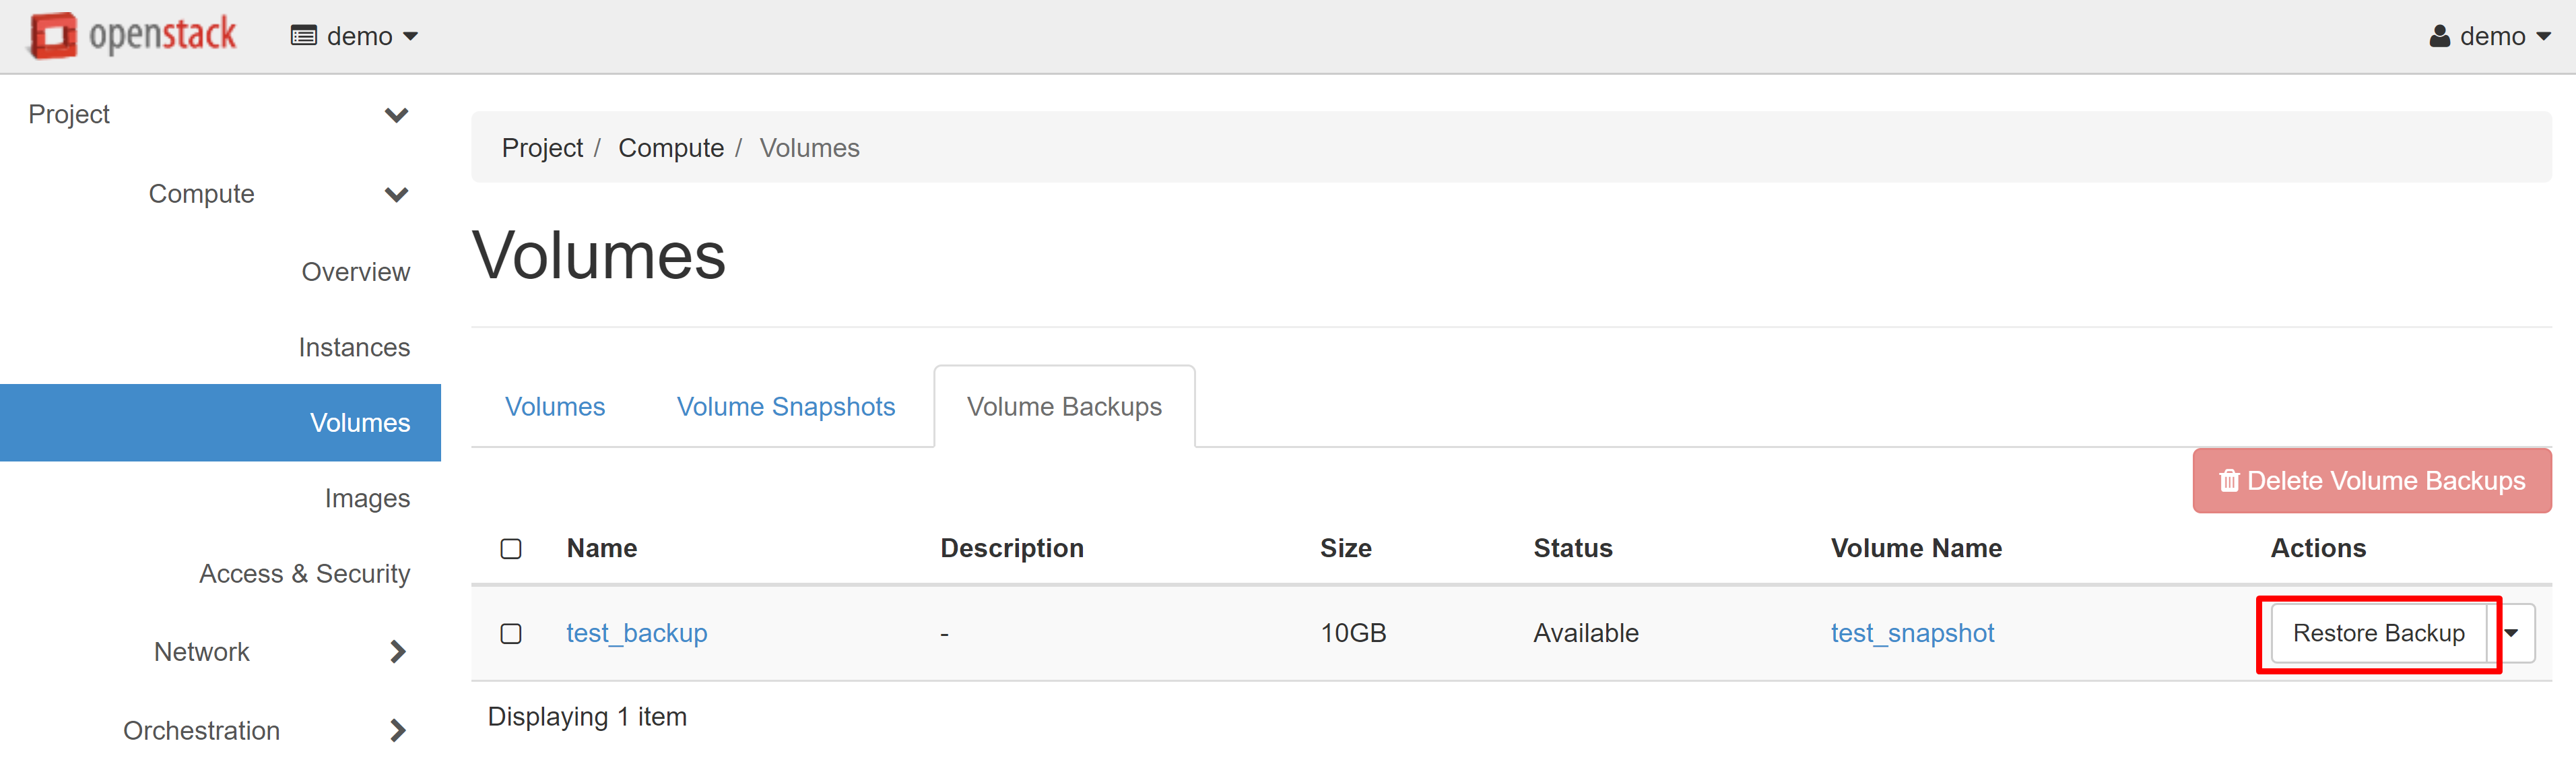
The created backup will appear on the VOLUME BACKUPS tab. To create one or several volumes from this copy, click RESTORE BACKUP in the drop-down menu opposite the required copy.
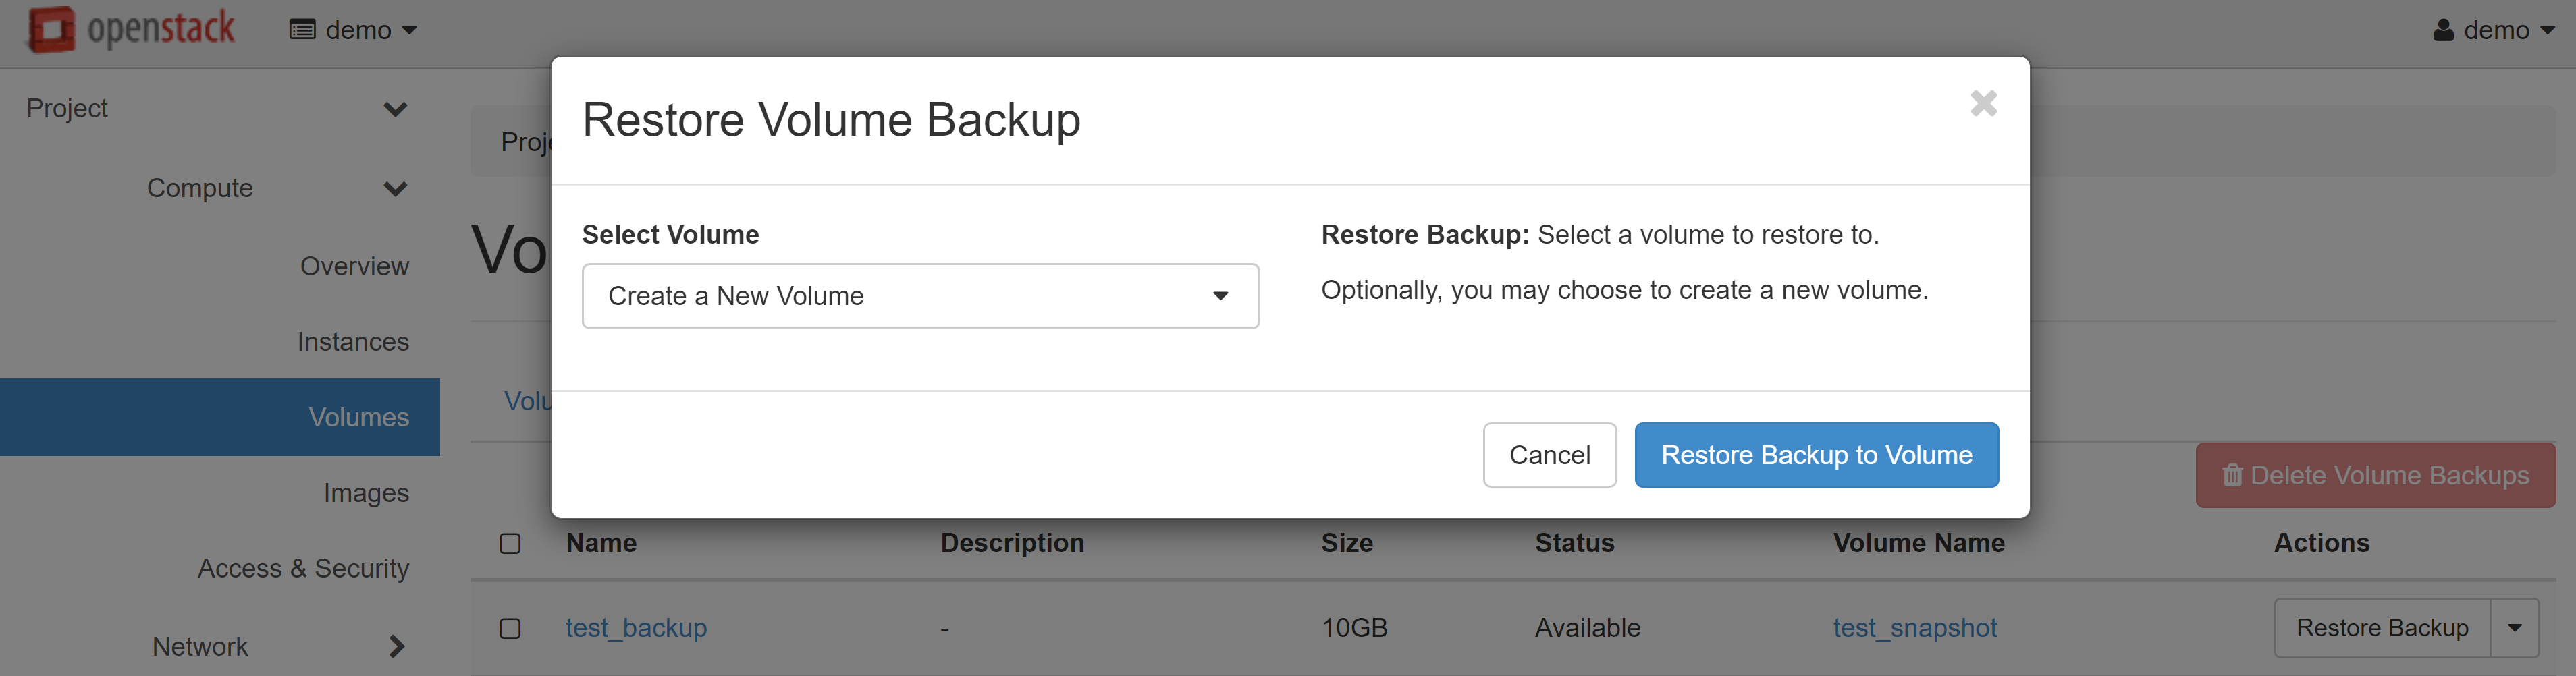
In the window that opens, select CREATE A NEW VOLUME in the SELECT VOLUME drop-down menu, then click RESTORE BACKPUP TO VOLUME.
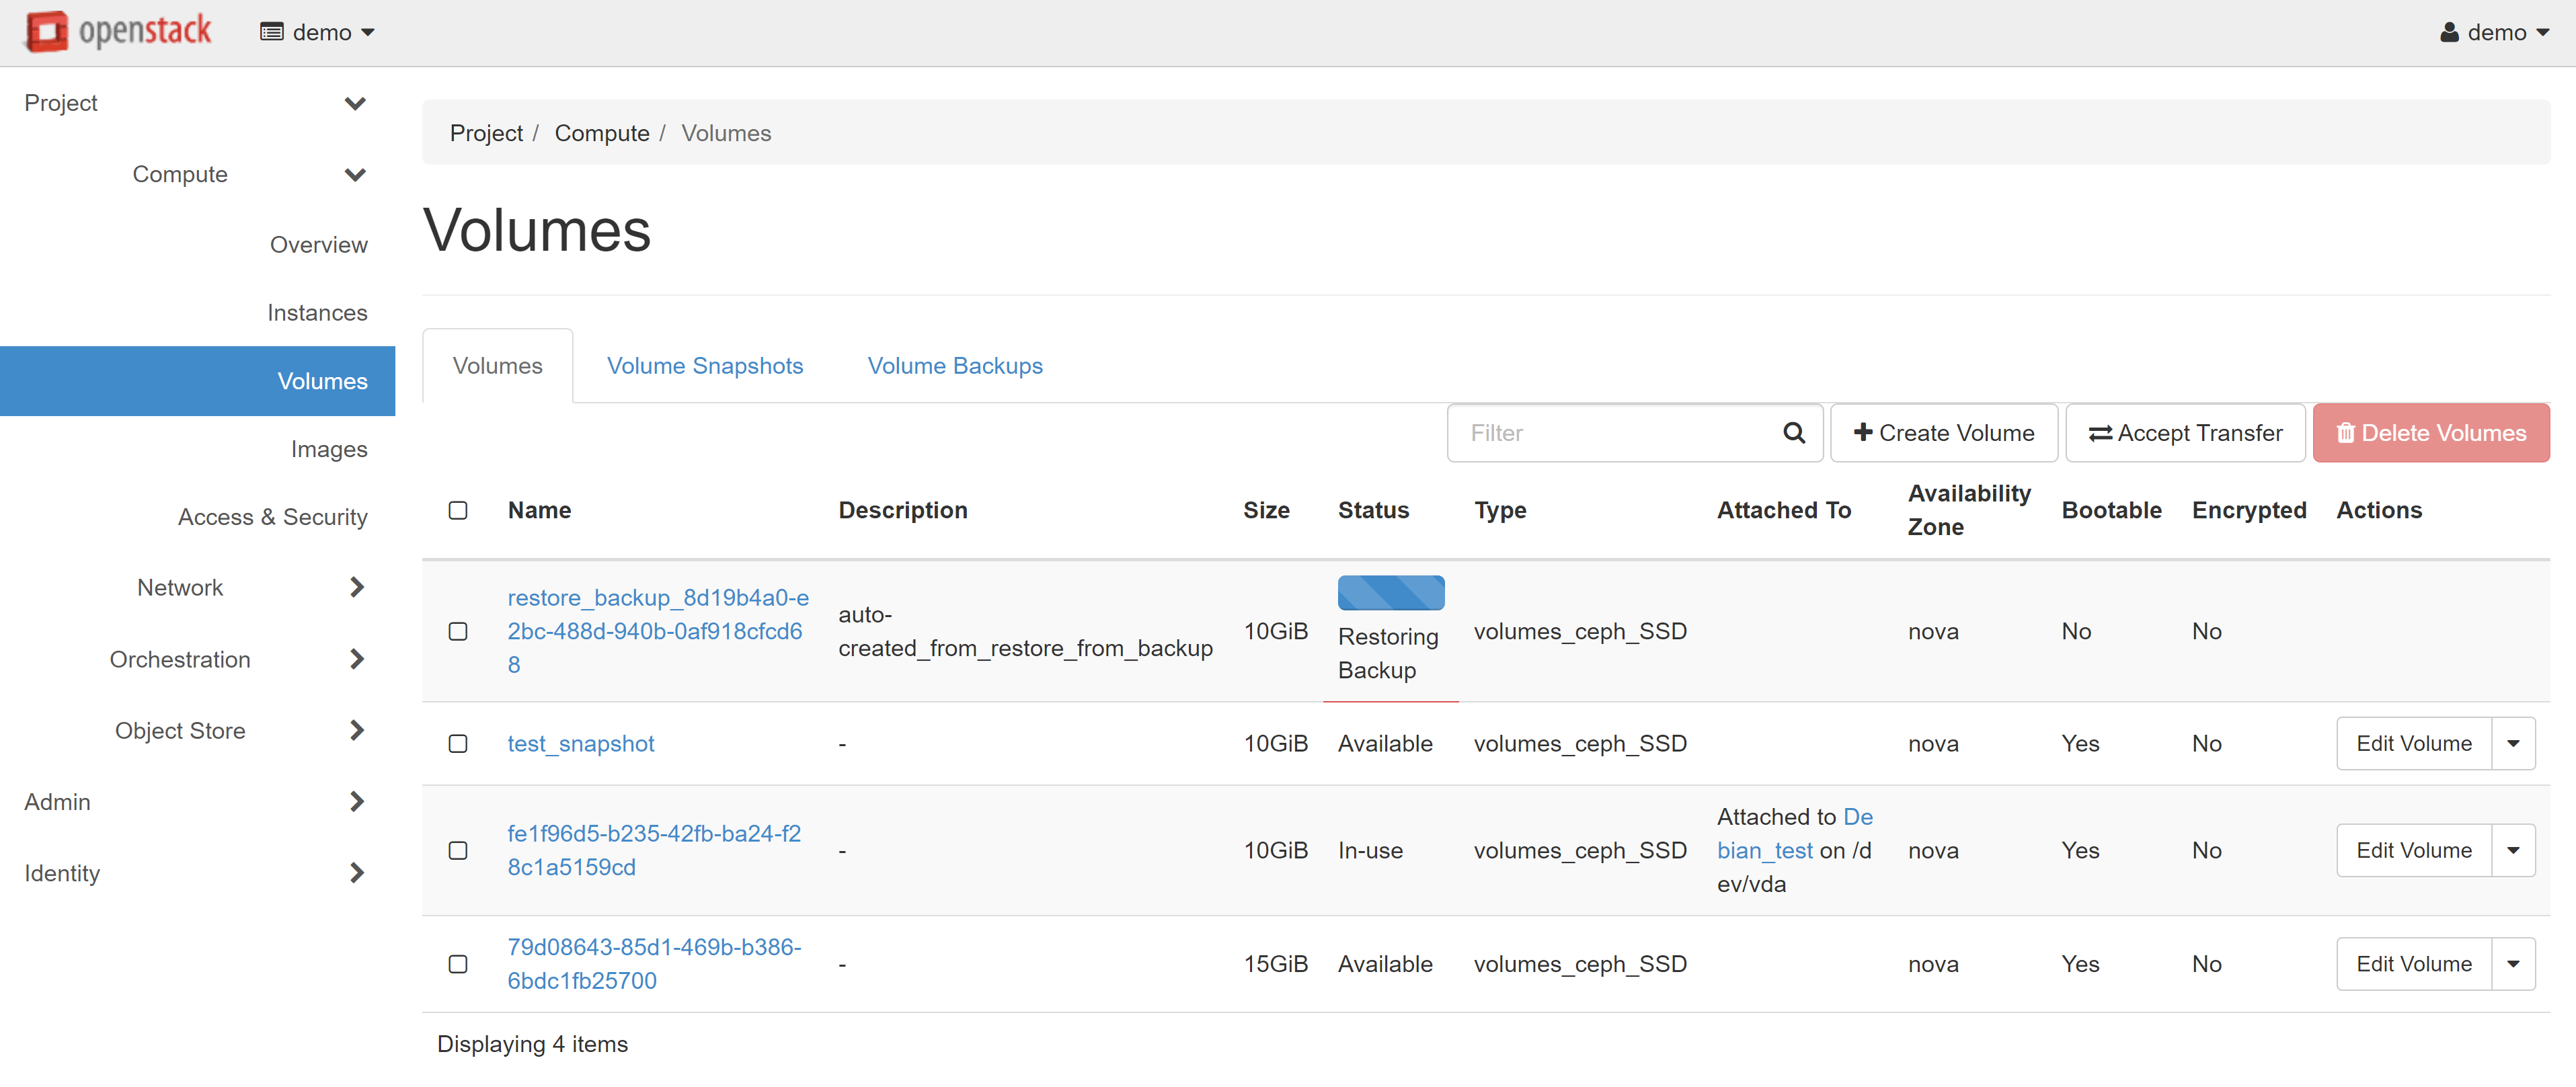
The new volume will appear in the list. You can connect it with an additional volume to another VM, or create a new instance on its basis.
After you've uploaded the image or created a backup, you can delete the snapshot and the source volume for the backup and image, if needed.
The source instance and its source volume are independent of backups and images and can also be deleted if required.
You can add capacities (for example processor cores) to your created cloud virtual machine. Learn more about how to create instances here.
In order to add vCPUs, go to the PROJECT — COMPUTE — INSTANCES section and select RESIZE INSTANCE from the drop-down menu in the instance chosen.

In the window that opens, you will see all available resources (the OLD FLAVOR item). In the NEW FLAVOR item, select the instance type with the required number of vCPU cores.
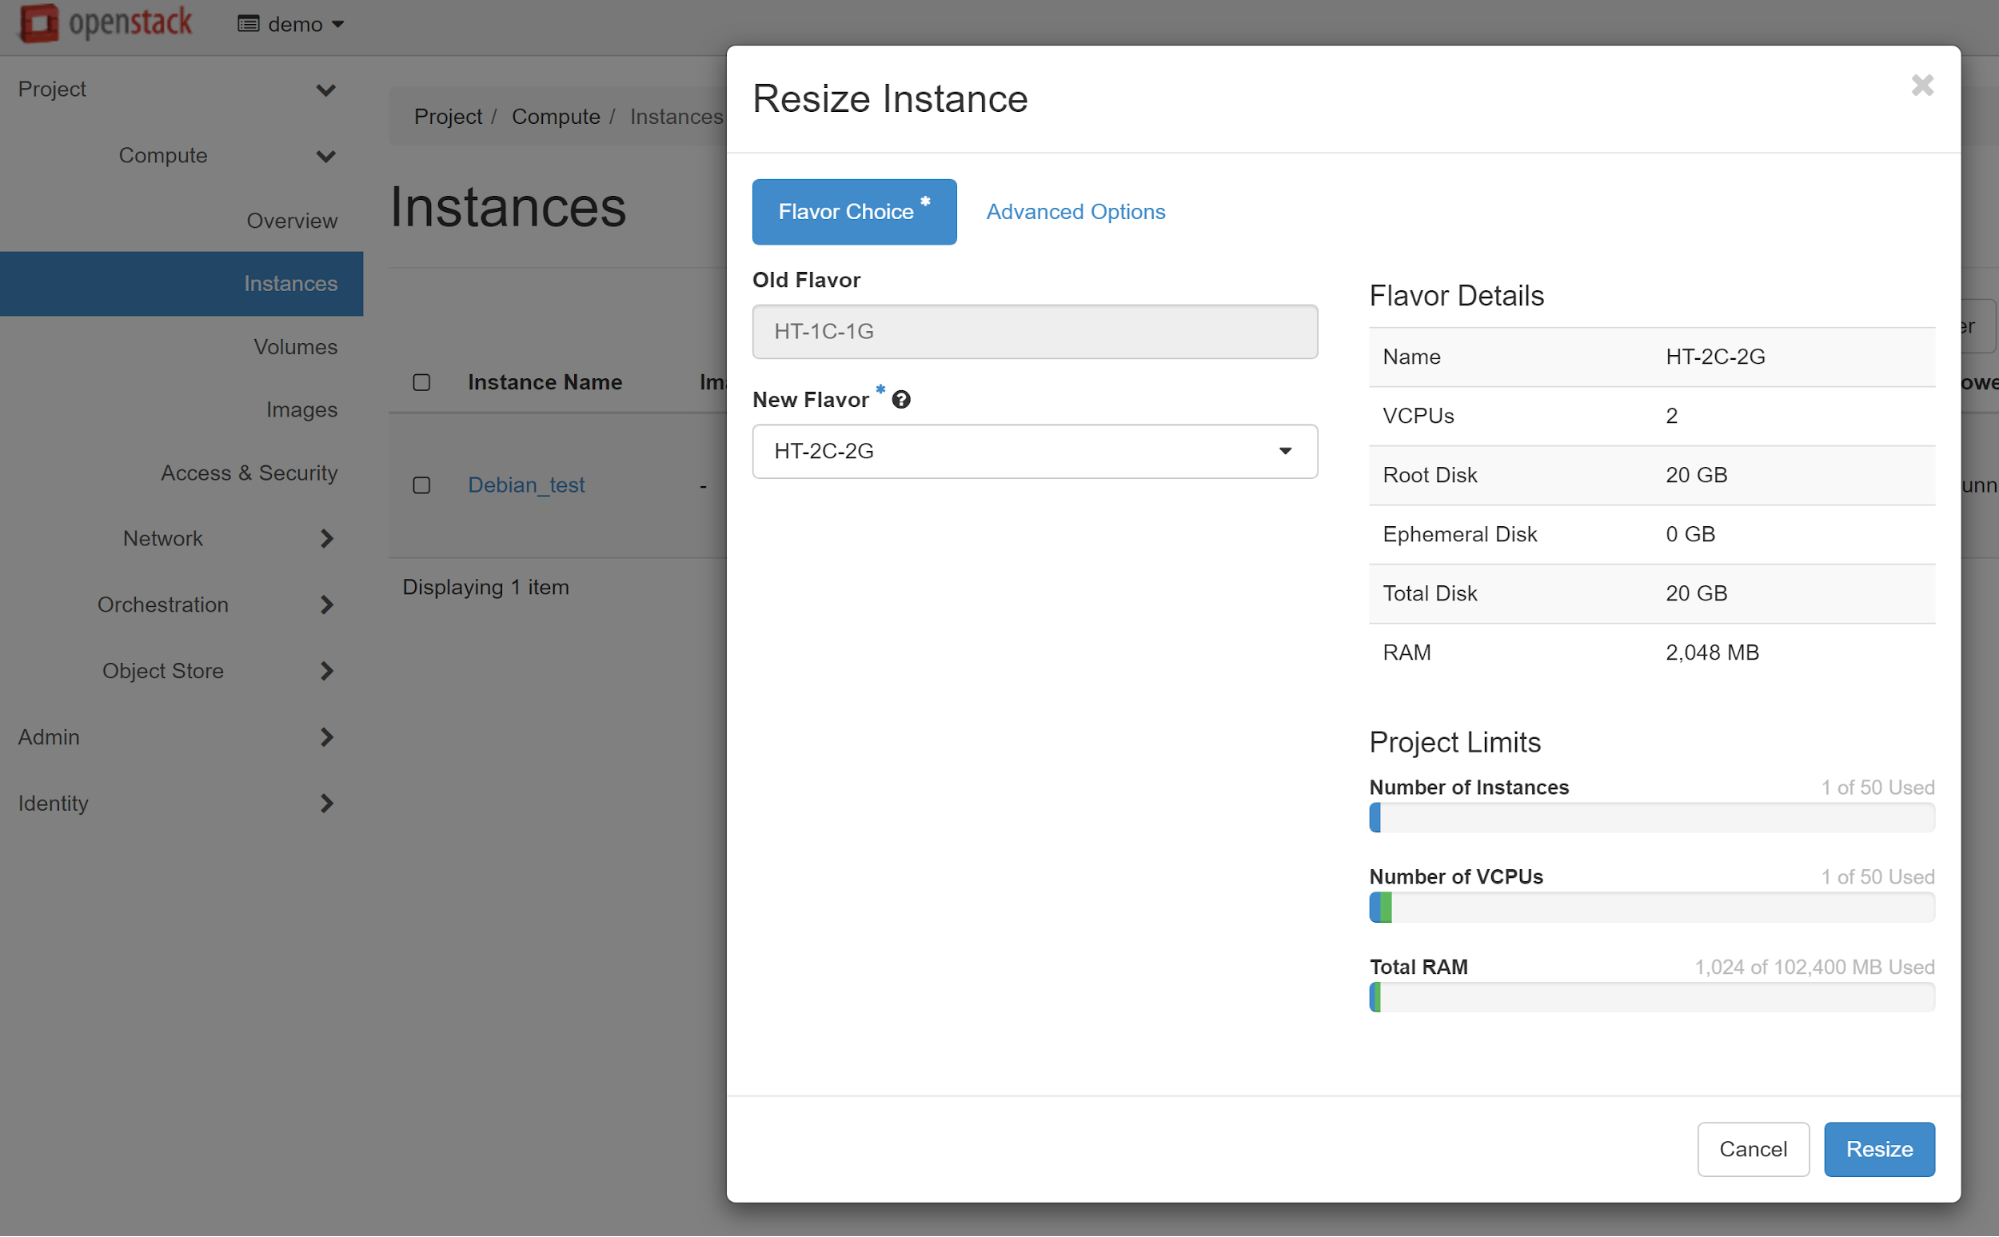
The next step is to confirm the instance type changing.
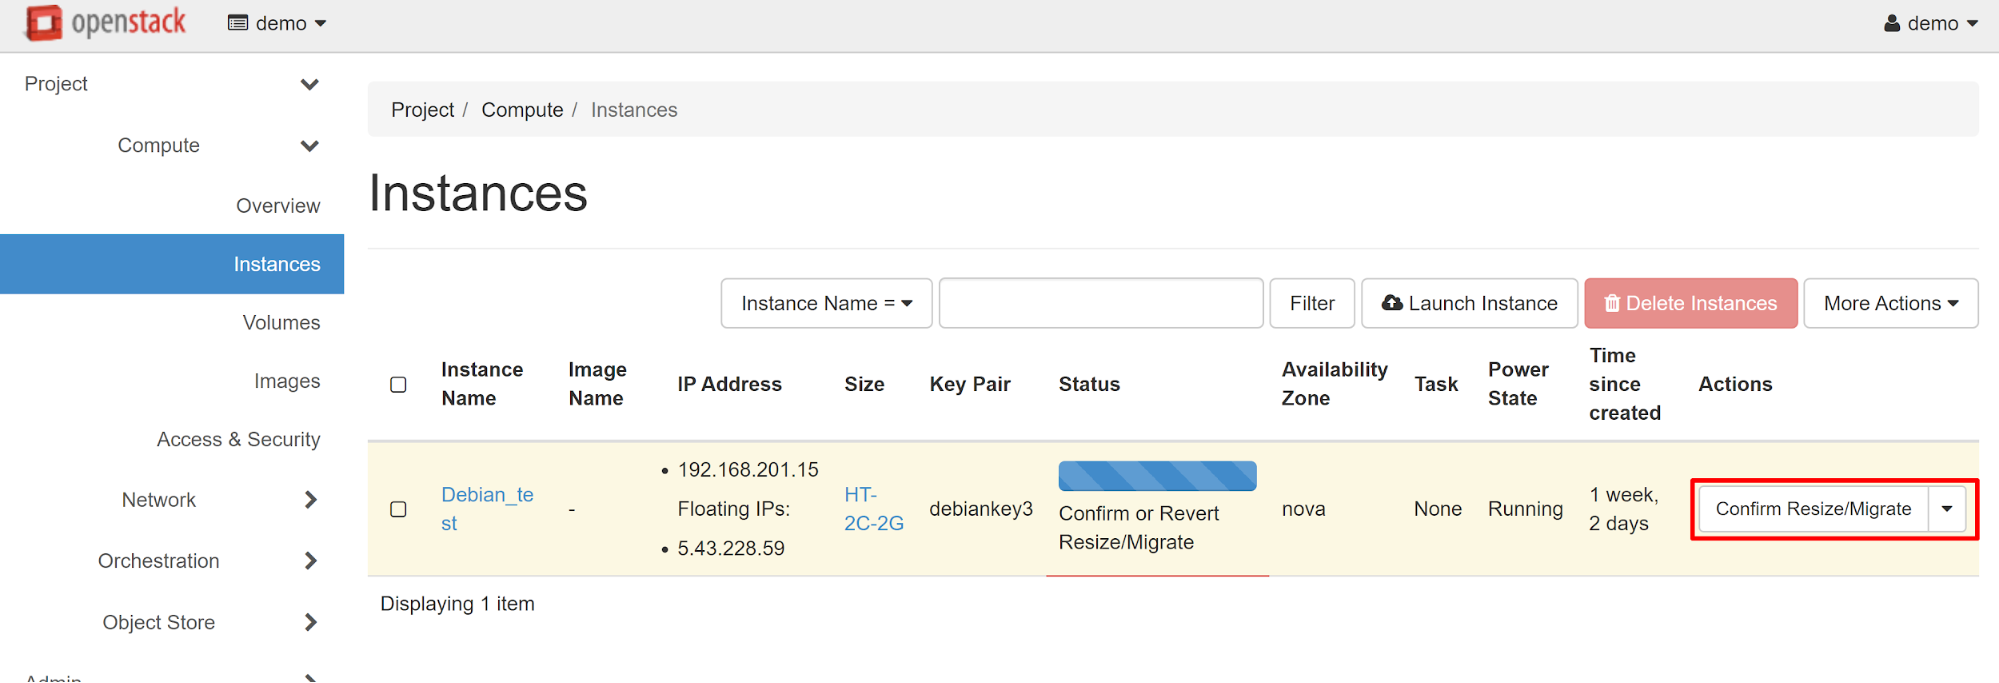
In the same way, if desired, you can reduce the number of processor cores, if there is no need for large capacities.
You can only access your cloud instance from an external network if you have associated with it an external IP address (Floating IP).
These addresses are not allocated automatically. The external IP address of your VM must be associated with the internal one.
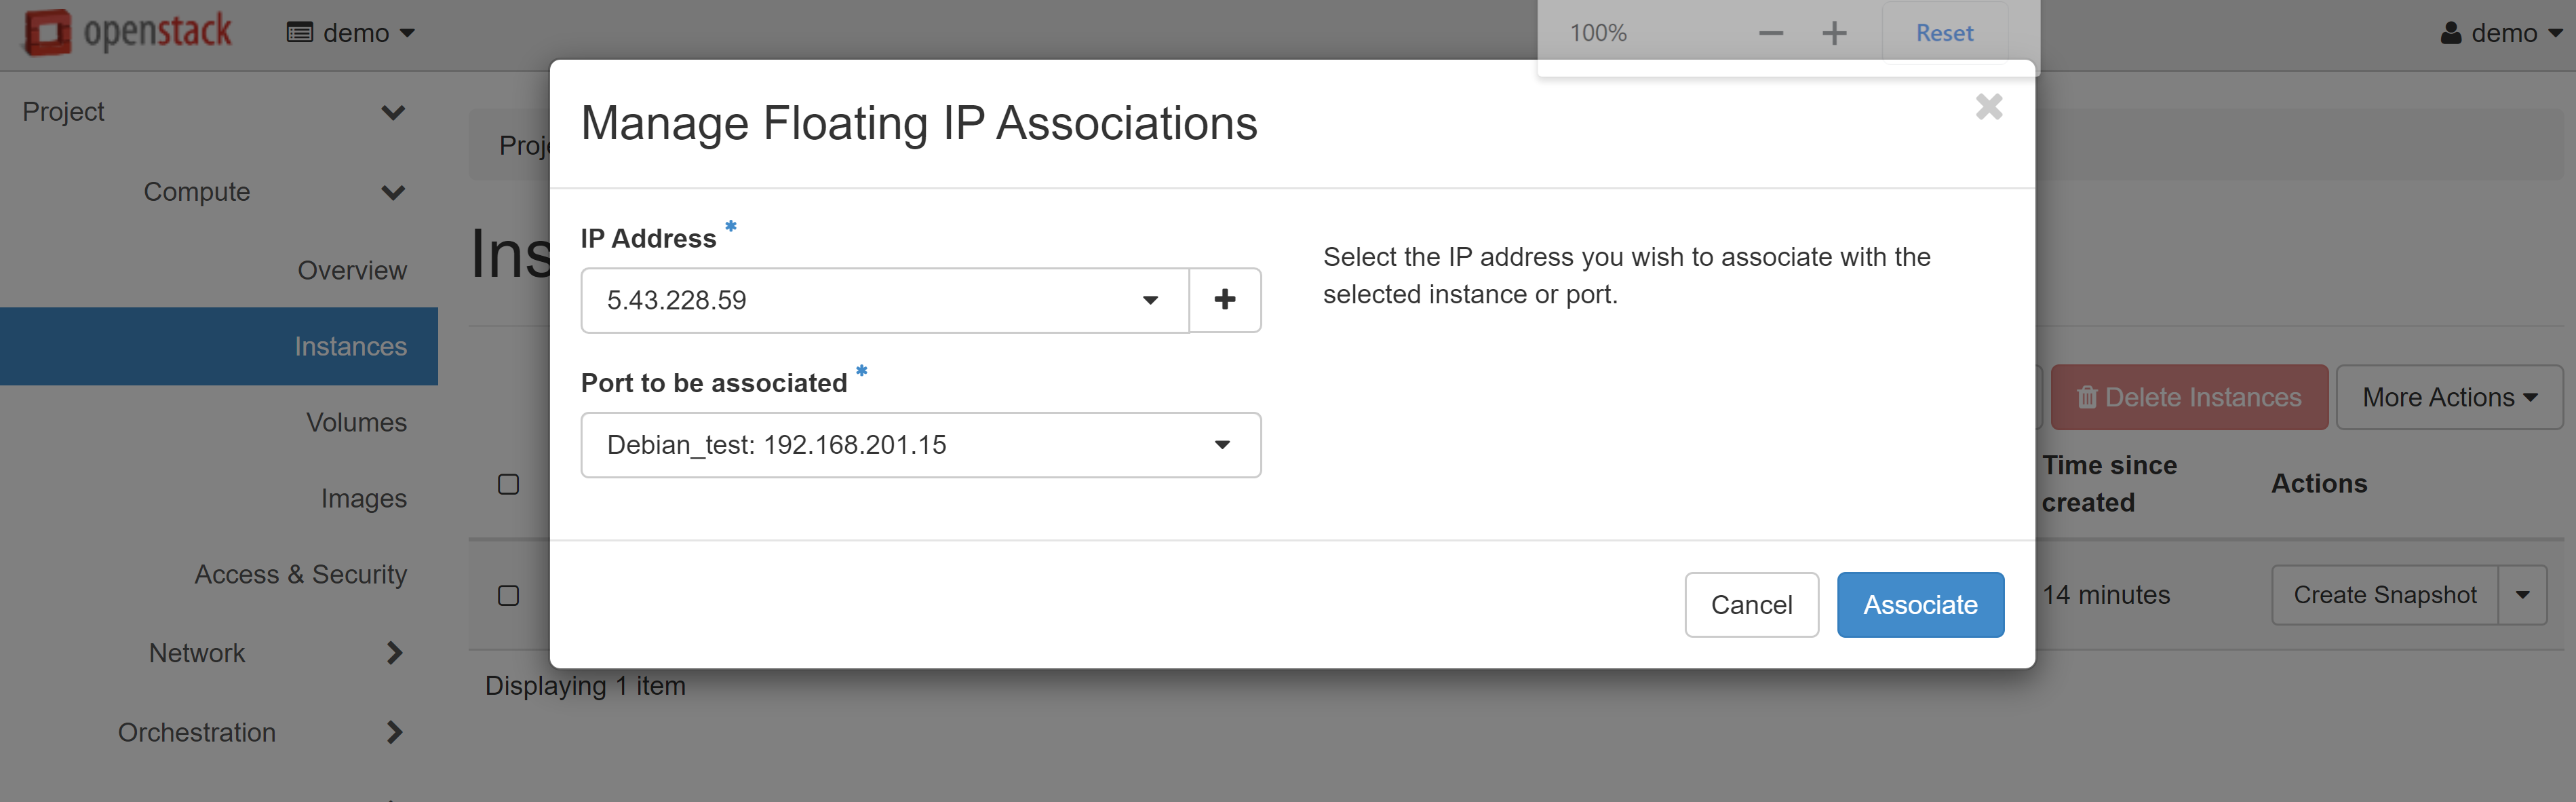
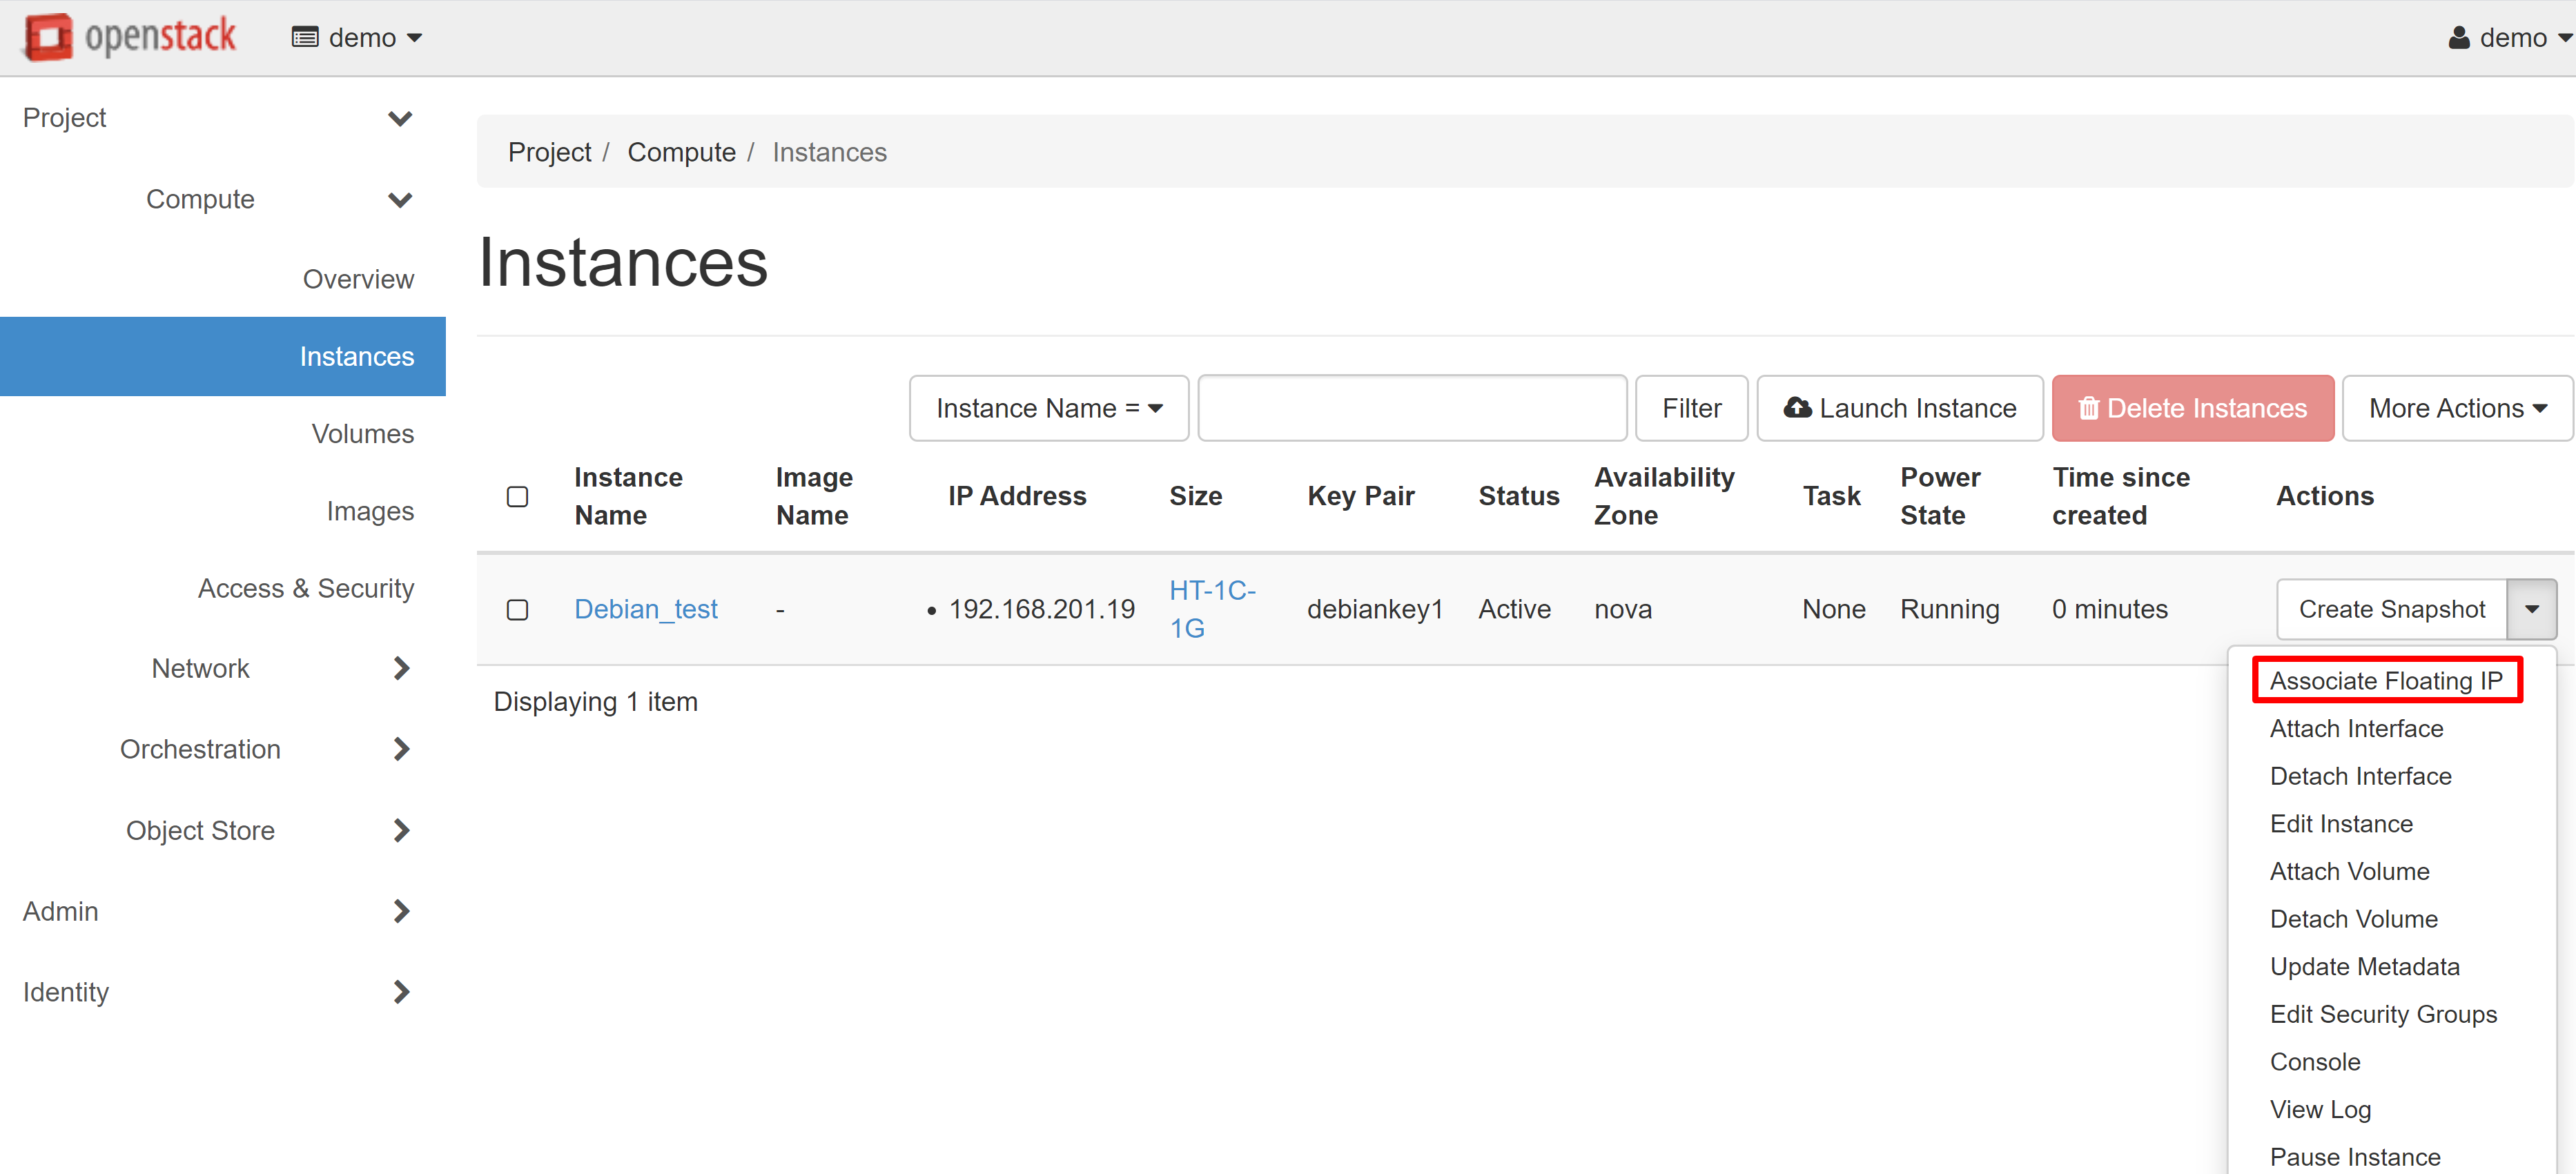
To assign an external IP address to your instance, go to the PROJECT — COMPUTE — INSTANCES section and select ASSOCIATE FLOATING IP from the drop-down menu next to the instance name.

In the window that opens, click «+» under IP ADDRESS.
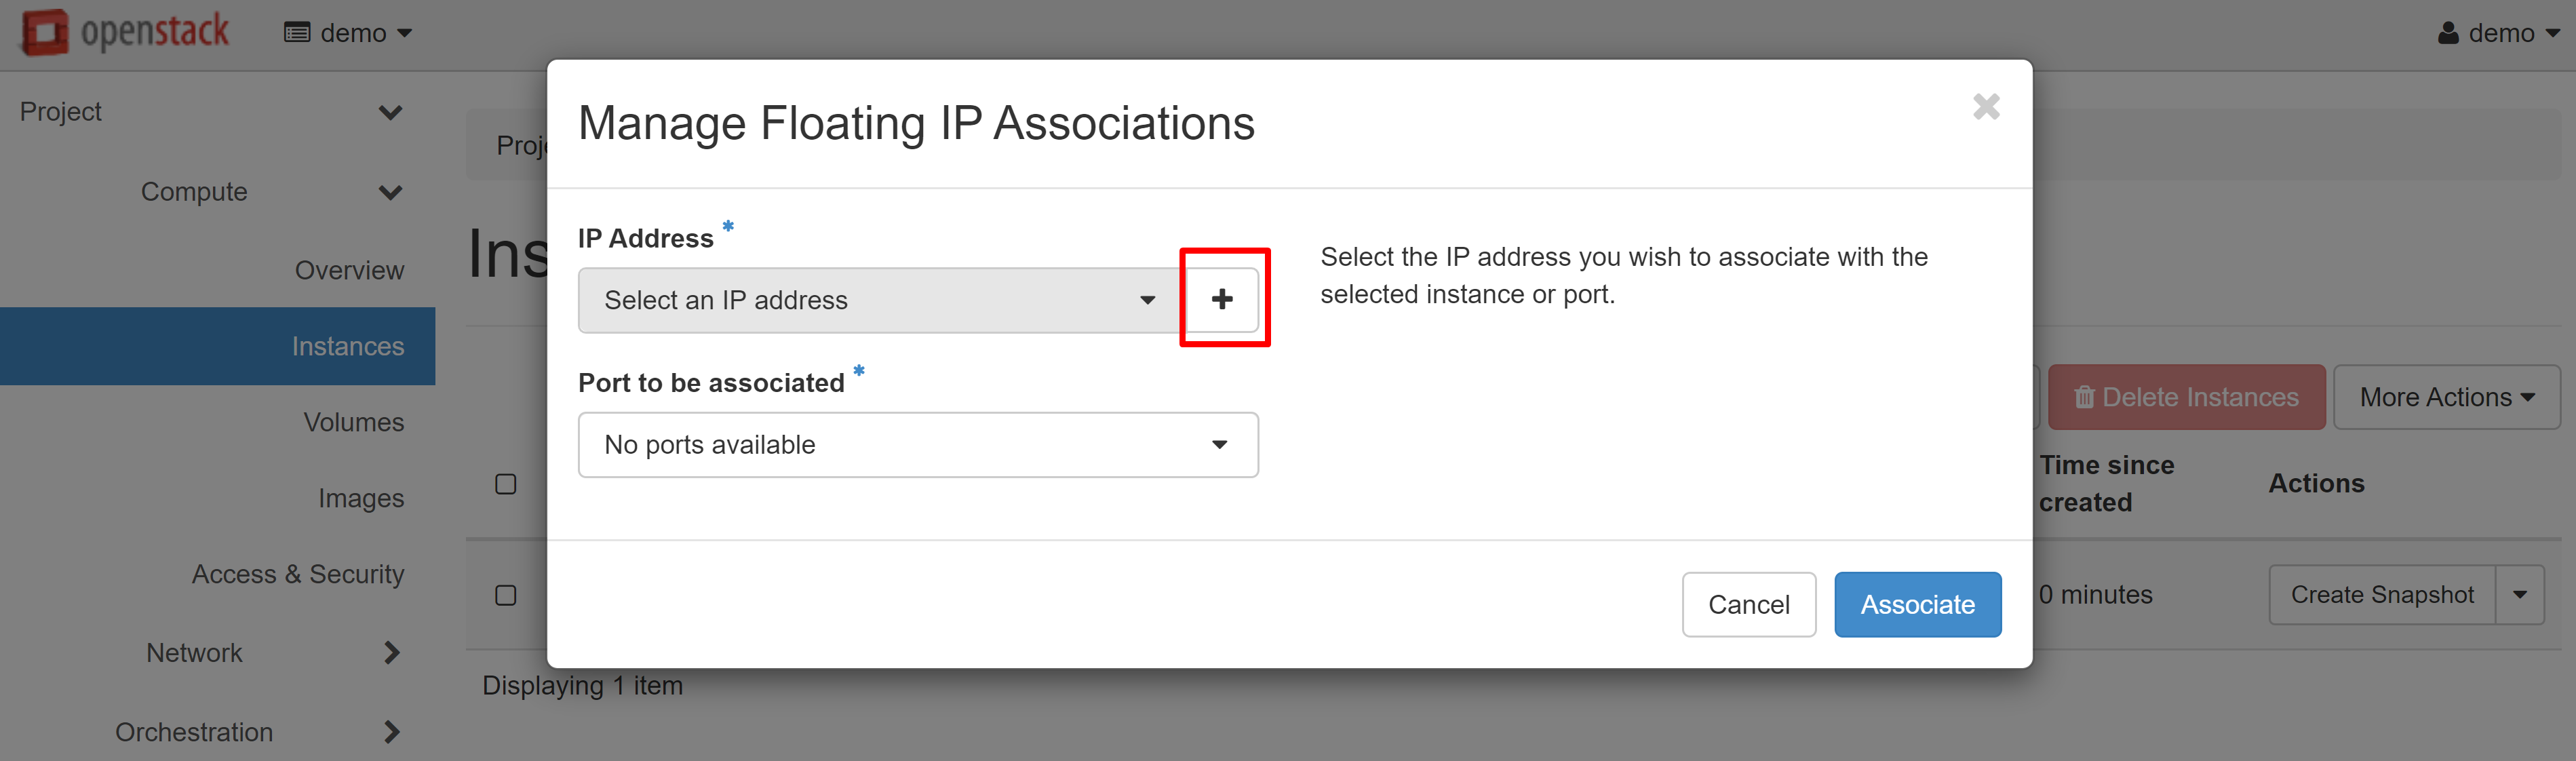
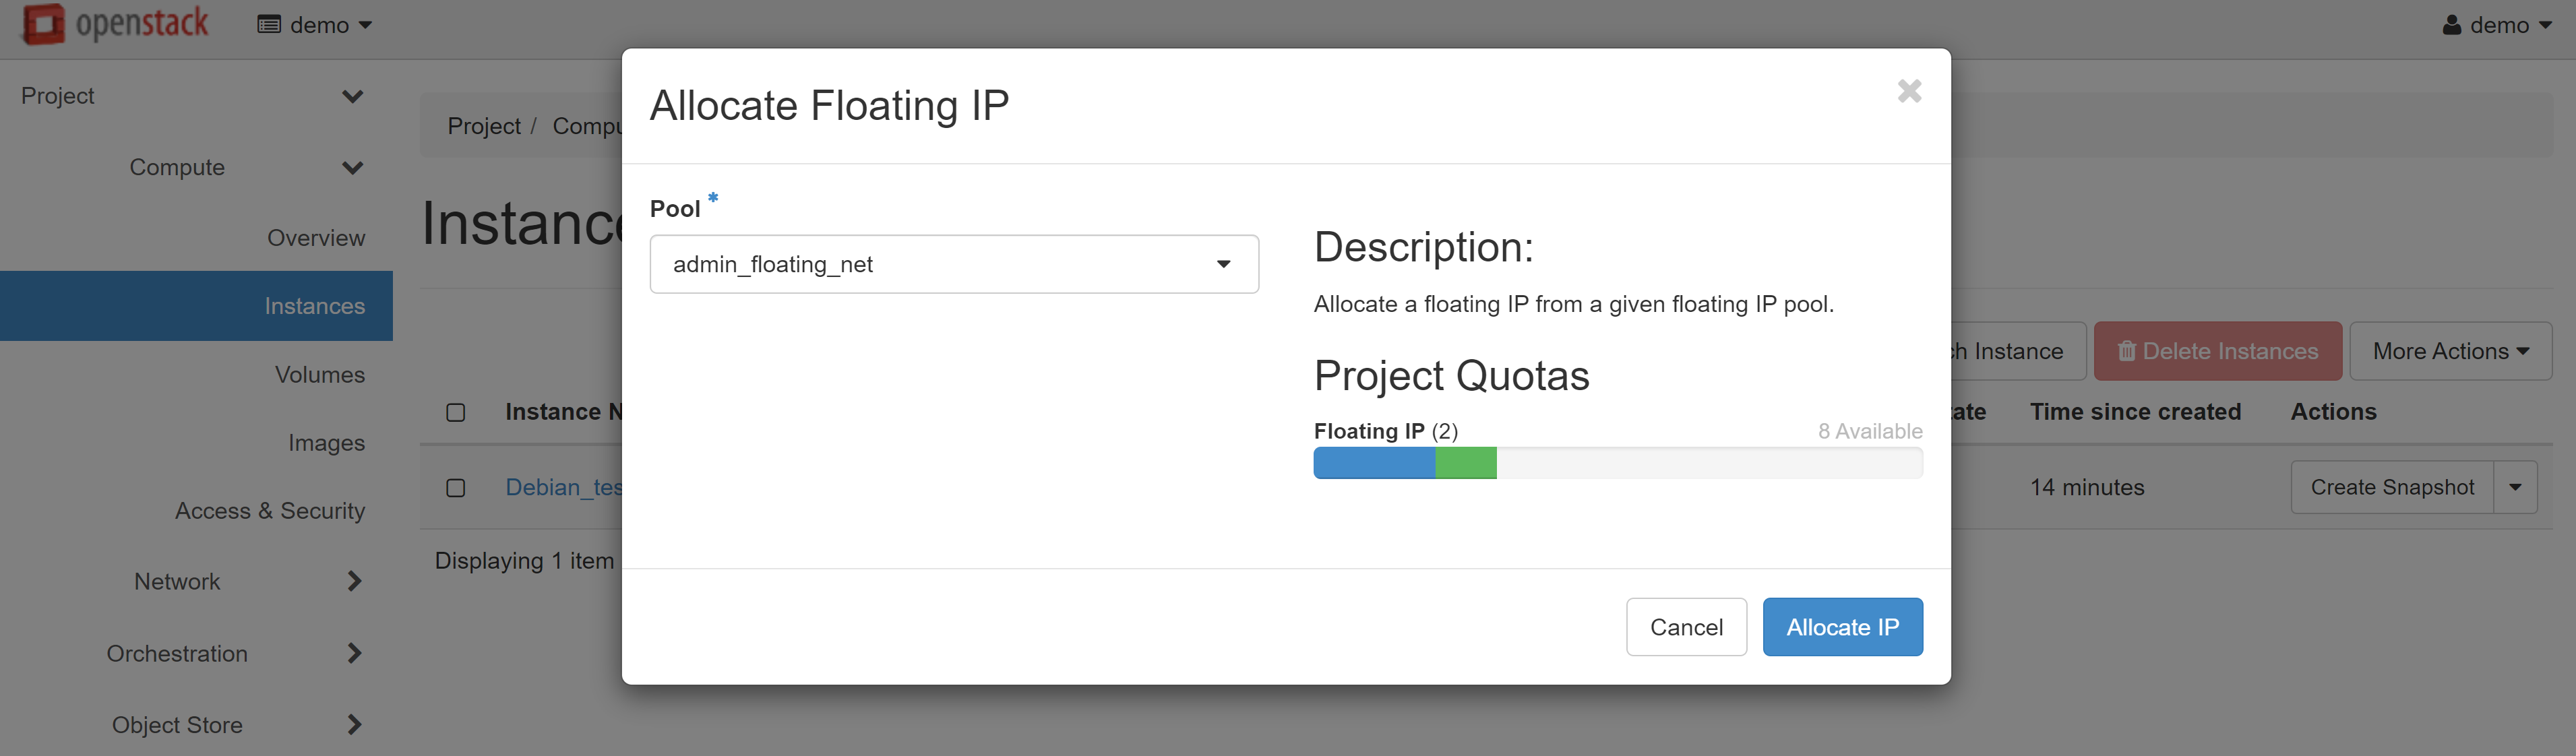
In the next window, click ALLOCATE IP, and then you will be immediately re-directed to the previous page.
An available white IP will appear in the IP ADDRESS drop-down list, which you can allocate to the port of your VM. To complete the setup, click ASSOCIATE.
Read more about creating instances and configuring the network for your project here.
Sometimes you may need to allocate an external IP address to the instance's network interface without using SNAT. To do this, you can rent a subnet from us.
Attention! When renting a subnet, three addresses will be used for service purposes: the network address, the default gateway, and the broadcast address. If you use DHCP, 2 more addresses will be used for DHCP agents (primary and backup).
The cost of the subnet for rental resources in Europe:
| Subnet | Number of IP addresses in the subnet | IP for a VM without DHCP | IP for VM with DHCP | Cost, Euro |
|---|---|---|---|---|
| /30 | 4 | 1 | 0 | 8 |
| /29 | 8 | 5 | 3 | 16 |
| /28 | 16 | 13 | 11 | 32 |
| /27 | 32 | 29 | 27 | 64 |
1. How To Configure The Network
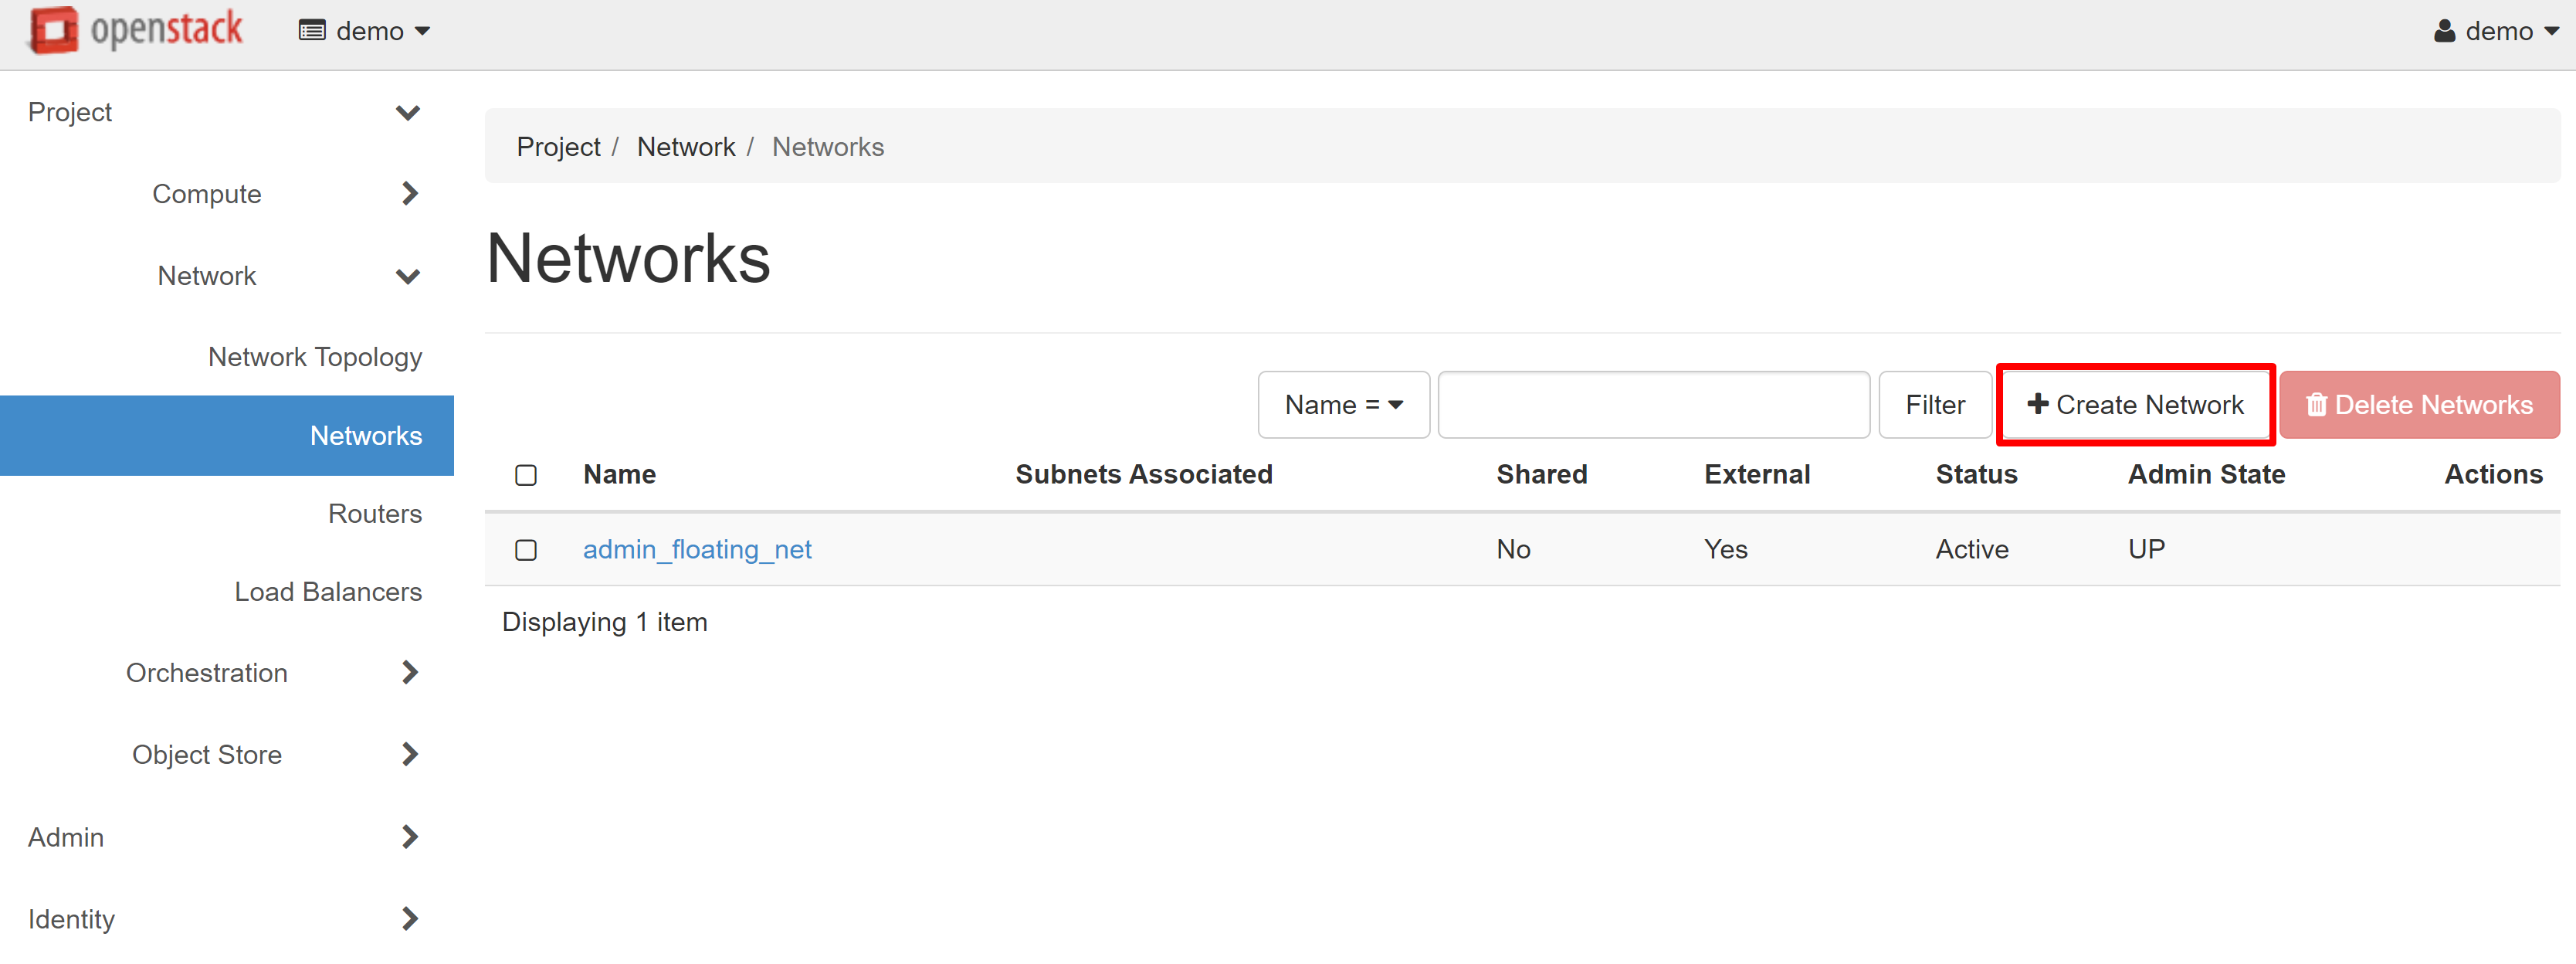
After you have received the access details for your project and have logged in to it, you should first configure the network where your instances will work. To do this, go to the PROJECT — NETWORK — NETWORKS section. To start the network creation process, click the CREATE NETWORK on the page that opens.
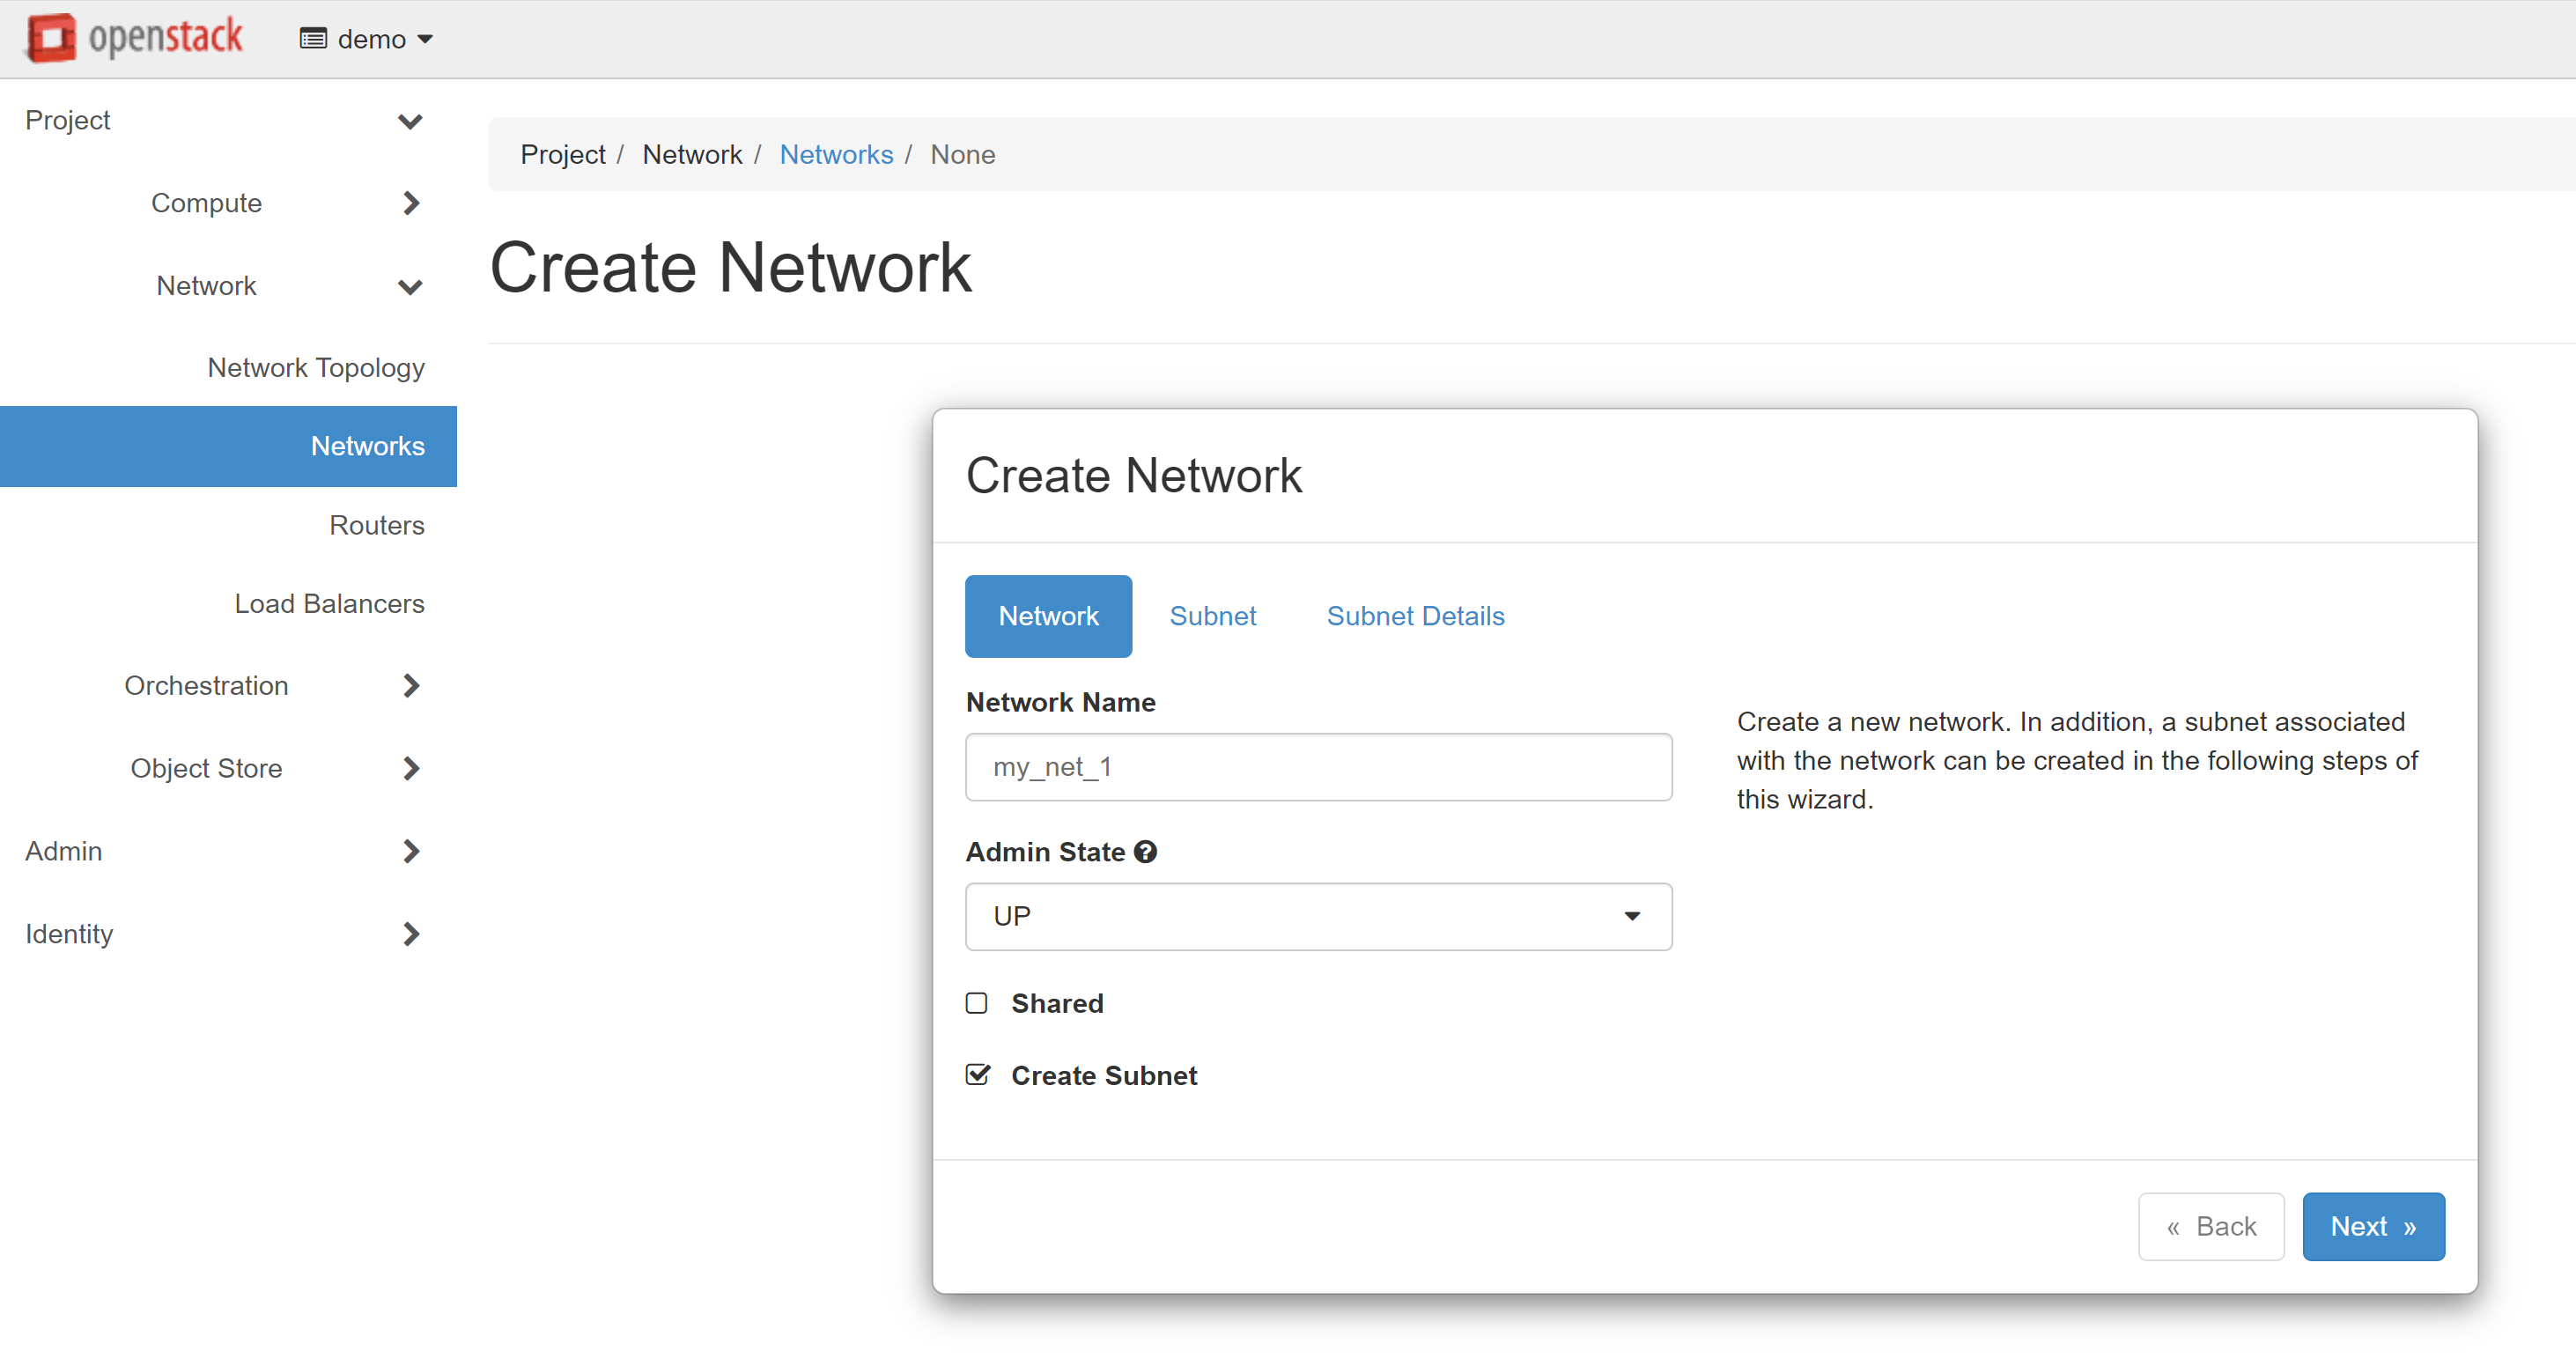
In the NETWORK tab, you can enter any name in the NETWORK NAME field. In our example, this will be my_net_1.
Attention! To avoid any errors, all names should be written in Latin letters.
Next, you should add a subnet for your network. Enter any name in the SUBNET NAME field on the SUBNET tab. We recommend setting different names for the network and subnet — for example, my_subnet_1
Below, in the NETWORK ADDRESS field, specify the address for the subnet to be created, for example: 192.168.201.0/24. You can leave the GATEWAY IP field empty — in this case, the first address of the selected network will be used by default. Alternatively, you can provide a specific gateway IP address.
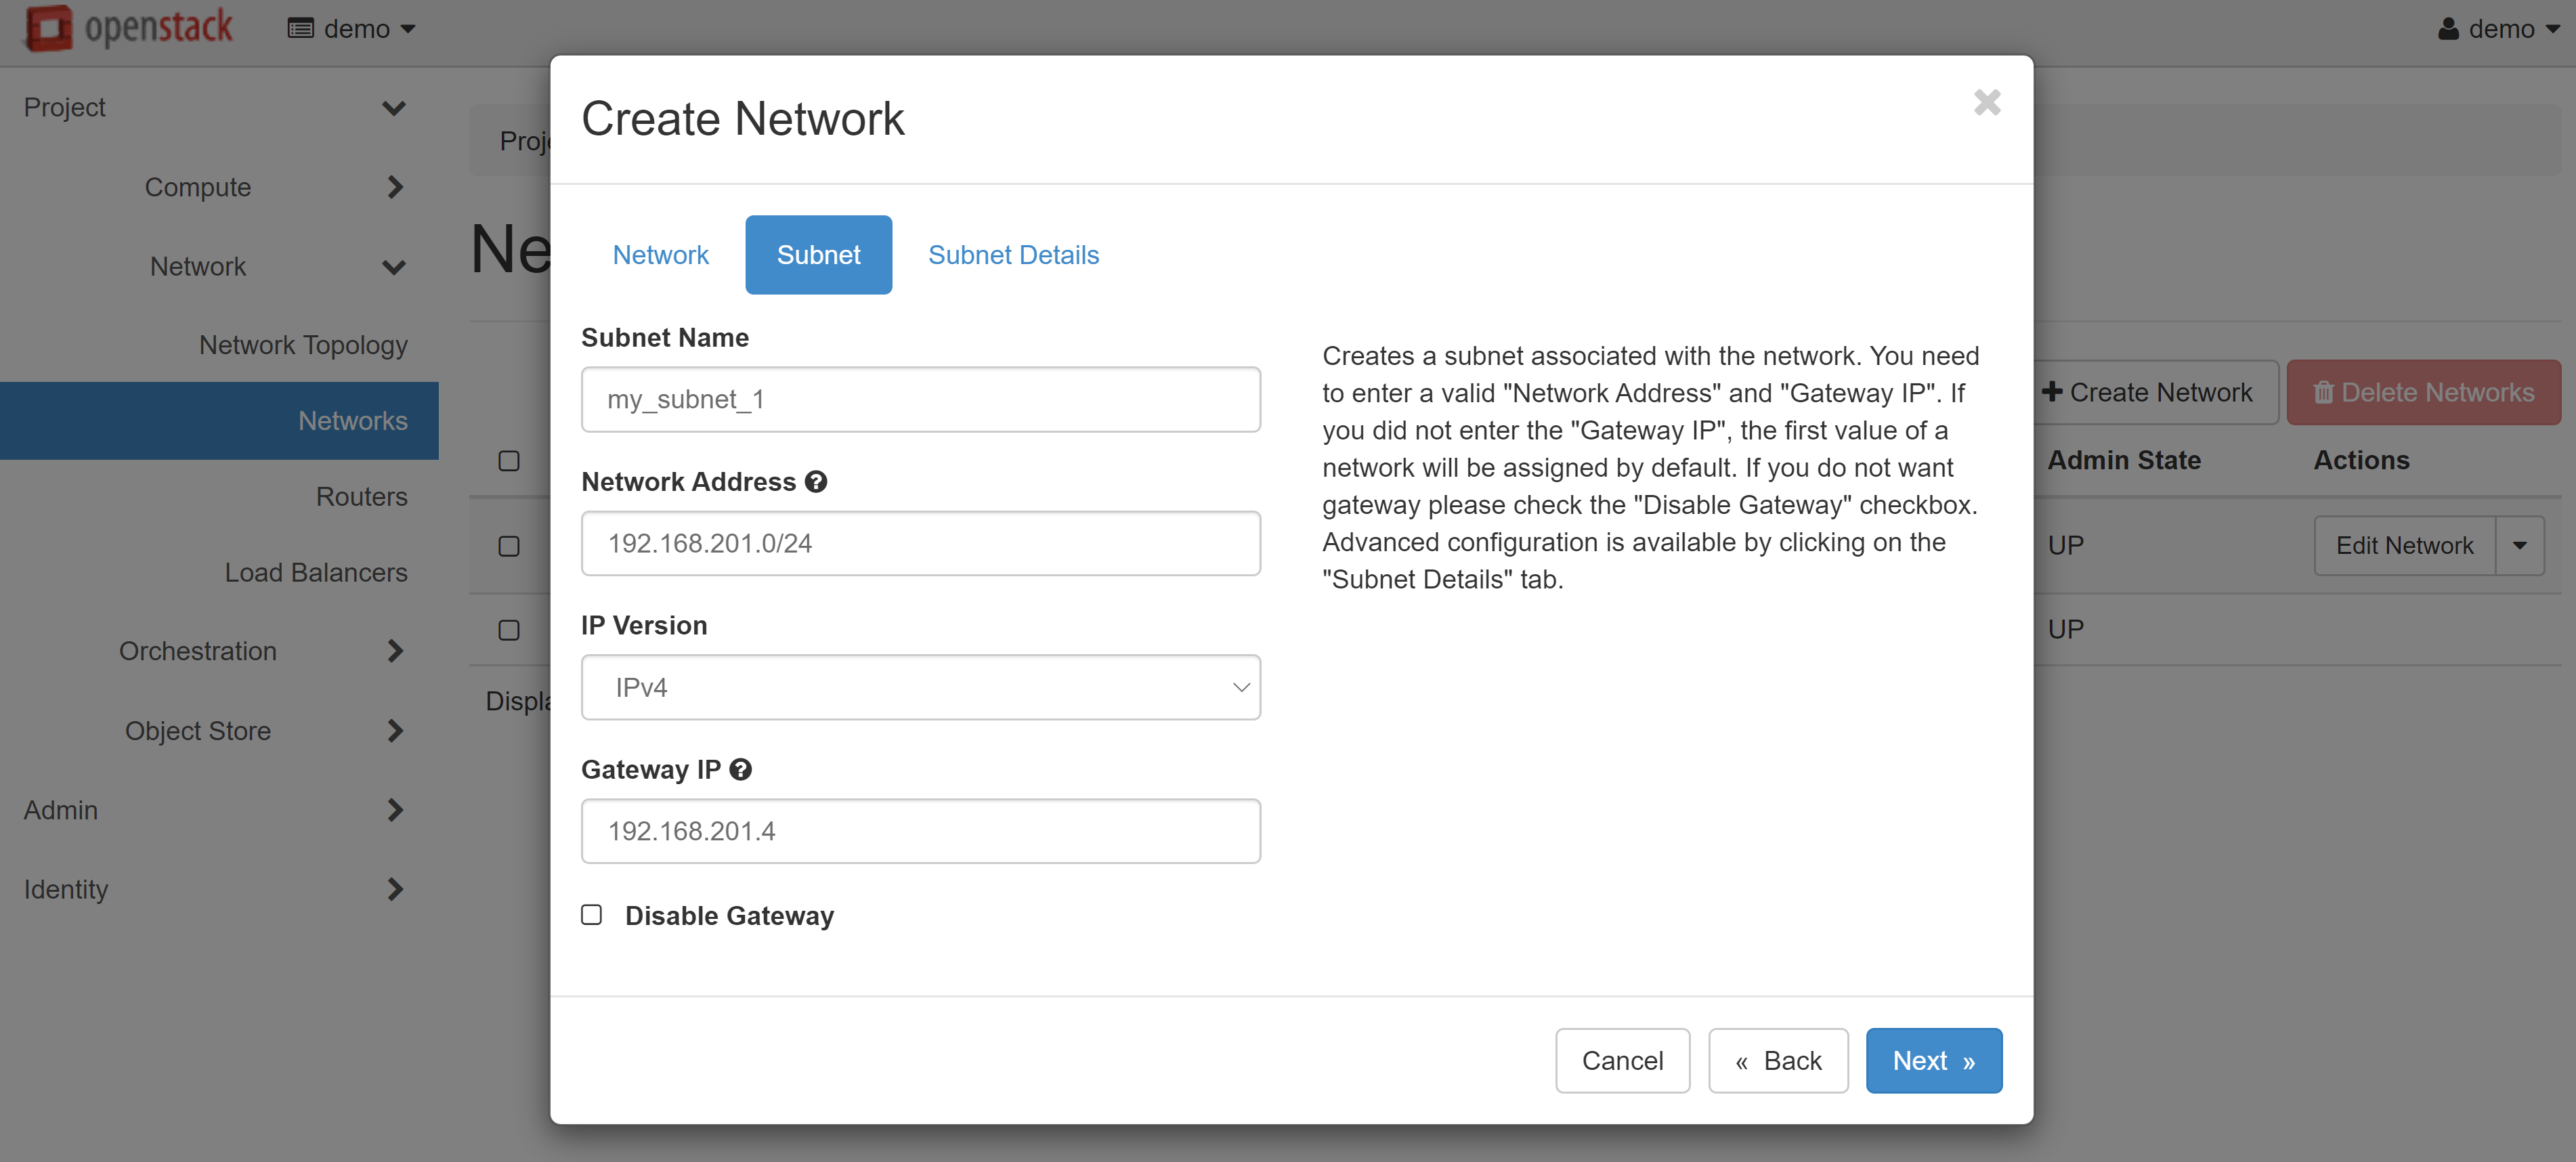
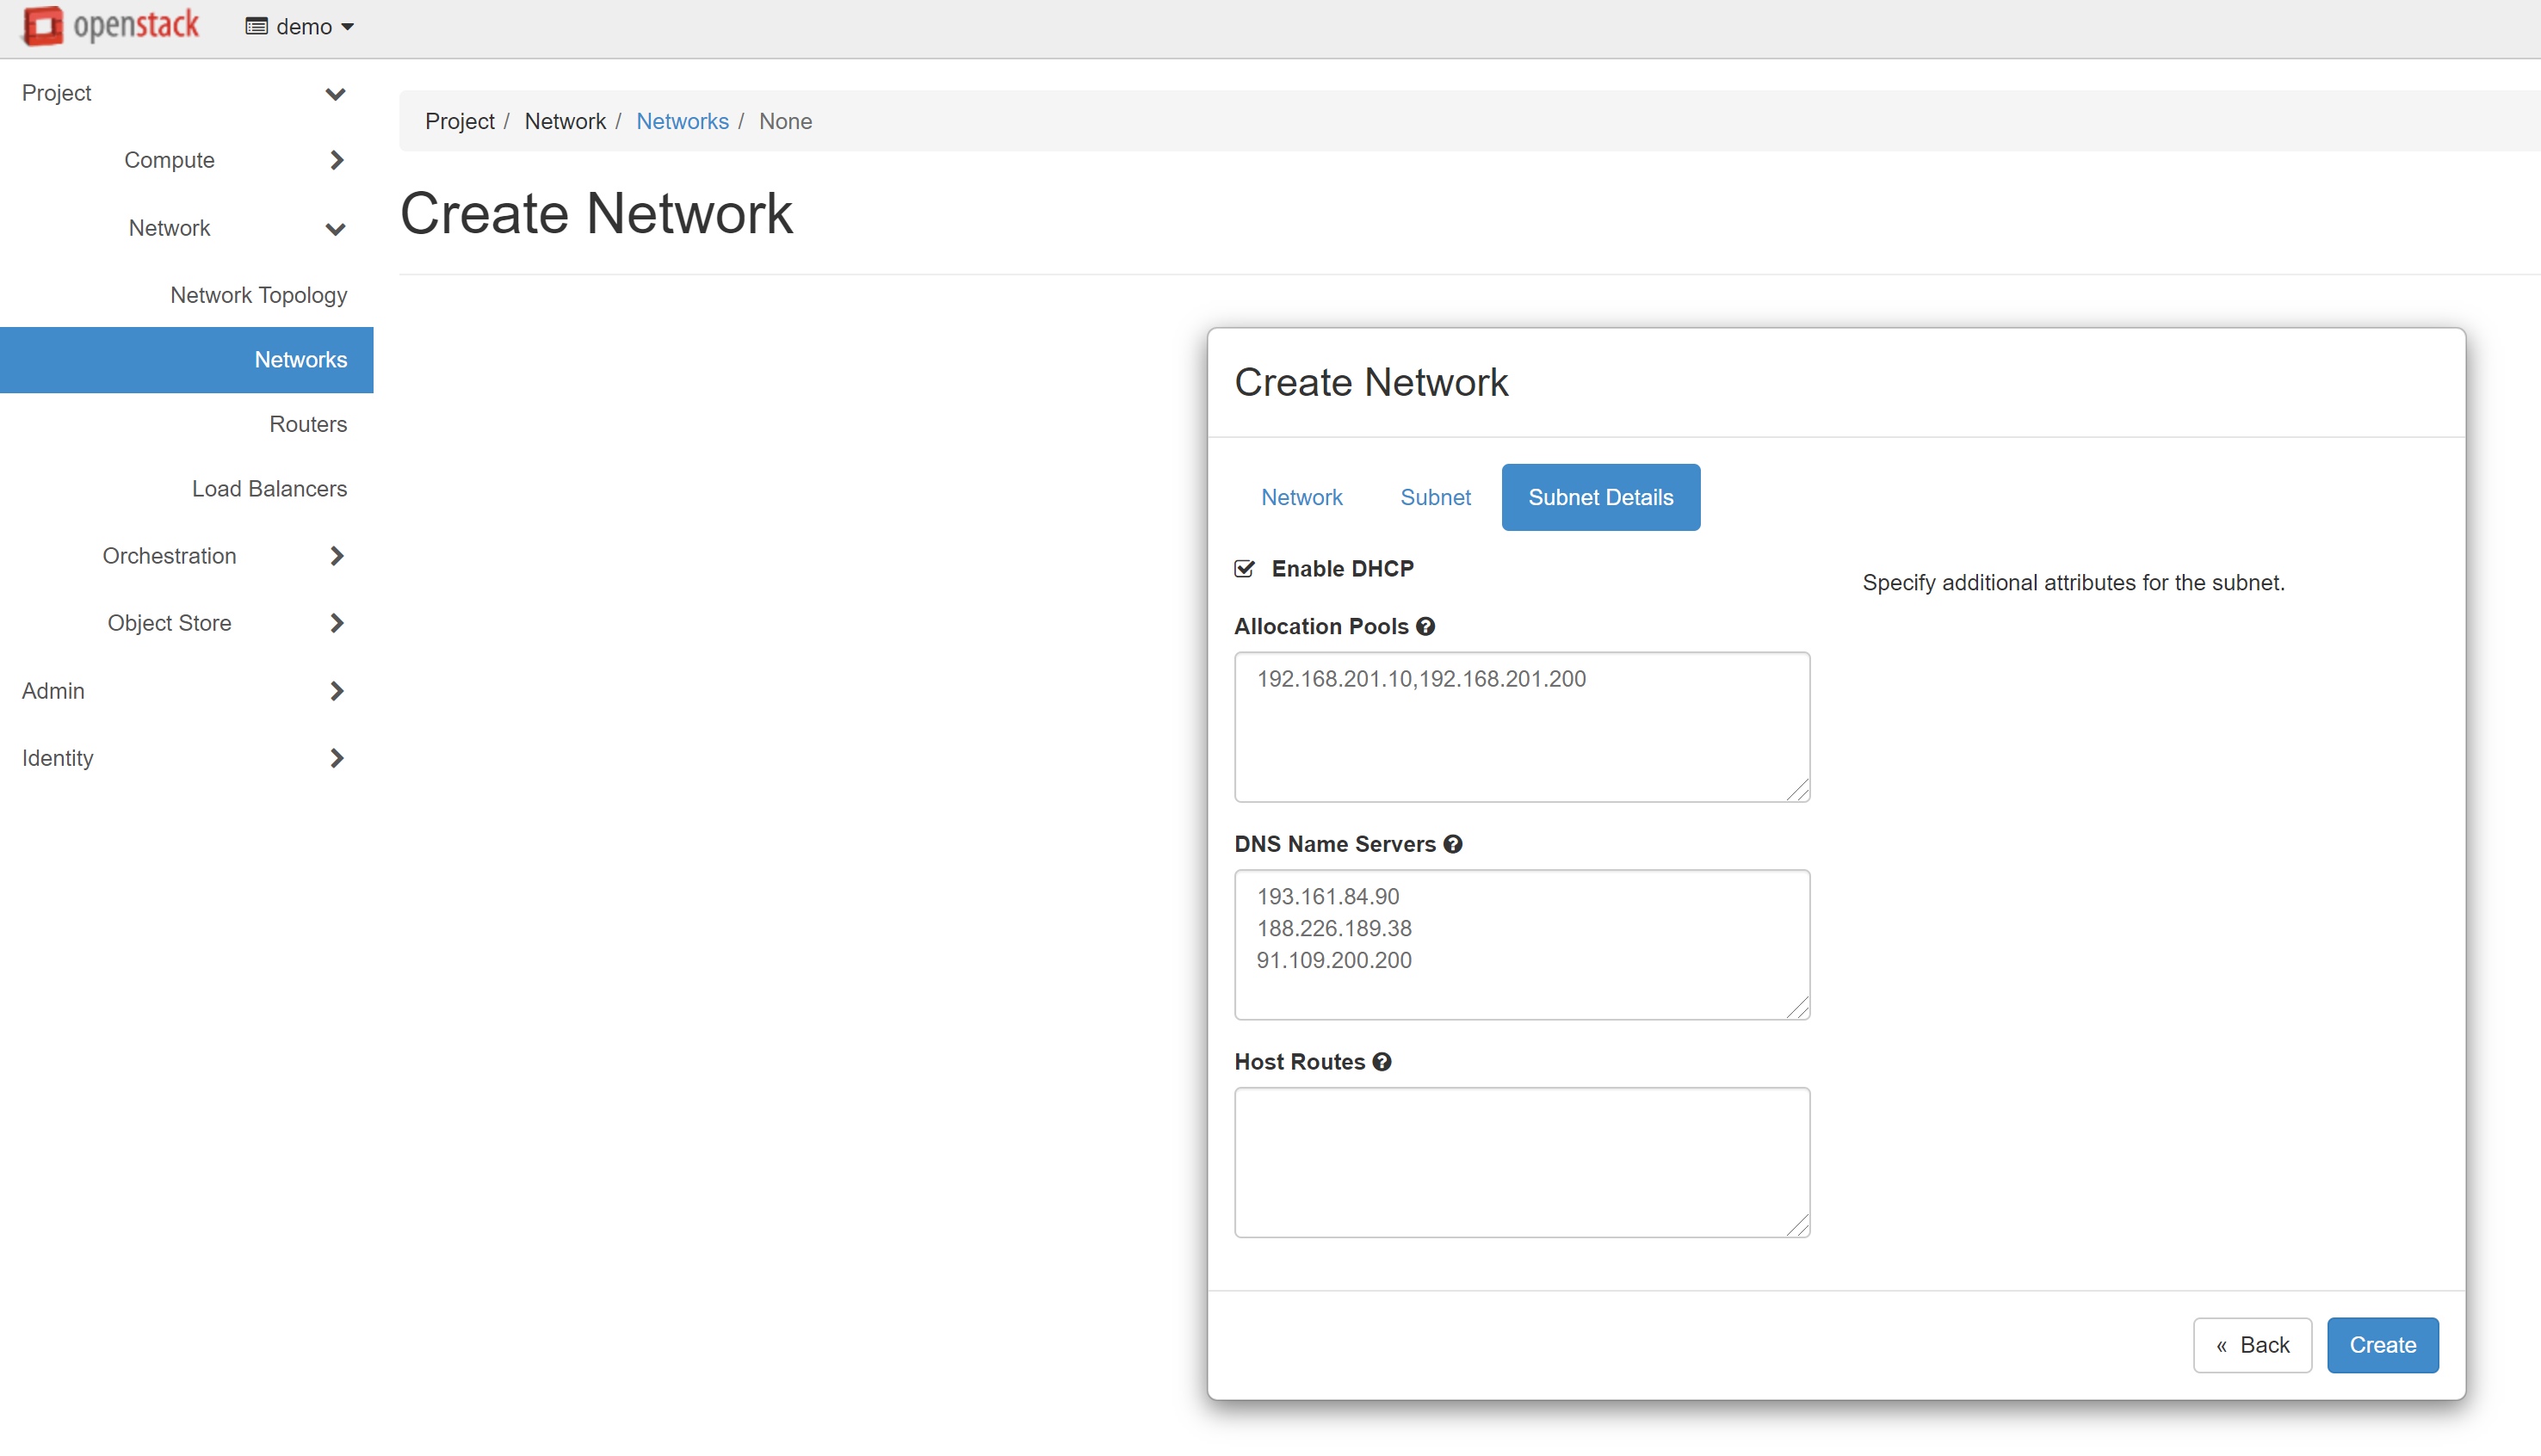
Please make sure that all data is correct, then open the SUBNET DETAILS tab. Check the ENABLE DHCP box. In the ALLOCATION POOLS field, enter the start and end values of the issued addresses separated by commas without spaces — for example, 192.168.201.10, 192.168.201.200. You can use our addresses as DNS servers, or any other. Addresses should be written as one per line.
Our DNS addresses for Europe:
193.161.84.90188.226.189.3891.109.200.200
Then click CREATE, and the created network will appear in the list of networks.
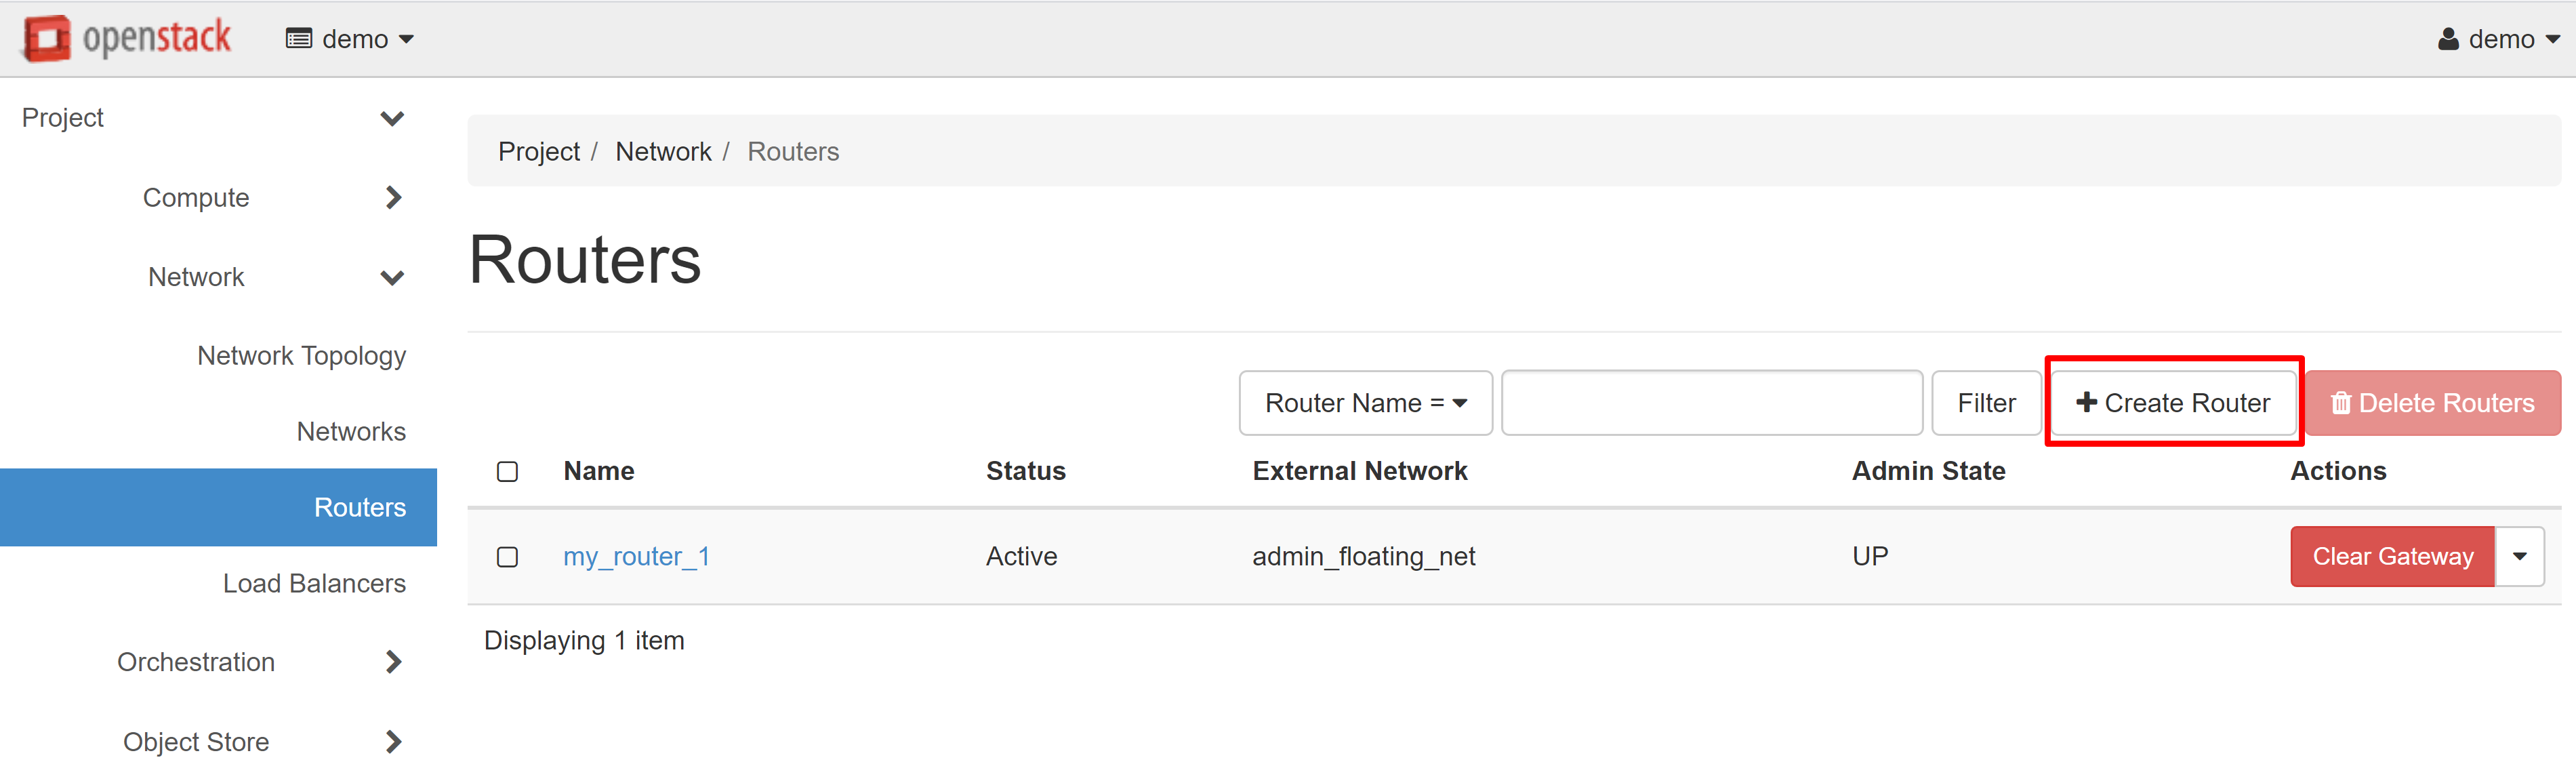
You should create and configure a router to ensure the operability of the network you created. Click CREATE ROUTER in the PROJECT — NETWORK — ROUTERS section.
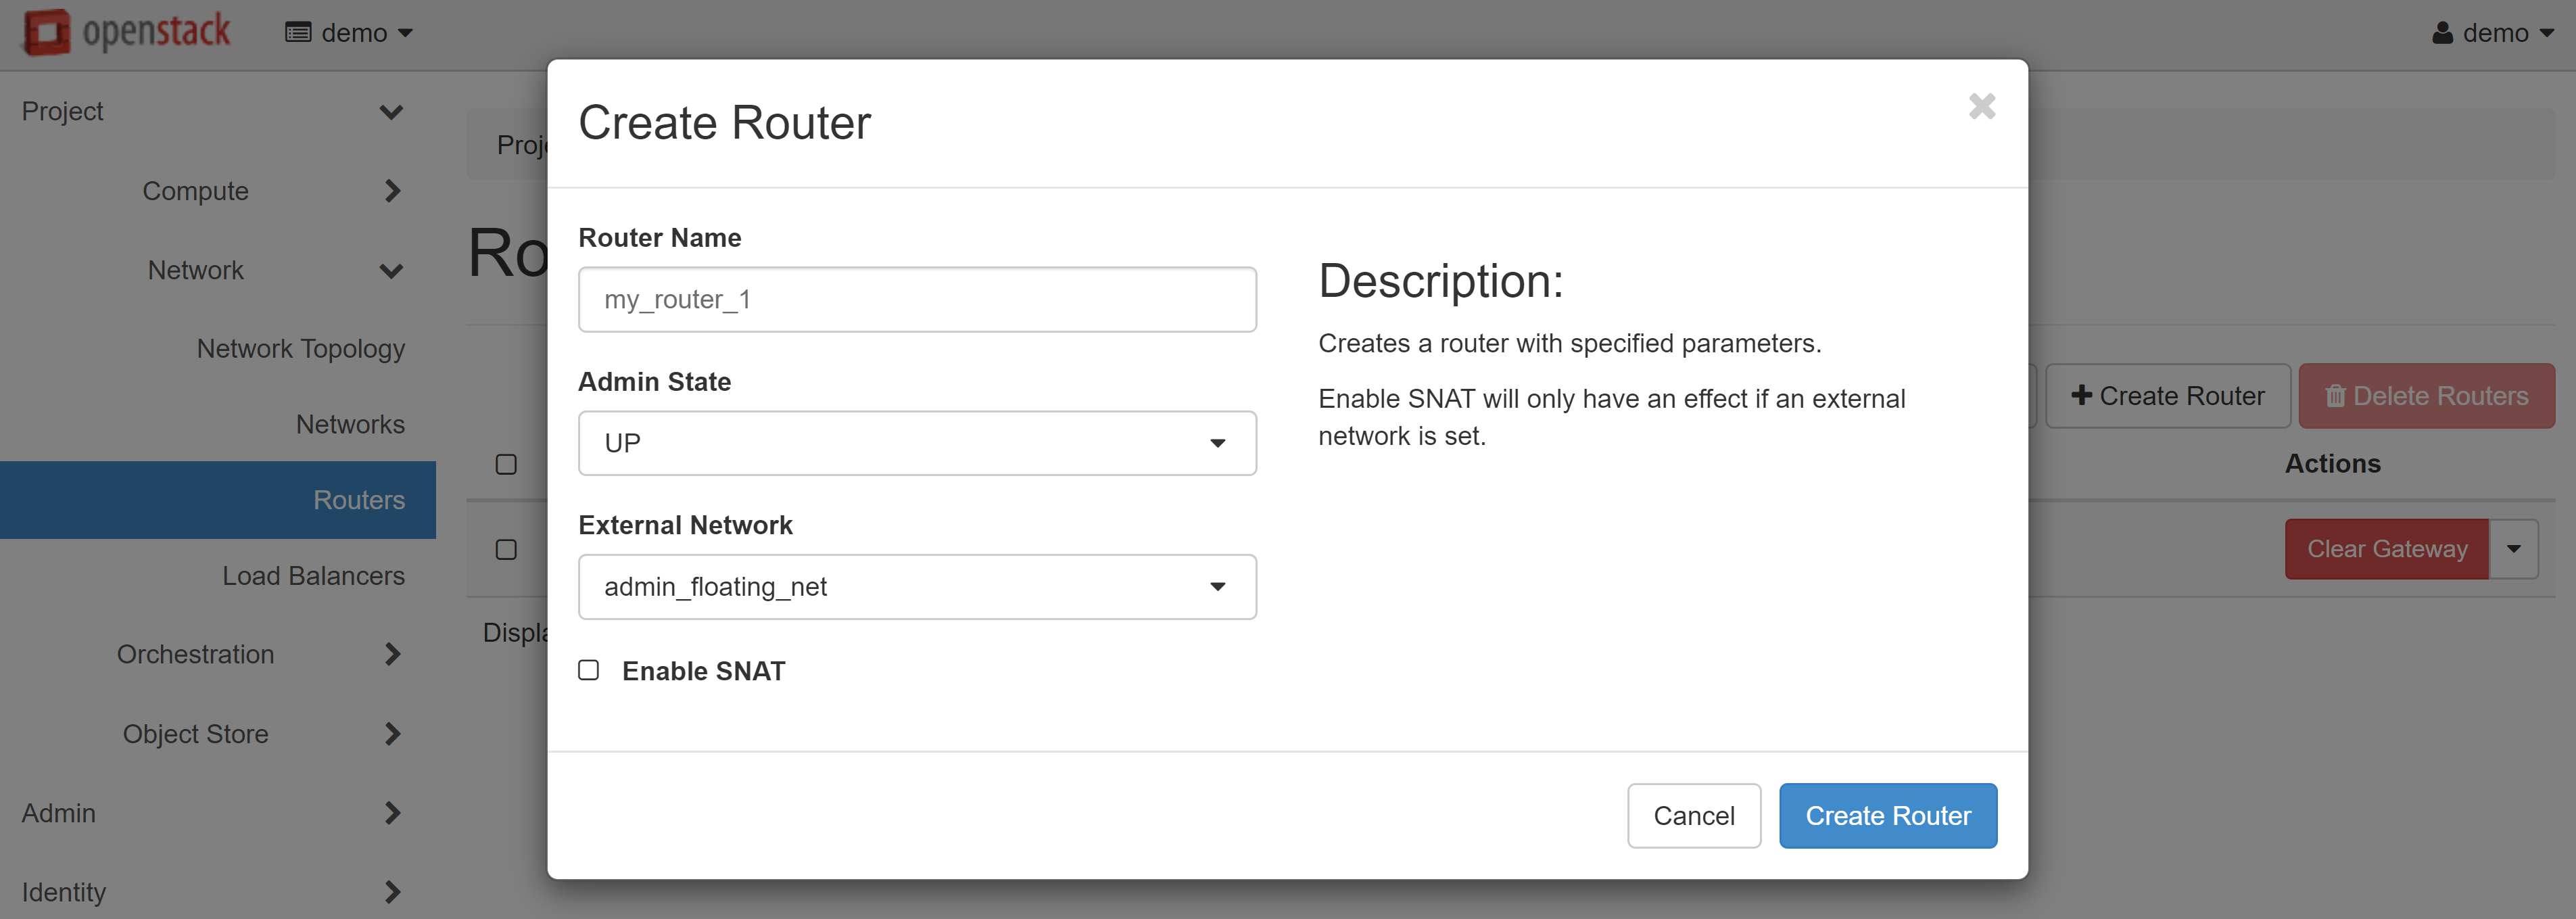
In the opened router creation window enter the router name (in Latin letters!) - for example, my_router_1. In the ADMIN STATE field, select UP, and in the EXTERNAL NETWORK field, select admin_floating_net, and then click CREATE ROUTER.
The router will appear in the list. To continue configuration, click on router name.
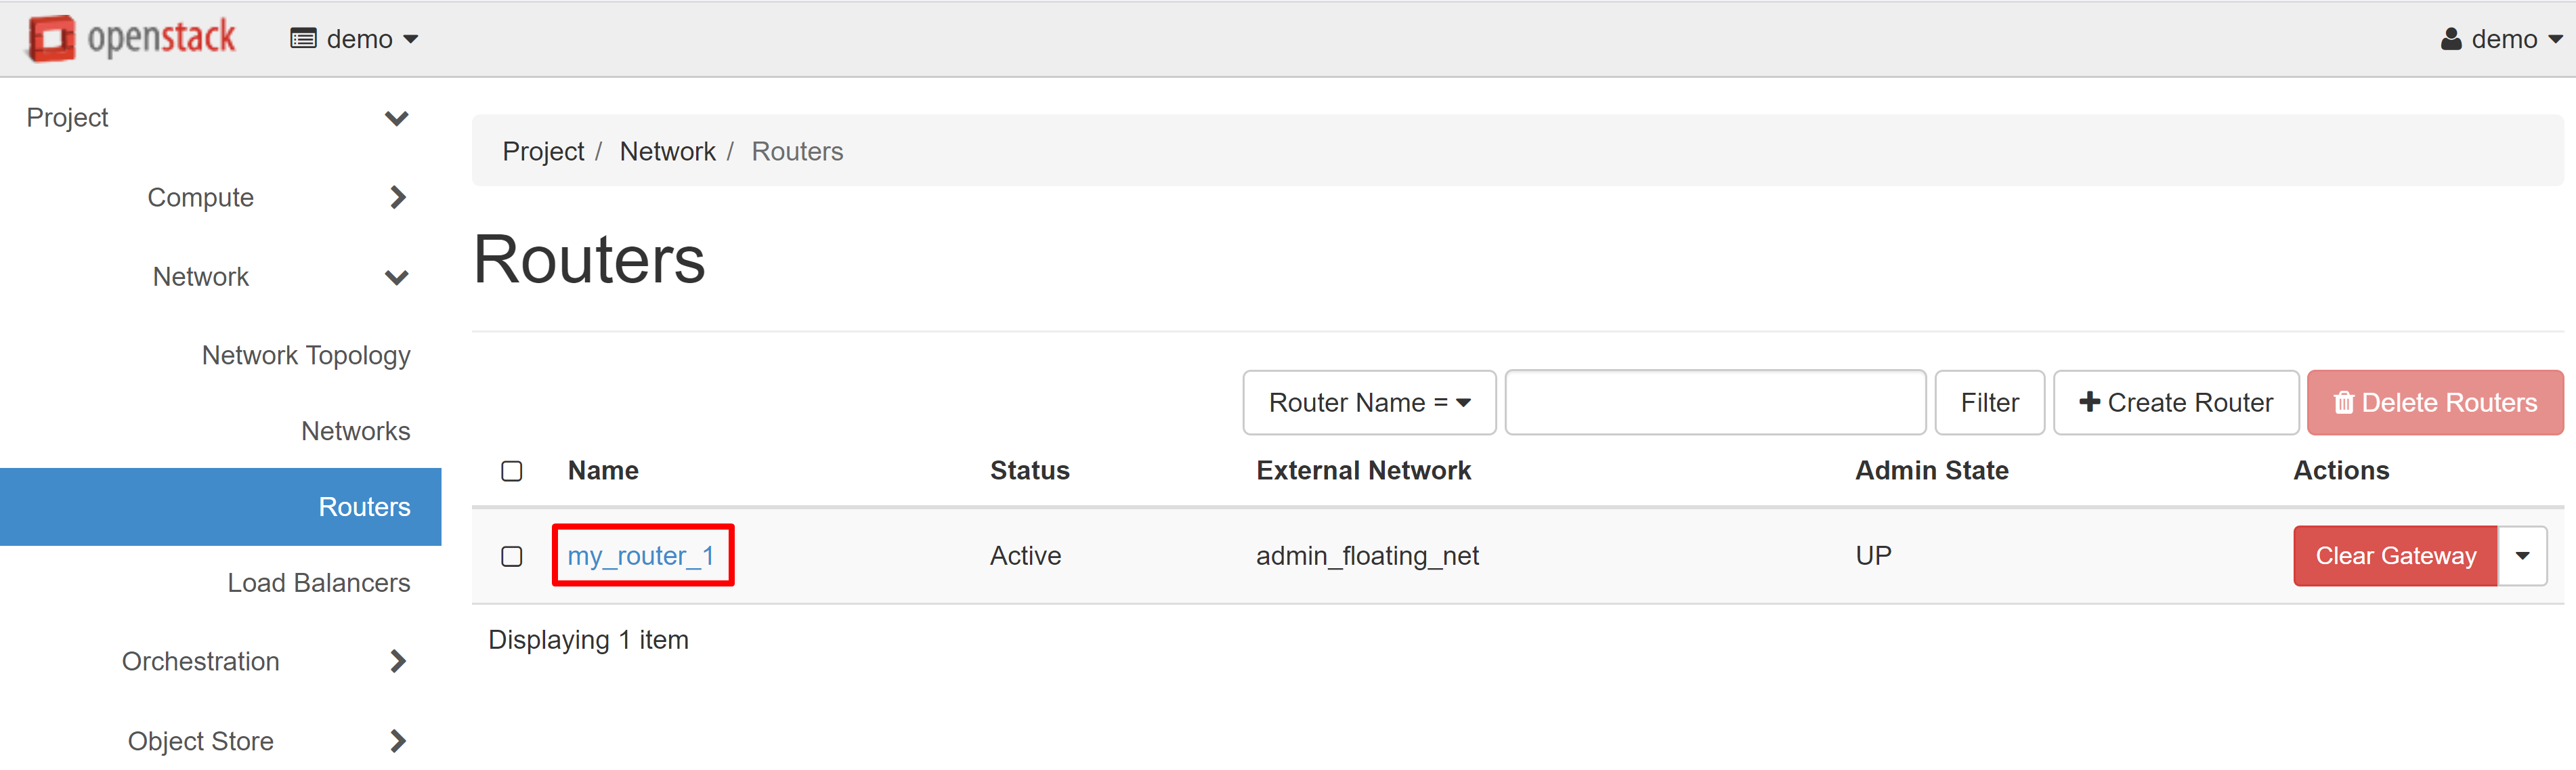
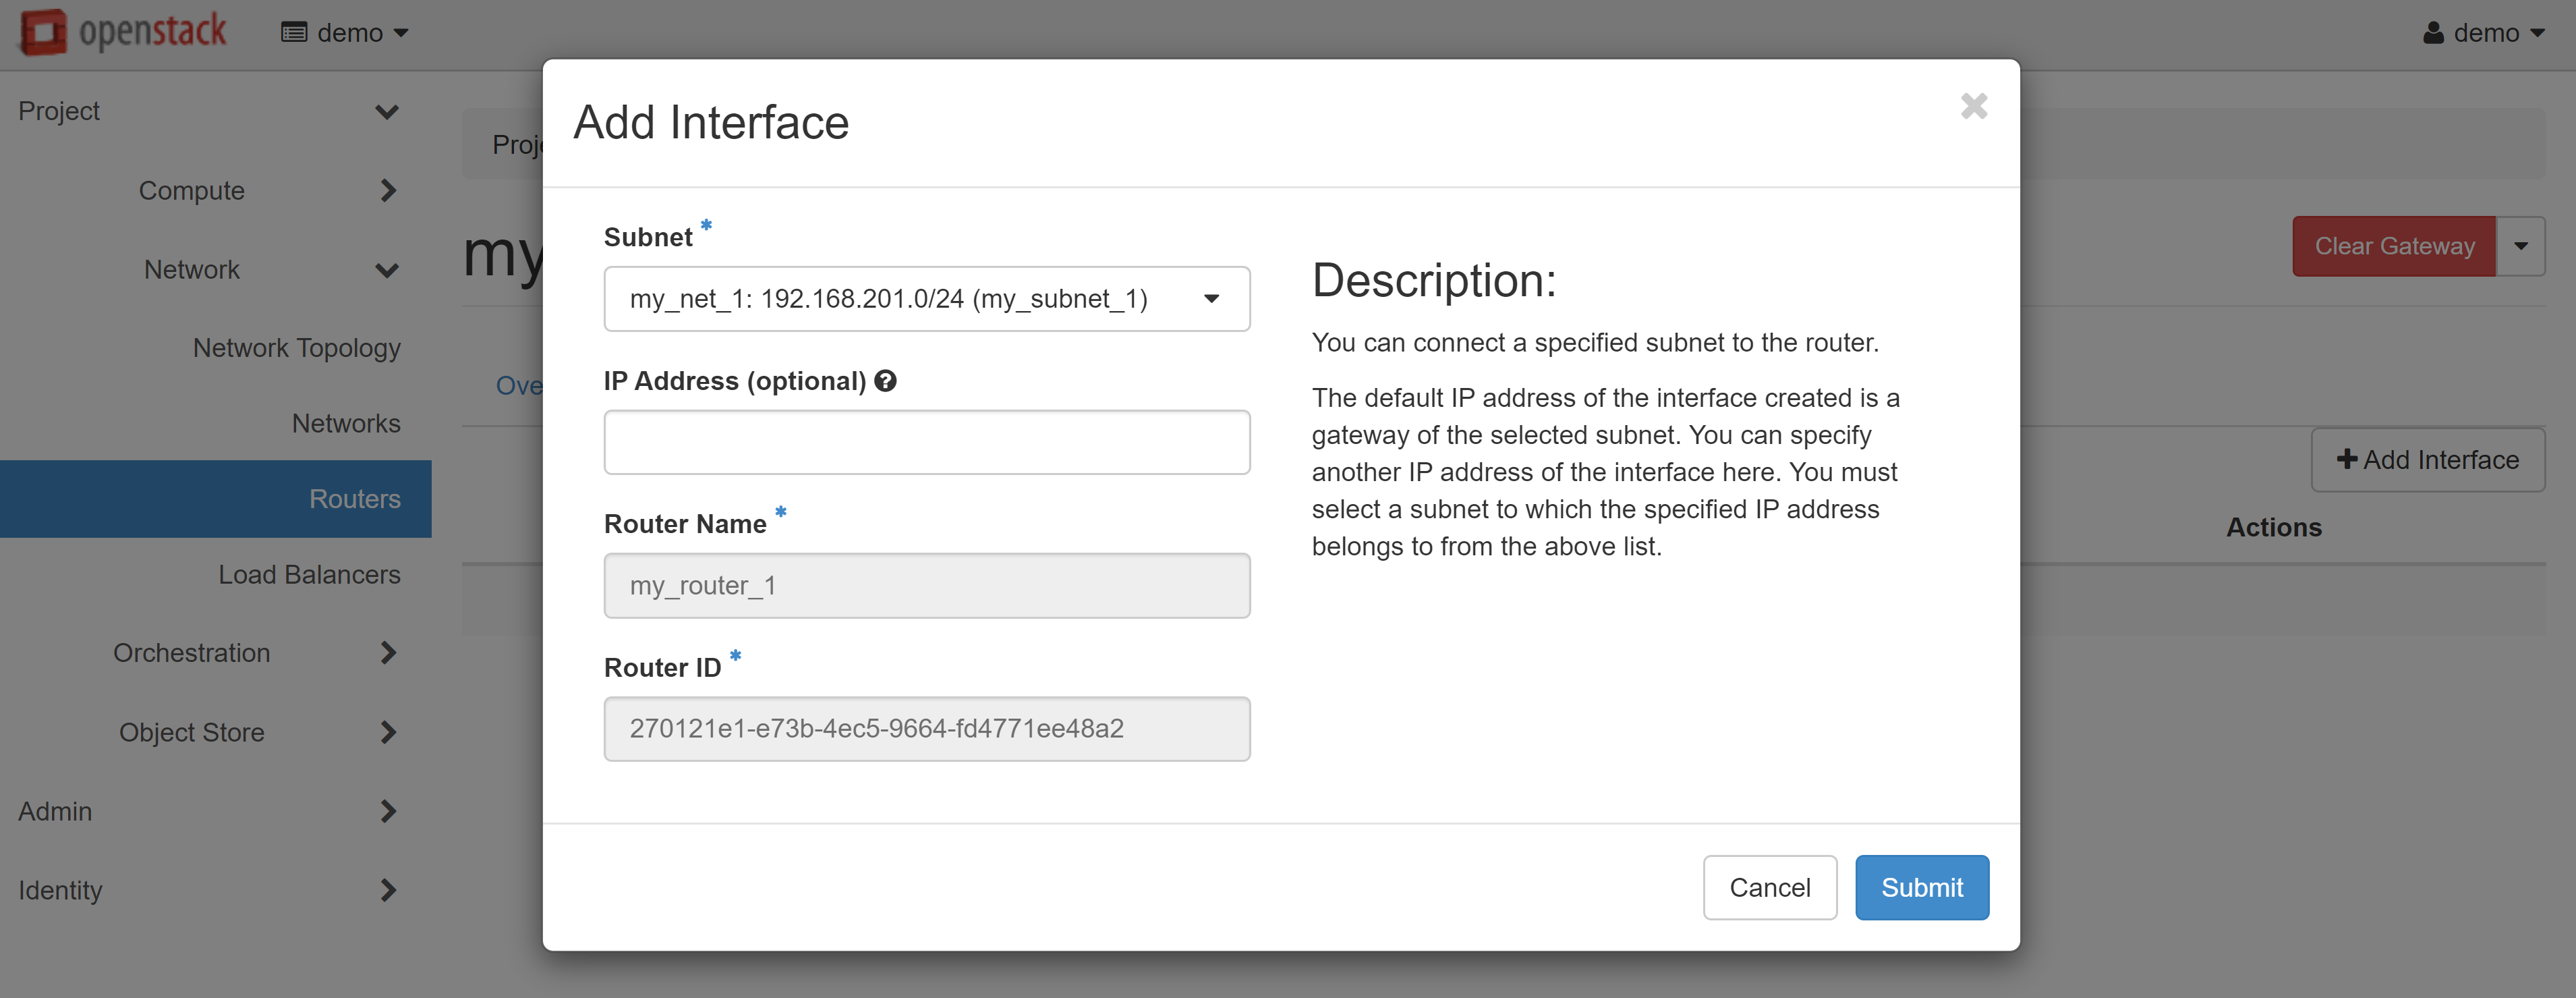
On the page that opens, select the INTERFACES tab, then ADD INTERFACE.
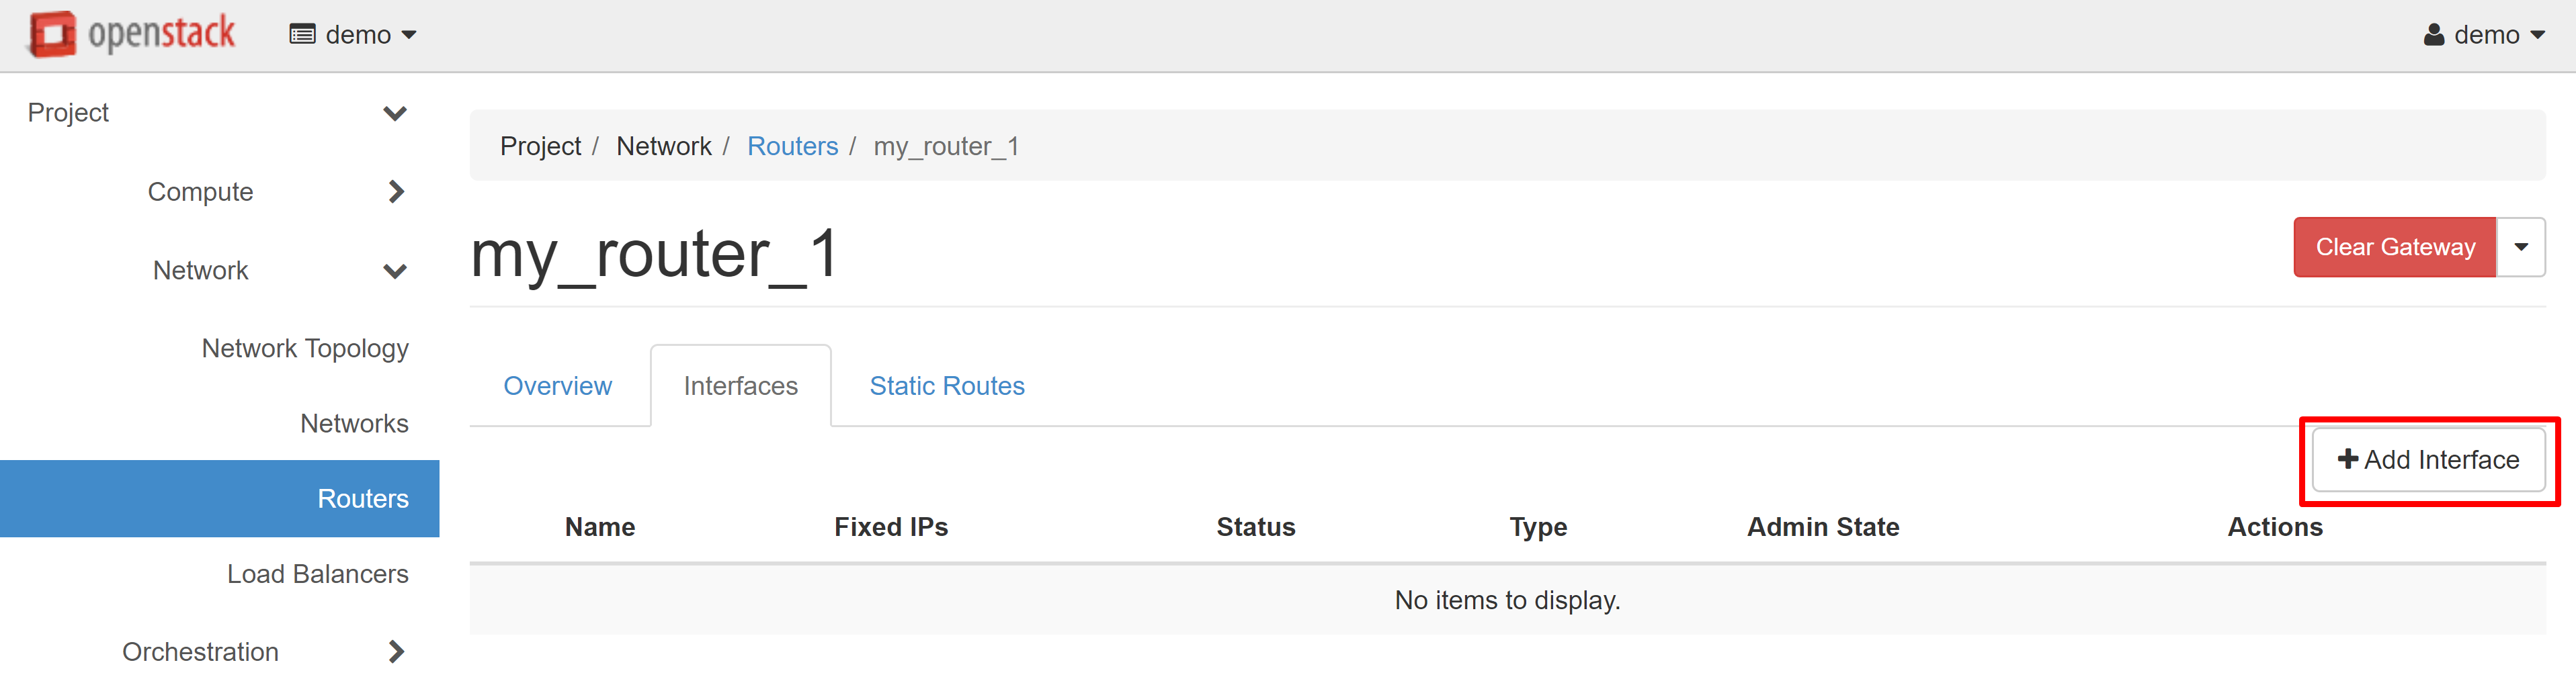
In the SUBNET field, select the previously created network and, if necessary, specify the IP address from the created range, then click SUBMIT.
This completes the network setup. Now you can create your first VM and configure security rules for it.
2. How To Create An Instance
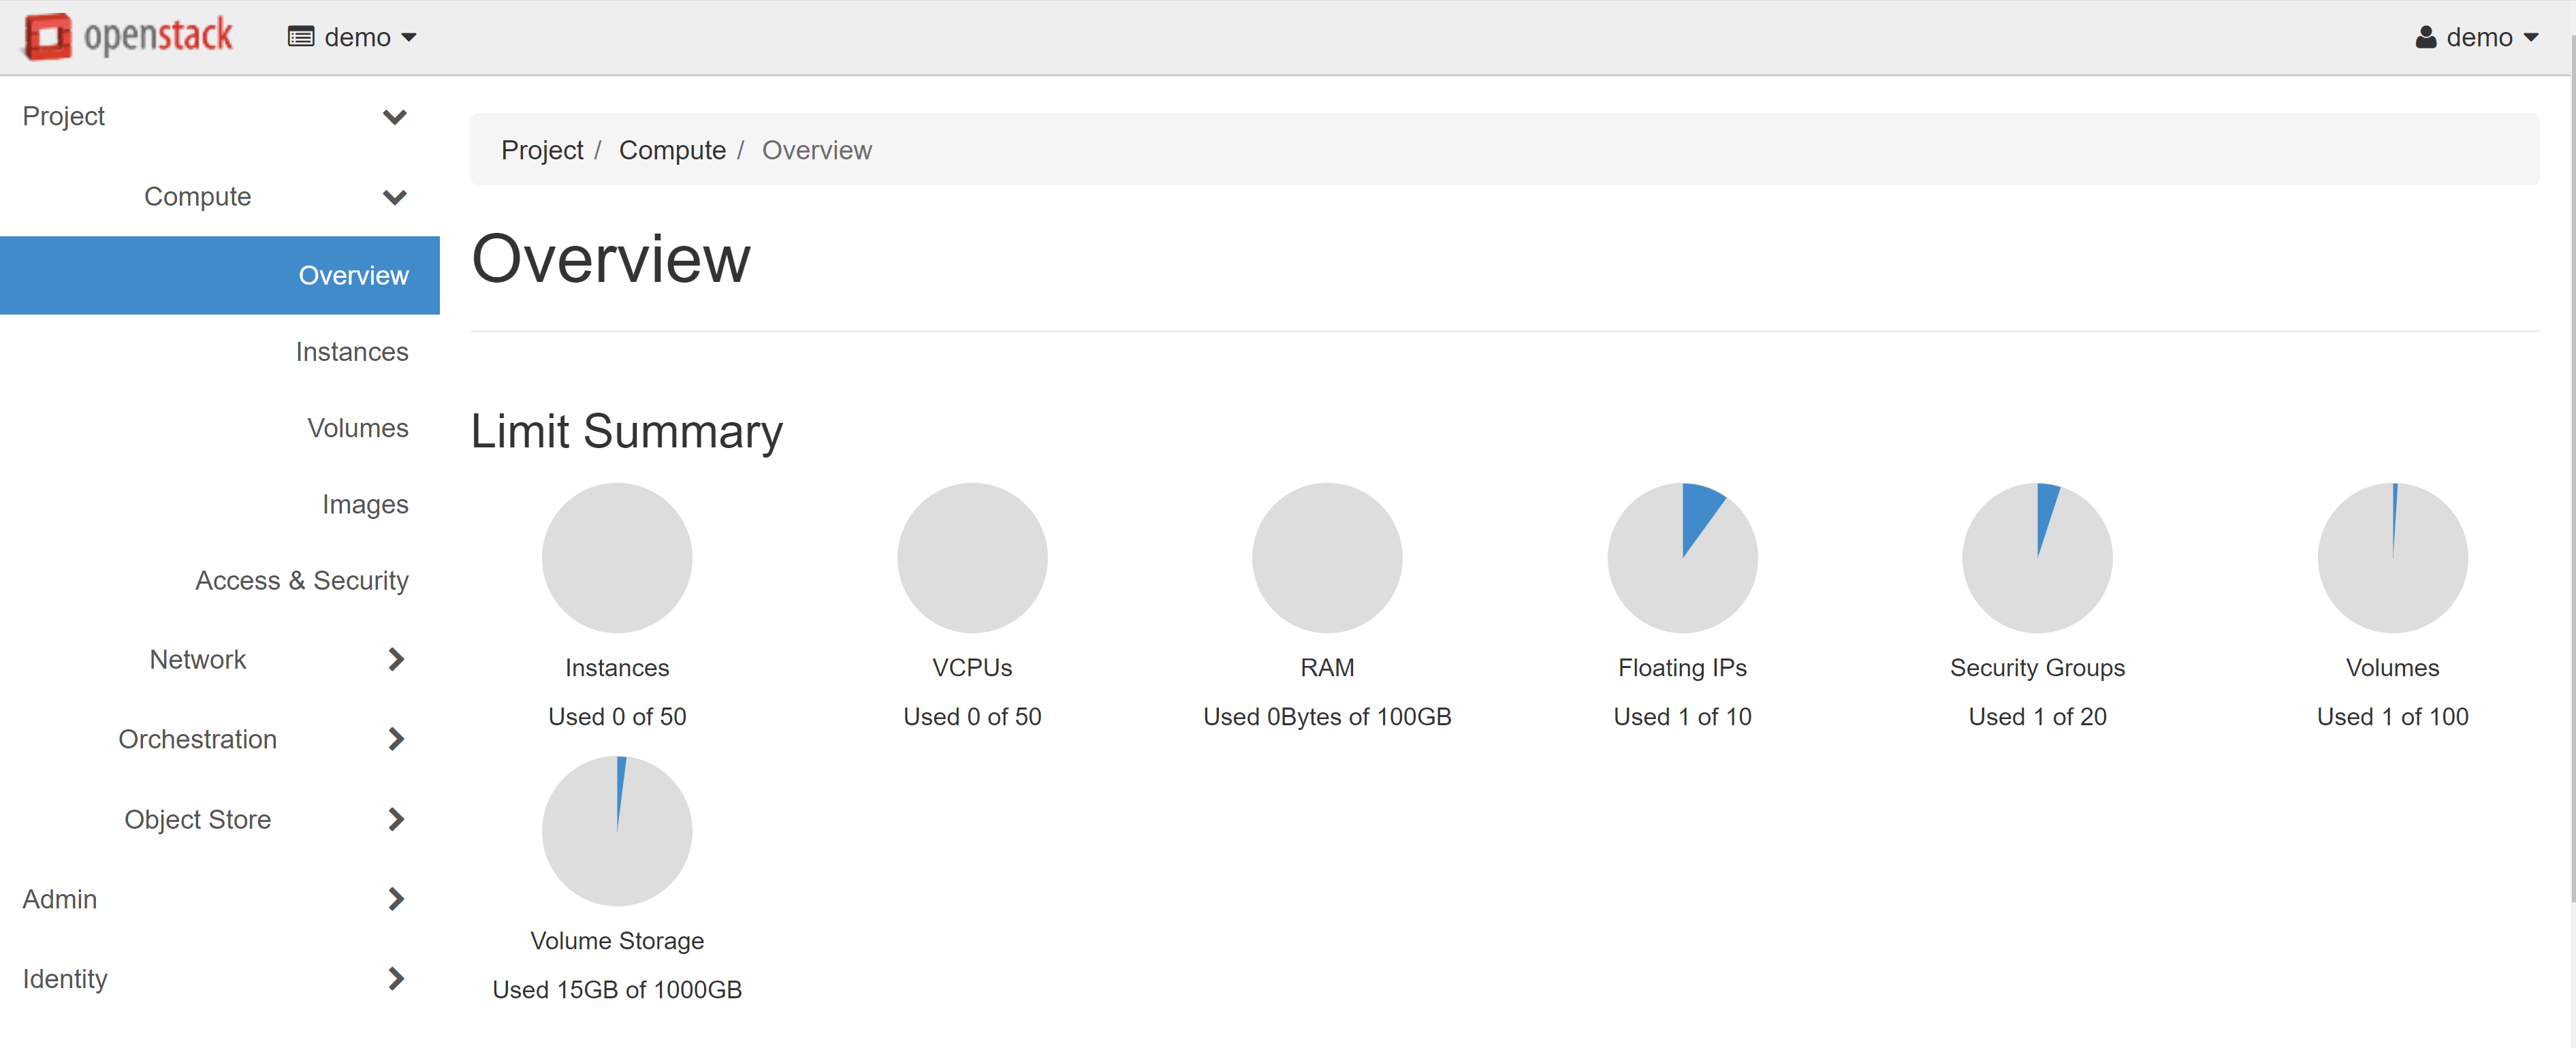
Before creating an instance, it is first recommended to check the available resources that you can use in your project. To do this, open the COMPUTE — OVERVIEW section. On the page that opens, you will see a LIMIT SUMMARY of your resources.
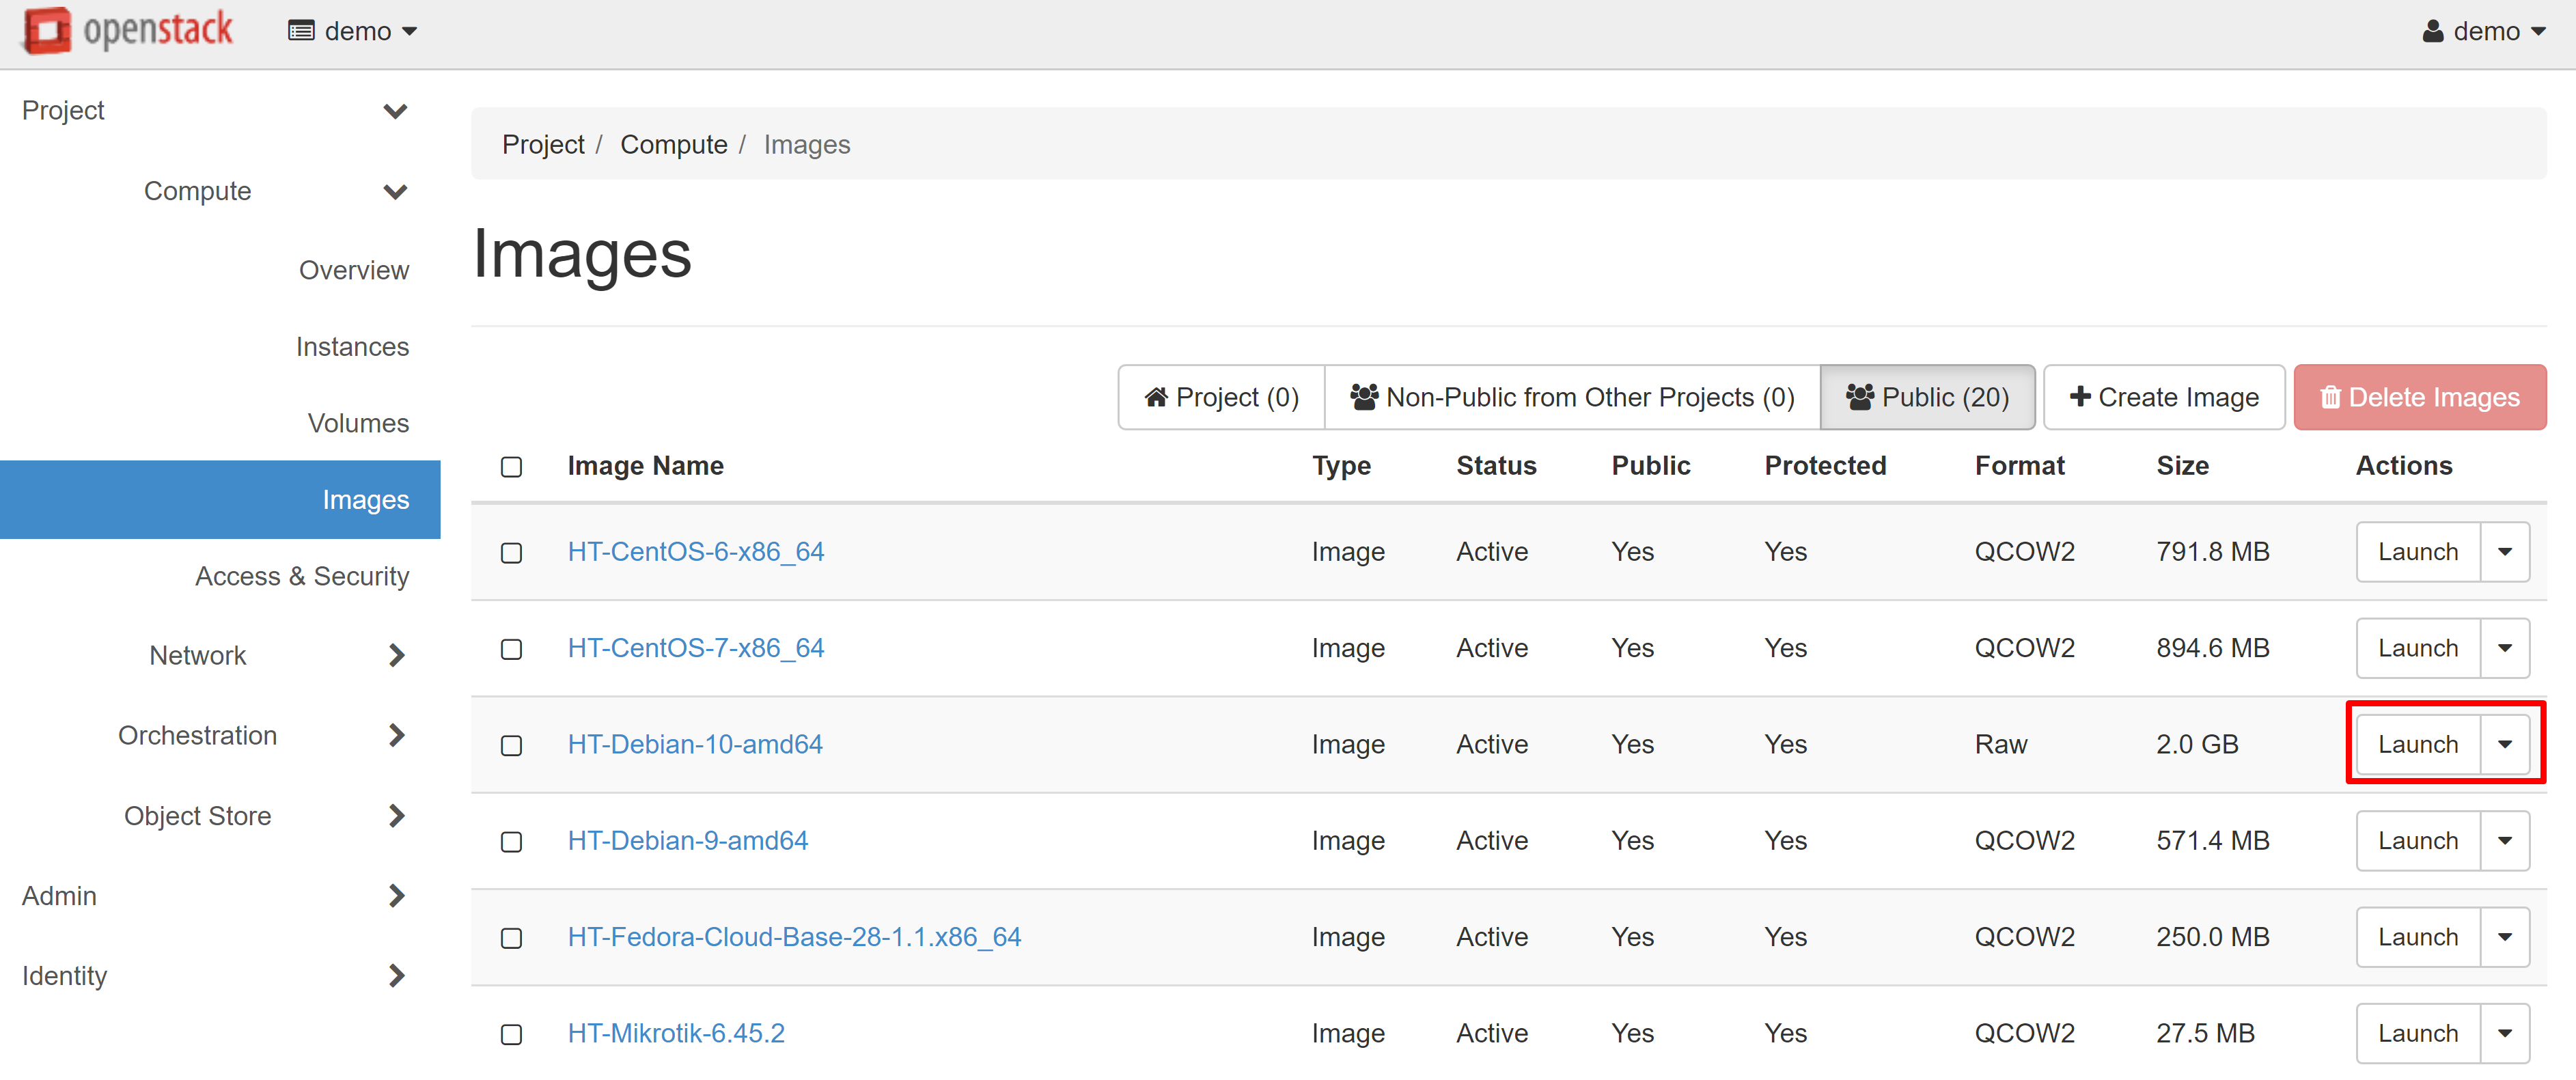
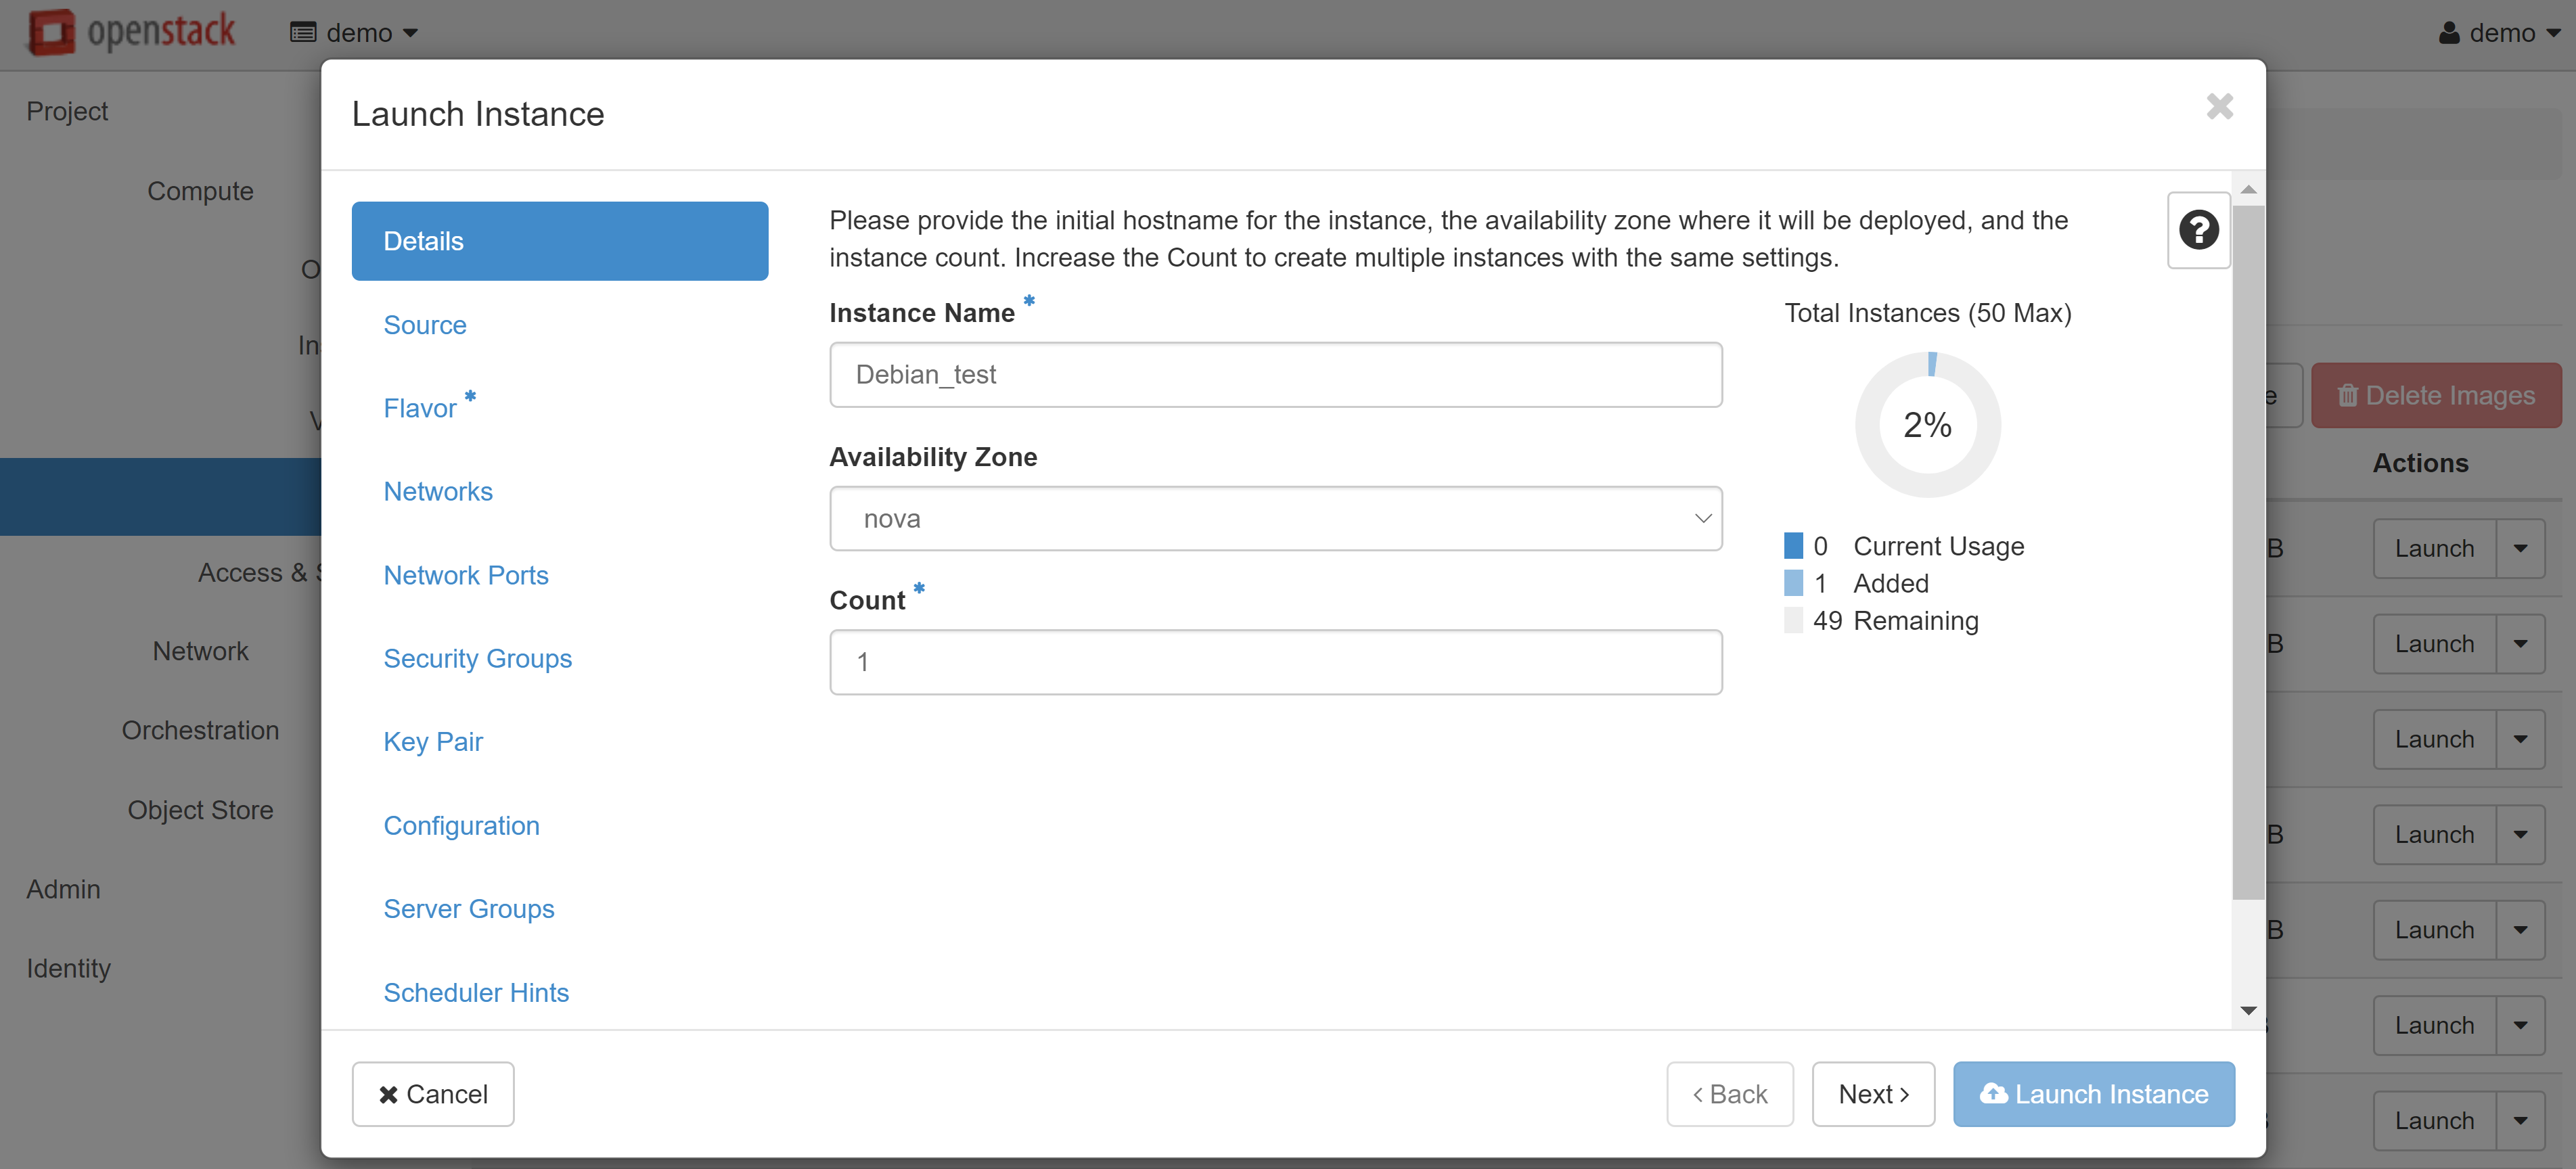
You can find all the VMs you created in the COMPUTE — INSTANCES section. To create an instance, open the COMPUTE — IMAGES section, then select the PUBLIC tab. Here you will see a list of all available images for creating VMs. Once you have decided on the desired image for the instance, click LAUNCH next to the device name. In our example, we used the image of a Debian 10.
In the instance creation window that opens, enter the desired VM name in the INSTANCE NAME field, which will also be used as the hostname, for example, Debian_test. You can increase the number of created instances in the COUNT field — in this case, they will be allocated to the corresponding indexes.
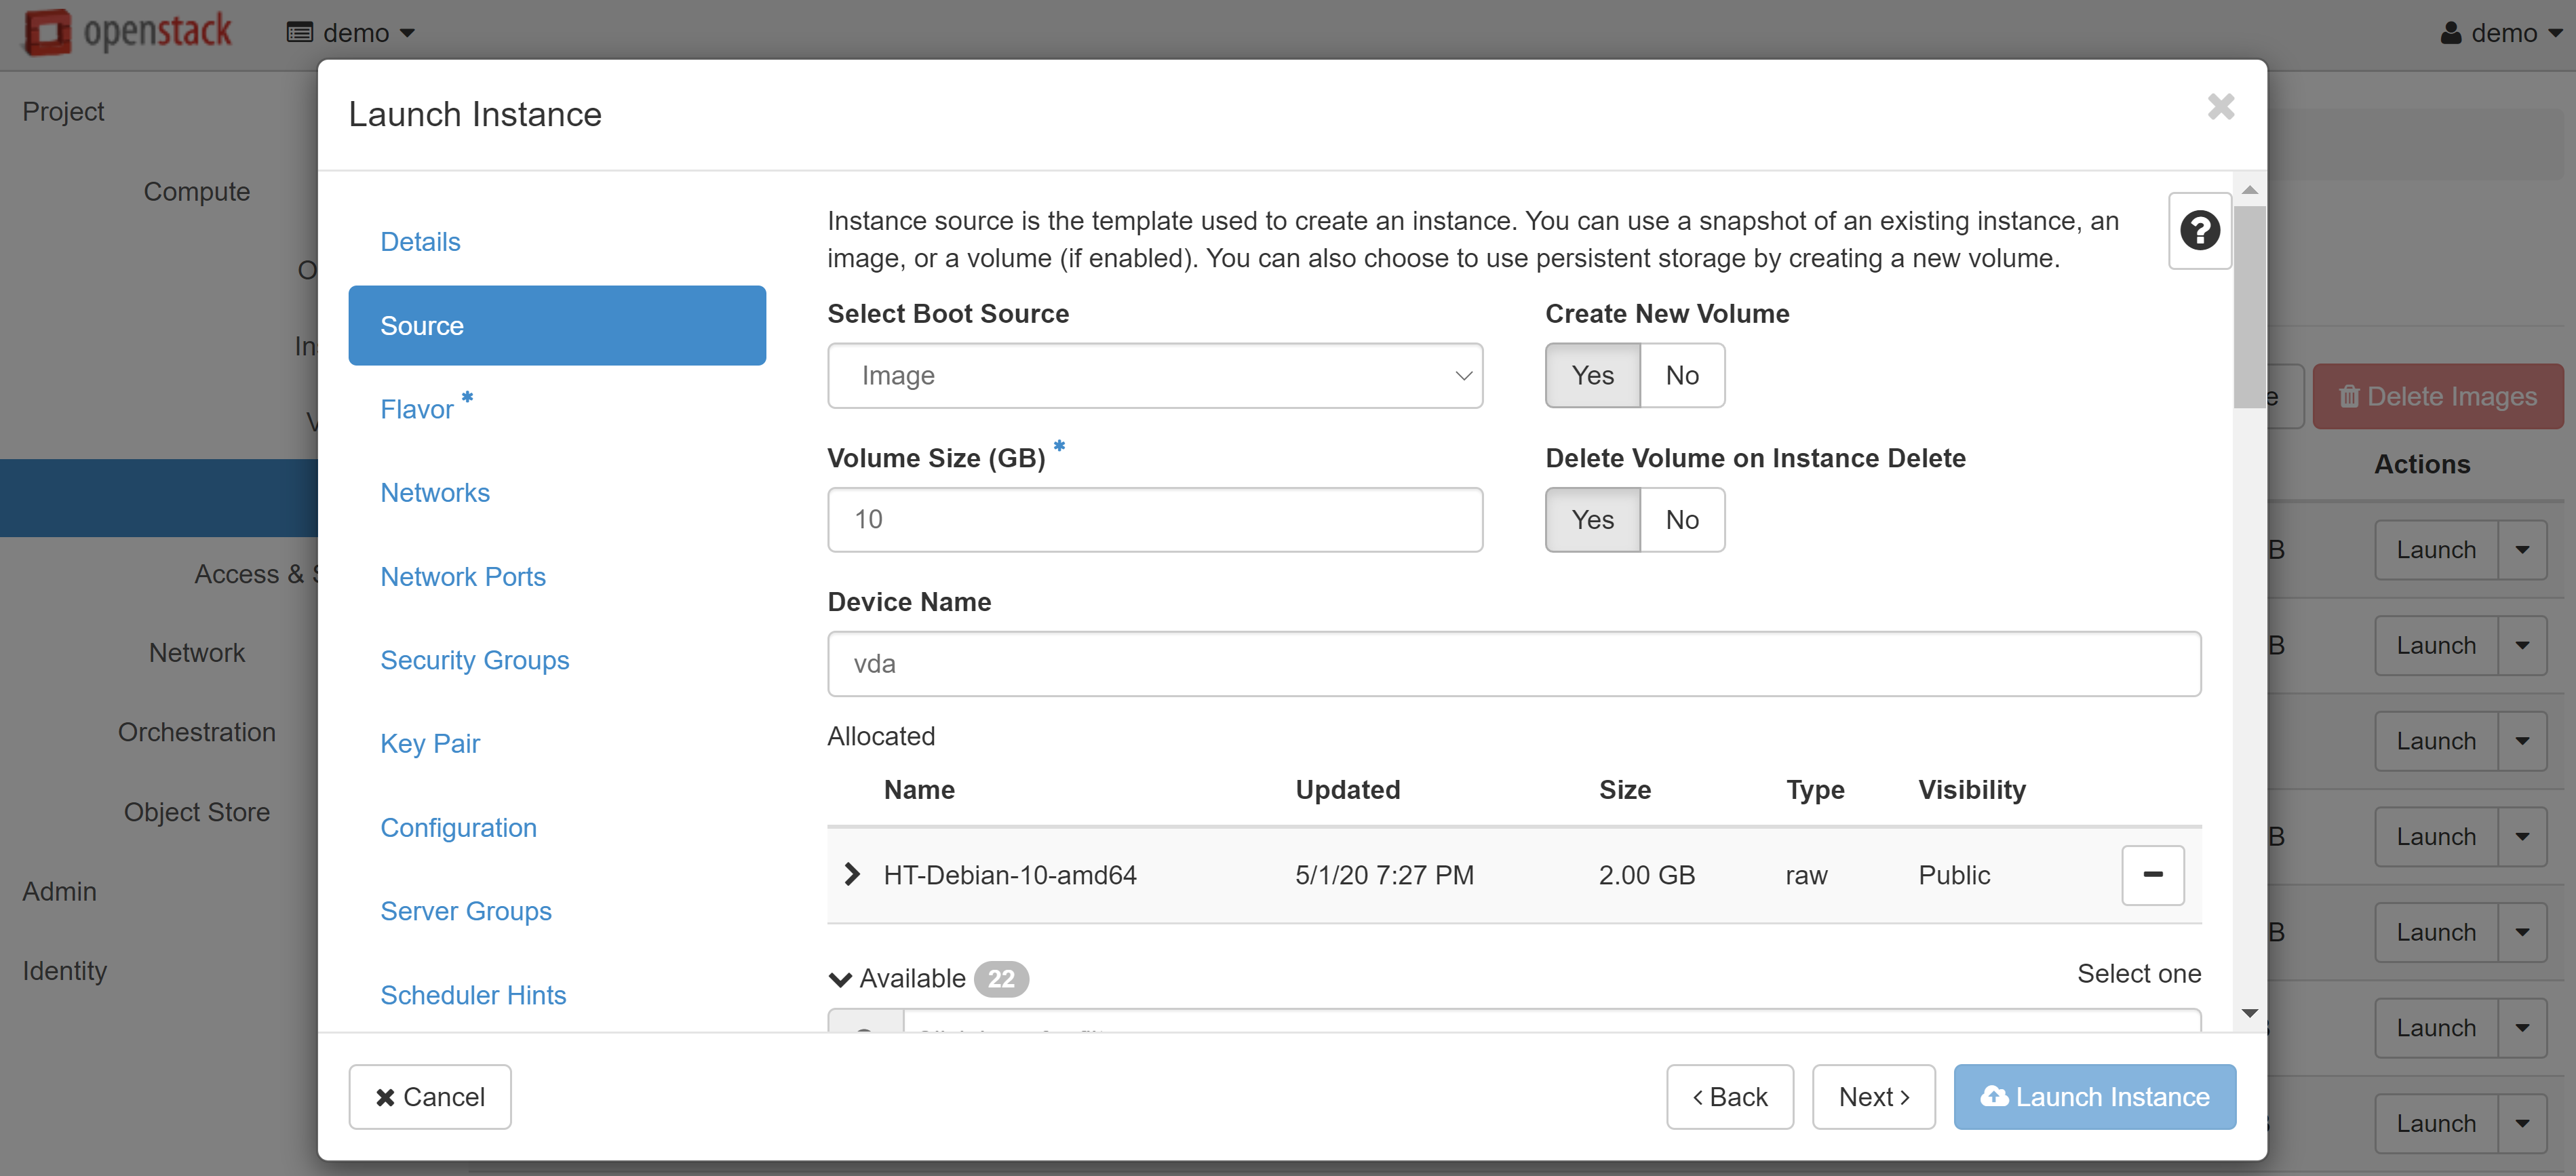
In the SOURCE menu item (on the left), select CREATE NEW VOLUME and set the volume size. You may also change the image that the VM will be created from, if required.
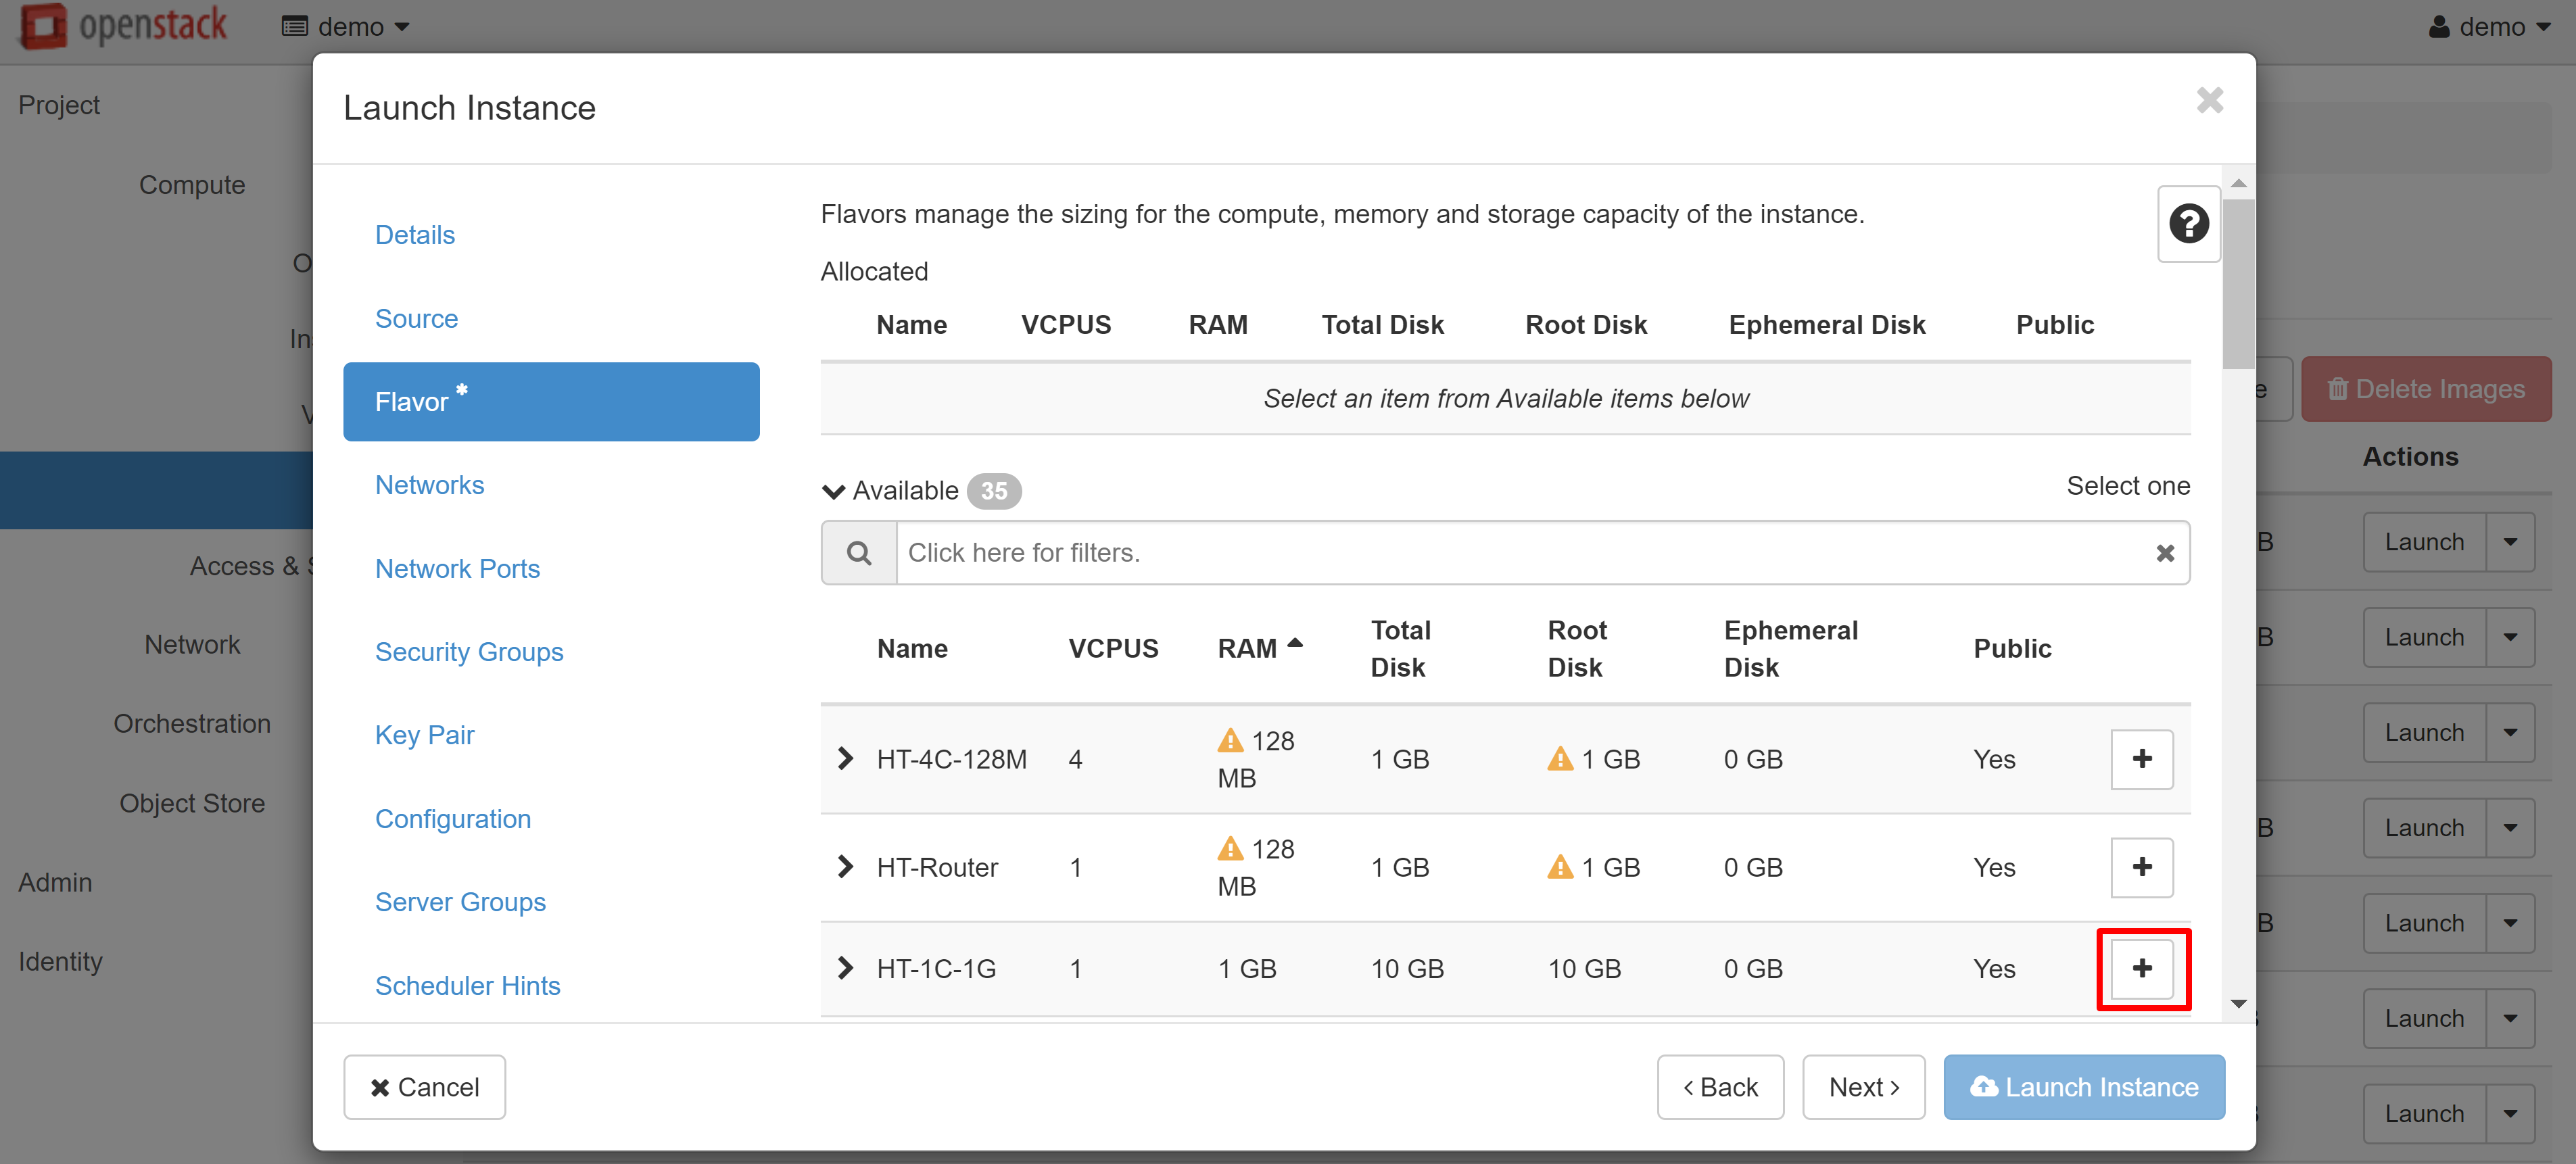
In the FLAVOR menu item, please select a template based on which resources will be issued for the VM. If a template exceeds the resources available to you, an exclamation mark will appear next to it. To select a template, click + next to it.
If you are creating an instance based on a Linux image, you should create a key pair in the KEY PAIR menu section on the left. Without this, you won't be able to connect to the created VM via SSH. You can import an existing key pair using the IMPORT KEY PAIR. If you want to create a new key pair, click on the CREATE KEY PAIR and enter the name in Latin letters (for example, debiankey2). Once created, the key file will be downloaded automatically by your browser.

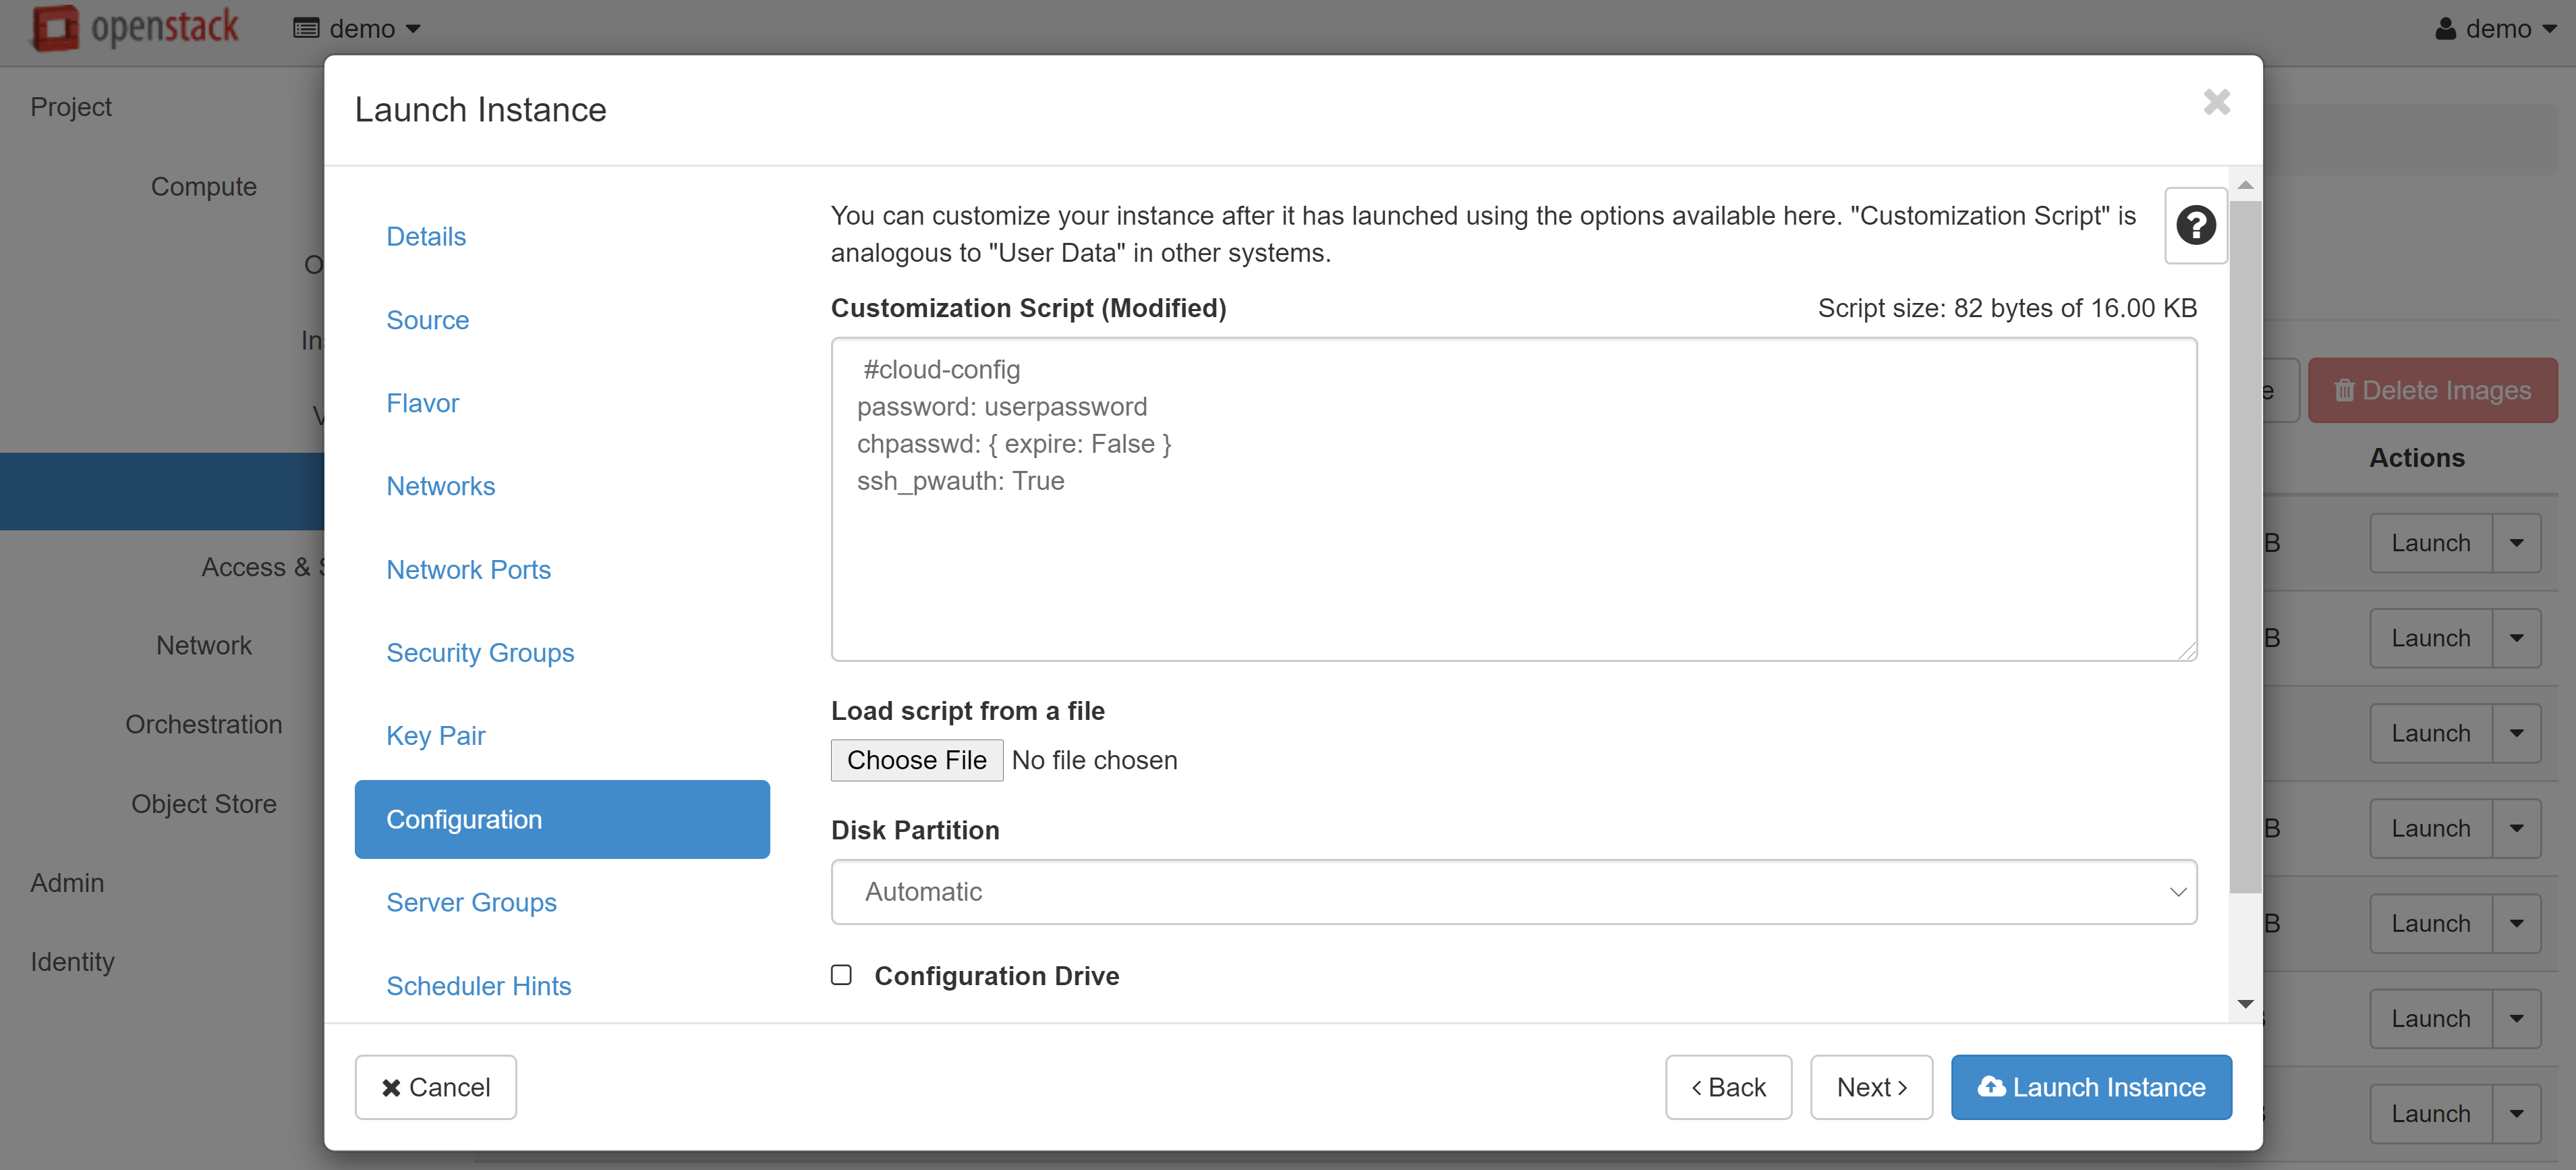
Linux/Unix only: if you plan to connect to the VM via the console and you do not need SSH access, you can add the following script to the CUSTOMIZATION SCRIPT field in the CONFIGURATION section:
#cloud-config
password: userpassword
chpasswd: { expire: False }
ssh_pwauth: True
where USERPASSWORD is your connection password.
After you have finished making changes, click LAUNCH INSTANCE. Your VM will appear in the list of instances, and after a while its status will change to ACTIVE. The next step is to associate a white IP address with your instance. To do this, select ASSOCIATE FLOATING IP from the drop-down menu next to the name of your instance.
In the window that opens, click «+» under IP ADDRESS.

In the window that opens, click ALLOCATE IP, and then you will be redirected to the previous page, where an available white IP will appear in the IP ADDRESS drop-down list, which you can associate with the port of your instance. Click ASSOCIATE to complete the configuration.
The user name for Linux instances is the same as the distribution name: DEBIAN for all versions of Debian, FEDORA for Fedora, etc.
If your VM is Windows-based, open the COMPUTE — INSTANCES section and click the name of the corresponding instance. On the page that opens, go to the CONSOLE tab and configure the system.

Your cloud VM is now successfully created, but you still don't have access to it via SSH or RDP. To connect to an instance, you should make changes to the current security group.
3. How To Manage Security Groups
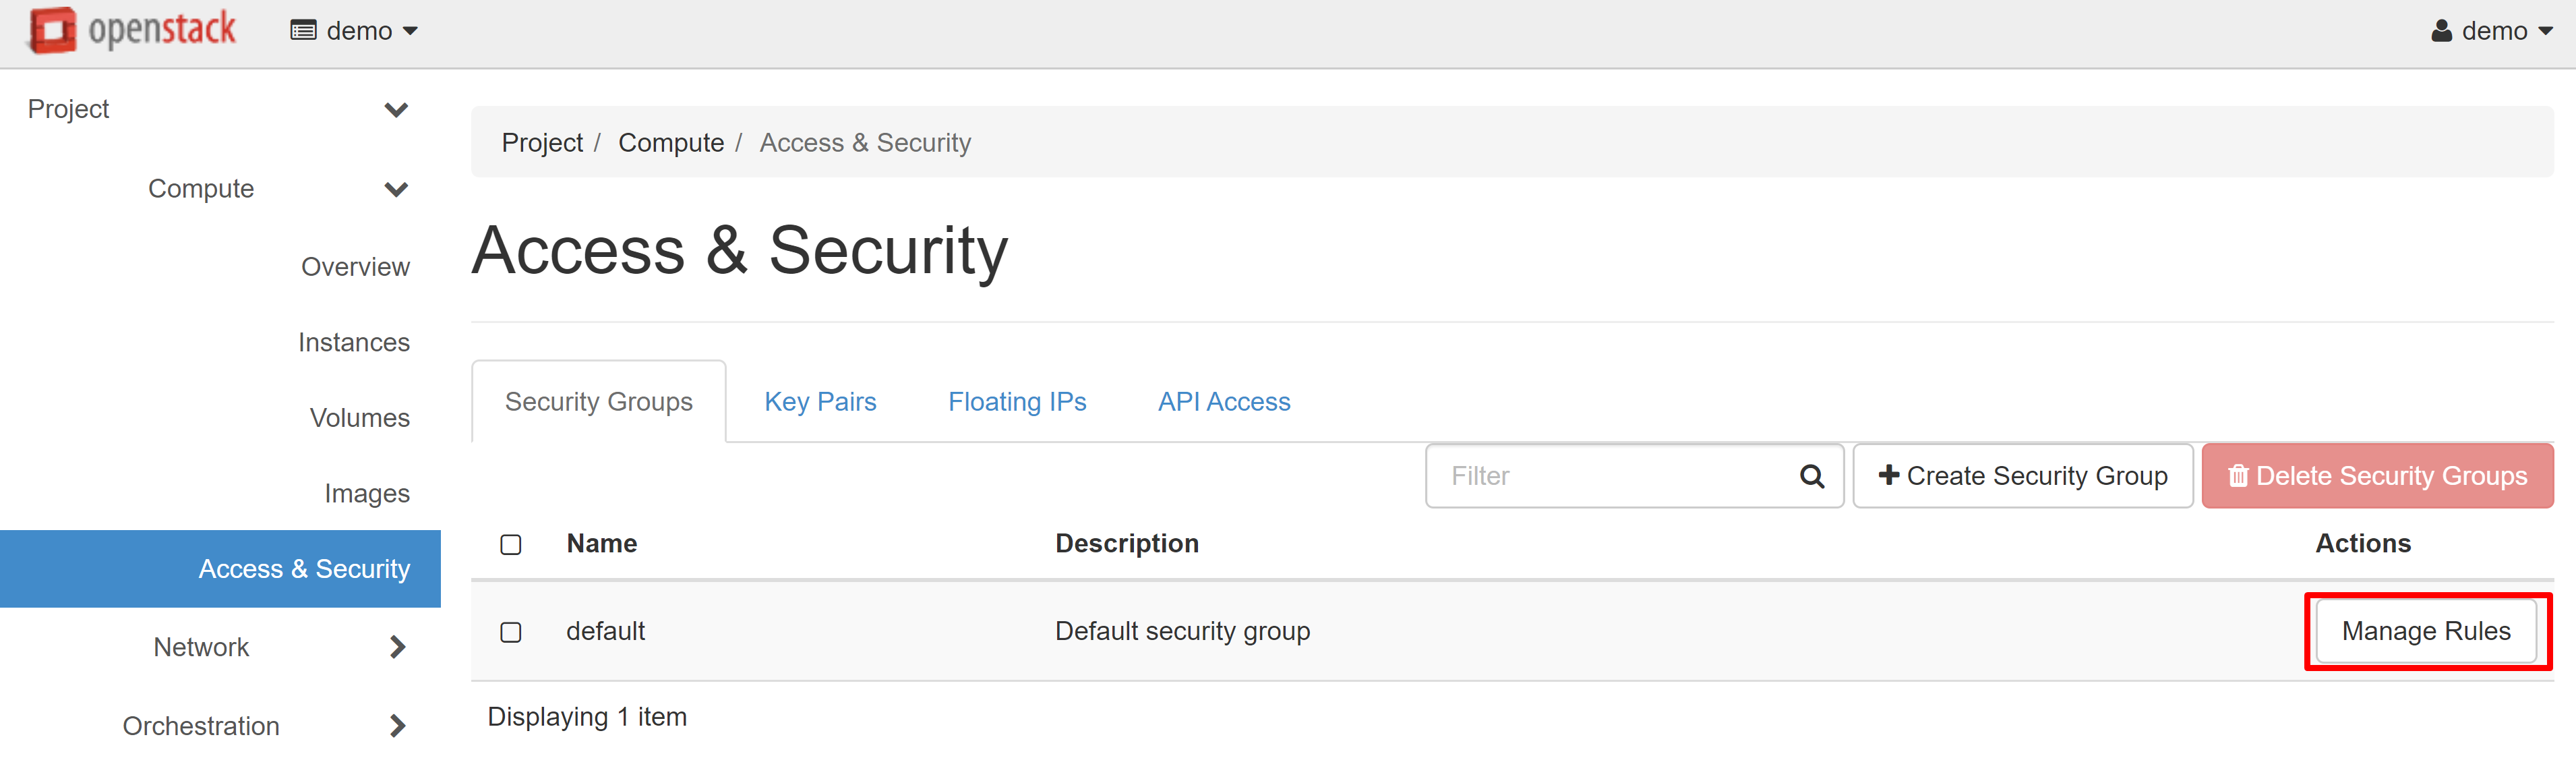
To change security group rules — create new ones and edit existing ones — open the COMPUTE — ACCESS & SECURITY section.
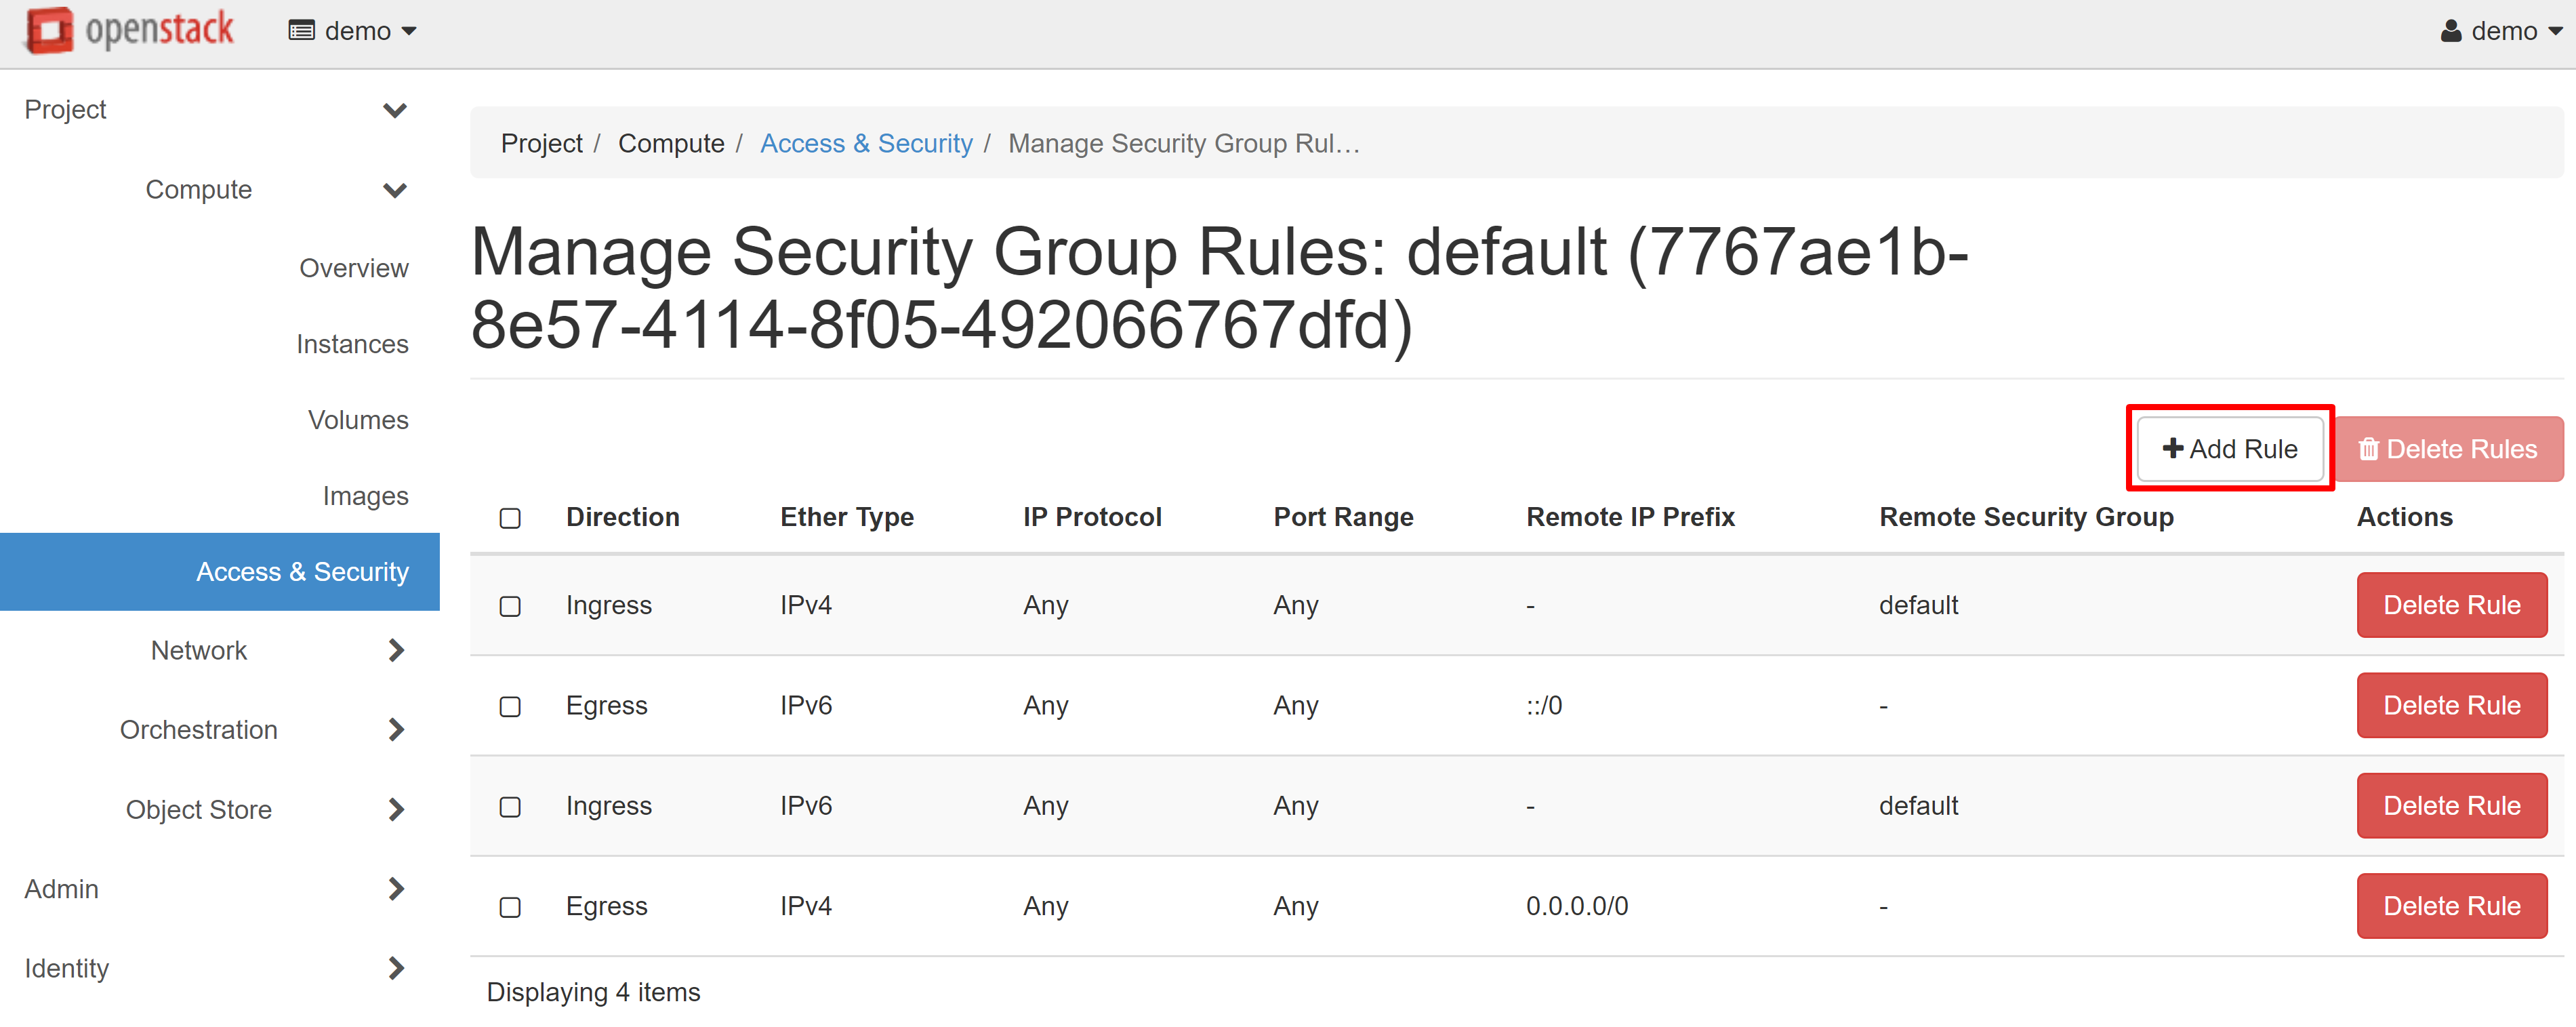
Click MANAGE RULES next to the DEFAULT rule.
On the page that opens, select ADD RULE.
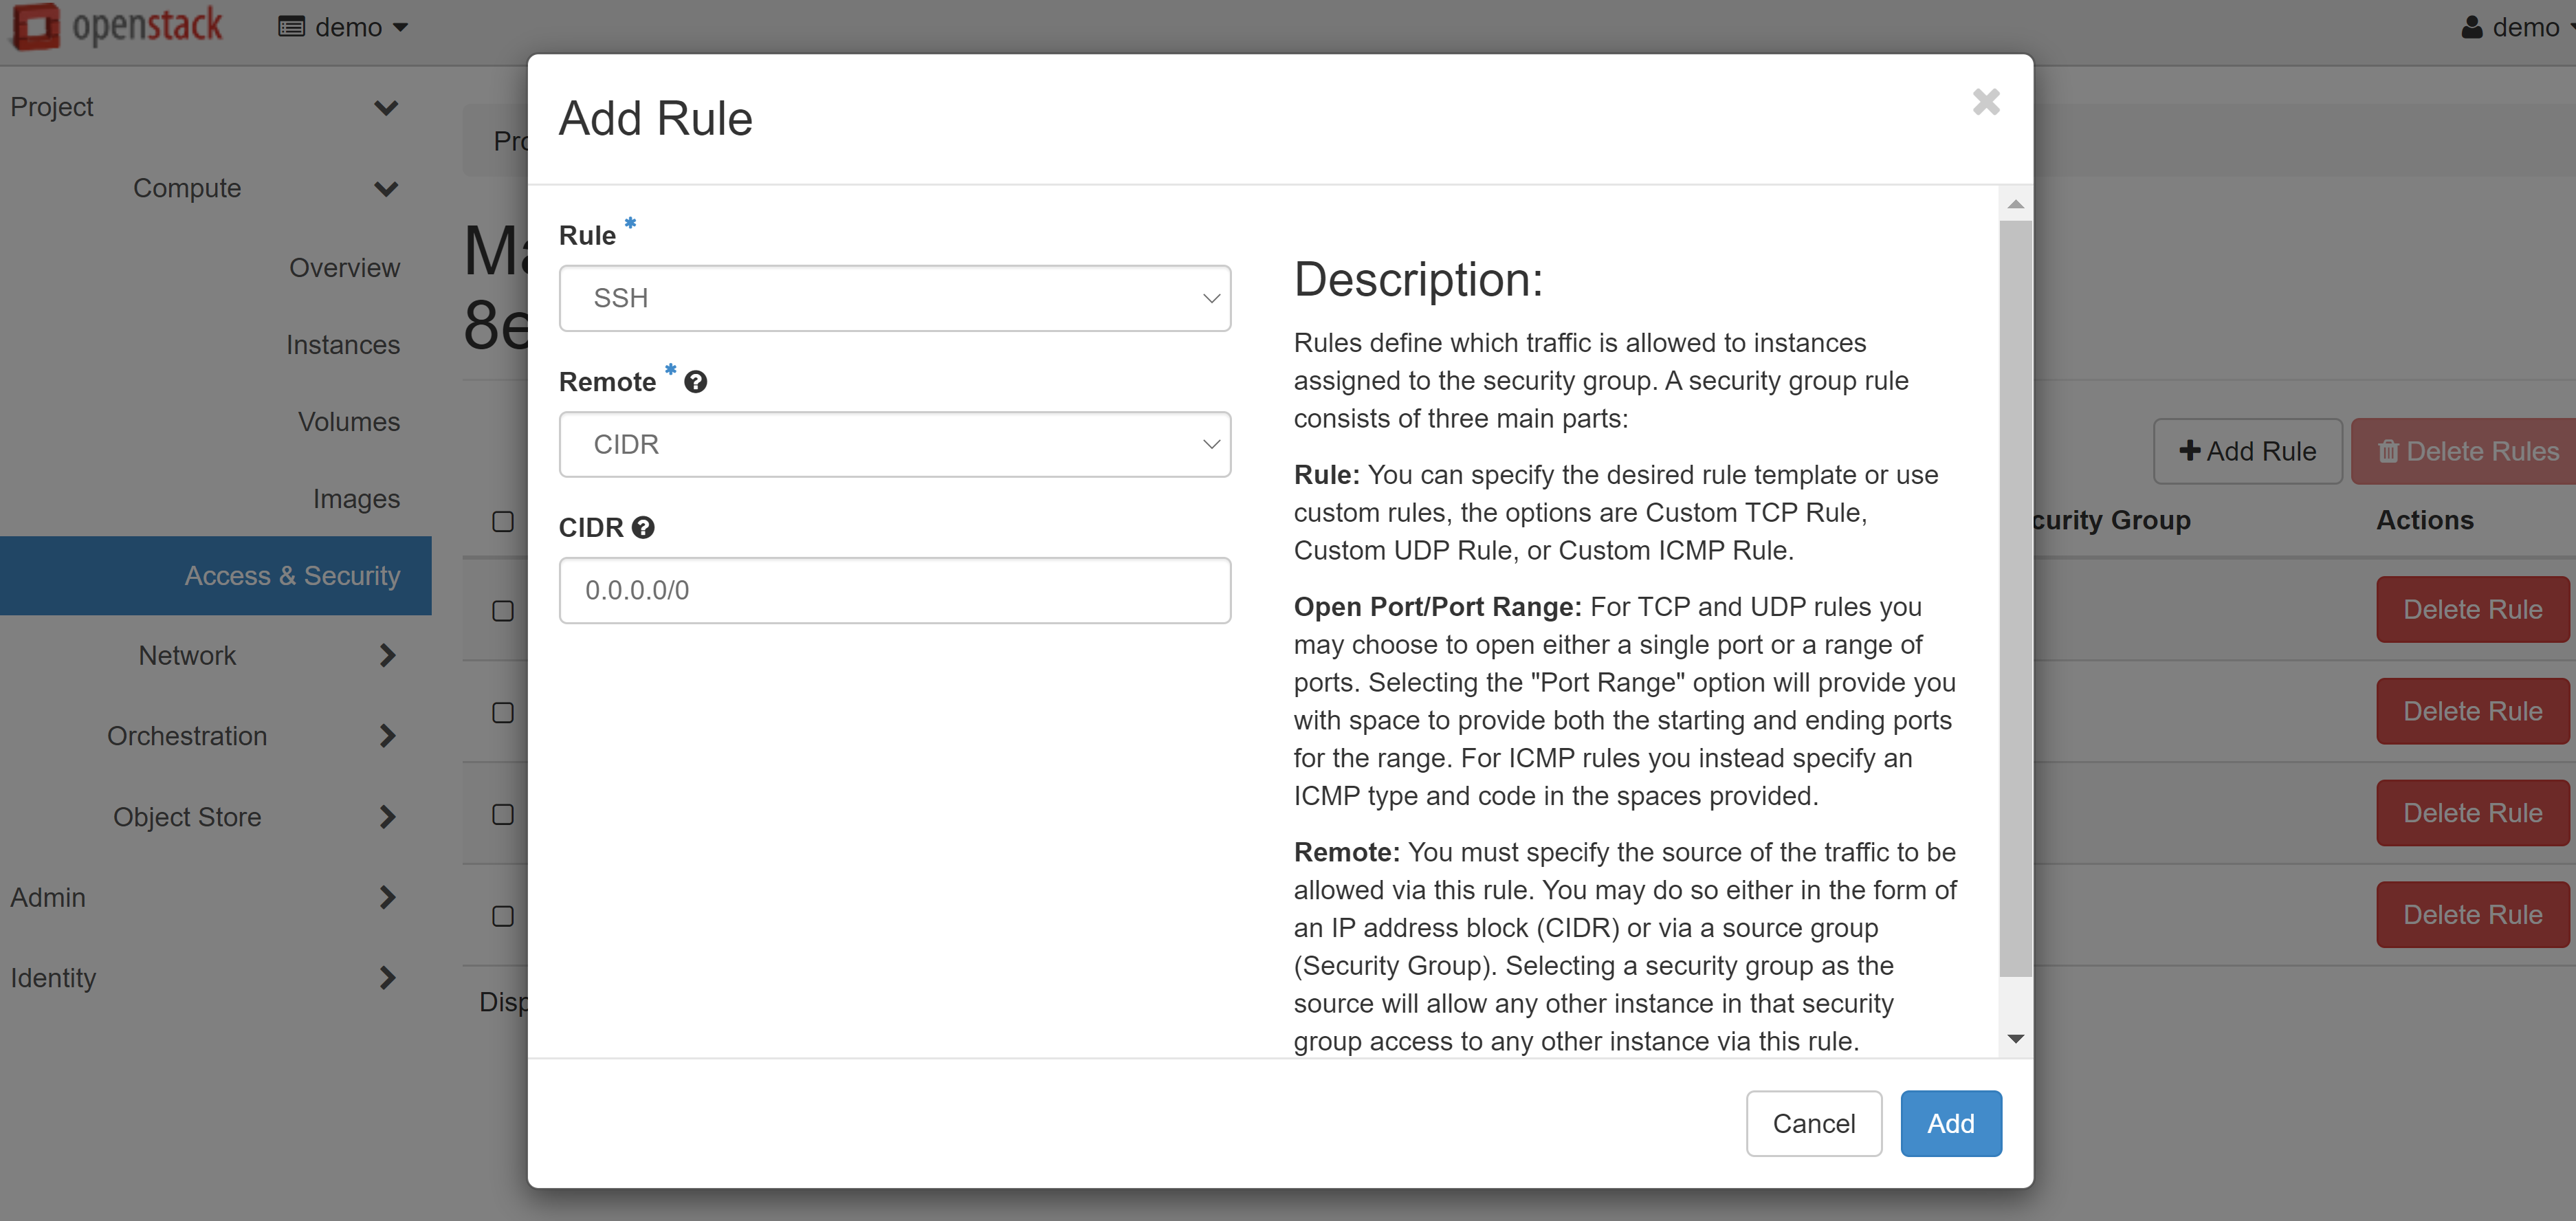
In the window that opens, select the required parameter from the RULE drop-down list: SSH for Linux or RDP for Windows.
Attention! You should only change the other fields if you are absolutely sure that these actions are necessary.
Then click ADD and the rule will be saved.
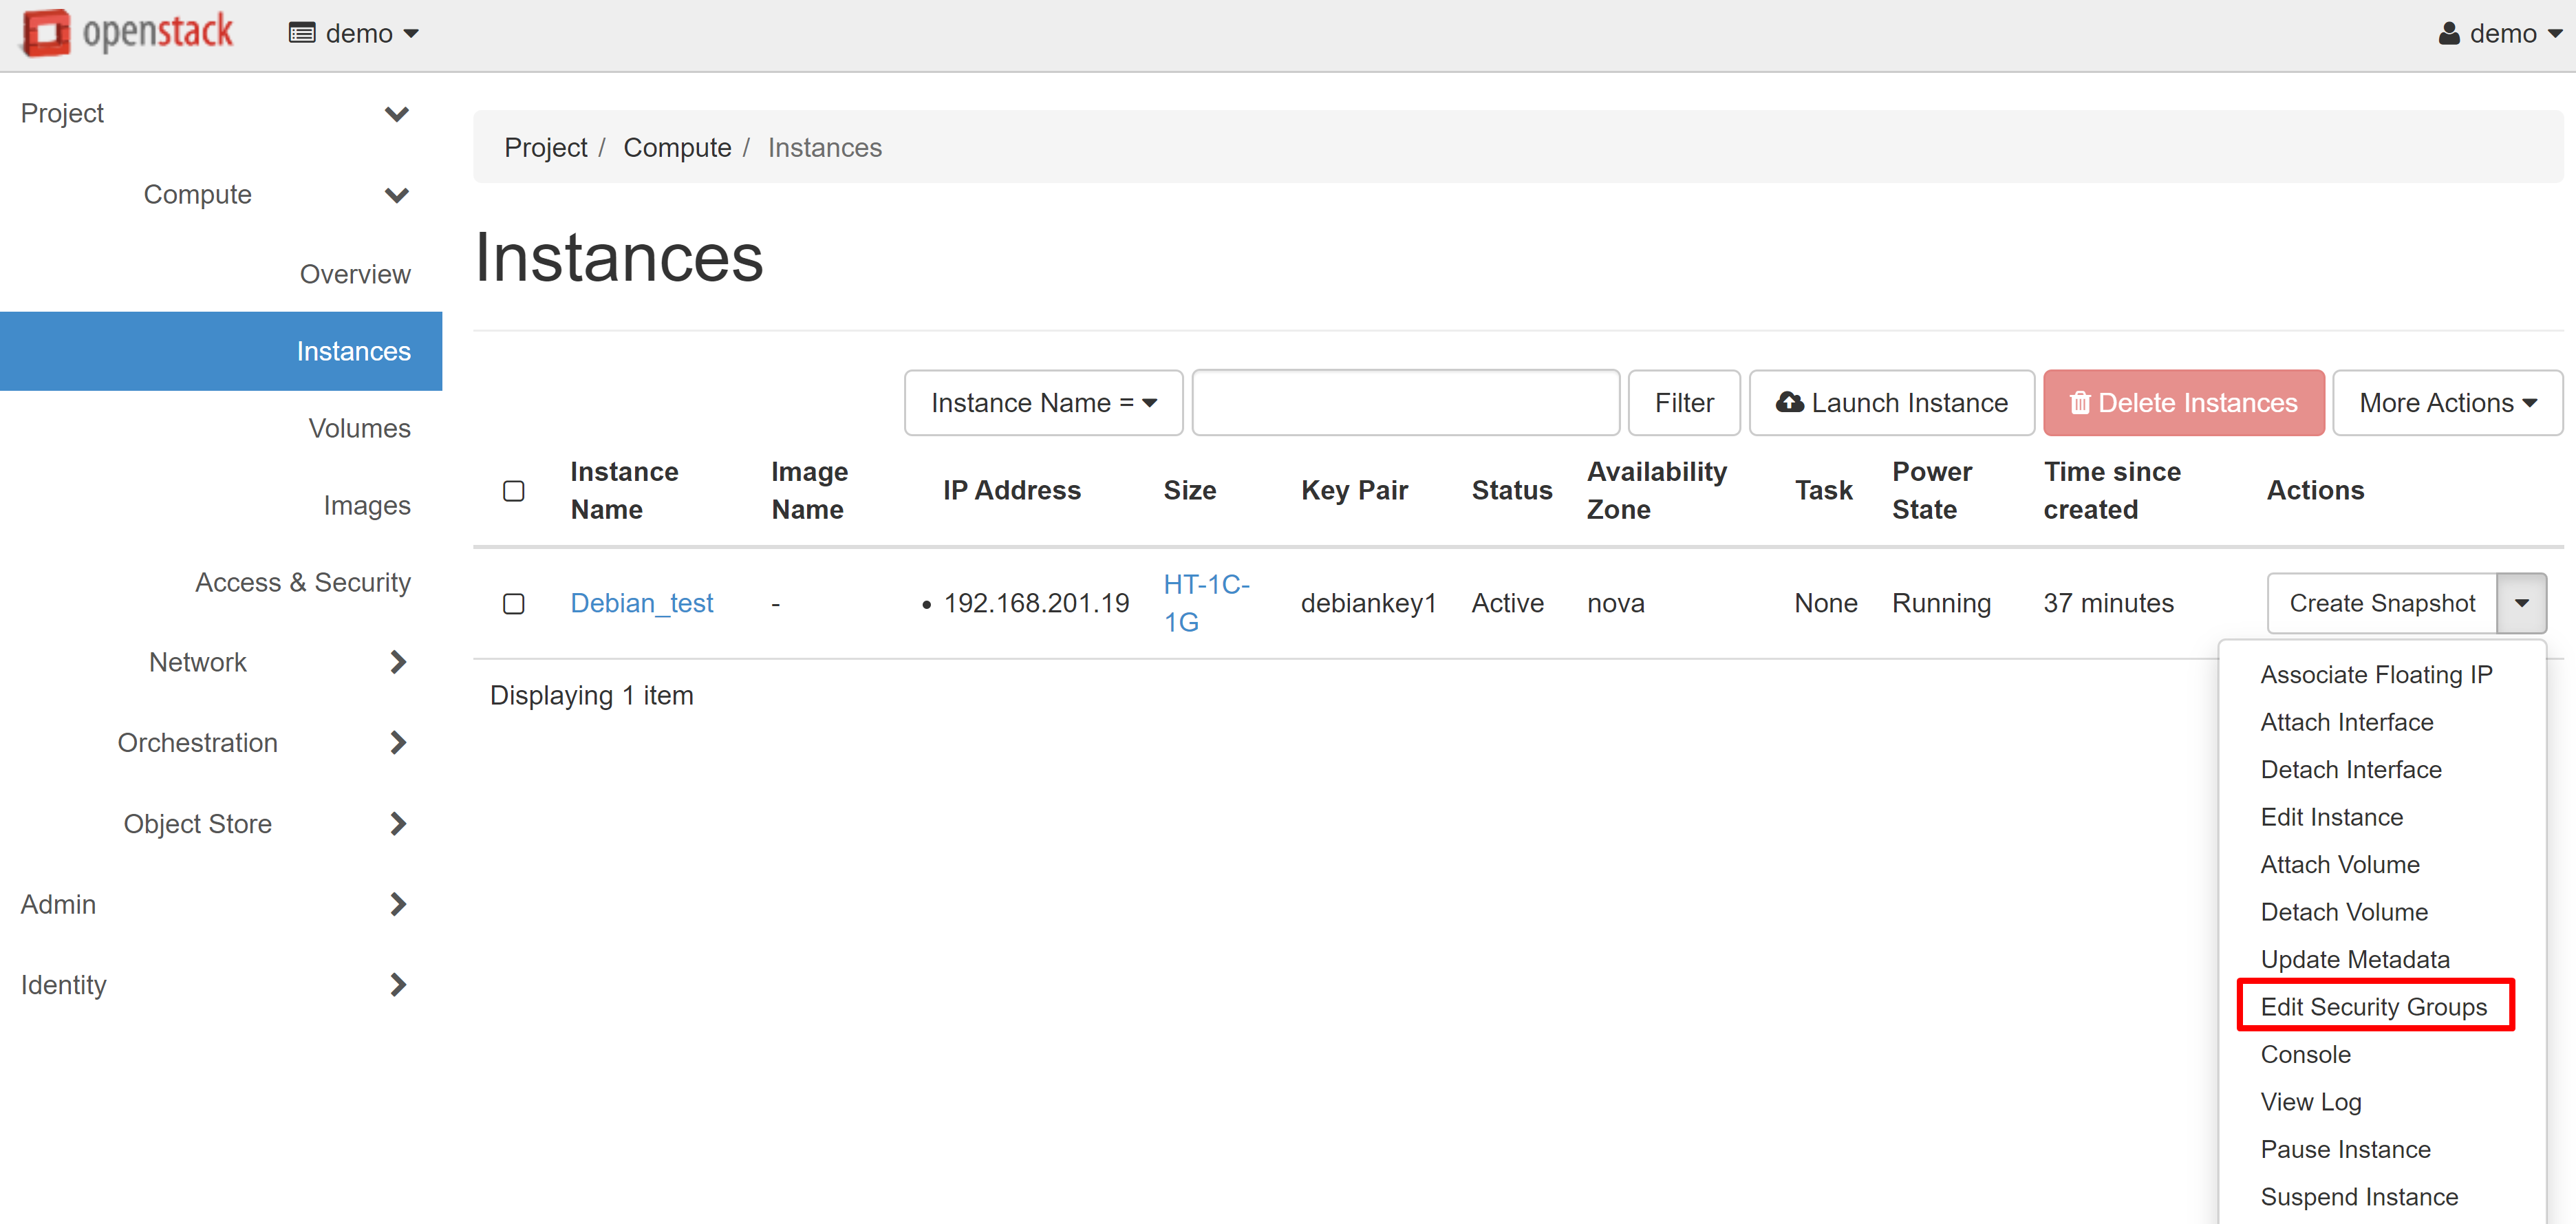
You can create separate security groups for different VMs. You can do this directly during the instance creation process from the corresponding menu section. You may also change the security group for existing instances in the COMPUTE — INSTANCES section. To do this, select EDIT SECURITY GROUPS in the drop-down list next to the desired machine.
You are now able to easily connect to the VM you created via SSH or RDP.
If you rent or host several servers within our data center, you can combine them into a single closed network based on Private VLAN (PVLAN) technology.
Two servers can be directly connected using an Ethernet cable. This service is provided free of charge.
If you have more than two servers that need to be combined, you will need switches with the configuration of separate VLAN. This service is paid. The current cost of connecting a Private VLAN is provided on the RENT A SERVER and HOST A SERVER pages in the ADDITIONAL SERVICES section.
Please note that a Private VLAN can be set up on either a 100 Mbit/s port or a 1 Gbit/s port.
By default, each server has two network ports: LAN-0 and LAN-1. One port is normally used for Internet access, whilst the second can be configured with a Private VLAN. However, we can install additional network cards, for example to aggregate ports into LACP trunks.
For your high-load projects (cluster systems, disk arrays, etc.), we can offer you optical switches with ports of up to 10 Gbit/s, on individual terms.
Our specialists will set up the Private VLAN within one day. Please contact our technical support to order a service.
If your browser fails to load a website showing the following message:
Your connection to this server has been blocked in this server's firewall.
You need to contact the server owner for further information.
Your blocked IP address is XXX.XXX.XXX.XXX
This server's hostname is YYY.YYY.YYY.YYY
where XXX.XXX.XXX.XXX is your IP-address, then we request that you copy the message and send it to our technical support. You may also only specify the IP address mentioned in the message and the address of your website (your domain). We will find the exact reason why your IP address is blocked and unblock it.
Attention! Showing this message does not mean that the actual website is blocked, but that the specific IP address from which you are trying to access the website has been blocked, for some reason. The website can still be accessed from other IP addresses.
When working with the IPMI View program, while connecting to the server console, you may encounter the CONNECTION FAILED error. To restore the server's connection, follow these steps:
- Exit the
IPMI View. - Log in to the web interface of the IPMI controller using the same details (please note that the IPMI web address and your authorization data are available in your Personal account and in the email that we sent to you when granting access to the server).
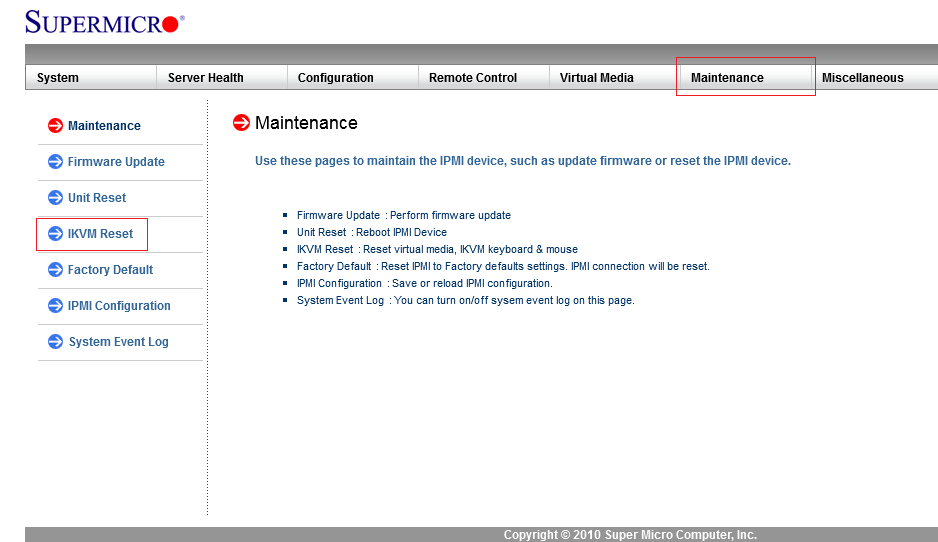
- Go to the
MAINTENANCEtab. - In the left-hand side menu, select
IKVM RESETand clickRESETin the window that opens. - Exit the web interface.
- Start the
IPMI Viewand try to connect to the server again.
Attention! These actions will not restart the server itself, only the IPMI controller.
The current version of the IPMI View is available here.
When working with a remote access PuTTY client in Windows, an error may occur due to incompatibility of key formats:
Unable to use key file (OpenSSH SSH-2 private key (old PEM format))
To eliminate this error, the key must be converted by the PuTTYgen tool. Download the utility through the website, open it, and select the "Conversions" tab in the top panel. In the menu that opens, press "Import key" and select the key.

To convert Keys after import, click "Save private key." The key will be saved in a new format (.ppk) with the selected name. If necessary, you can also set the password for the key.
After that, you can connect with a new key to your servers or virtual machines in our data center.
Every dedicated server you ordered includes unlimited KVM access (KVM stands for Keyboard, Video, and Mouse, also it can be named KVM over IP — a virtual remote console for your server). Using this you can work with BIOS and OS directly without our tech support.
For all standard dedicated server plans KVM Virtual Media feature is available. It allows you to upload to the server any files — it’s usually used for ISO images for OS installation. You can then mount it via virtual DVD-ROM.
You can also power cycle your server via KVM web-interface, IPMIview app, or My account.