
n8n is a modern workflow automation tool that integrates more than 300 different services and platforms. With its help, you can create complex automation scenarios without needing to write code — simply connecting nodes with visual links.
Self-hosting n8n on your own VPS gives maximum control over your automated processes. In this guide, we'll cover installing n8n using Docker — the most practical and scalable deployment method.
System Requirements
For successful installation of n8n, you'll need:
- VPS server with Linux (Ubuntu 22.04 or later is recommended)
- Account with administrative privileges (sudo)
- Docker and Docker Compose
- Minimum 1 GB RAM (2 GB or more recommended)
- Minimum 5-10 GB free disk space (20 GB or more recommended for active use)
Environment Preparation: Installing Docker
Start by connecting to the server via SSH and run the following commands to install Docker:
sudo apt update
sudo apt install -y apt-transport-https ca-certificates curl software-properties-common
curl -fsSL https://download.docker.com/linux/ubuntu/gpg | sudo gpg --dearmor -o /usr/share/keyrings/docker-archive-keyring.gpg
echo "deb [arch=amd64 signed-by=/usr/share/keyrings/docker-archive-keyring.gpg] https://download.docker.com/linux/ubuntu $(lsb_release -cs) stable" | \
sudo tee /etc/apt/sources.list.d/docker.list > /dev/null
sudo apt update
sudo apt install -y docker-ce docker-compose
Verify the correct installation by checking versions:
docker --version
docker-compose --version
To simplify work, add your user to the docker group:
sudo usermod -aG docker $USER
Important: After executing this command, you need to end the current SSH session and reconnect for the changes to take effect.
Quick Installation Using Docker
Creating Persistent Storage
First, create a Docker volume to save n8n settings and data:
docker volume create n8n_data
Running n8n
Execute the command to start the n8n container:
docker run -it --rm \
--name n8n \
-p 5678:5678 \
-v n8n_data:/home/node/.n8n \
docker.n8n.io/n8nio/n8n
After startup, n8n will be available through the browser at:
http://<your_VPS_IP>:5678
PostgreSQL Integration (Extended Configuration — Optional)
n8n initially works with the lightweight SQLite database, which is perfect for development and small projects. However, SQLite has performance limitations under intensive use and doesn't support concurrent operation of multiple processes.
For stable operation in production environment and ensuring scalability, you should switch to PostgreSQL — a professional relational DBMS capable of handling large data volumes and multiple connections.
PostgreSQL Setup
The first step is to deploy PostgreSQL. You can choose one of the following options:
- Installation on the same server.
- Using cloud services (ElephantSQL, AWS RDS, Google Cloud SQL).
- Deployment on a separate server.
Deploying PostgreSQL via Docker
For quick creation of a PostgreSQL instance, use the following command:
docker run --name postgres \
-e POSTGRES_USER=n8n_user \
-e POSTGRES_PASSWORD=supersecret \
-e POSTGRES_DB=n8n \
-p 5432:5432 \
-d postgres
Container parameters:
n8n_user— database user (you can choose any name),supersecret— access password (use a strong password),n8n— name of the database to be created.
Connecting n8n to PostgreSQL
After starting PostgreSQL, configure n8n to work with the new database:
docker run -it --rm \
--name n8n \
-p 5678:5678 \
-e DB_TYPE=postgresdb \
-e DB_POSTGRESDB_DATABASE=n8n \
-e DB_POSTGRESDB_HOST=localhost \
-e DB_POSTGRESDB_PORT=5432 \
-e DB_POSTGRESDB_USER=n8n_user \
-e DB_POSTGRESDB_PASSWORD=supersecret \
-v n8n_data:/home/node/.n8n \
docker.n8n.io/n8nio/n8n
Environment variables description:
DB_TYPE=postgresdb— activates PostgreSQL driver,DB_POSTGRESDB_DATABASE=n8n— target database name,DB_POSTGRESDB_HOST=localhost— database server host (replace with actual IP for remote deployment),DB_POSTGRESDB_PORT=5432— PostgreSQL connection port,DB_POSTGRESDB_USER=n8n_user— user credentials,DB_POSTGRESDB_PASSWORD=supersecret— authentication password.
Security Recommendations
Consider the following points when configuring:
- Create unique database and user names.
- Use strong passwords to protect data.
- Verify network accessibility between n8n and PostgreSQL containers.
- When using external PostgreSQL, configure the firewall to allow incoming connections from the n8n server's IP address.
Installation via Docker Compose (Preferred Method)
Docker Compose simplifies container and configuration management. This approach is recommended for permanent operation.
Creating Configuration File
Create a Docker Compose configuration file in the nano text editor by entering the command in terminal:
nano docker-compose.yml
Insert the following configuration into the opened editor:
version: '3'

services:
  n8n:
    image: docker.n8n.io/n8nio/n8n
    restart: always
    ports:
      - "5678:5678"
    environment:
      - GENERIC_TIMEZONE=Europe/Berlin
    volumes:
      - n8n_data:/home/node/.n8n

volumes:
  n8n_data:
Save the file with the keyboard shortcut:
- Ctrl + O (save)
- Enter (confirm)
- Ctrl + X (exit editor)
Managing n8n
Start n8n in background mode:
docker compose up -d
Stop n8n:
docker compose down
Updating n8n to the Latest Version
To update n8n, execute the commands sequentially:
docker compose pull
docker compose down
docker compose up -d
Tunnel Mode: Working with External Webhooks
Purpose of Tunnel
Tunnel mode creates a temporary public HTTPS address for your local server, which is necessary for testing incoming webhooks from external services (Telegram, Stripe, Zapier, etc.), in case you don't have a domain and HTTPS.
Application
This mode is perfect for:
- Debugging webhook integrations
- Testing automation with external services
- Temporary server publication without SSL configuration
Example: if you're setting up a bot in Telegram for automatic message processing, Telegram needs to send webhooks to your server. However, without a public IP and SSL certificate, this is impossible. Tunnel mode solves this problem by providing a temporary secure URL that can be specified in Telegram bot settings.
Activating Tunnel
docker run -it --rm \
--name n8n \
-p 5678:5678 \
-v n8n_data:/home/node/.n8n \
docker.n8n.io/n8nio/n8n \
start --tunnel
Warning: Tunnel mode is intended exclusively for testing. Do not use it in production for security reasons.
Summary
You've mastered installing n8n on VPS using Docker — a reliable and flexible deployment method. Now you can create automated workflows by integrating popular services: Telegram, Google Workspace, Slack, CRM systems, and hundreds of other platforms.
n8n provides powerful capabilities for:
- Automating routine tasks
- Synchronizing data between systems
- Creating notifications and alerts
- Processing webhooks and API requests
Professional Hosting Solution for n8n
Want to avoid technical complexities? We have everything you need!
Our services:
- Optimized infrastructure: VPS and dedicated servers for n8n.
- Expert support: 24/7 assistance in Czech and English.
- Flexible plans and conditions: Configurations that match your needs.
Contact us and start automating business processes today!
This guide details the process of setting up Microsoft Outlook email client to work with an email account created in the cPanel hosting control panel. For detailed instructions on creating an email account, you can find information in our Knowledge Base: "How to create an email account in cPanel".
Before you begin setup, make sure you have the following information:
- Your email address (
name@your-domain). - Your email account password.
- IMAP incoming mail server (obtained when creating an email account in cPanel).
- SMTP outgoing mail server (obtained when creating an email account in cPanel).
You should also have Microsoft Outlook Email Client installed on your device.
Step 1: Launch Microsoft Outlook
- Start the Microsoft Outlook program.
-
In the prompt window suggesting to create a new email account, select the
"Advanced setup"option.
Figure 1. Selecting the “Advanced setup” option when launching MS Outlook
-
On the next screen, select
"Internet email".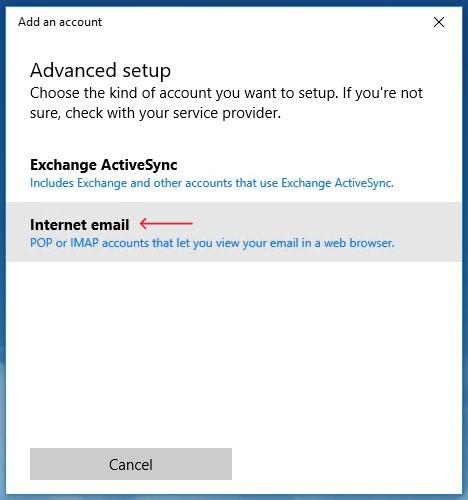
Figure 2. Selecting the “Internet email” option for email setup
Step 2: Enter Basic Settings
Enter the following data in the appropriate fields:
- Email address: Enter your full email address (in our example:
example@your-domain.cz) - User name: Enter the name that recipients will see
- Password: Enter your email account password
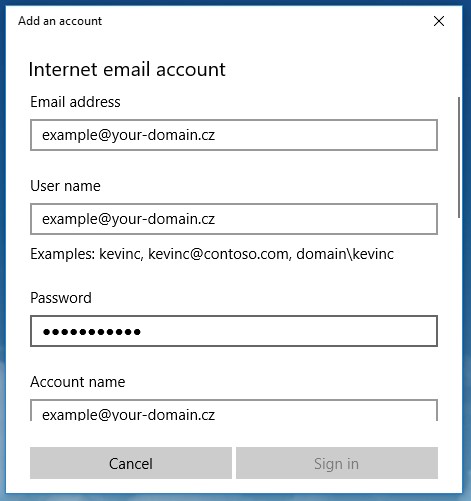
Figure 3. Data entry form for email account setup
Step 3: Configure Ports and Security
Continue filling out the form:
- Account type: Select IMAP4
- Incoming mail server: Specify the IMAP incoming mail server (obtained when creating an email account in cPanel)
- IMAP port:
993
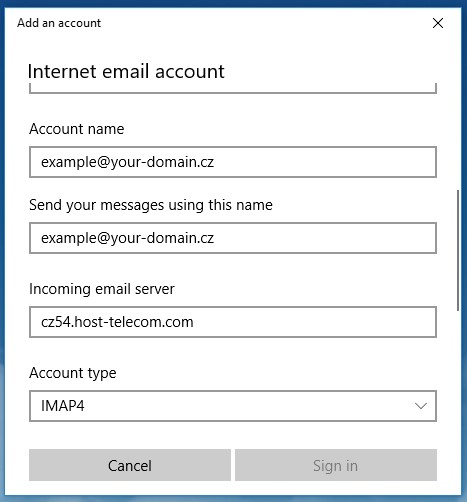
Figure 4. IMAP protocol settings
- Outgoing mail server (SMTP): Specify the SMTP outgoing mail server (obtained when creating an email account in cPanel)
- SMTP port:
465
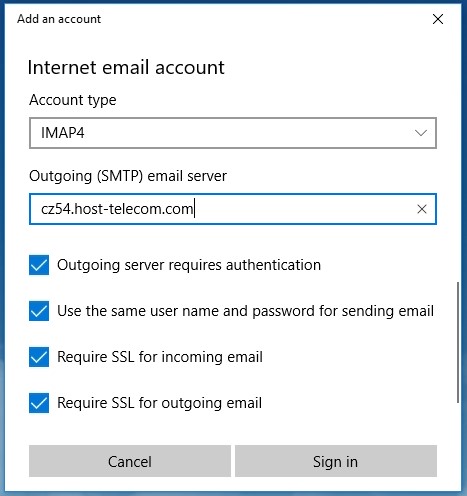
Figure 5. SMTP protocol settings
Step 4: Complete the Setup
- After entering all data, click the
"Sign in"button. - Wait for the setup process to complete.
- After successful setup, you will see a confirmation message.
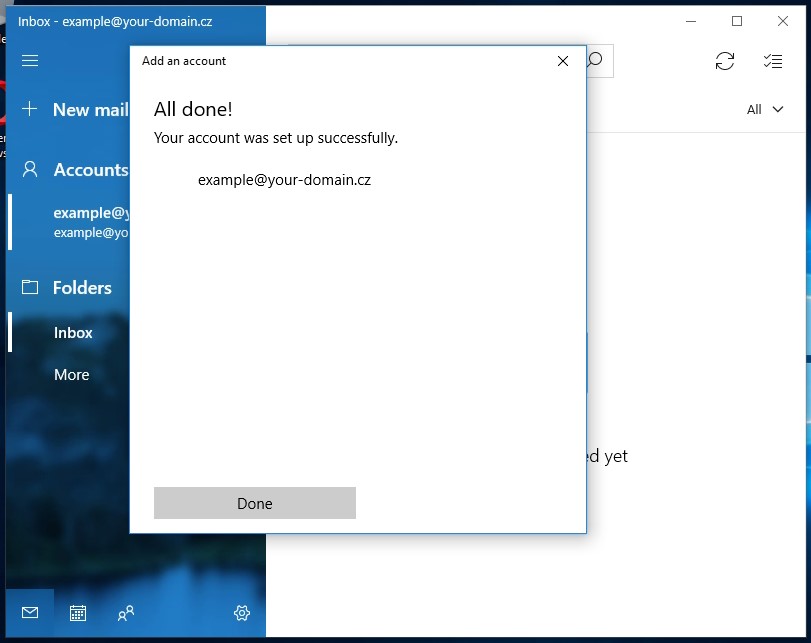
Figure 6. Confirmation of successful email account setup
Verify Settings
Make sure the following settings are established:
- Email address:
name@your-domain - Account (login):
name@your-domain - Password: your password
- IMAP server: incoming mail server (obtained when creating an email account in cPanel)
- IMAP port:
993 - SMTP server: outgoing mail server (obtained when creating an email account in cPanel)
- SMTP port:
465
Congratulations! You have successfully set up your mailbox in Microsoft Outlook.
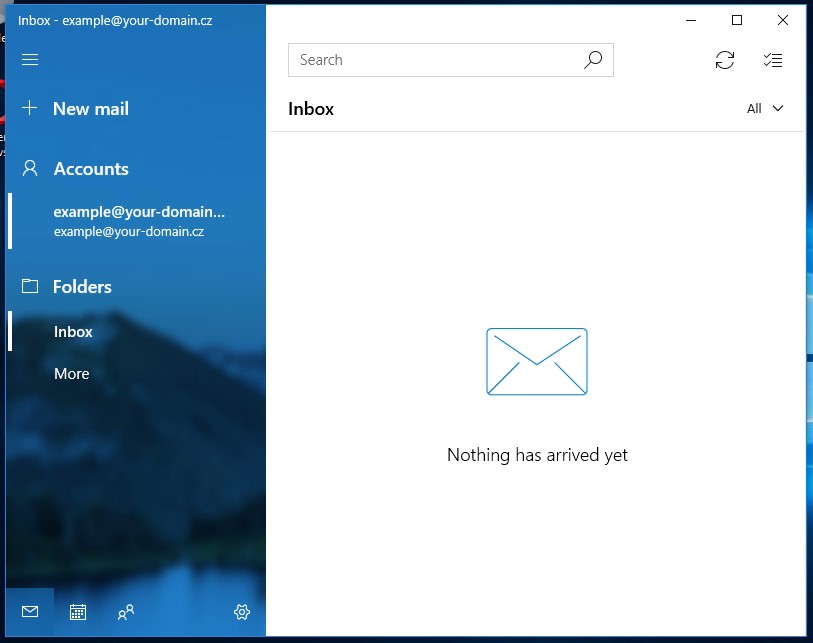
Figure 7. “Inbox” folder
Enjoy working with your email and hosting from Host-telecom.com!
This guide is designed for Host-telecom.com customers who use virtual hosting services and want to set up corporate email on their domain. Corporate email with your domain name creates a professional image and strengthens customer trust. This step-by-step instruction details the process of creating an email account through the cPanel control panel. By following the directions below, you will quickly set up and start using corporate email on your domain.
The domain your-email.cz is used as an example in this guide.
Step 1: Log in to the cPanel Control Panel
- In your browser, open the page: https://www.host-telecom.com/my-account/
- Go to the
"Hosting panel"section and click the"Enter"button - Enter your domain and login credentials received in the email when activating the virtual hosting service
Step 2: Go to Email Account Management
- In the cPanel interface, open the
"Email"section. -
Select
"Email Accounts".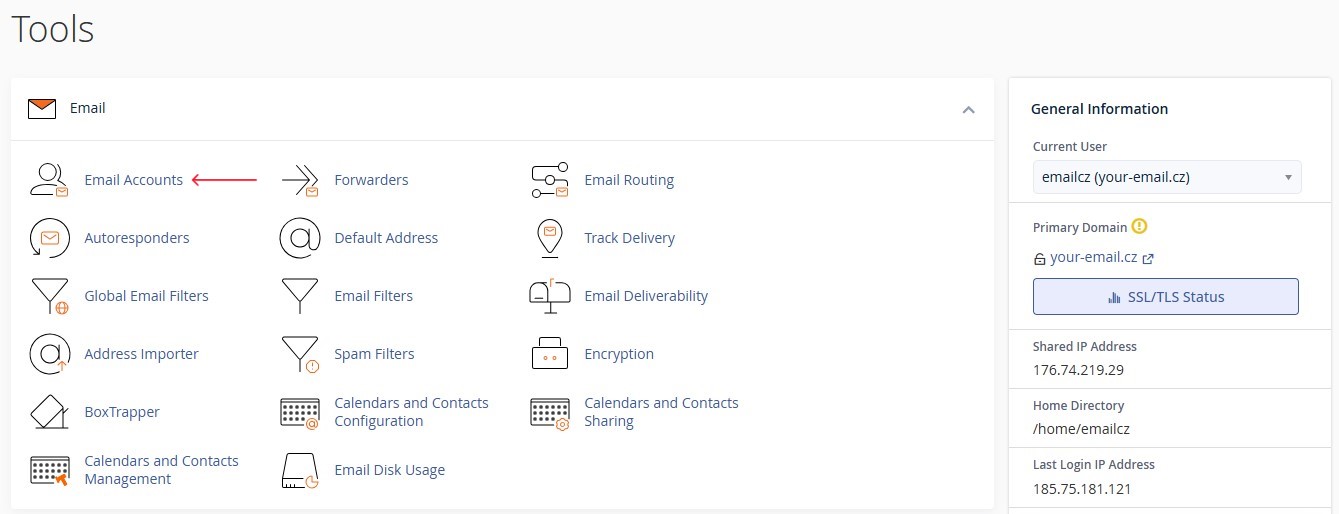
Figure 1. Email section interface in cPanel
Step 3: Create a New Email Account
-
On the email account management page, click the
“Create”button.
Figure 2. "Create" button on the email accounts management pagel
-
Fill out the form:
- In the
"Username"field, specify the name of the account (in our example: example) - Create a secure password for the account
- In the
-
Click the
"Create"button to complete the process.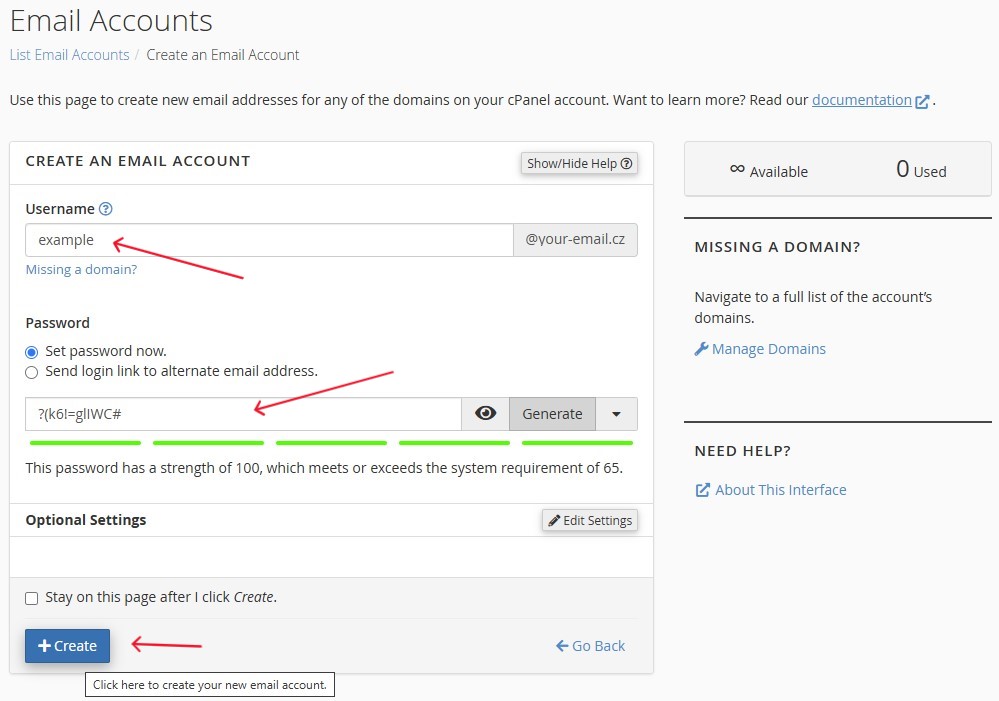
Figure 3. Email account creation form
Step 4: Access the Created Email Account
- The created email account will appear in the list on the
"Email Accounts"management page. -
To access the webmail interface, click the
"Check Email"button next to the created account.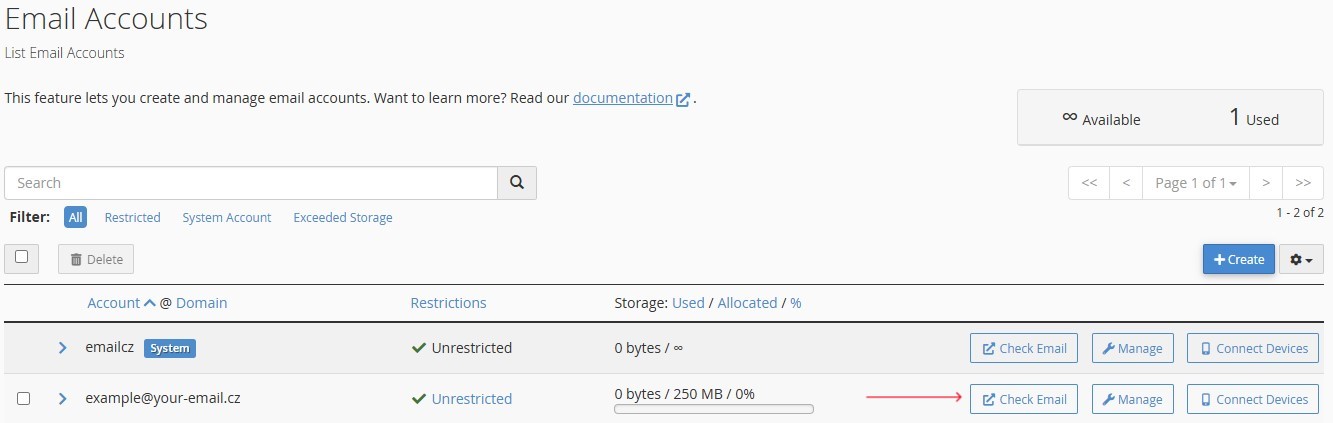
Figure 4. "Check Email" button for email account access
Step 5: Verify Email Functionality through the Web Interface
- Go to the page https://www.host-telecom.com/my-account/
- Select the
"Webmail"section. - The system will redirect you to the
ROUNDCUBEweb interface. -
Click the
"Open"button.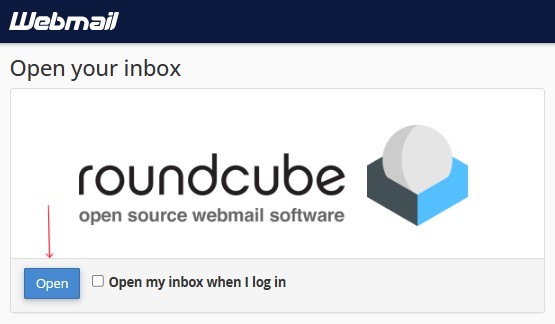
Figure 5. Access to the webmail interface
- Log in to the account using the created credentials.
- Check the functionality of the email account by sending a test message.
Step 6: Get Parameters for Email Client Configuration
You can use the ROUNDCUBE web interface to work with your email or set up an email client. Next, we'll explain how to get the necessary parameters.
-
To get email client settings, click the
"Configure Mail Client"button in the bottom left corner of the webmail interface.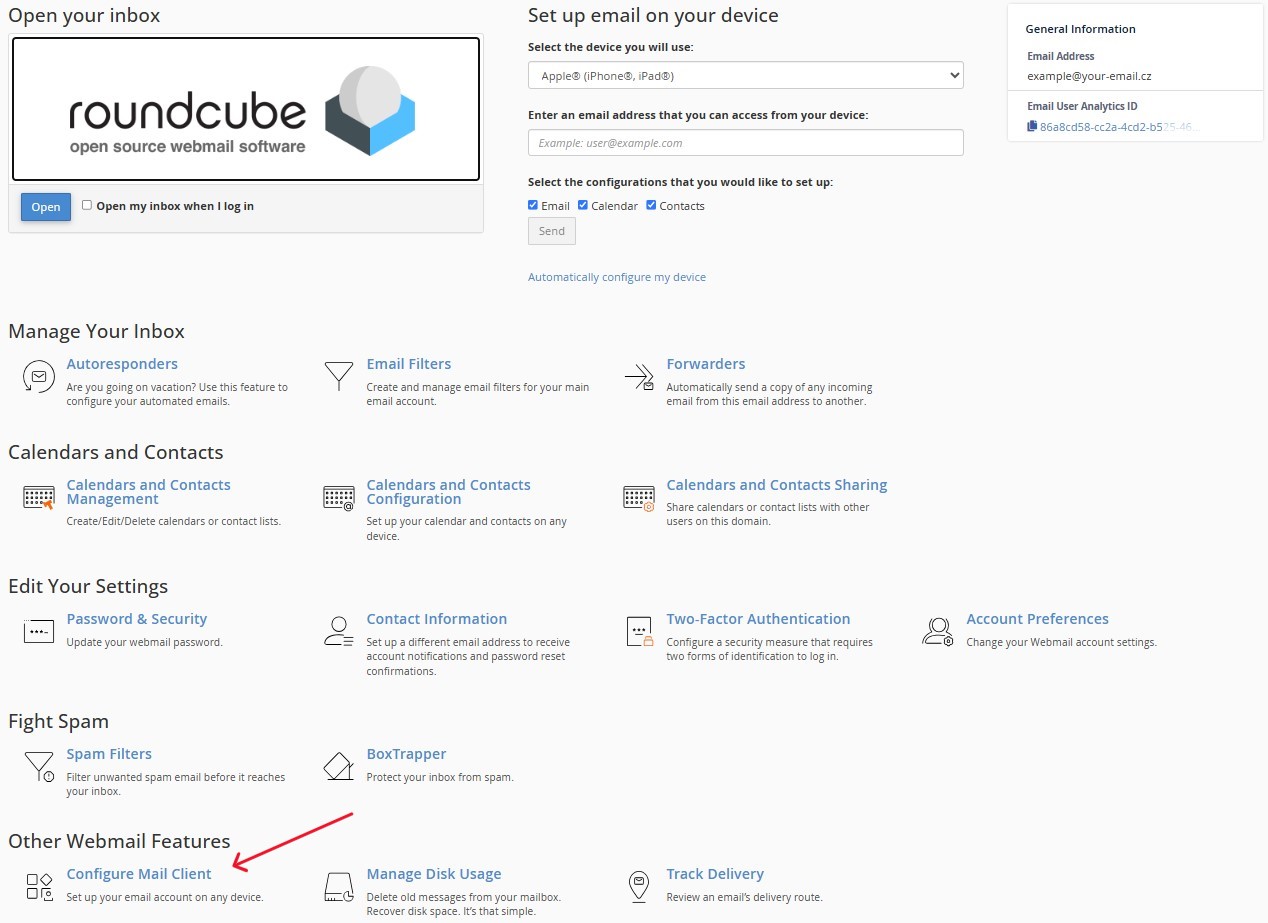
Figure 6. Configure Mail Client button
-
The page that opens will display all the necessary parameters for connecting to various email clients:
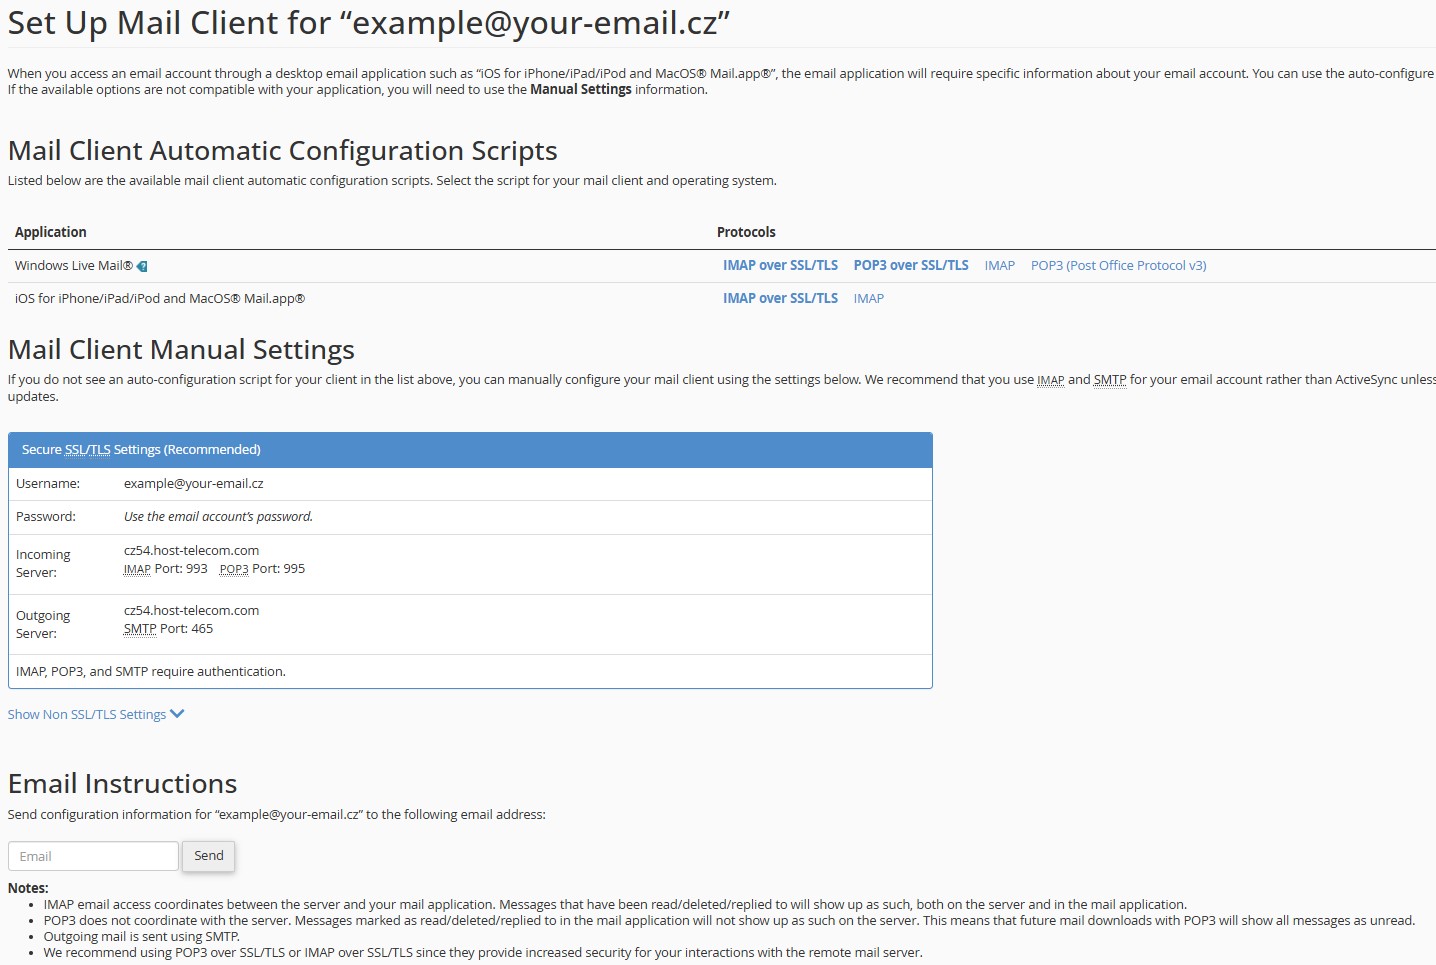
Figure 7. Settings for email clients
Key configuration parameters:
- Email address:
example@your-email.cz(provided only as an example!) - Password: entered when creating the email account
- Incoming mail server IMAP:
cz54.host-telecom.com(provided only as an example!) - IMAP port:
993 - Outgoing mail server SMTP:
cz54.host-telecom.com(provided only as an example!) - SMTP port:
465 IMAP,POP3, andSMTPrequire authentication
Congratulations! You have successfully set up an email account on your own domain in the cPanel control panel. Now you can use it both through the ROUNDCUBE web interface and through email clients.
Detailed instructions for setting up Microsoft Outlook email client can be found in our guide: "How to Set Up Microsoft Outlook Email Client."
If you have questions or technical problems, please contact Host-telecom.com support.
Additional Recommendations
- Periodically update your password to increase security.
- Create a professional signature for your emails.
- Set up an auto-responder for extended absences.
You can easily change the PHP version on your cPanel account by following these steps:
- Log in to your cPanel account.
- Navigate to the
Softwaresection and click on Select PHP Version.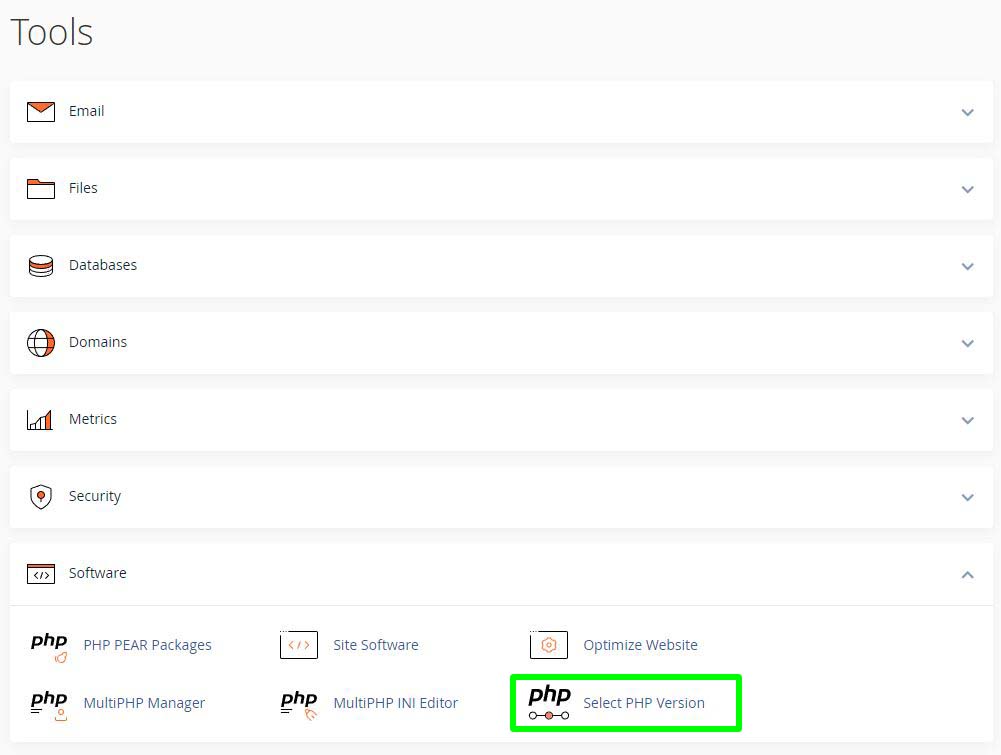
- Click on the PHP Version drop-down box and select your preferred PHP version.

- Click on
Applybutton to save your PHP version change.
It is important to know which version of PHP is required for your web applications to avoid any unwanted errors. If any error occurs on your website after changing PHP version, revert back to the previous PHP version your website was using.
Unlock the power of comprehensive website monitoring with cPanel's cutting-edge Site Quality Monitoring feature. This intuitive tool empowers you to track and analyze the performance and overall health of your online presence in real-time.
Stay ahead of the curve with insightful data on your website's availability, uptime, speed, SEO optimization, content quality, technical stability, and security metrics. Armed with this invaluable intelligence, you can identify and swiftly address potential issues before they disrupt the user experience and tarnish your website's reputation.
Leverage this robust monitoring solution to make data-driven decisions, optimize your online assets, and deliver a seamless, engaging experience for your visitors. Elevate your website's performance and keep it in peak condition with cPanel's Site Quality Monitoring.
Quick Start Guide to Using the cPanel Site Quality Monitoring function
- Log into cPanel: Access your cPanel account using your credentials.
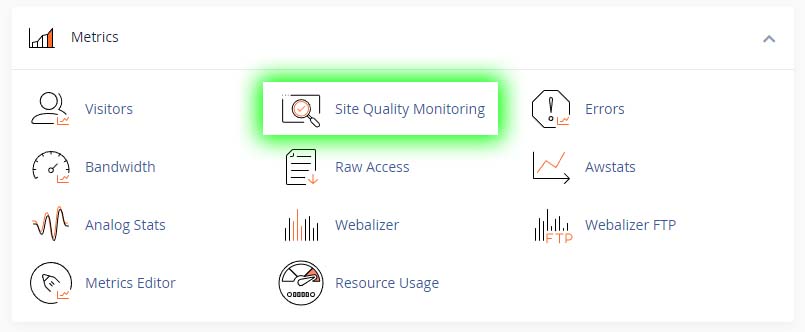
- Access the Site Quality Monitoring interface: Navigate to the Metrics section in cPanel and click on Site Quality Monitoring.
- Add your website: Select your website’s URL from the dropdown list.
- Sign up for Site Quality Monitoring: If you haven’t already, you will need to complete the sign-up process. This involves providing your website’s details and agreeing to the terms of service.
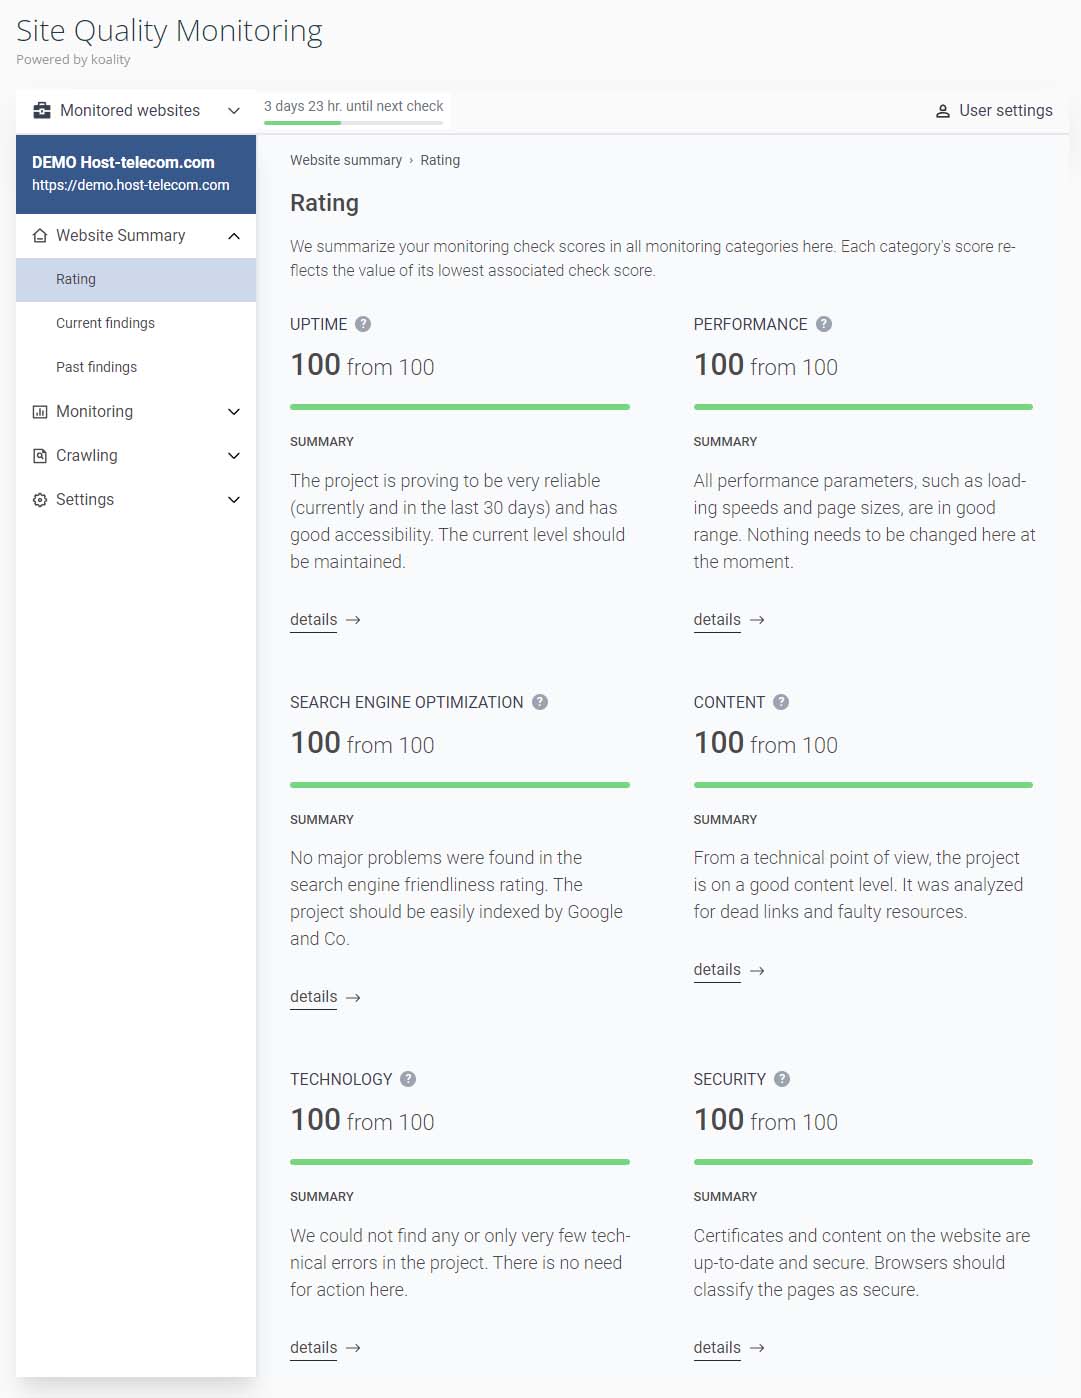
- Review your Website Quality Rating: Click on the monitored domain to view the scores from the audited website.

You will now see a summary of your website rating. Make your selection from the left hand menu. This image shows the summary of our test website, showing a 100% score for all analysed settings.
Benefits of Using cPanel's Site Quality Monitoring
cPanel's Site Quality Monitoring provides website owners with a range of valuable benefits:
- Proactive Problem Detection: Identify and address website issues before they impact your visitors.
- Enhanced Website Performance: Improve your website's speed and responsiveness, delivering a superior user experience.
- SEO: Optimize your website's performance to boost its visibility in search engine rankings.
- Robust Security: Detect and mitigate potential security vulnerabilities to safeguard your online presence.
- Guaranteed Uptime: Ensure your website is consistently available and accessible to your audience.
Monitoring Tabs
Site Quality Monitoring provides a comprehensive overview of your website’s health across six main categories:
Availability
Monitors the reliability of your website and how consistently it can be accessed by visitors. It checks for uptime, downtime, and redirects.
Availability is a critical aspect of your website’s performance. It measures how reliably and quickly users can access your website’s content. A site with high availability responds promptly to user requests and efficiently delivers resources that web browsers can load without issues.
Performance
The Performance tab in cPanel Site Quality Monitor provides a detailed overview of your website’s loading speed and responsiveness. It includes a summary of your website’s overall performance, breaking down key metrics like page size, server response time, and total blocking time. You can also drill down into specific URLs to see detailed performance metrics for each page. Additionally, the Performance tab allows you to configure how often your website’s performance is monitored and select the browser and device profiles used to simulate user requests.
Content
The Site Quality Monitor in cPanel provides a comprehensive suite of tools for assessing and optimizing your website’s content delivery performance. The Content section, in particular, delves into the critical aspects of content delivery, including dead links and broken elements. By regularly reviewing the Content section, you can proactively identify and address these issues, ensuring a seamless and enjoyable user experience for your visitors.
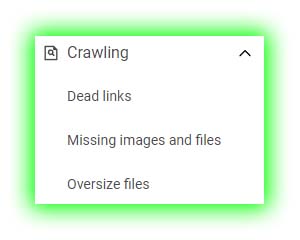
Crawling Tab
The Crawling tab provides tools for manually performing crawls of your website to check for specific issues:
- Dead links: Identify links within your website that are no longer valid or return errors.
- Missing images and files: Check for missing or broken images, CSS, or JavaScript files.
- Oversize files: Identify files that are larger than a specified size threshold.
Interpreting Scores and Colors
Site Quality Monitoring assigns scores from 0 to 100 to each monitoring category. A higher score indicates better performance in that area.
The Site Quality Monitoring feature includes colour indicators. These colour indicators reflect the presence of monitoring check errors and failures in the following ways:
| Color | Description |
|---|---|
| Green | Your website has passed all monitoring checks in this category. |
| Yellow | Your website has non-critical errors or failures in this monitoring check category. |
| Red | Your website has critical errors in this monitoring check category. |
Troubleshooting and Improving Website Performance
If you notice any red or yellow scores, you can use the detailed error reports provided by Site Quality Monitoring to identify and address the underlying issues. This may involve optimising your website’s code, improving your web server configuration, or addressing security vulnerabilities.
Practical Examples
- Improving Loading Speed: If your site has a low score in loading speed, the tool may suggest optimising images or leveraging browser caching. Implementing these suggestions can significantly reduce load times.
- Enhancing SEO: For SEO improvement, the tool might recommend adding relevant meta descriptions or improving header usage. These changes can make your site more attractive to search engines and users.
- Addressing Content Issues: In cases of duplicate content, the tool will identify the pages in question. You can then revise or remove the duplicate content to boost your site’s uniqueness and quality.
Summary
Comprehensive Insights for Website Success
cPanel's Site Quality Monitoring is a powerful tool that empowers website owners and administrators to optimize their online presence. This robust feature provides actionable insights and personalized recommendations to enhance your website's health, performance, and search engine visibility.
By regularly utilizing Site Quality Monitoring and implementing its suggestions, you can cultivate a more successful and engaging digital experience for your audience. This comprehensive tool equips you with the data-driven guidance necessary to maintain and continually improve the quality of your website, ensuring it exceeds user expectations and aligns with search engine standards.
Harness the Power of Site Quality Monitoring
Follow this guide to effectively leverage the Site Quality Monitoring function within cPanel. Unlock the insights and recommendations needed to elevate your website's performance, driving increased user satisfaction and search engine success. Invest in the long-term health and vitality of your online presence with cPanel's comprehensive Site Quality Monitoring solution.
Frequently Asked Questions
What is Site Quality Monitoring?
Site Quality Monitoring is a feature in cPanel that evaluates and reports on the health and performance of your website. It provides a score based on factors like page speed, SEO, and user experience, offering insights into potential areas for improvement.
How do I access Site Quality Monitoring in cPanel?
To access Site Quality Monitoring, log into your cPanel account, navigate to the Metrics section, and select Site Quality Monitoring. Here, you will find a dashboard displaying your website’s health score and detailed reports.
What does the health score indicate?
The health score, ranging from 0 to 100, reflects your website’s overall performance and health. A higher score indicates better health, suggesting good page speed, effective SEO, and a positive user experience.
Can Site Quality Monitoring improve my website’s SEO?
Yes, Site Quality Monitoring identifies SEO weaknesses in your website, like poor meta tags or inadequate keyword usage. By addressing these issues, you can improve your site’s SEO, potentially increasing its visibility and ranking in search engines.
How often should I check my Site Quality Monitoring?
Regular monitoring is recommended. Checking your Site Quality Monitoring at least once a month helps you stay updated on your website’s performance and address issues promptly.
What kind of issues does Site Quality Monitoring detect?
It detects a range of issues, including slow page loading times, broken links, SEO weaknesses, duplicate content, and poor mobile responsiveness.
Is technical expertise required to understand the reports?
No, the reports are designed to be user-friendly and understandable even for those without technical expertise. They provide clear explanations and actionable recommendations.
How can I improve my website’s health score?
Improving your health score involves addressing the identified issues. This could mean optimising images to speed up loading times, revising content to eliminate duplication, or making layout adjustments for better mobile responsiveness.
Does Site Quality Monitoring also check for website security?
While Site Quality Monitoring focuses on performance and SEO, it does not directly address security issues. However, maintaining a healthy, well-performing site can contribute to overall website security.
Is Site Quality Monitoring available for all types of websites?
Site Quality Monitoring is available for websites hosted on servers with cPanel. It is suitable for various types of websites, including e-commerce, blogs, and corporate sites.
This tutorial will teach you how to install a LAMP stack on a virtual server.
LAMP is a suite of software including:
- Linux;
- Apache;
- MySQL;
- PHP.
This will allow you to run your own website after installing it.
We are going to use a virtual server, HT-VPS-5 tariff, 16 GB RAM and 160 GB SSD-drive. However, for the majority of basic tasks (blog, business card site) and projects that are not very demanding, a simpler HT-VPS-1 configuration will be fine. The operating system we use is the Linux distribution Ubuntu 20.04.
To begin with, allow us to have a look at the basics of running a website. Each site requires different components for its functionality. Typically, these include a web server, support for the programming language that the site is written in, and database support. Here we will guide you how to install Apache web server, PHP language support and MySQL database support.
SSH SETUP
We are going to do all operations using the prompt with the SSH protocol. You should know your IP address, username and password. You will receive this data for connection in an email when you order a virtual server.
Open a command prompt (terminal) on your local computer and input the command to connect.
shh root@XXX.XXX.XXX.XXX
Enter the address of your server instead of XXX.XXX.XXX.XXX.
If this is the first time you connect, you may see this message:
The authenticity of host 'XXX.XXX.XXX.XXX (XXX.XXX.XXX.XXX)' can't be established. RSA key fingerprint is SHA256:YaaqERsh9oMs/Qa5nlMJLlb4ewlJDGLaDGsuOcDzOs8. Are you sure you want to continue connecting (yes/no/[fingerprint])? yes
Please just press 'yes' or the letter 'y', you will be asked to enter your password
When you enter a password, no symbols are shown on the screen for security reasons.
Warning: Permanently added 'XXX.XXX.XXX.XXX' (RSA) to the list of known hosts. root@ip_XXX.XXX.XXX.XXX's password:
Type in the password and press 'Enter'.
When you connect to the server, you get to the command prompt on the server itself, i.e. in the system installed on the server.
Before you install any components, we recommend you upgrade your system to the latest up-to-date version.
Run the commands sequentially:
apt update
apt upgrade
An update of the system will start.
The next step is to reboot the server, you can do this using the reboot command.
Before proceeding to the LAMP installation, you need to perform the initial configuration of the server.
Right now you are logged in as root, which is insecure, so you should create a non-privileged user.
Let's run the adduser [username] command to do this, for instance:
adduser host-telecom
Next, enter the password for this user twice.
Please remember your password or save it in a secured place.
After that you will be asked to enter some user data (full name, phone number, etc.), but you don't have to enter all of this, you can just leave the fields blank by pressing 'enter' each time.
Now, you created a new user, although he doesn't have administrator rights. To give it root privileges, you need to add it to the sudo group.
Execute the command:
usermod -aG sudo host-telecom
UFW FIREWALL SETUP
To improve server security, we recommend to use the popular and simple to customize UFW firewall. Various applications can register their own profiles for UFW, meaning ready-made sets of security settings that you can activate. Let's output the list of current profiles with the command:
sudo ufw app list
Available applications: OpenSSH
The profile of the OpenSSH service is now available in our case, which allows us to connect to the server via SSH.
Activate this service using the command:
ufw allow OpenSSH
    Rules updated
    Rules updated (v6)
Next, activate the firewall by command:
ufw enable
You will be warned that the current connection may be interrupted:
Command may disrupt existing ssh connections. Proceed with operation (y|n)? But because you have enabled OpenSSH, don't be concerned and type 'y' and press 'Enter'.
Firewall is active and enabled on system startup
To check the status of the firewall run the command:
ufw status You can see that it is active and the OpenSSH profile is also active:
    Status: active

    To Action From
    -- ------ ----
    OpenSSH ALLOW Anywhere
    OpenSSH (v6) ALLOW Anywhere (v6)
You allowed only SSH connections, and the firewall now blocks all other connections. Later, you will allow HTTP connections to open a website.
Here's a very important point: you need to connect using SSH, not as root, but as the host-telecom user you just created.
For this purpose, don't close your current SSH connection to root for now, but instead open a new terminal window and connect in it, just in case you might suddenly run into problems and be able to fix them.
In the new terminal window, run the command:
ssh host-telecom@XXX.XXX.XXX.XXX
Enter the password for the host-telecom user.
If all is successful, you will be prompted to enter commands, but you will be working under the host-telecom user, and all administrative commands will have to be executed via sudo, i.e. you will enter 'sudo' before each command.
You can close the SSH session with the root user by typing the 'exit' command.
APACHE WEB SERVER SETUP
To install the Apache web server, run the command:
sudo apt install apache2
Make changes to the firewall before testing the Apache web server.
Check the list of profiles:
sudo ufw app list
You will find that apart from OpenSSH, 3 new Apache profiles are also added. Each profile contains a set of settings:
- Apache — opens port
80, used by the http protocol; - Apache Full — opens ports 80 and
443, used by http and https protocols; - Apache Secure — opens port
443only.
You need to apply Apache Full to allow both http and https traffic.
Run the command to activate the profile:
sudo ufw allow in "Apache Full"
    Rule added
    Rule added (v6)
Once this is done, you can test how Apache works and open the default website.
For this purpose, open your browser and enter the IP address of the server. The following information page will appear:
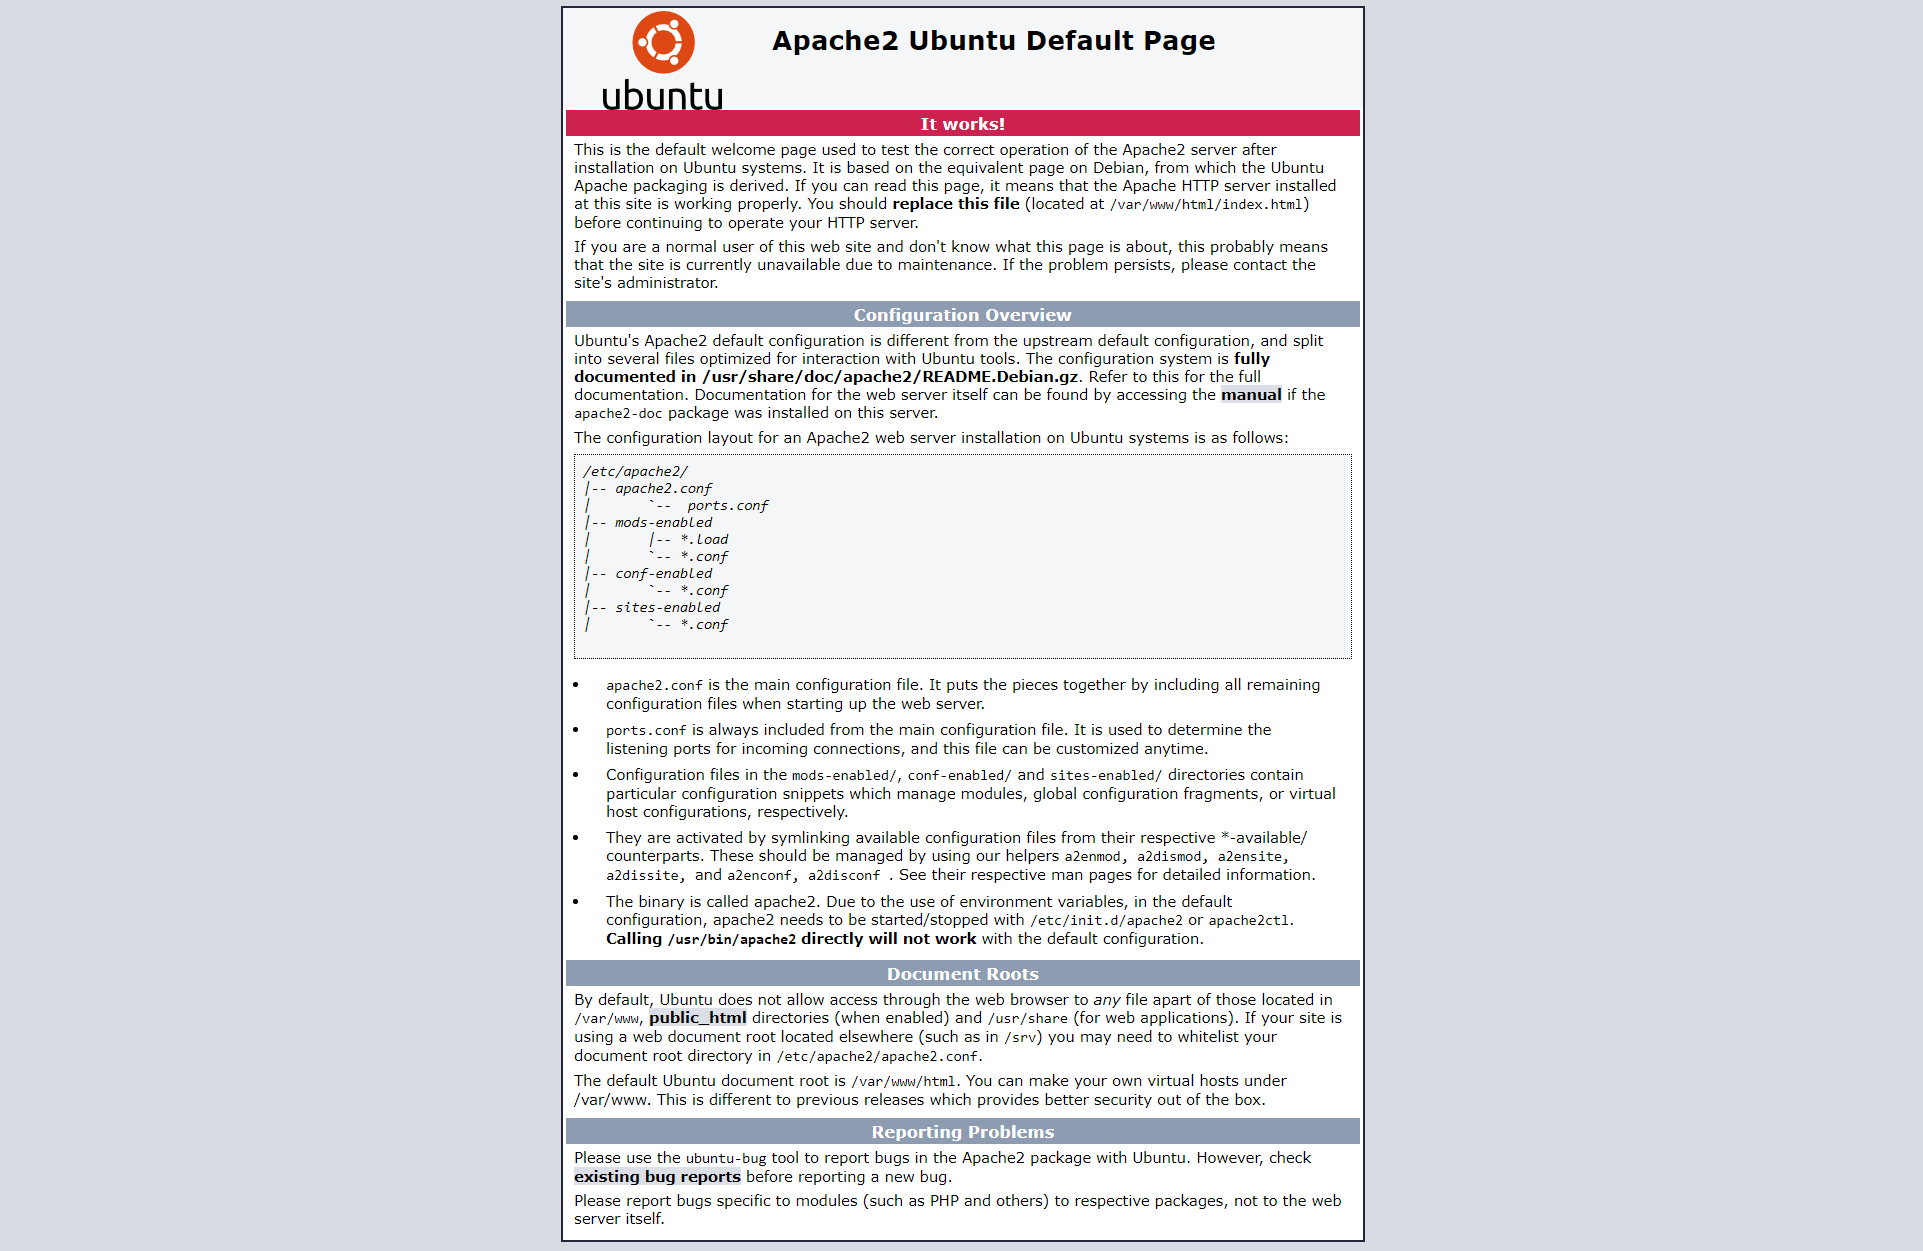
Actually it is already a running website with a single HTML page.
MYSQL DATABASE SUPPORT SETUP
To install MySQL database support, run the command:
sudo apt install mysql-server
Once the installation is complete, we recommend running a special script that helps you set various security settings. Run the command to do this:
sudo mysql_secure_installation
Further you need to answer a few questions. The first is to enable the VALIDATE PASSWORD plugin, used to prevent simple passwords from being used when setting MySQL database passwords. To enable it, type 'y' and press 'enter'.
The next step asks you to set the level of password validation:
    There are three levels of password validation policy:

    LOW Length >= 8
    MEDIUM Length >= 8, numeric, mixed case, and special characters
    STRONG Length >= 8, numeric, mixed case, special characters and dictionary
    file

    Please enter 0 = LOW, 1 = MEDIUM and 2 = STRONG:
Choose medium: enter 1 and press 'enter'.
Then enter a strong password and confirm it.
Please note: This is the password for the root user specifically for MySQL, and is not related to the root user you have on your system.
You can answer all subsequent questions with 'y' and then press 'enter':
- request to remove an anonymous user,
- request to disable remote authorization of the root user,
- deleting the test database.
Once complete, you will be prompted to activate the settings and customizations you have made.
You will get a message as a result:
    Success.

    All done!
PHP LANGUAGE SUPPORT SETUP
Further, you should install support for the PHP language. To do this, you need to install three packages:
- PHP
- libapache2-mod-php — a module that allows you to process PHP files,
- php-mysql — allows PHP to communicate with MySQL.
sudo apt install php libapache2-mod-php php-mysql
The LAMP installation is now complete.
However, before you can launch your site, you have to create a virtual host for it. Create a directory for your site and make the settings for your host.
Run the command:
sudo mkdir /var/www/mysite
Specify the domain of your site instead of mysite.
You created the directory using sudo, i.e. as root. Change the permissions and group for this directory to be under your host-telecom user.
sudo chown -R $USER:$USER /var/www/mysite
Then, you should create a configuration file for your virtual host. Configuration files are stored in the /etc/apache2/sites-available directory. Open the console text editor nano and create a configuration file. Run the command:
sudo nano /etc/apache2/sites-available/mysite.conf
Paste the following code:
    <VirtualHost *:80>
        ServerName XXX.XXX.XXX.XXX
        ServerAlias XXX.XXX.XXX.XXX
        ServerAdmin host-telecom@localhost
        DocumentRoot /var/www/mysite
        ErrorLog ${APACHE_LOG_DIR}/error.log
        CustomLog ${APACHE_LOG_DIR}/access.log combined
    </VirtualHost>
Please note, for ServerName we entered the IP address of our server, if you have a domain you should specify it.
Exit the nano editor by pressing Ctrl + X, and enter 'yes' to save the file..
To get your virtual host activated by the web server, run the command:
sudo a2ensite mysite You need to restart the server to allow the changes to take effect. Run the command:
sudo systemctl reload apache2
Create a test page in your directory where your site files should be located. Open the nano text editor again:
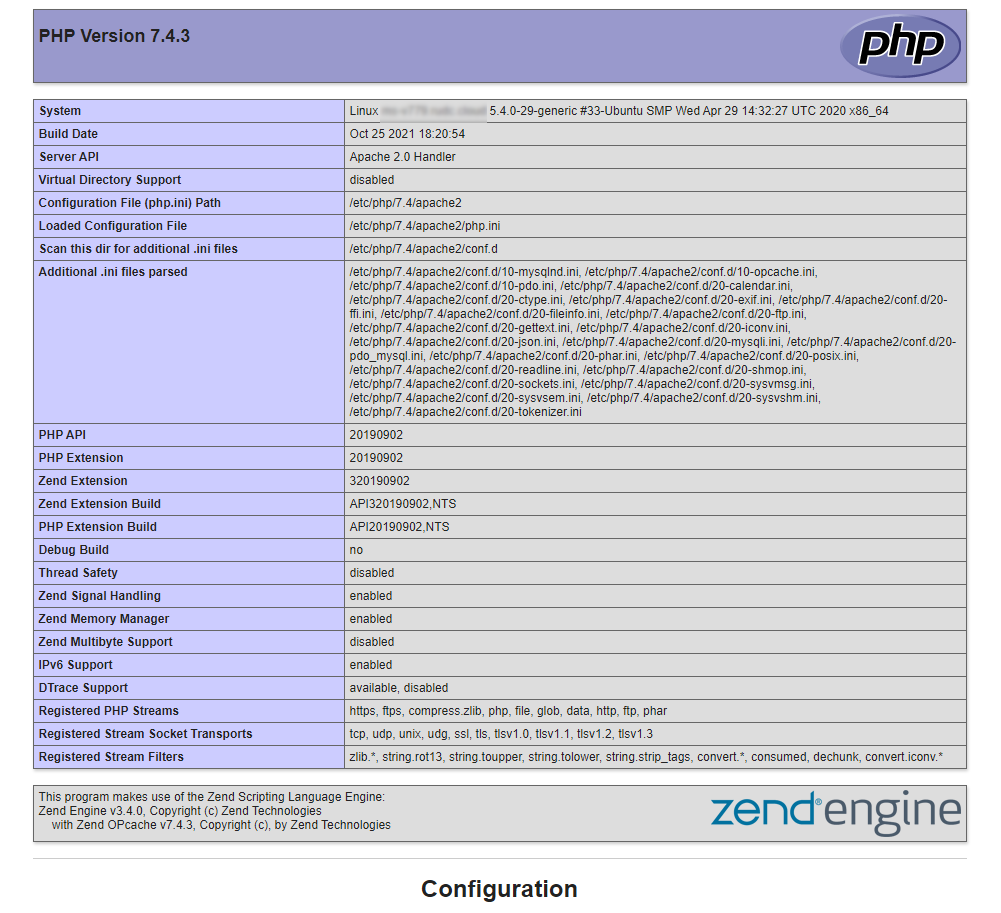
nano /var/www/mysite/index.php
And add the following code in it:
    <?php
    phpinfo();
This is a PHP function that displays detailed information about the current php configuration. Enter the IP address of your server into the address bar of your browser and you will see that you get a page with PHP configuration information.
We've reviewed the basic steps of setting up Apache, PHP, MySQL and learned how to create virtual hosts. Now you can install almost any CMS and launch your online business or blog.
CloudPanel is an opensource solution that allows you to easily install the LEMP stack (Linux, Nginx, MySQL and PHP) on your VPS or cloud server.
Based on the official documentation, CloudPanel is a cost-free and modern control panel for server configuration and management focused on simplicity.
CloudPanel was initially developed by MGT-COMMERCE GmbH, a Berlin-based company, over a decade ago purely to offer optimized hosting for Magento sites in the AWS cloud.
Nowadays, this free control panel has become one of the most capable control panels for Nginx servers, and is compatible with a wide range of PHP, Node.js, Static Websites and Python applications. At the same time, it's become more flexible.
Actually, with CloudPanel you can run any of your favorite applications on any cloud or dedicated server in just a few minutes.
At present, CloudPanel only supports Linux distributions - Debian 11 and Ubuntu 22.04.
The installation of CloudPanel is pretty simple and easy.
Let's see what CloudPanel has to offer before we start the installation:
| Service | Version | |
|---|---|---|
| NGINX | 1.21 | with PageSpeed module |
| MySQL | 8.0 | |
| MariaDB | 10.6, 10.8 | |
| PHP | 7.1-8.1 | |
| Redis | 6 | |
| ProFTPD | 1.3 | |
| Node.js | 12, 14, 16 | Versions LTS |
| Yarn | 1.22 | |
| Python | 3.10 |
| Service | Version | |
|---|---|---|
| NGINX | 1.21 | with PageSpeed module |
| MySQL | 5.7, 8.0 | |
| MariaDB | 10.7, 10.8 | |
| PHP | 7.1-8.1 | |
| Redis | 6 | |
| ProFTPD | 1.3 | |
| Node.js | 12, 14, 16 | Versions LTS |
| Yarn | 1.22 | |
| Python | 3.9 |
Technical Requirements:
- Ubuntu 22.04 (Jammy Jellyfish) or Debian 11 (Bullseye)
- >= 1 CPU
- >= 2 GB RAM
- >= 10 GB Disk Space
In this guide we will use the Debian 11 distribution.
CloudPanel INSTALLATION
Connect to your server using ssh. To do this, open a terminal and enter the command:
ssh root@XXX.XXX.XXX.XXX
You need to update your system and install the necessary packages before running the installer.
apt update && apt -y upgrade && apt -y install curl wget sudo
Then run the installer with the desired database engine.
curl -sSL https://installer.cloudpanel.io/ce/v2/install.sh | sudo bash
curl -sSL https://installer.cloudpanel.io/ce/v2/install.sh | sudo DB_ENGINE=MARIADB_10.8 bash
curl -sSL https://installer.cloudpanel.io/ce/v2/install.sh | sudo DB_ENGINE=MARIADB_10.6 bash
curl -sSL https://installer.cloudpanel.io/ce/v2/install.sh | sudo bash
curl -sSL https://installer.cloudpanel.io/ce/v2/install.sh | sudo DB_ENGINE=MYSQL_5.7 bash
curl -sSL https://installer.cloudpanel.io/ce/v2/install.sh | sudo DB_ENGINE=MARIADB_10.8 bash
curl -sSL https://installer.cloudpanel.io/ce/v2/install.sh | sudo DB_ENGINE=MARIADB_10.7 bash
The installation is now complete. You can now access CloudPanel through your browser: https://XXX.XXX.XXX.XXX:8443.
Just ignore the warning about the self-signed certificate and click on "Advanced" and "Go to site..." to proceed with CloudPanel.
Then fill in all the information: name, email, username and password.
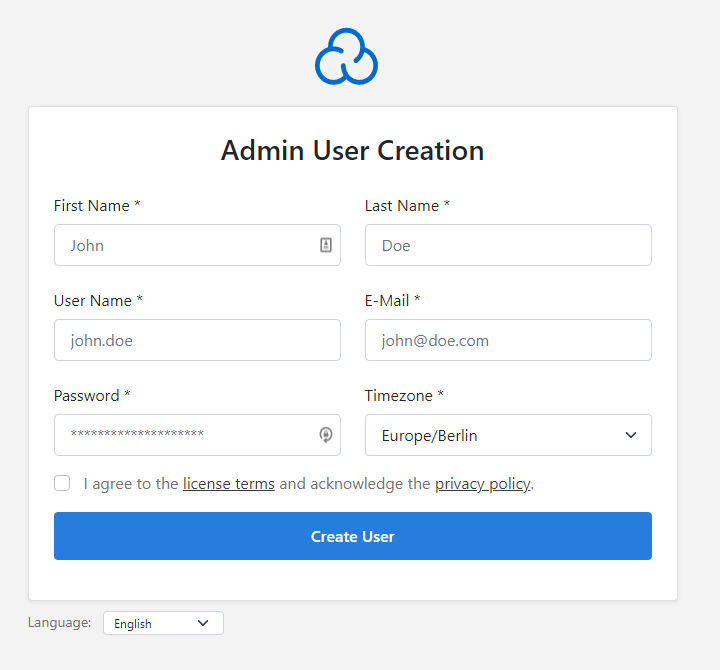
Confirm that you agree to the terms and conditions and privacy policy and click the "Create user" button.
There you go! Now you are ready to log in to CloudPanel.
VestaCP is a control panel with a wide variety of functionality that allows you to easily monitor and manage your server. This guide explains how to install VestaCP on your Linux VPS.
Minimum Specifications:
- CentOS 5, 6, 7, Debian 7, 8, 9, Ubuntu 12.04 - 18.10;
- RAM 512 Mb
- HDD 20 Gb
- CPU 1 Ghz
Connect to your server using ssh. Open a terminal and run the command:
ssh root@XXX.XXX.XXX.XXX
Enter the address of your server instead of XXX.XXX.XXX.XXX.XXX.
Before you run the installer, the system must be updated and the necessary packages must be installed.
apt update && apt -y upgrade && apt -y install curl wget sudo
Next, load the installation script with the command:
curl -O http://vestacp.com/pub/vst-install.sh Then run the script:
bash vst-install.sh During the installation, you will be asked to answer several questions:
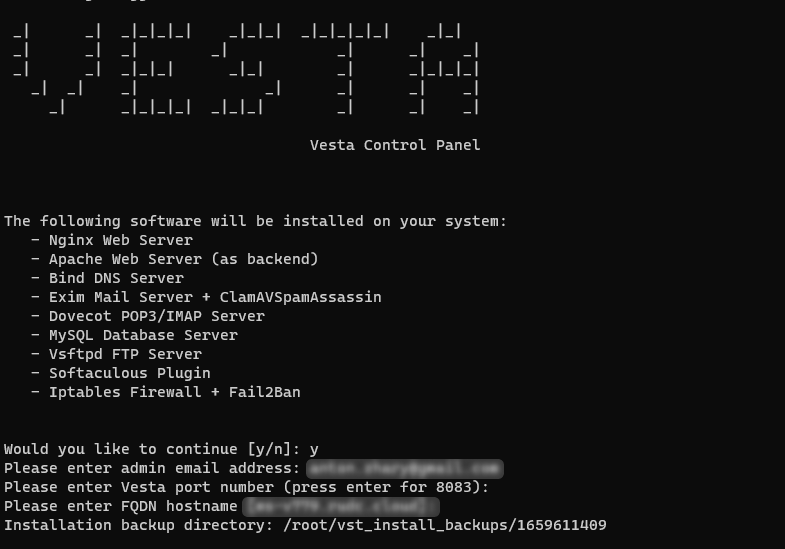
Enter the requested data and press Enter.
Once the installation is complete, you will be prompted for a login and password to access the control panel.
After the installation and configuration of the caching DNS server, if the server can be accessed at an external (white) address, you should check that the server responds only to requests from trusted hosts (clients). If the server responds to requests from all hosts, this server is called DNS Open Resolver.
The risk exists that DNS Open Resolver can be exploited by attackers to perform various types of attacks:
- Loading the server with random DNS requests, blocking the channel with traffic. This can cause a denial of service (DoS) and make the DNS service inaccessible to other users.
- Sending special requests to a server with a fake source IP address in order to organize an attack on a third host that involves your server. DNS Open Resolver will send responses to this spoofed address, which can lead to a high volume of network traffic aimed at the victim of the attack. Such an attack is called DNS Amplification.
- Replace responses to your server with false data that will get into the cache (Cache Poisoning). When a client computer accesses a DNS server that is compromised this way, it may obtain false or malicious IP addresses for domain names.
Information
A caching DNS server is a server that processes recursive client requests.
Recursive and iterative DNS requests
On receiving a recursive request, the server either returns an answer to the request or an error message. The server performs all data searching and querying of other servers. In case of receiving an iterative request, the server can return the address of another server rather than the answer, and then the client will forward this request to the specified server.
On receiving a recursive request, the server either returns an answer to the request or an error message. The server performs all data searching and querying of other servers. In case of receiving an iterative request, the server can return the address of another server rather than the answer, and then the client will forward this request to the specified server.
How to check if a server is open
You can check if your server is open to recursive requests at https://openresolver.com/.
Or with commands that perform requests to DNS:
dig +short @XXX.XXX.XXX.XXX mysite.ru
host mysite.ru XXX.XXX.XXX.XXX
nslookup mysite.ru XXX.XXX.XXX.XXX
As XXX.XXX.XXX.XXX enter the IP address of the server to be checked. The example name is mysite.ru, you can check any.
If the request gives an IP address when requested from any host, then your server is DNS Open Resolver.
How to turn off or limit access to only authorized hosts/networks
- Limit access to the server port (udp/53) on the network perimeter, or locally on the DNS server itself.
- If you want the server to be responsible for only one or a few specific zones, you can turn off recursive queries by adding the
“recursion no;”option to thenamed.confconfiguration file (named.conf.localor other, depending on your settings). - Enable recursive requests for trusted networks/hosts only, example:
“allow-recursion { localhost; 10.16.0.0.0/16; };”(10.16.0.0.0/16— replace with trusted addresses).
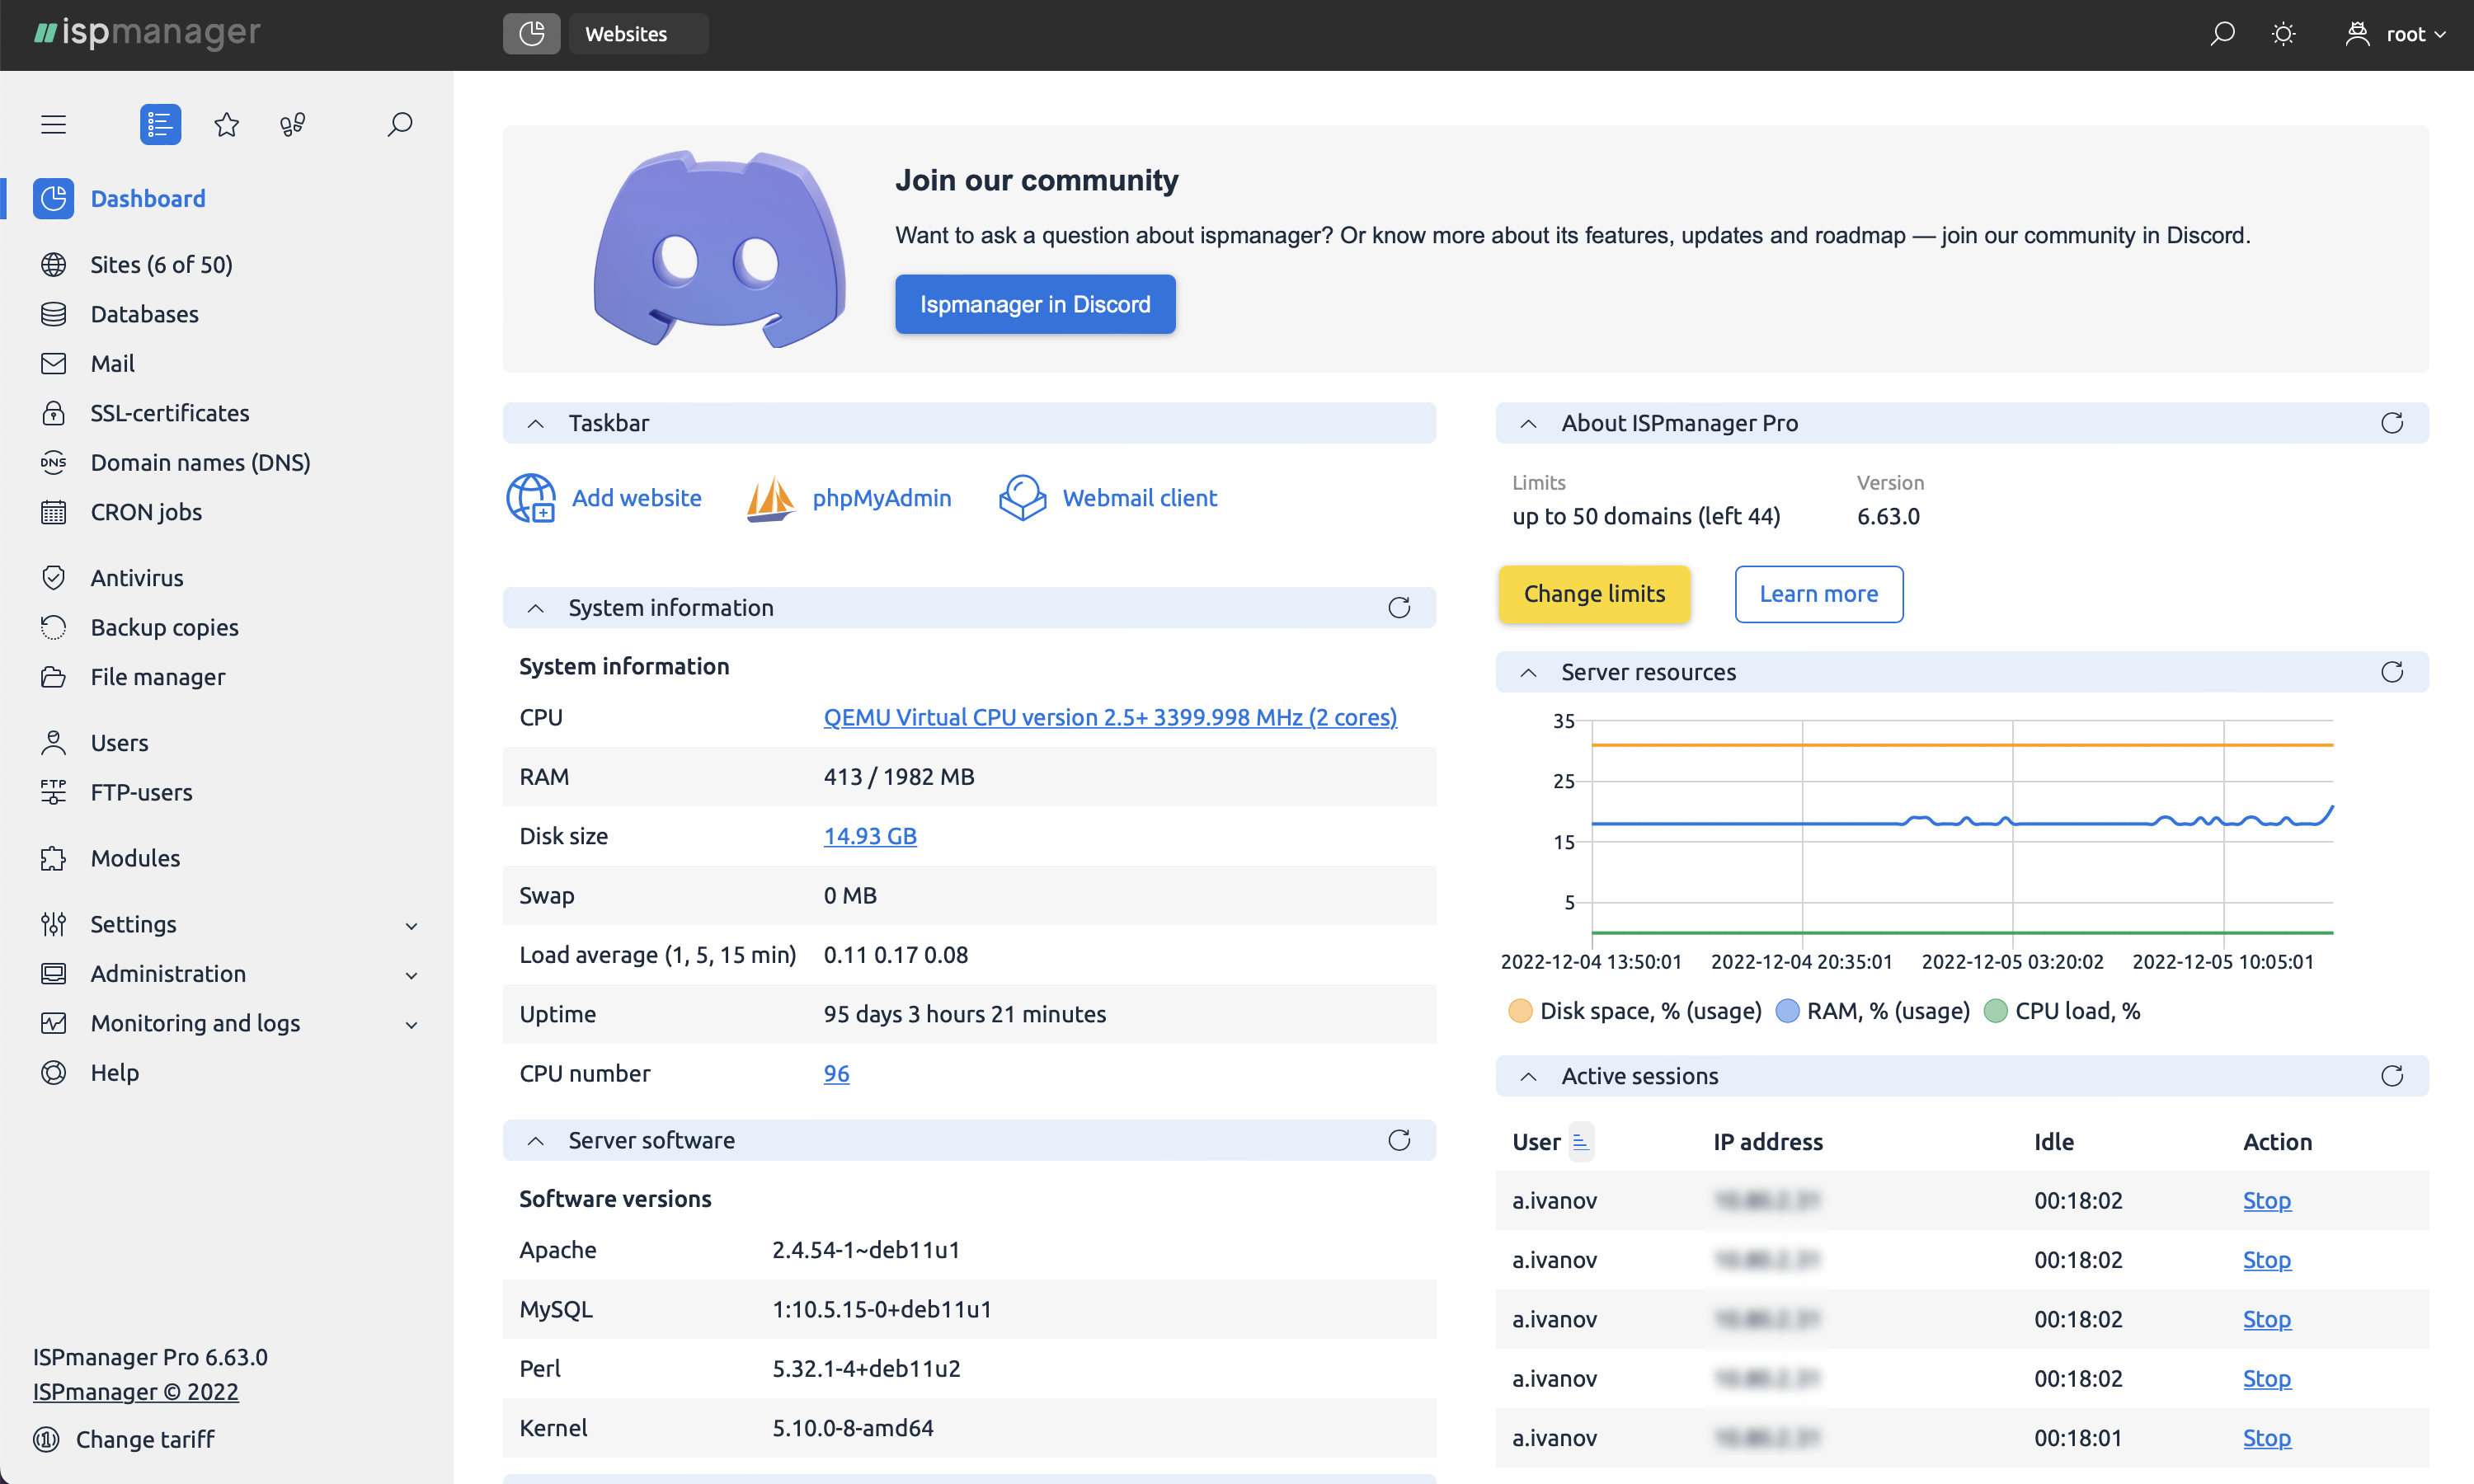
In this guide, we will review the ispmanager site and server control panel in detail and tell you about its main advantages and versions.
What does ispmanager do
The ispmanager panel helps you to install and manage web services. It deploys all the required software to maintain websites, mail, and databases. It lets users run projects in a ready-to-use web environment and then manage them in a graphical interface, without the need for a console.
The ispmanager panel is helpful for web developers, system administrators, and site managers. The panel significantly simplifies server administration, which means it can be used not only by skilled professionals but also by newcomers.
The latest version of the panel is ispmanager 6. It has an improved interface, a more proactive bug-fixing system, system monitoring, advanced tools for developers, and support for major CMSes.
The key features of the ispmanager panel
Web server support and management. You can install and configure web servers such as Apache, Nginx, and OpenLite Speed from the panel. There is no problem with further administration.
Mail domains creation and mailbox management. You can use the panel to create a mail domain and mailbox, adjust rules and restrictions, use anti-spam and anti-virus protection, and connect Roundcube web interface. It is possible to get a configuration file for mail clients.
Database support and management. MySQL/MariaDB, PostgreSQL, Percona Server.
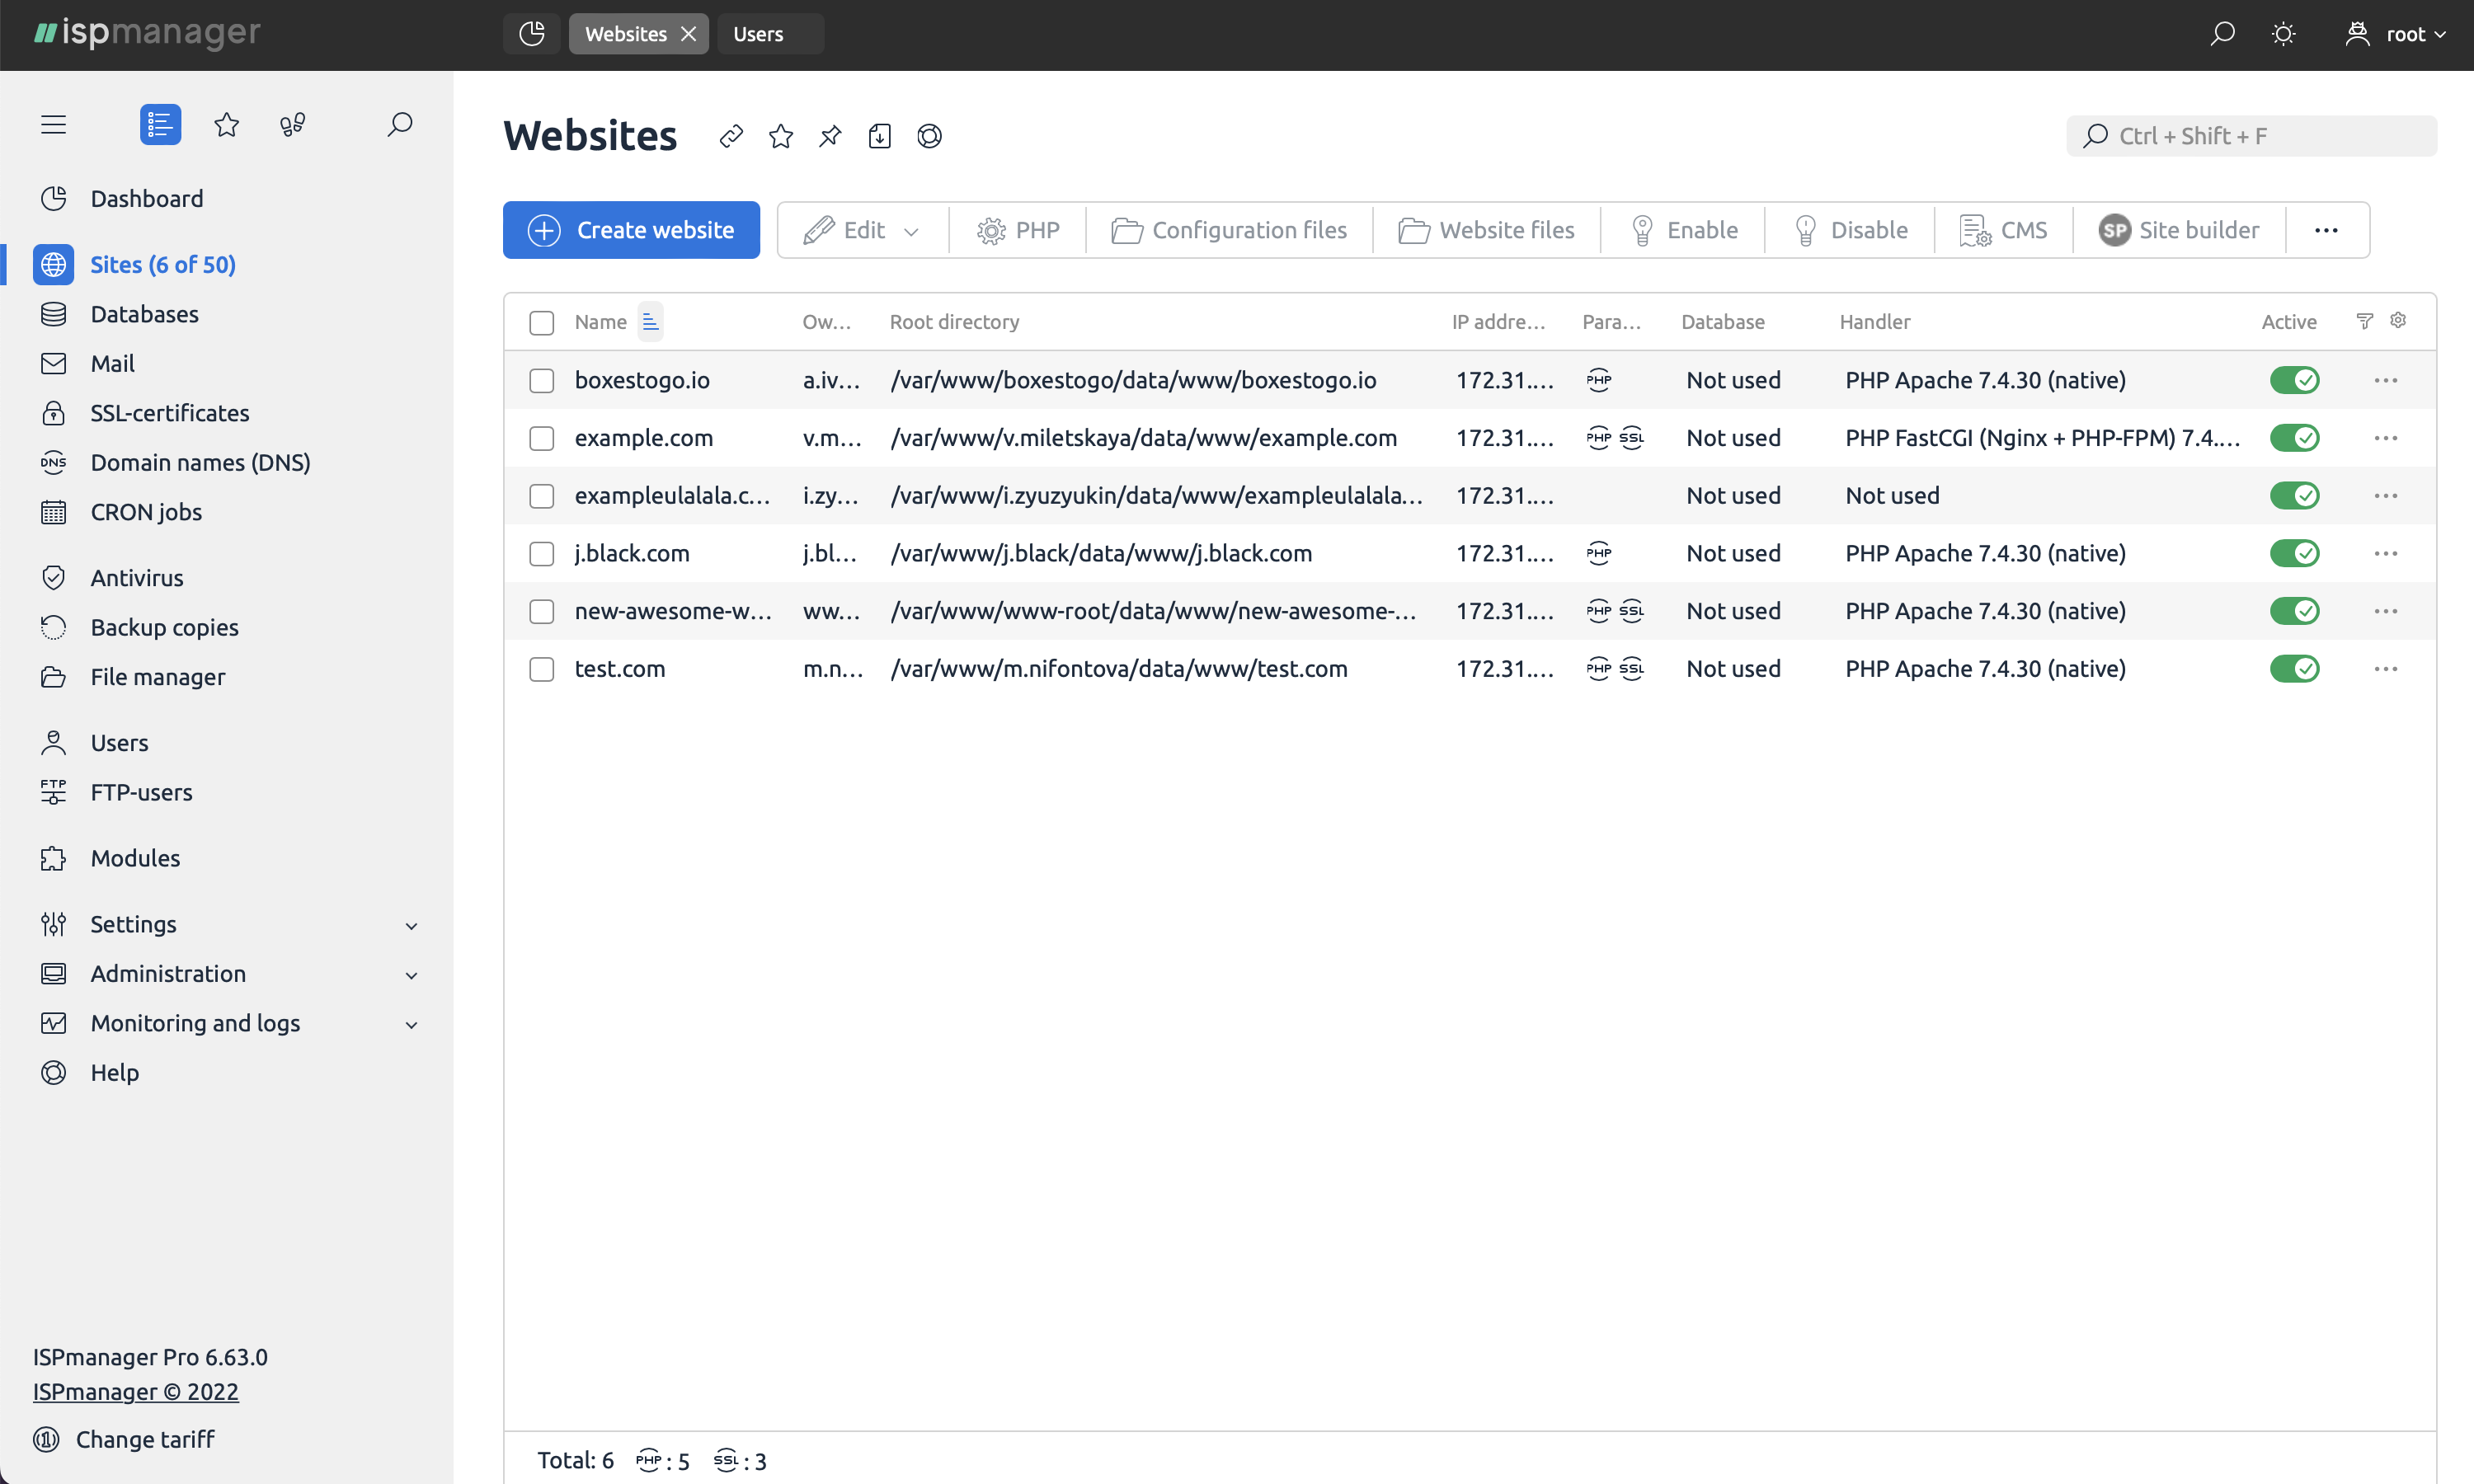
Website creation and management. The ispmanager panel includes tools for simple work with websites at all stages: from installing CMS to adding content.
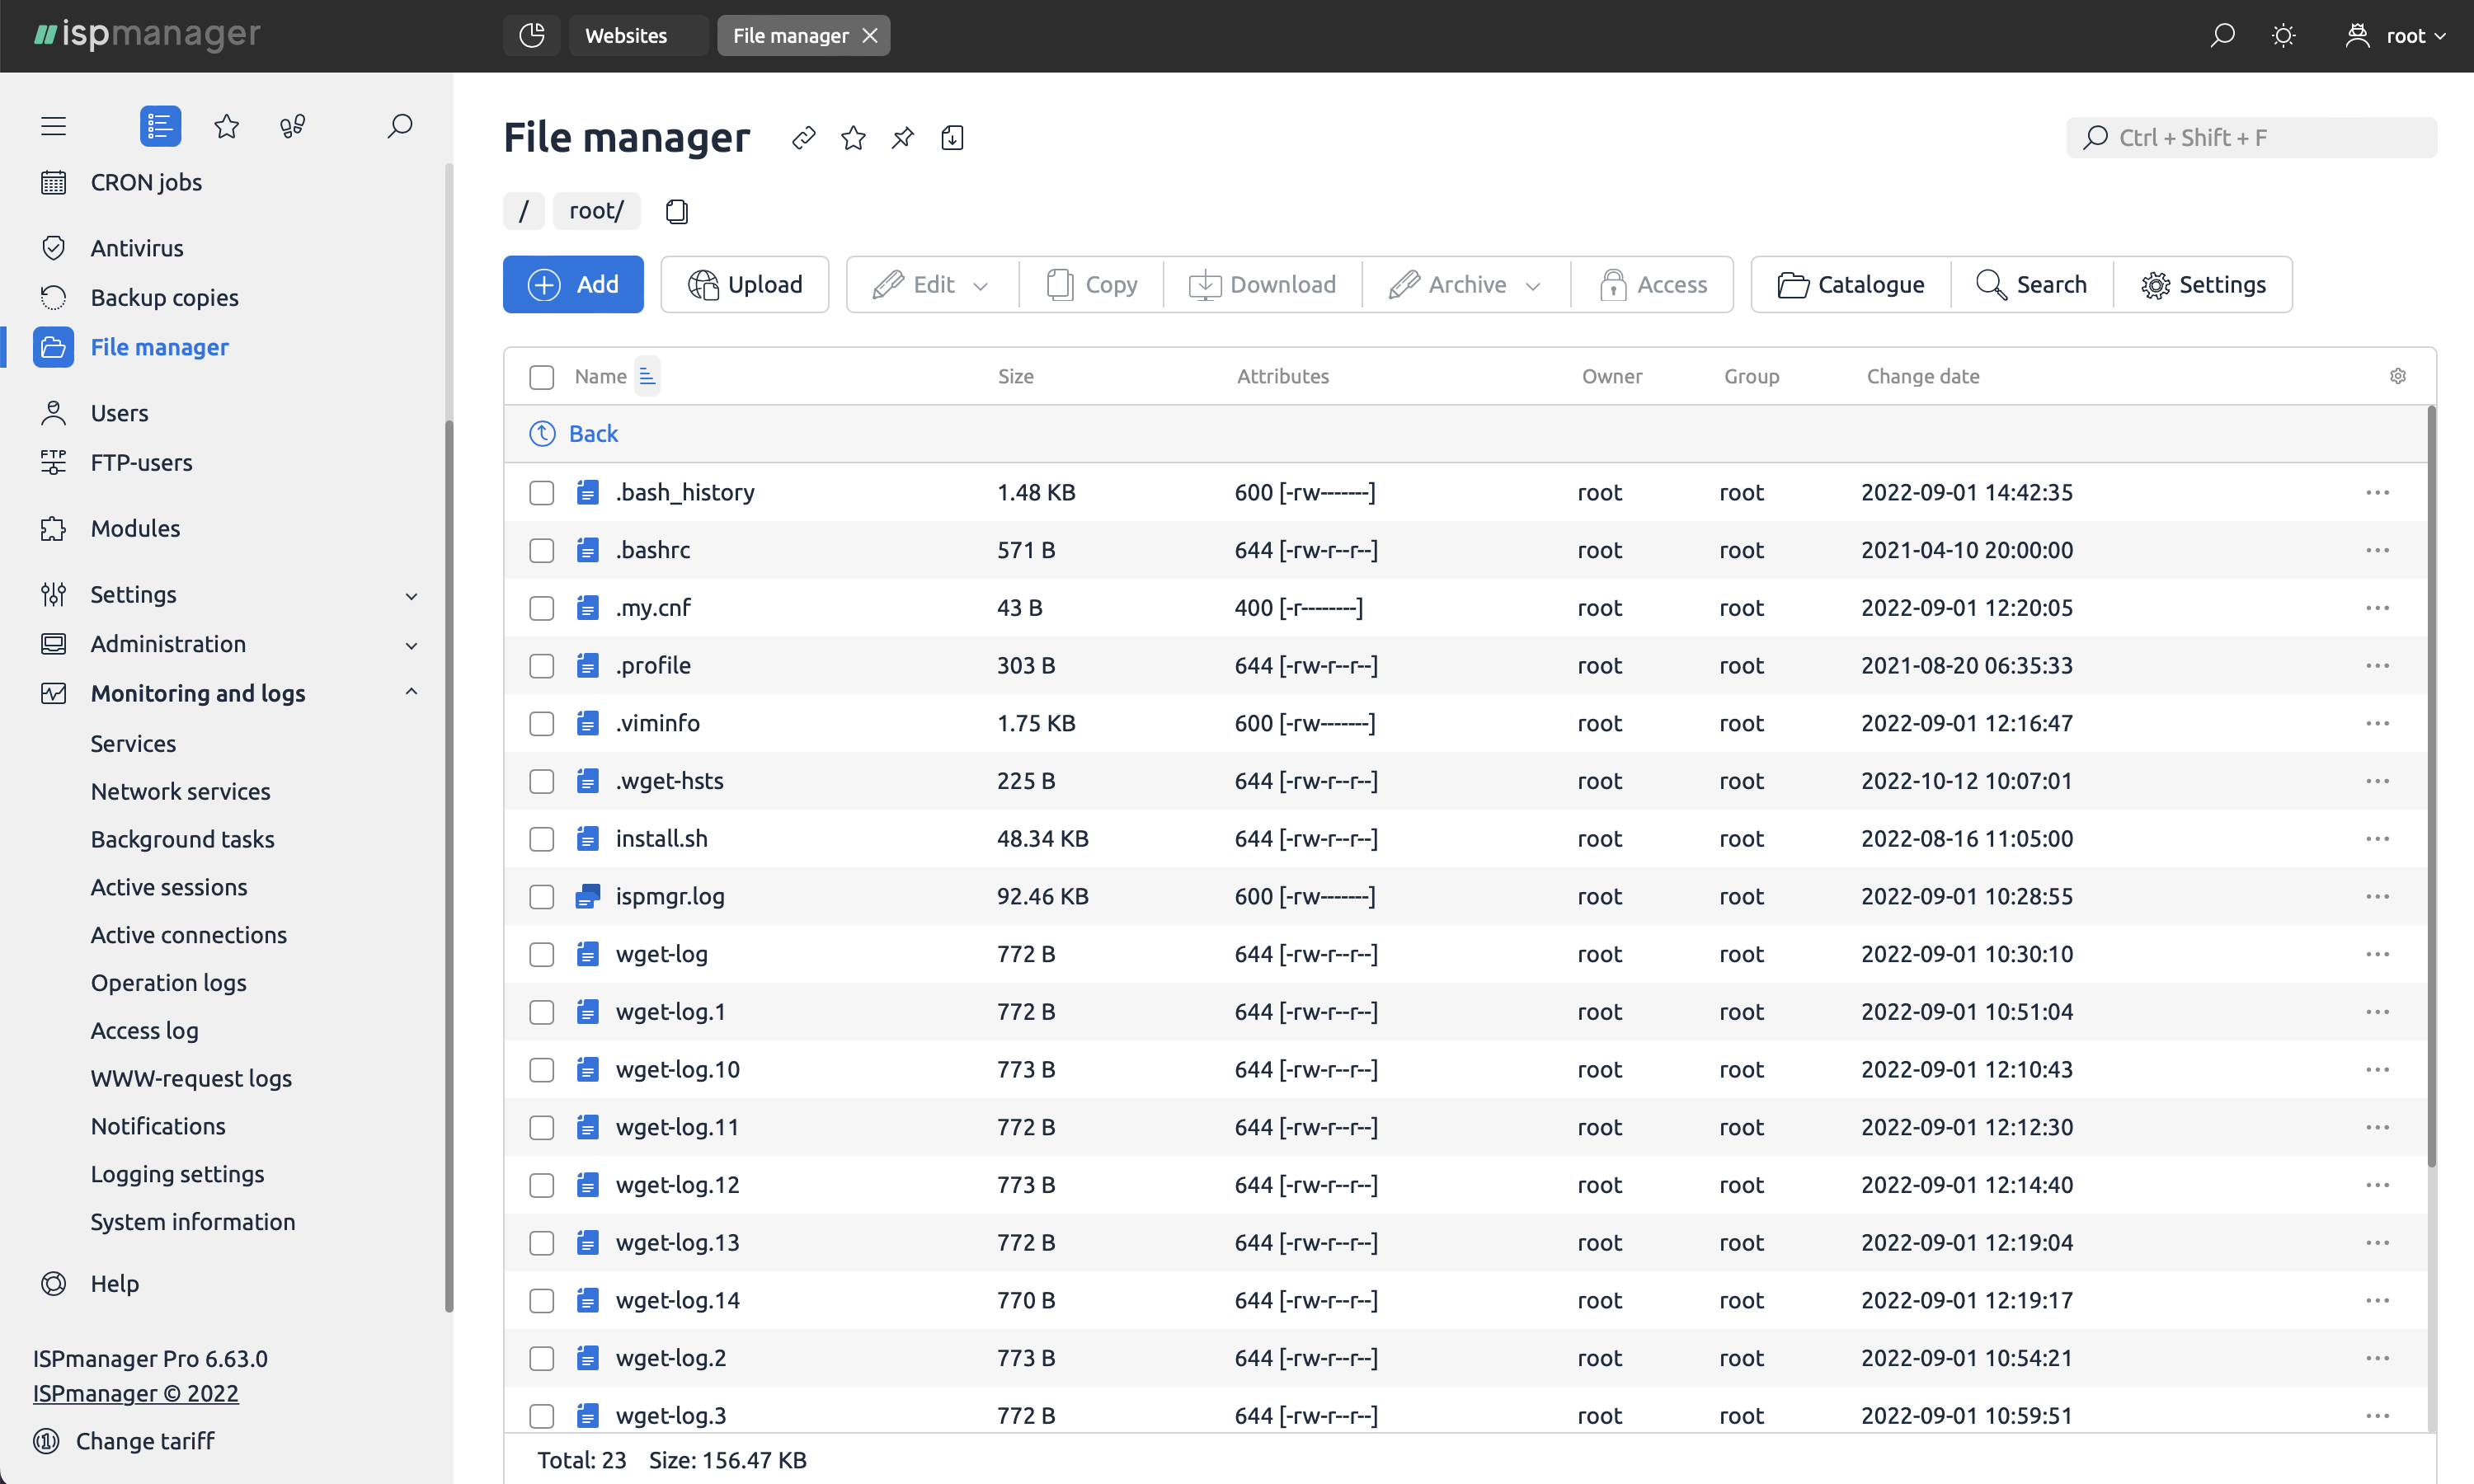
File management. The graphical file manager supports downloading large data volumes without connection loss. It also supports popular FTP servers.
Programming languages support. It is possible to add Python and Perl straight from the panel, without further configuring the repositories. You can choose the PHP interpreter version and mode for a separate site. It supports Node.js handler and PHP Composer.
Server and site protection. It includes tools for server backup, mail protection, firewall, response to DDoS attacks, and high-quality anti-virus Dr.Web to keep your system protected.
Dark and light theme. Ispmanager follows all modern design trends and takes care of user experience. Dark theme is a smart solution, which makes it more convenient to work in a dark place.
Which ispmanager version will be the one to choose?
Today, four versions (licenses) of the ispmanager panel exist. There are three versions — lite, pro, and host — which are mostly used for deploying and administering sites on VPS or dedicated servers. Licenses vary in the number of domains that you can manage. However, if you are an internet hosting provider and would like to offer a panel to your customers, the business version is the right option for you. Let's look more closely at the features and differences.
Ispmanager lite is ideal for freelancers and web studios that have a small number of projects — no more than 10 domains. However, a lot of team members can work with the panel: the total number of user accounts is unlimited. The version provides all the necessary tools for a developer: it allows you to configure web servers, make websites, and add extra modules.
Ispmanager pro has the same features as the lite version but also supports a maximum of 50 domains, so it is sufficient for a larger number of projects. Additionally, it has a complete module to work with Docker technology.
Ispmanager host has the same functionality as the pro version, but without limiting the number of domains, which means that it is suitable for large web studios.
Ispmanager business
Ispmanager business significantly differs from other versions and is designed for service providers. The business version supports shared hosting:
- manages a cluster of servers;
- allows setting up reselling;
- allows limiting RAM, and CPU for users, to ensure that "neighbors" in hosting do not disturb each other.
We've put together the main differences between the versions in a useful table to help you choose the best version for your needs.
| Lite | Pro | Host | Business |
|---|---|---|---|
For web developers and site administrators. Can be purchased from a provider or installed directly on VPS, dedicated servers | For providers and resellers | ||
Up to 10 domains | Up to 50 domains | Unlimited number of domains | Unlimited number of domains |
For one or more projects | For the average number of projects | To support a large number of websites | To start a business with ispmanager |
The version of ispmanager to choose depends on your needs and the number of projects you are going to manage. If you want to build and manage websites, the lite, pro, or host licenses are sufficient. If you prefer to run your own hosting and reselling service, choose business. If you order our servers, either VPS or dedicated, then you can pick any version of ispmanager that meets your specific needs.