In this guide, we will review the ispmanager site and server control panel in detail and tell you about its main advantages and versions.
What does ispmanager do
The ispmanager panel helps you to install and manage web services. It deploys all the required software to maintain websites, mail, and databases. It lets users run projects in a ready-to-use web environment and then manage them in a graphical interface, without the need for a console.
The ispmanager panel is helpful for web developers, system administrators, and site managers. The panel significantly simplifies server administration, which means it can be used not only by skilled professionals but also by newcomers.
The latest version of the panel is ispmanager 6. It has an improved interface, a more proactive bug-fixing system, system monitoring, advanced tools for developers, and support for major CMSes.
The key features of the ispmanager panel
Web server support and management. You can install and configure web servers such as Apache, Nginx, and OpenLite Speed from the panel. There is no problem with further administration.
Mail domains creation and mailbox management. You can use the panel to create a mail domain and mailbox, adjust rules and restrictions, use anti-spam and anti-virus protection, and connect Roundcube web interface. It is possible to get a configuration file for mail clients.
Database support and management. MySQL/MariaDB, PostgreSQL, Percona Server.
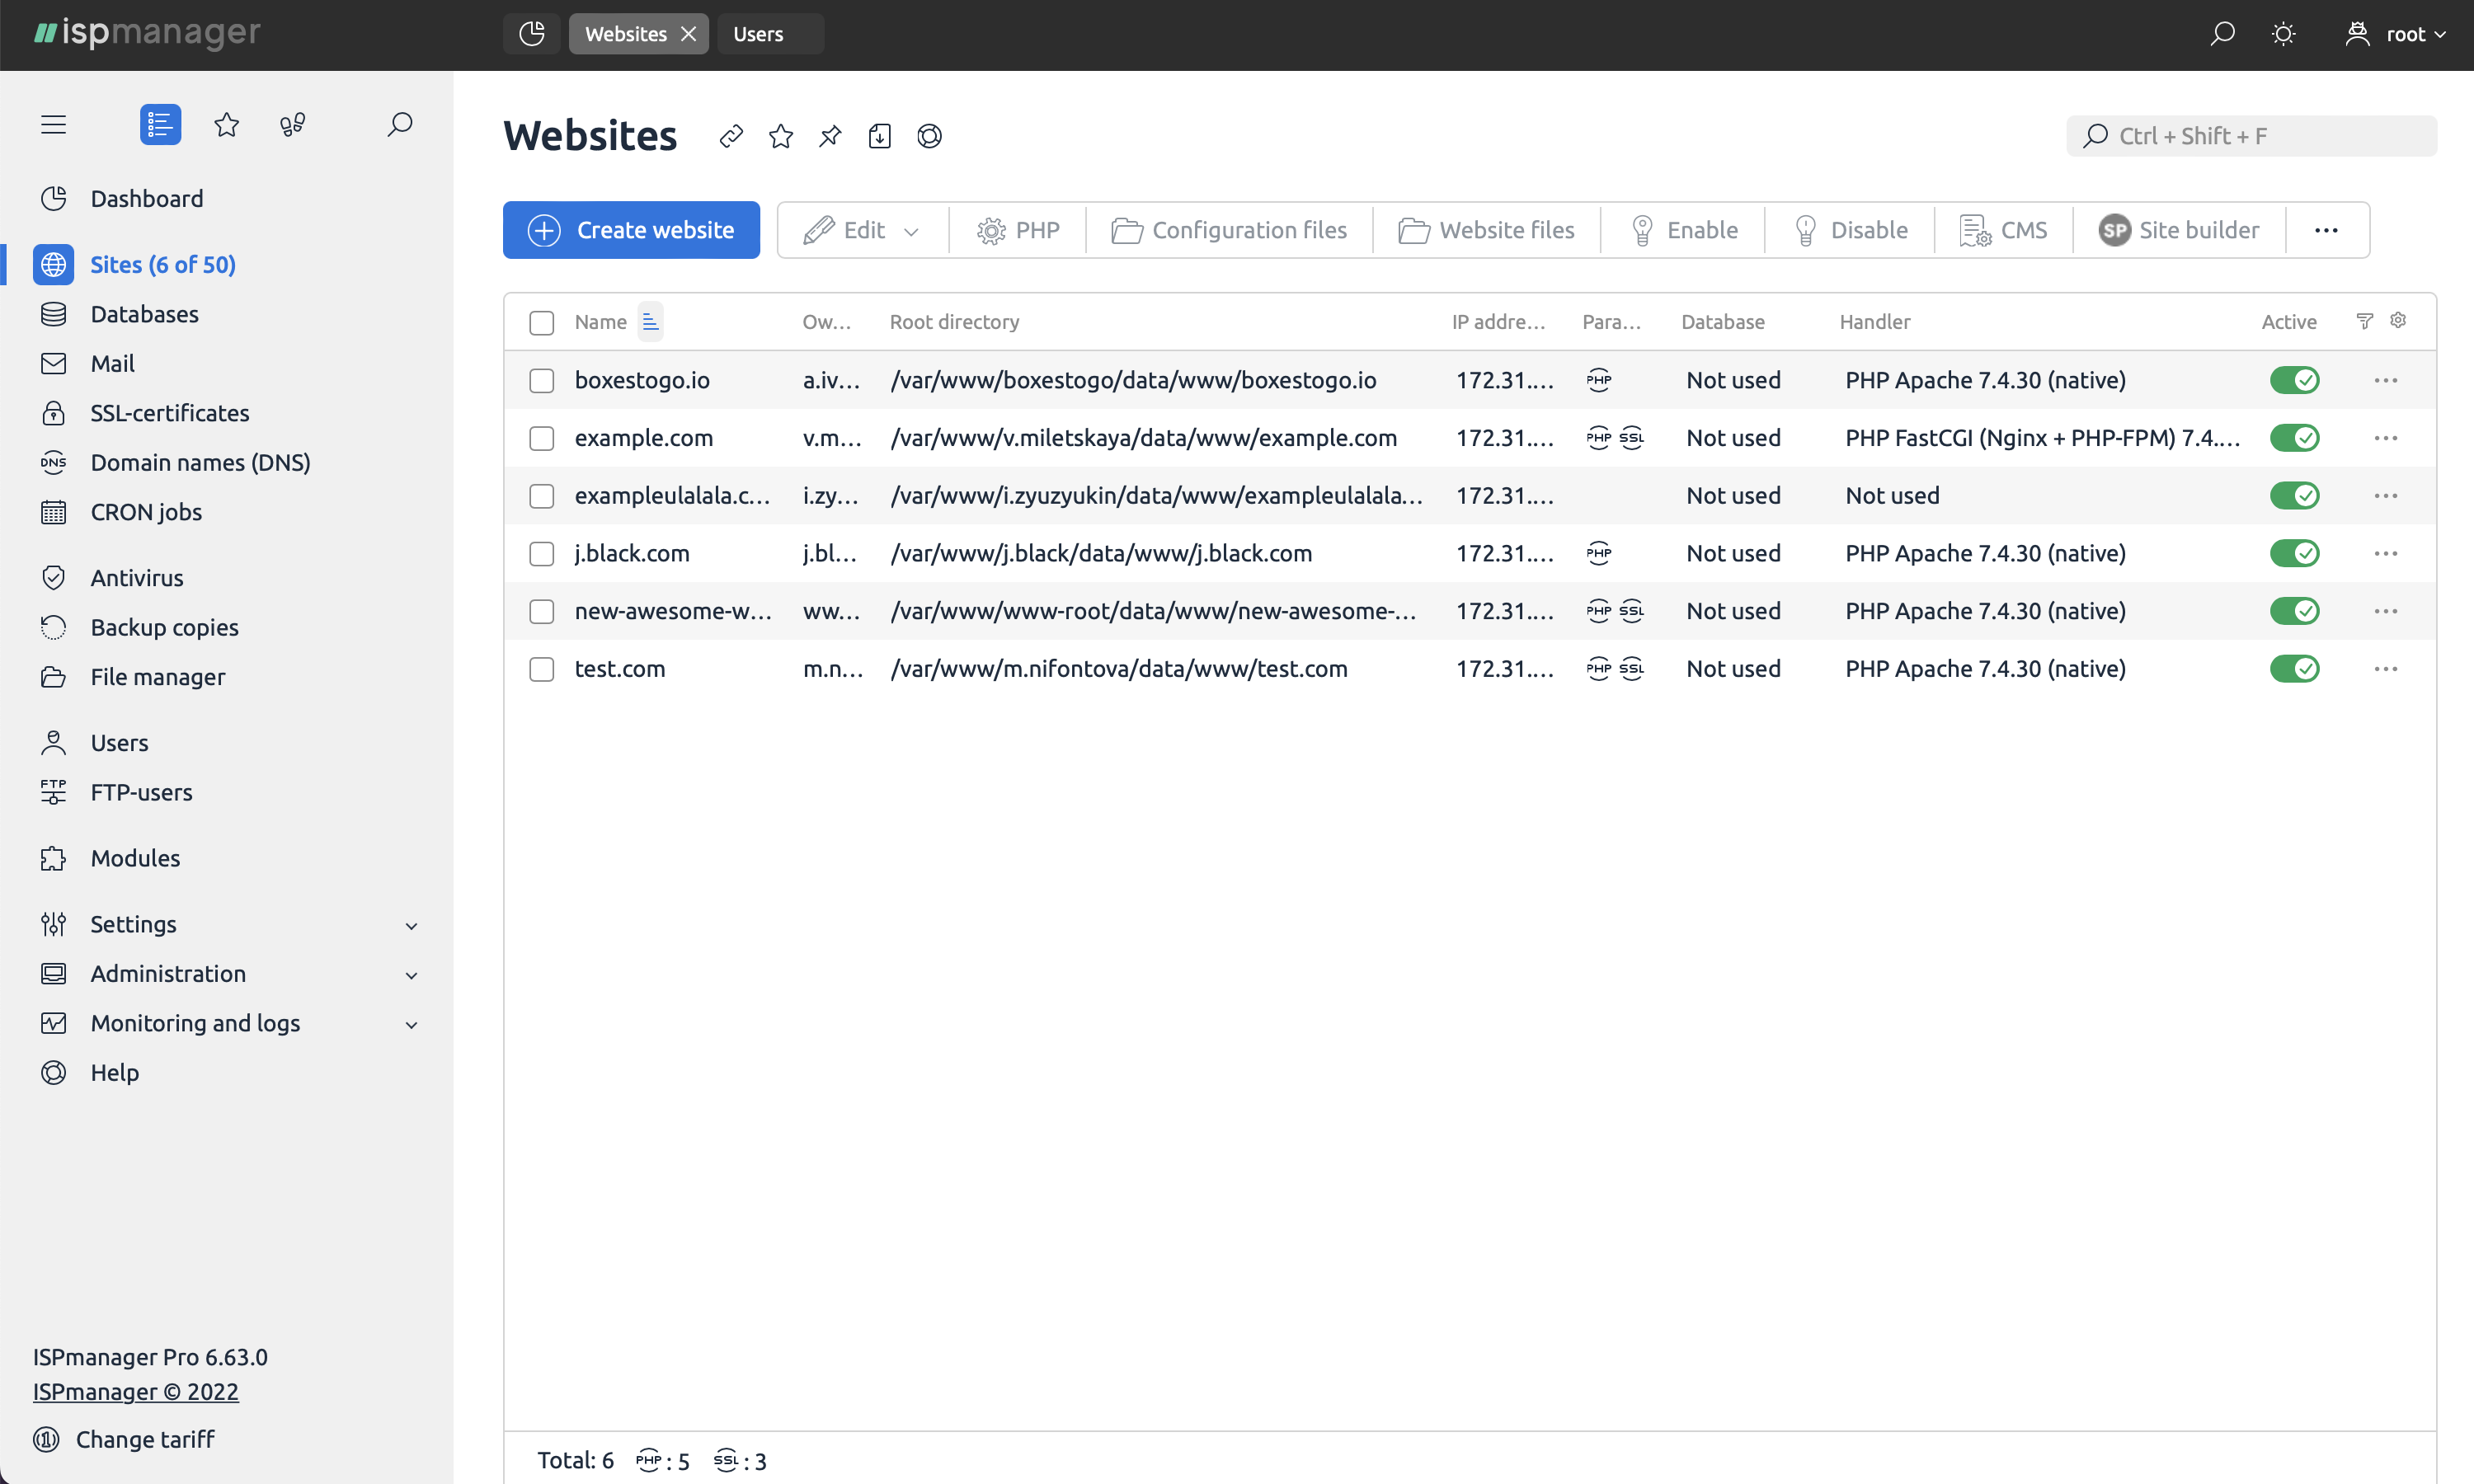
Website creation and management. The ispmanager panel includes tools for simple work with websites at all stages: from installing CMS to adding content.
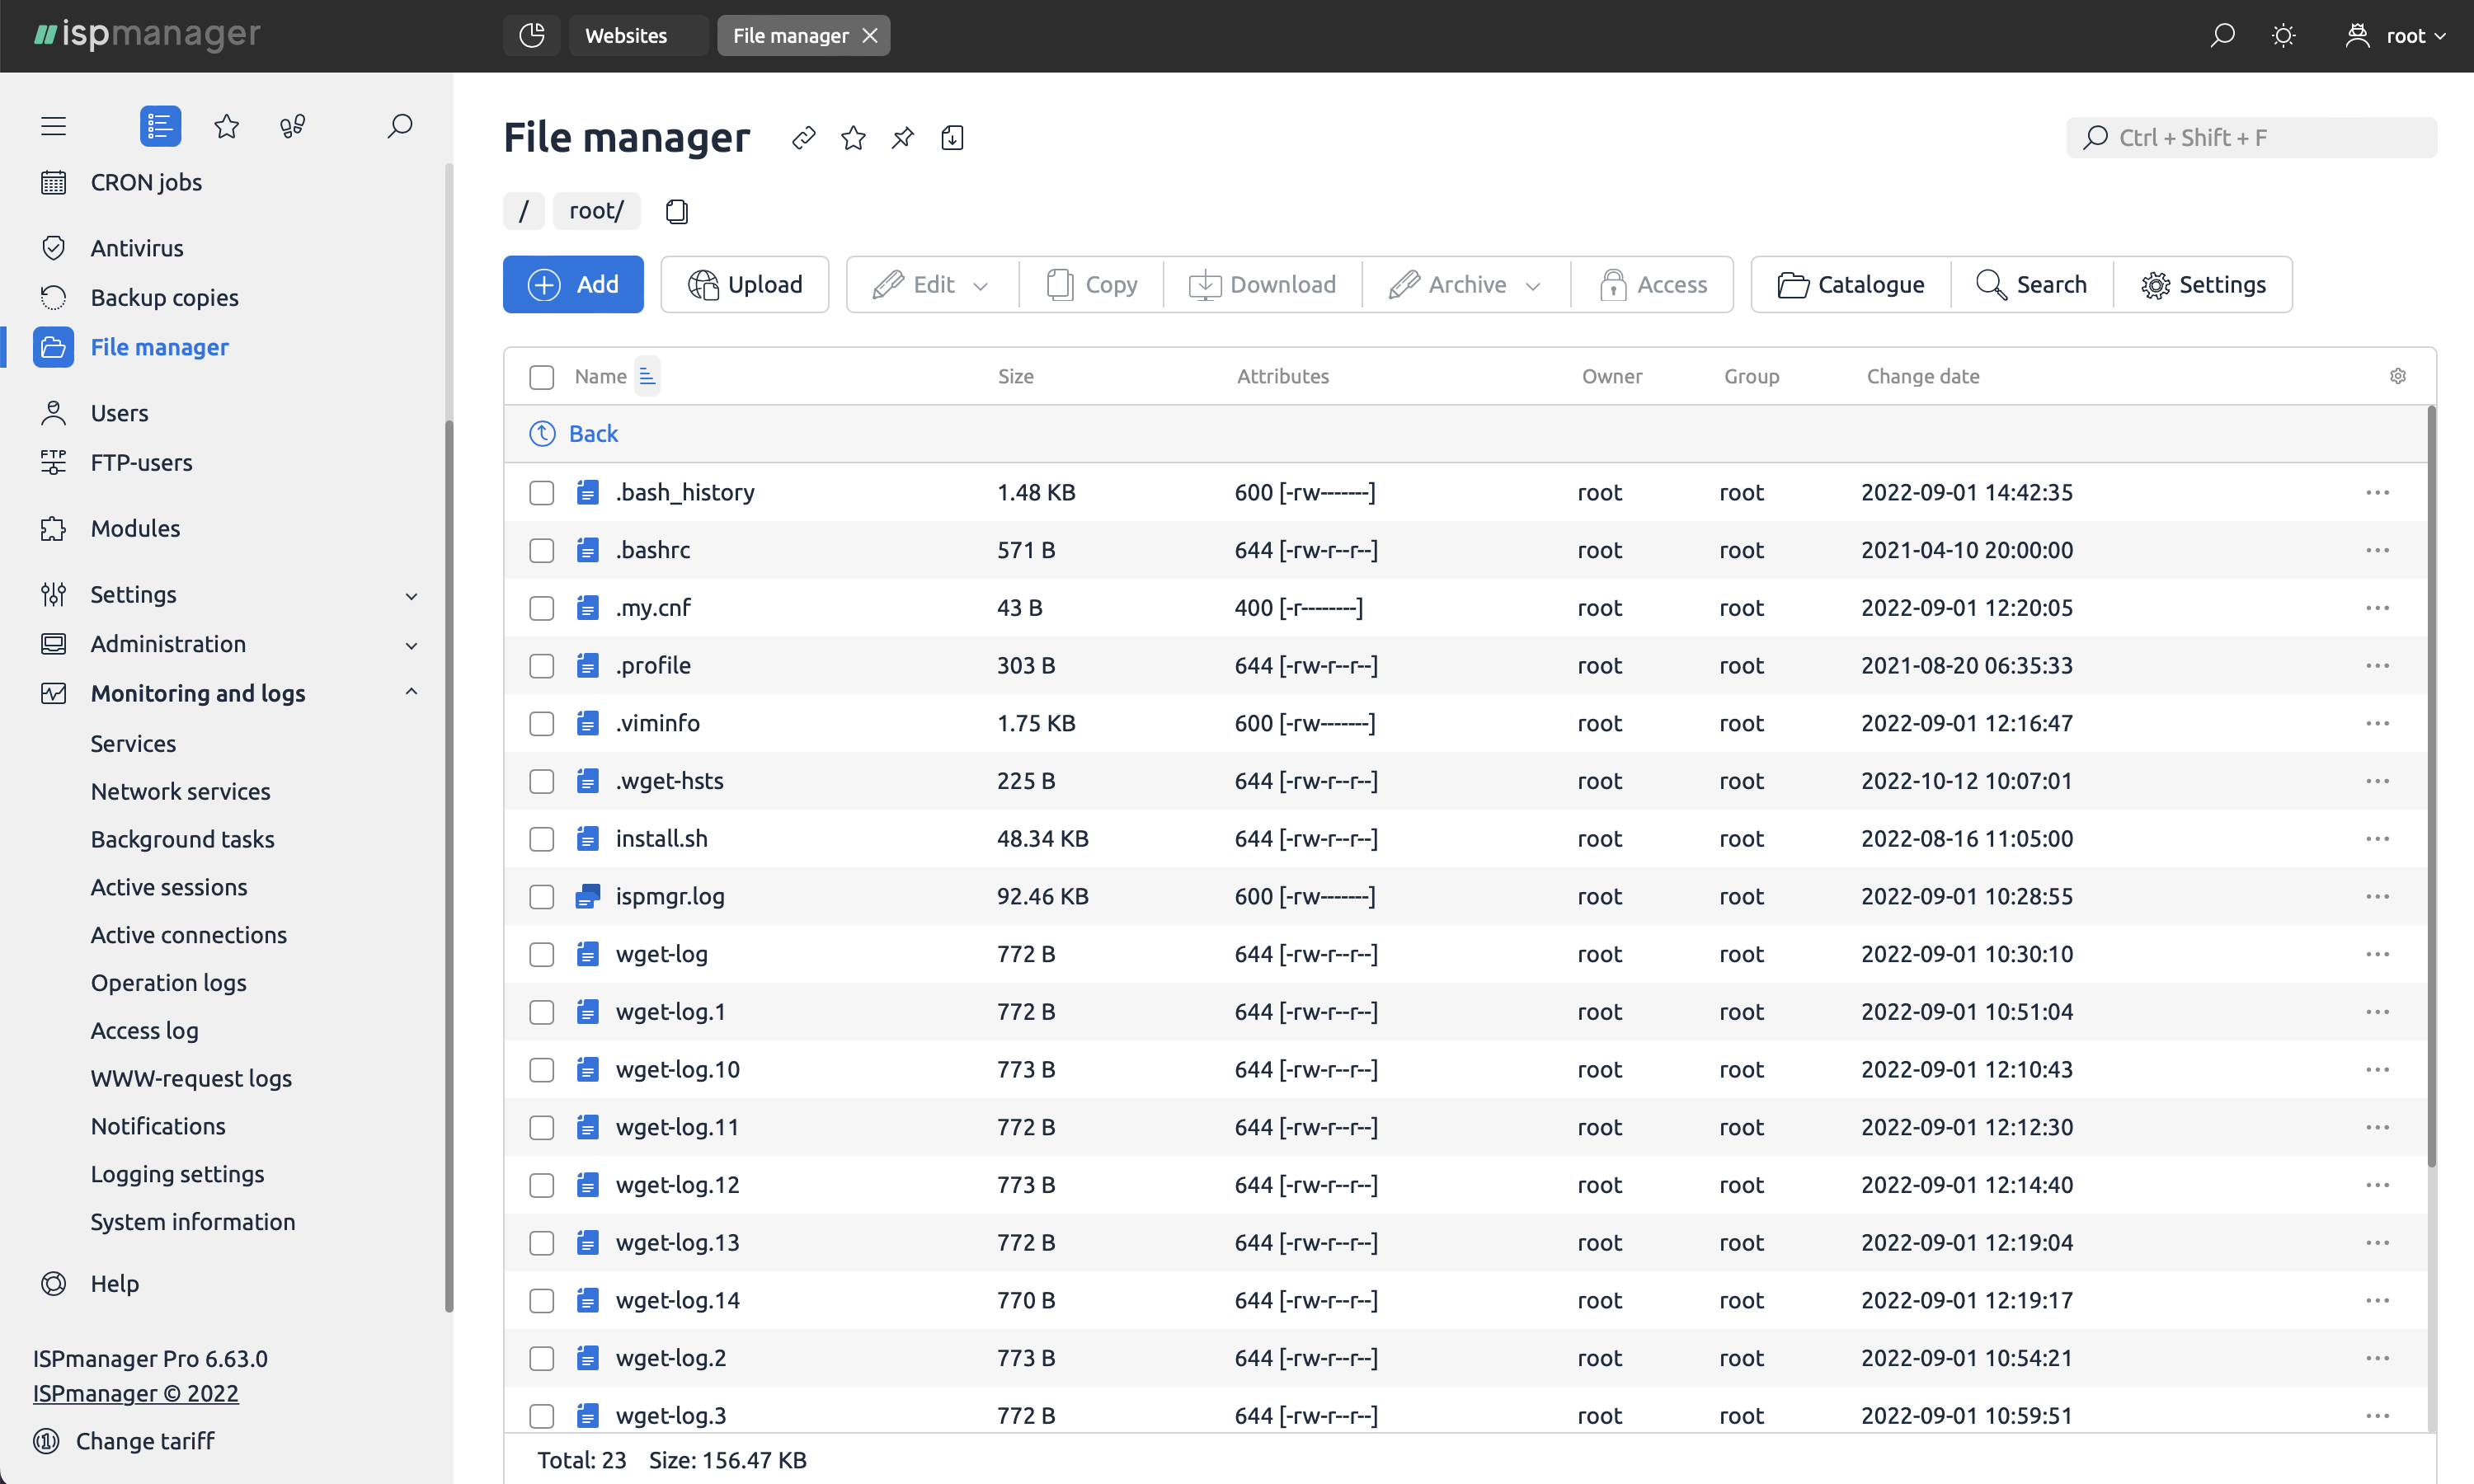
File management. The graphical file manager supports downloading large data volumes without connection loss. It also supports popular FTP servers.
Programming languages support. It is possible to add Python and Perl straight from the panel, without further configuring the repositories. You can choose the PHP interpreter version and mode for a separate site. It supports Node.js handler and PHP Composer.
Server and site protection. It includes tools for server backup, mail protection, firewall, response to DDoS attacks, and high-quality anti-virus Dr.Web to keep your system protected.
Dark and light theme. Ispmanager follows all modern design trends and takes care of user experience. Dark theme is a smart solution, which makes it more convenient to work in a dark place.
Which ispmanager version will be the one to choose?
Today, four versions (licenses) of the ispmanager panel exist. There are three versions — lite, pro, and host — which are mostly used for deploying and administering sites on VPS or dedicated servers. Licenses vary in the number of domains that you can manage. However, if you are an internet hosting provider and would like to offer a panel to your customers, the business version is the right option for you. Let's look more closely at the features and differences.
Ispmanager lite is ideal for freelancers and web studios that have a small number of projects — no more than 10 domains. However, a lot of team members can work with the panel: the total number of user accounts is unlimited. The version provides all the necessary tools for a developer: it allows you to configure web servers, make websites, and add extra modules.
Ispmanager pro has the same features as the lite version but also supports a maximum of 50 domains, so it is sufficient for a larger number of projects. Additionally, it has a complete module to work with Docker technology.
Ispmanager host has the same functionality as the pro version, but without limiting the number of domains, which means that it is suitable for large web studios.
Ispmanager business
Ispmanager business significantly differs from other versions and is designed for service providers. The business version supports shared hosting:
- manages a cluster of servers;
- allows setting up reselling;
- allows limiting RAM, and CPU for users, to ensure that "neighbors" in hosting do not disturb each other.
We've put together the main differences between the versions in a useful table to help you choose the best version for your needs.
| Lite | Pro | Host | Business |
|---|---|---|---|
For web developers and site administrators. Can be purchased from a provider or installed directly on VPS, dedicated servers |
For providers and resellers |
||
Up to 10 domains |
Up to 50 domains |
Unlimited number of domains |
Unlimited number of domains |
For one or more projects |
For the average number of projects |
To support a large number of websites |
To start a business with ispmanager |
The version of ispmanager to choose depends on your needs and the number of projects you are going to manage. If you want to build and manage websites, the lite, pro, or host licenses are sufficient. If you prefer to run your own hosting and reselling service, choose business. If you order our servers, either VPS or dedicated, then you can pick any version of ispmanager that meets your specific needs.
This guide will cover the main features and capabilities of ispmanager — the control panel for websites and web-server. We'll also talk about the interface, the differences between versions of the panel, and the support that ispmanager users can receive. You can choose this control panel when you order a virtual server with an operating system based on Linux distributions.
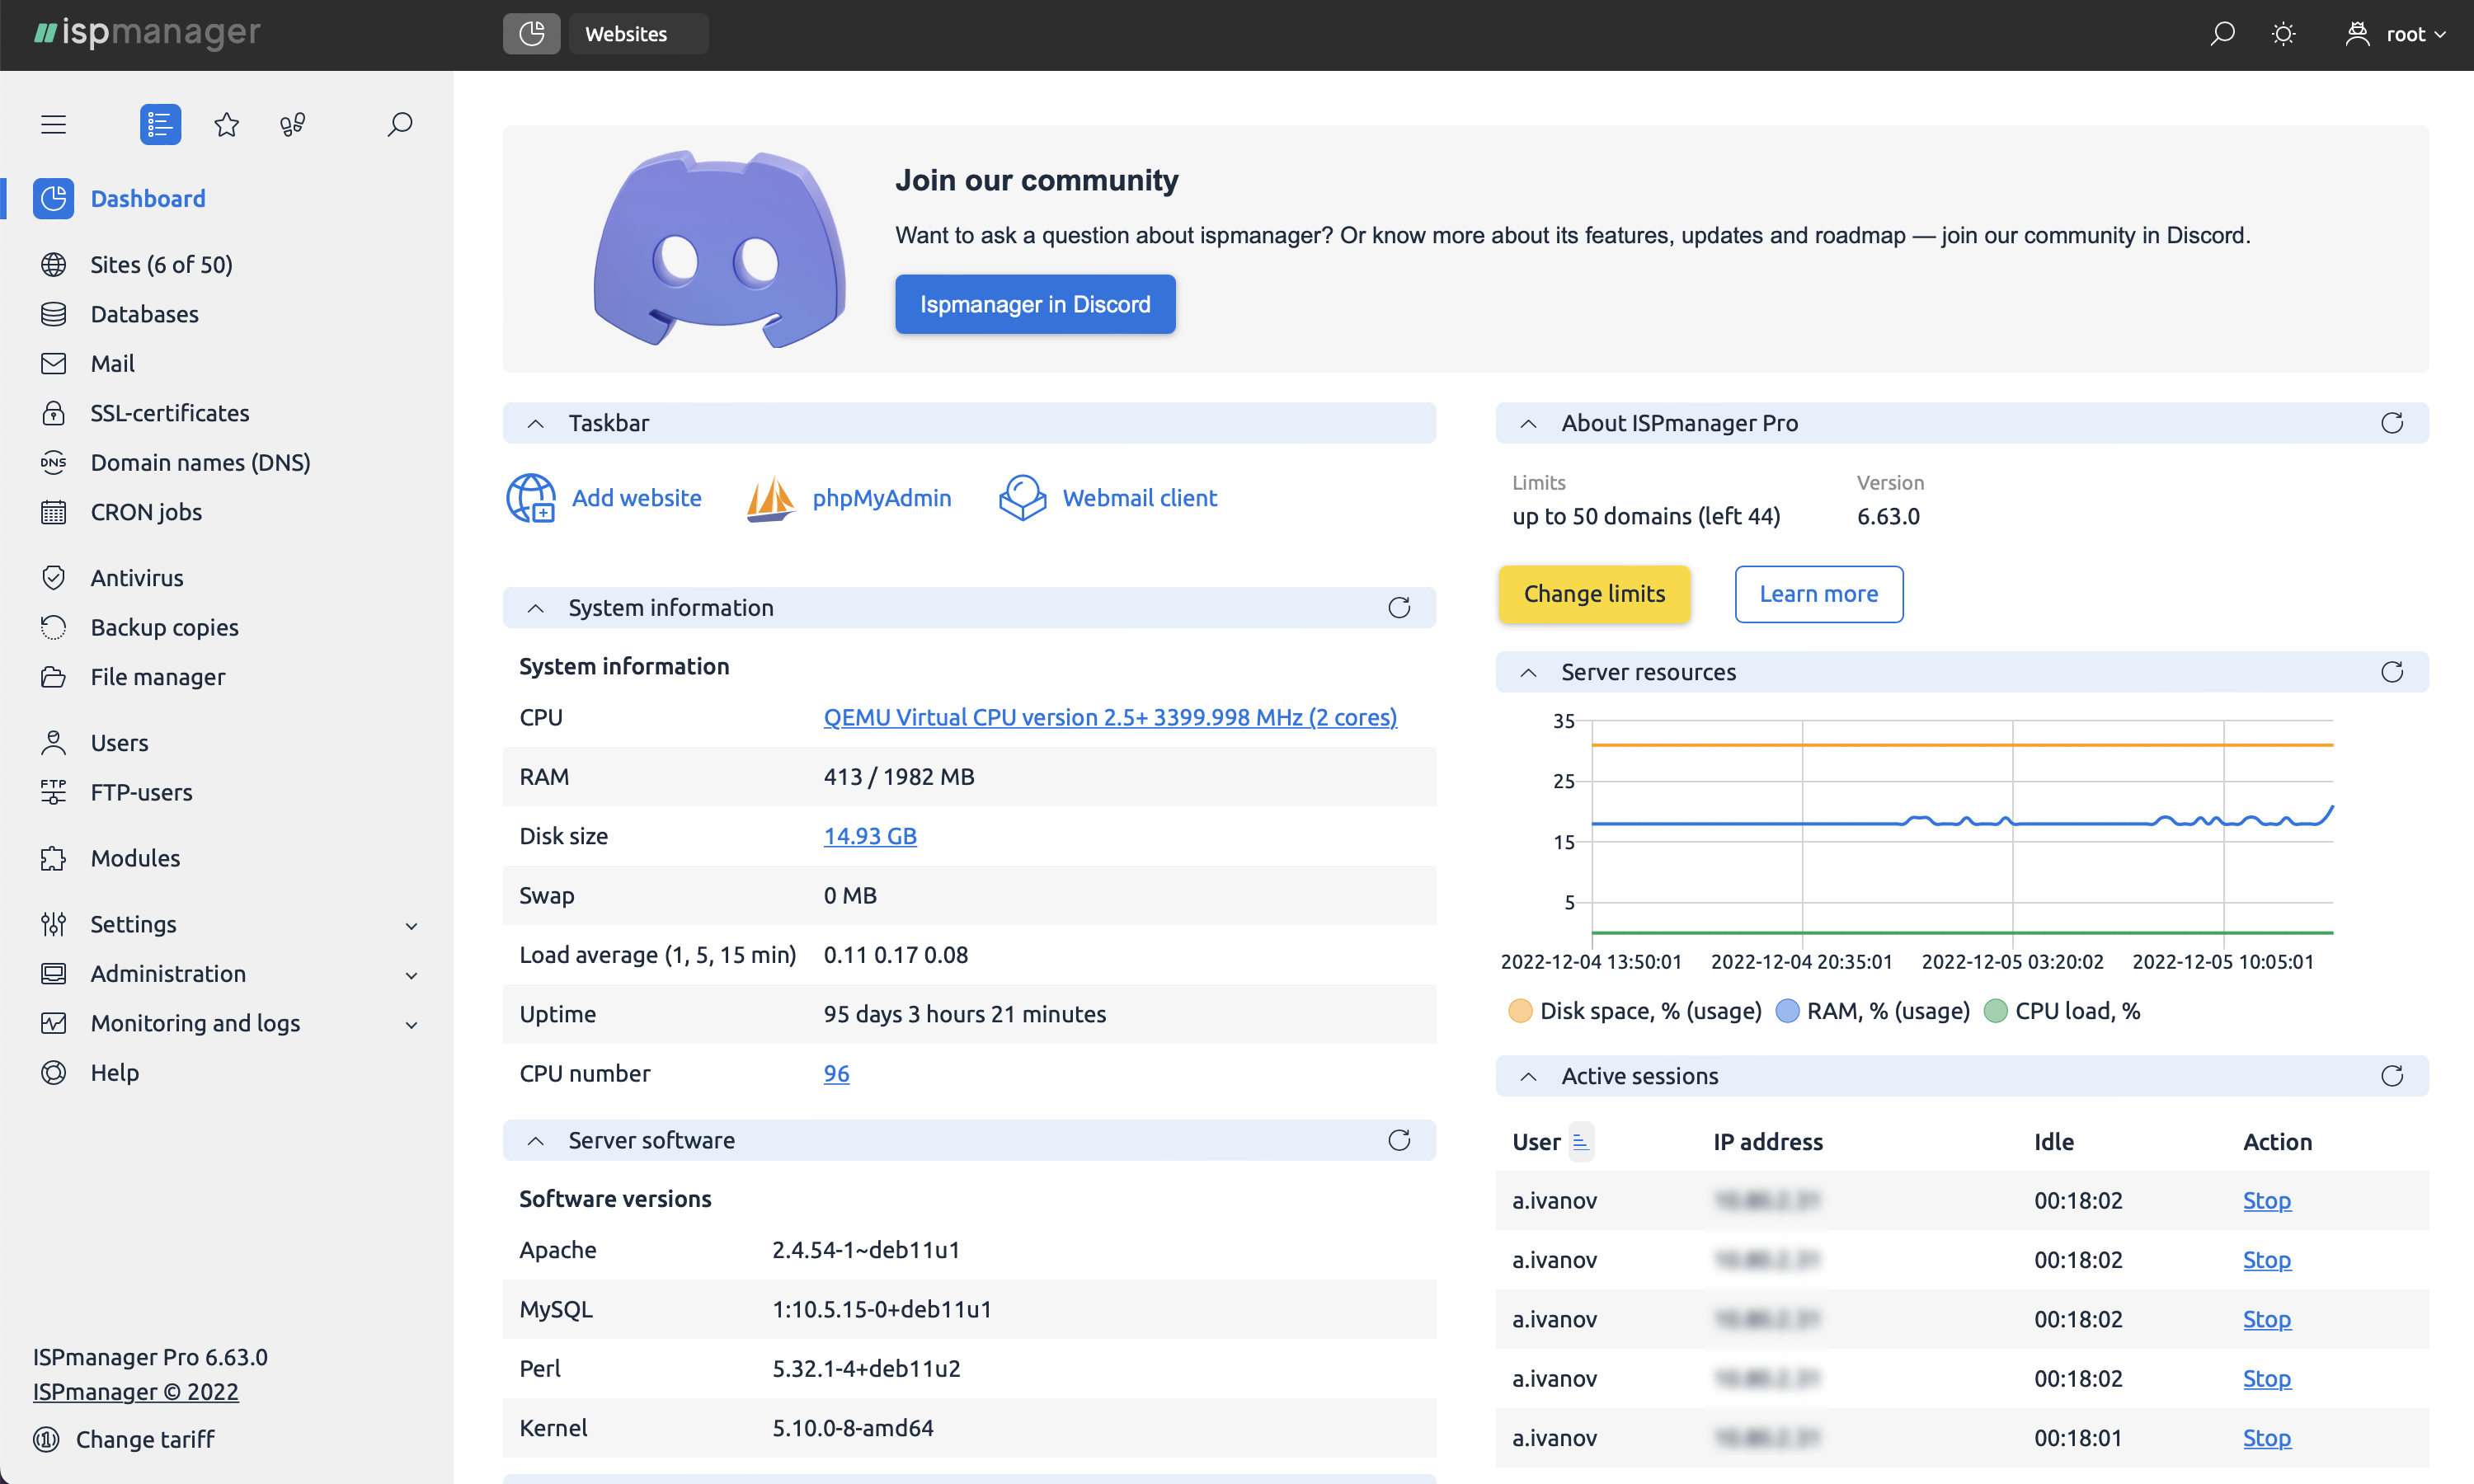
Learning the interface
If you don't want to work with the server via the console, you can use the ispmanager GUI. It's clear and user-friendly, and the settings required for the smooth operation of the web server are all set in advance and can be easily configured in the panel. The left side of the interface is the main menu, from which you can go to the desired settings: create a site, write to the DNS server, and manage the file manager. You can select the language of the panel — English and Italian languages available. Here you can also manage users: create an account for each and individually set the access permissions.
The core functionality of the ispmanager panel
Ispmanager is a commercial web server panel. It helps to create and manage websites, e-mail accounts, and databases. We will take a detailed look at the panel's features.
Website creation. With ispmanager panel, you are able to connect a domain, configure PHP and Node.js, install an SSL certificate and CMS, or create a site using the website builder.
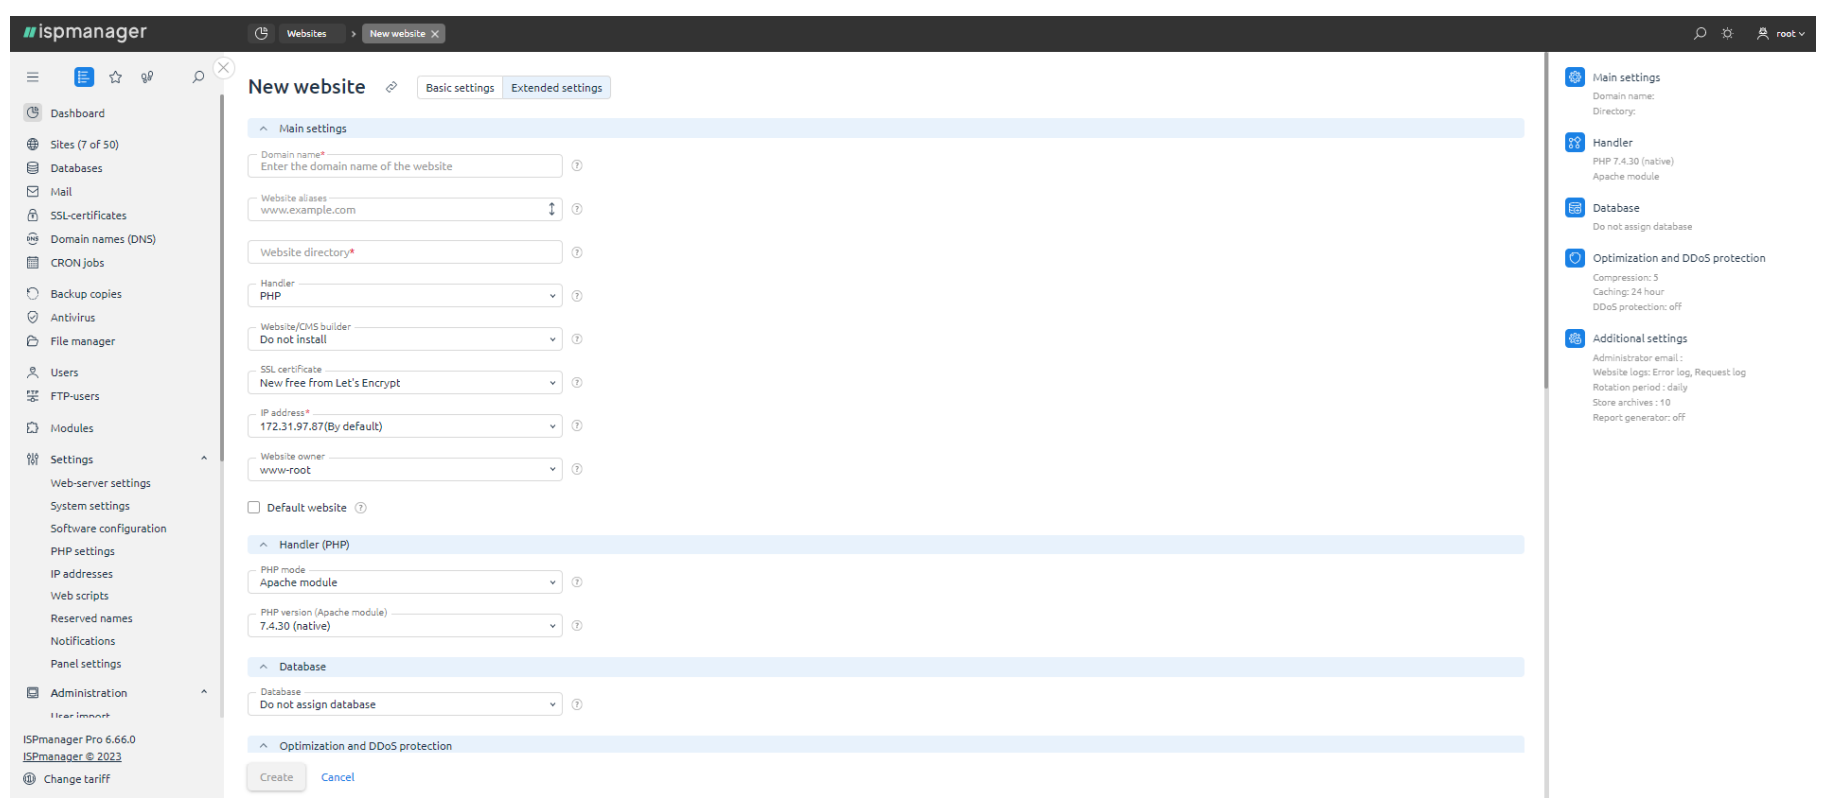
Work with PHP. The ispmanager panel significantly simplifies working with PHP: it supports different modes and alternate versions for each host, extensions, and the Composer package manager.
Node.js. The ispmanager panel supports Node.js: you can set up different versions and divide applications between users.
DNS server. The panel includes its own DNS server, and the ability to connect external ones as well. For phishing protection, there is support for DNSSEC, an extension that generates a unique digital signature for NS records.
Email domains. The ispmanager panel provides support for managing a mail server on its own domain. Includes transition to the Roundcube mail client and a large selection of tools to protect against spam and viruses: blacklists, email header analysis, behavior-based blocking, and much more.
Databases. You can create database servers directly from ispmanager. It supports MySQL, MariaDB, PerconaServer, PostgreSQL. It is possible to install a dedicated version of DB for any site and manage user access to the database.
SSL certificates. A great benefit of ispmanager is that it supports free SSL certificates from Let's Encrypt. They are automatically installed and extended. However, you can add any commercial certificates to your site if you need advanced protection.
File manager and FTP. The panel includes its own file manager with a code editor, and you can also manage FTP access: add users and grant access rights.
Backups. The panel backs up user data. It supports saving backups directly on the server and to external storages, even cloud storages.
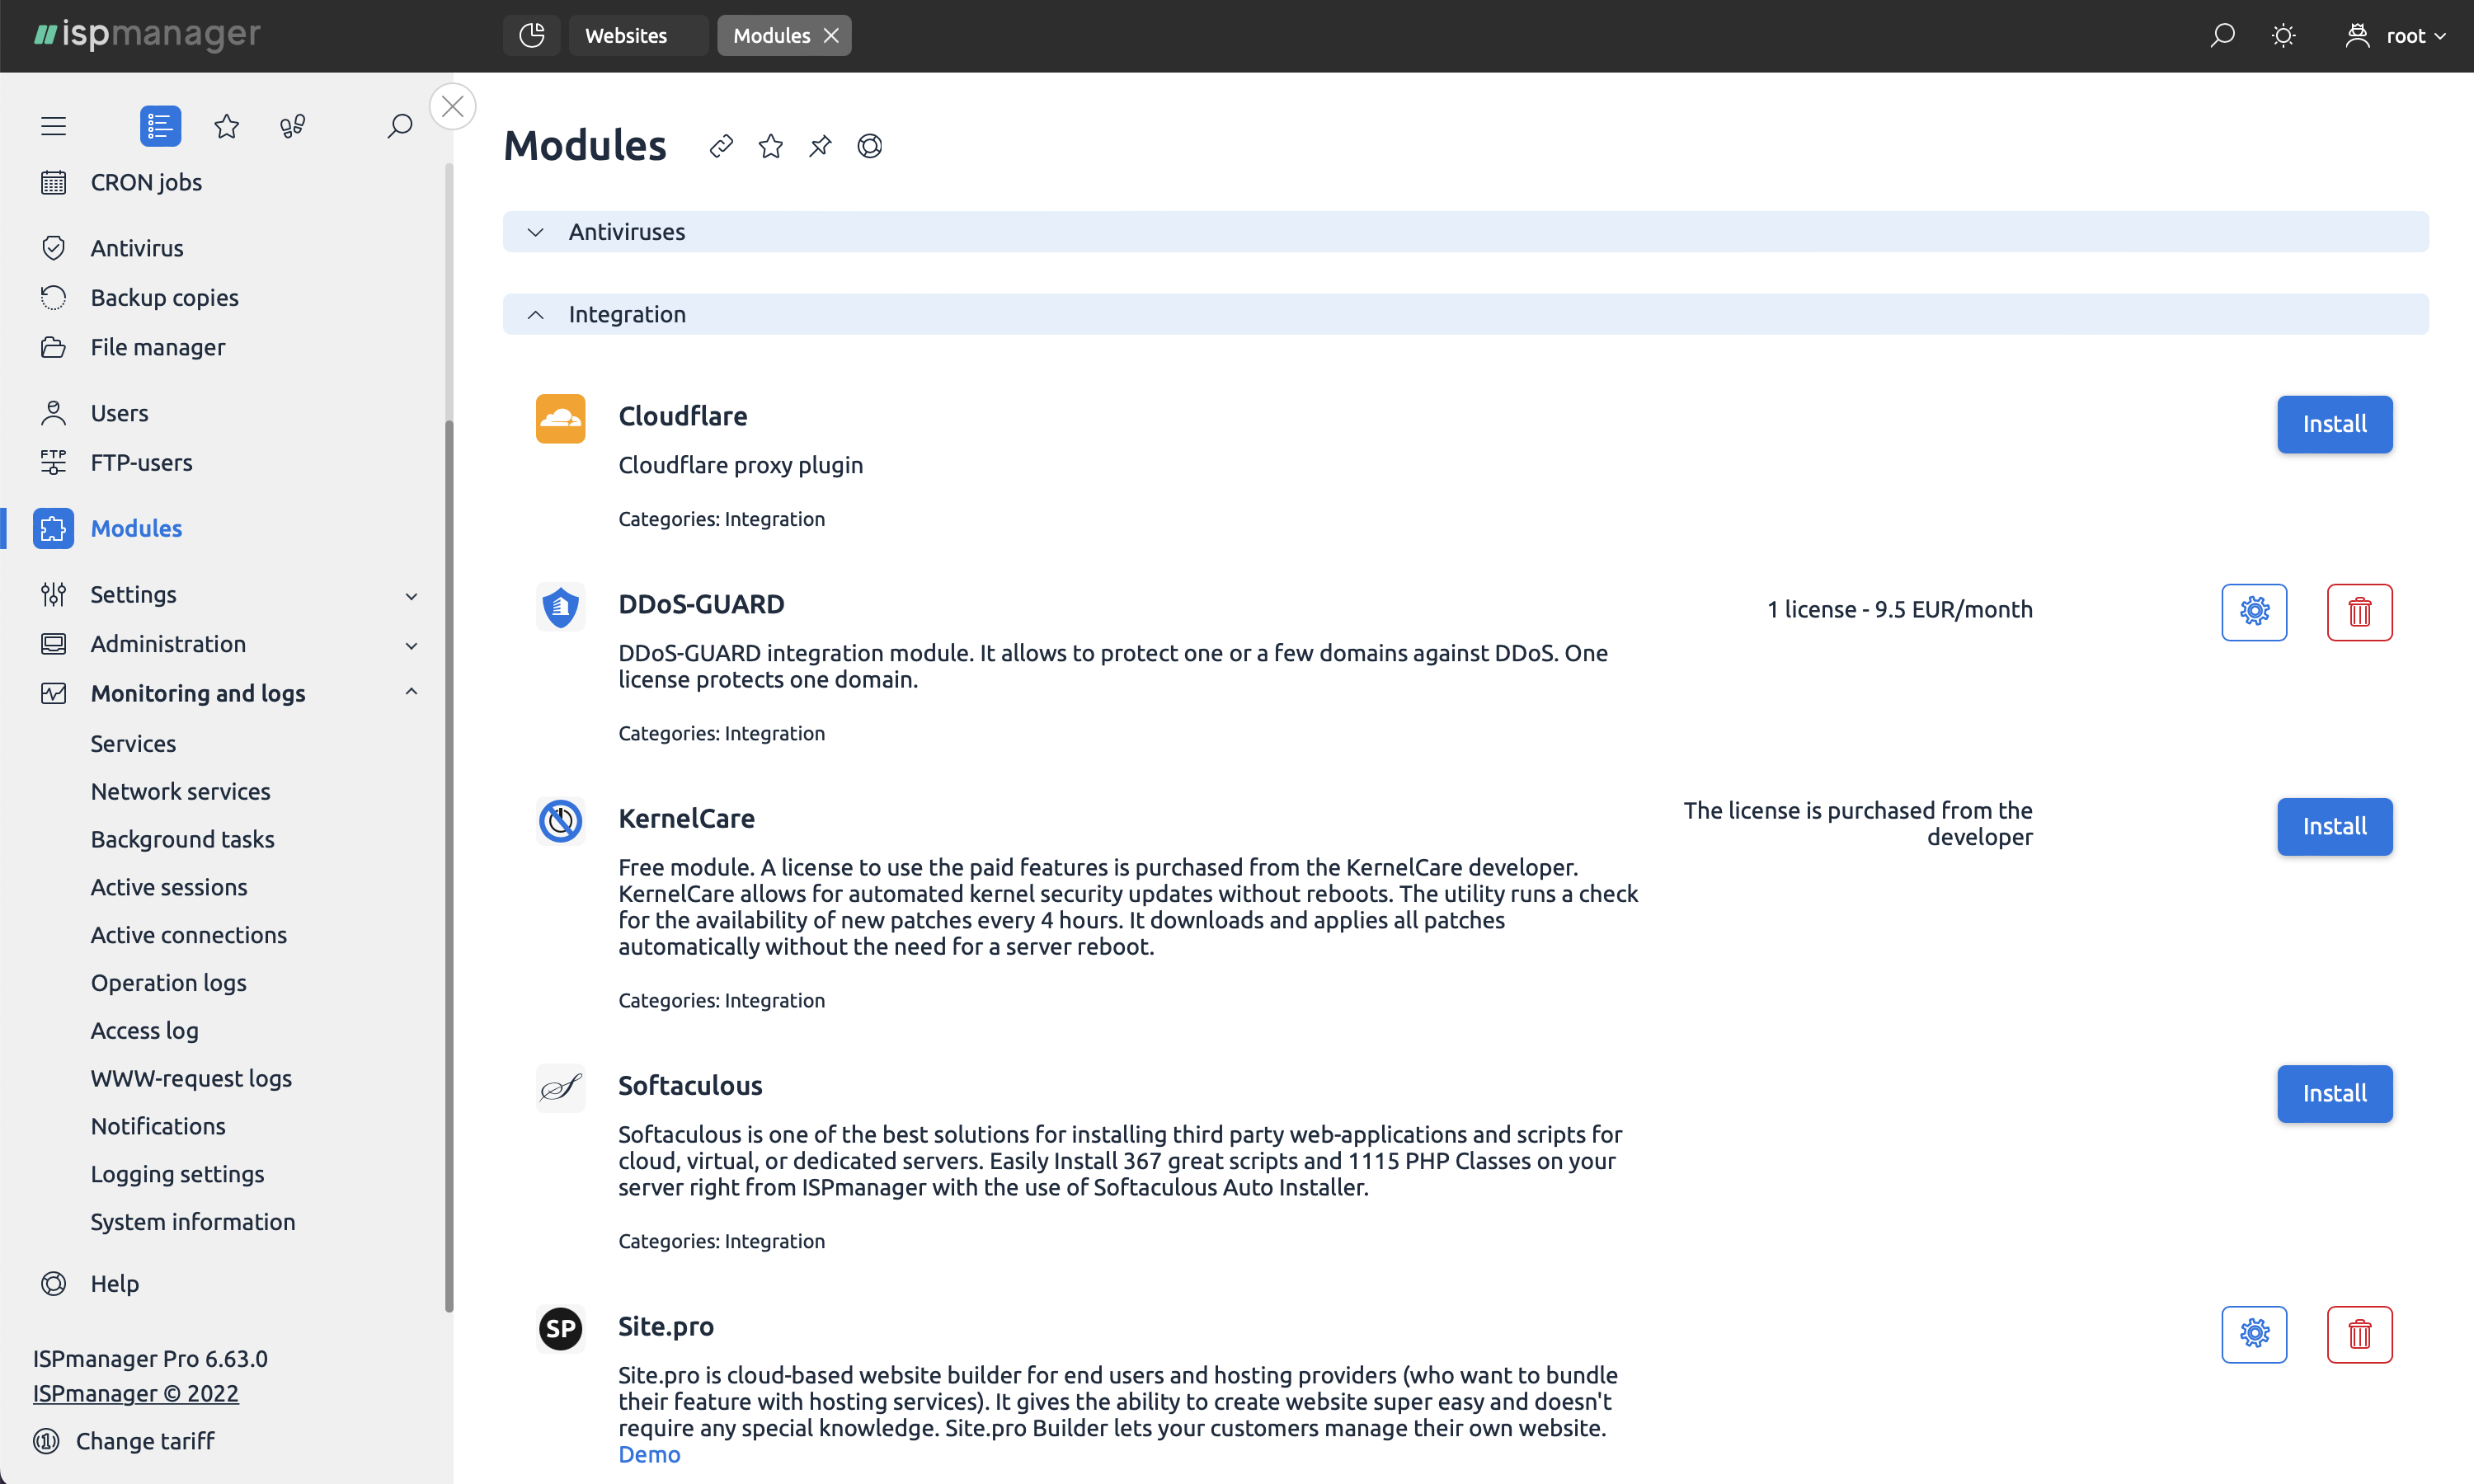
Modules in ispmanager
Besides the basic tools, a lot of which are included in ispmanager, there is an opportunity to add extra modules that improve functionality. There are both free and paid modules. Here's a look at several of them.
Dr.Web is a commercial antivirus module for websites. It detects and eliminates threats and scans the system.
DDoS-guard is a commercial DDoS protection module. It works on the principle of a reverse proxy server: it allows all traffic to pass through the network of servers and filters malicious traffic. Apart from the attack prevention itself, the module can act as a CDN (content delivery network), thus speeding up the download of images, videos, and other media content.
Softaculous is a tool for deploying web applications. The module is free, but there are some paid scripts. The library contains more than 400 scripts and CMS. With Softaculous you can not only install them, but also update them automatically, and this is very important for the security and performance of the site.
Site.Pro is a module in ispmanager that is widely used to create a website using the website builder easily. In ispmanager is presented a free version, and it is already possible to make a beautiful informational site based on one of the dozens of templates.
The differences between versions of ispmanager
The ispmanager panel is available in various versions (licenses): lite, pro, host, and business. Let's take a closer look at the features and differences.
Ispmanager business is intended for shared hosting. The primary difference from other versions is the possibility to manage a cluster of servers. This version often suits web-hosting providers or companies that manage a lot of web projects.
Lite, pro, and host are the most popular versions of ispmanager. Any of them can be deployed on a single VDS/VPS or dedicated server. The ispmanager lite, pro, and host versions differ in the number of sites you can create in the panel.
We've put together the differences between the versions in a helpful table to help you decide which version is best for you.
| Lite | Pro | Host | Business |
|---|---|---|---|
For web developers and site administrators. Can be purchased from a provider or installed directly on VPS, dedicated servers |
For providers and resellers |
||
Up to 10 domains |
Up to 50 domains |
Unlimited number of domains |
Unlimited number of domains |
For one or more projects |
For the average number of projects |
To support a large number of websites |
To start a business with ispmanager |
You can also find out more about the differences in the versions in our article: "How to pick the most suitable version of the ispmanager panel for your purposes".
About the developer, updates, and documentation of ispmanager
Ispmanager is one of the most popular panels with an eighteen-year history.
The first release, ispmanager 4, was published in 2005. The current version — ispmanager 6 — has been released in 2021.
Updates for ispmanager are available every two weeks. New features first appear in the beta branch, then, after further testing, in the stable. The software has an open roadmap, so you can see which new features are scheduled to be released and vote for them.
Ispmanager has complete documentation in English. There are also unofficial user manuals available on the Internet.
How to get ispmanager on a VDS/VPS
You can order Linux servers (VPS or dedicated) and select any version of ispmanager for your specific needs straight in the server order form.
Portmapper (portmap, rpcbind) is an Open Network Computing Remote Procedure Call service. It dynamically converts Remote Procedure Call service numbers (such as NIS or NFS) into TCP/UDP port numbers.
The service sends RPC broadcast messages on port 111. This specific feature of portmapper could be used to perform a DDoS attack. The UDP protocol allows IP spoofing. Thus, attackers can send small requests to portmapper using the victim's IP address. As a result the server will send all the replies to the victim's address in a much larger volume when receiving such requests. Such amount of traffic from the service heavily loads the infrastructure resources - servers and network equipment, which in turn may lead to inability or delays in processing requests from normal users, which is the purpose of a DDoS attack.
How to check portmapper activity
To check whether you have portmapper running on a VPS or a dedicated server, use the utility rpcinfo, which runs an RPC query and displays the registered RPC services. You can check both local and remote hosts.
To check the local host, run the rpcinfo command:
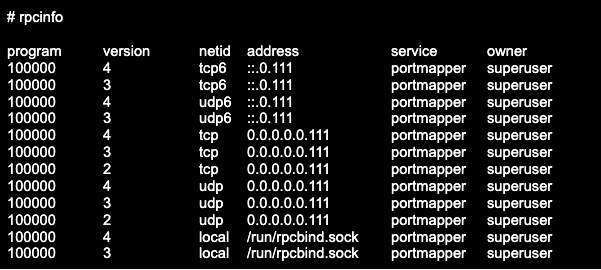
To check a remote host, specify its address, for example after the -p key. Applying the -s key will show the output in shortened form. Example output of rpcinfo command with -p and -s keys:


The options of the rpcinfo utility can be found in the man help, which can be called with the command man rpcinfo (also man rpcbind).
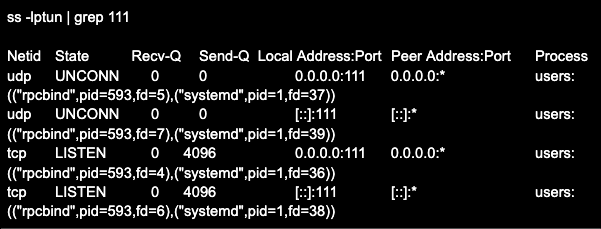
Additionally, a local host check can be performed with the ss utility (netstat). The use and description of the keys for this utility can also be found in the man help. Here is an example (the command header is added separately for clarity):
How to disable portmapper
To disable and remove portmapper (rpcbind) from boot in distributions that use systemd, such as Debian, RHEL, Ubuntu, CentOS, Fedora, Gentoo, etc., run the command systemctl stop rpcbind.service:

Next, stop the socket with the systemctl command stop rpcbind.socket.
Use the commands systemctl disable rpcbind.service and systemctl disable rpcbind.socket to remove it from the autorun.
If you are using script-based boot scripts in /etc/init.d, you can stop the service with the /etc/init.d/rpcbind stop command.
You can remove it from the autostart in Debian-based distributions by using the update-rc.d -f rpcbind remove command.
In RedHat distributions, you can remove it using the command chkconfig rpcbind off.
After you disable the portmapper service and run the rpcinfo command, you will see an error message:

How to restrict the connection to portmapper
If you still need the portmapper service, you can restrict access to it by, for example, allowing only certain IP addresses to connect. This can be done by using a network filter by restricting access to port 111.
Examples of commands to restrict UDP for IPv4:

Attention! These guidelines will help you to install VPN client software on your iOS or Android smartphone. The server side of the software is pre-installed on a virtual private server. You can read more about installing a VPN on servers in our guidelines:
VPN is a virtual private network. This technology is a closed and secure logical network in addition to an insecure network (the Internet). You can read more about VPN services and how to use them in our blog (“VPN technology for business: pros and cons”).
How to install and connect OpenVPN on Android
Step 1.
Install an SCP-enabled SFTP client on your smartphone from the App Store: andftp, mobilesftp, or similar apps.
Step 2.
Set up a connection to the server where the OpenVPN server-side is installed using the SCP protocol (port 22). For this purpose, enter the server IP address, your username, and password.
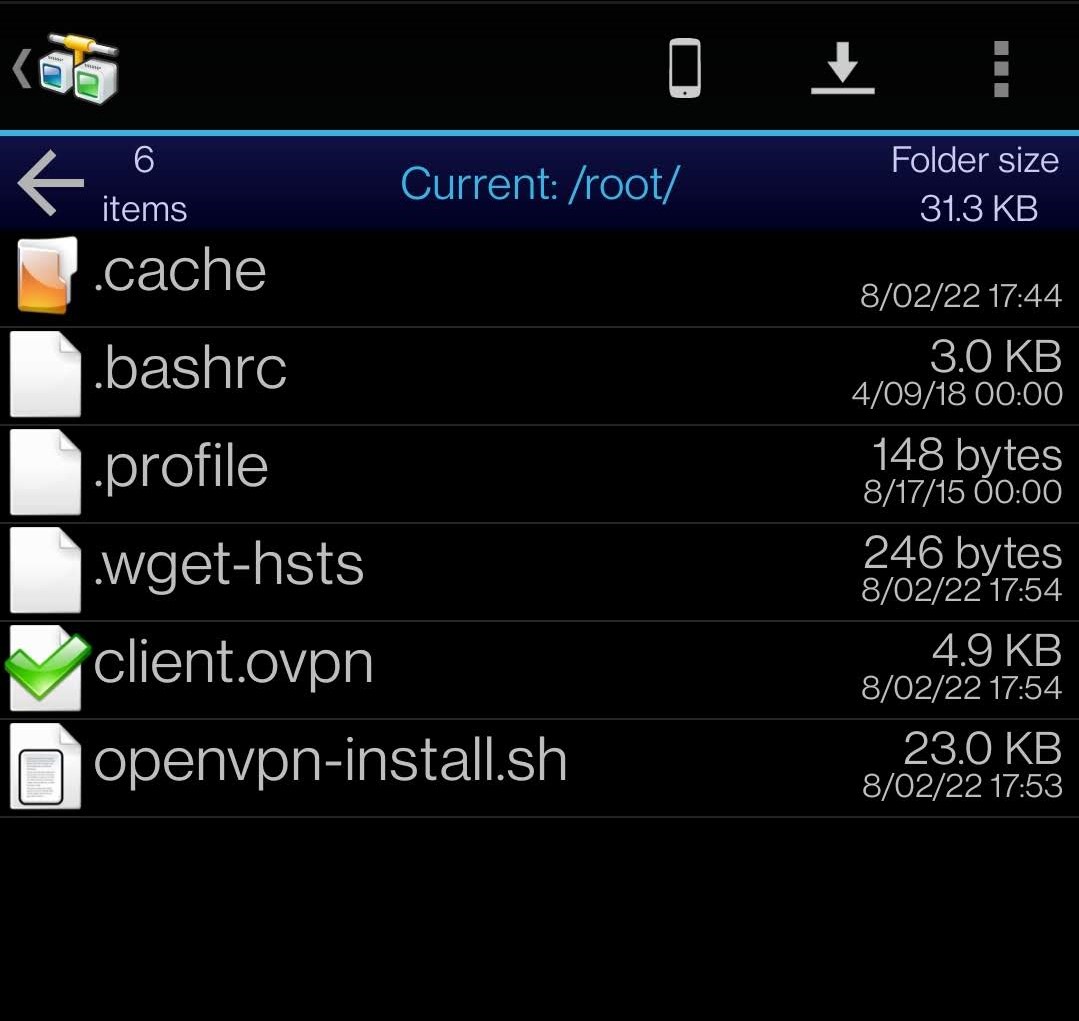
Step 3. Download the client.ovpn file to your smartphone.
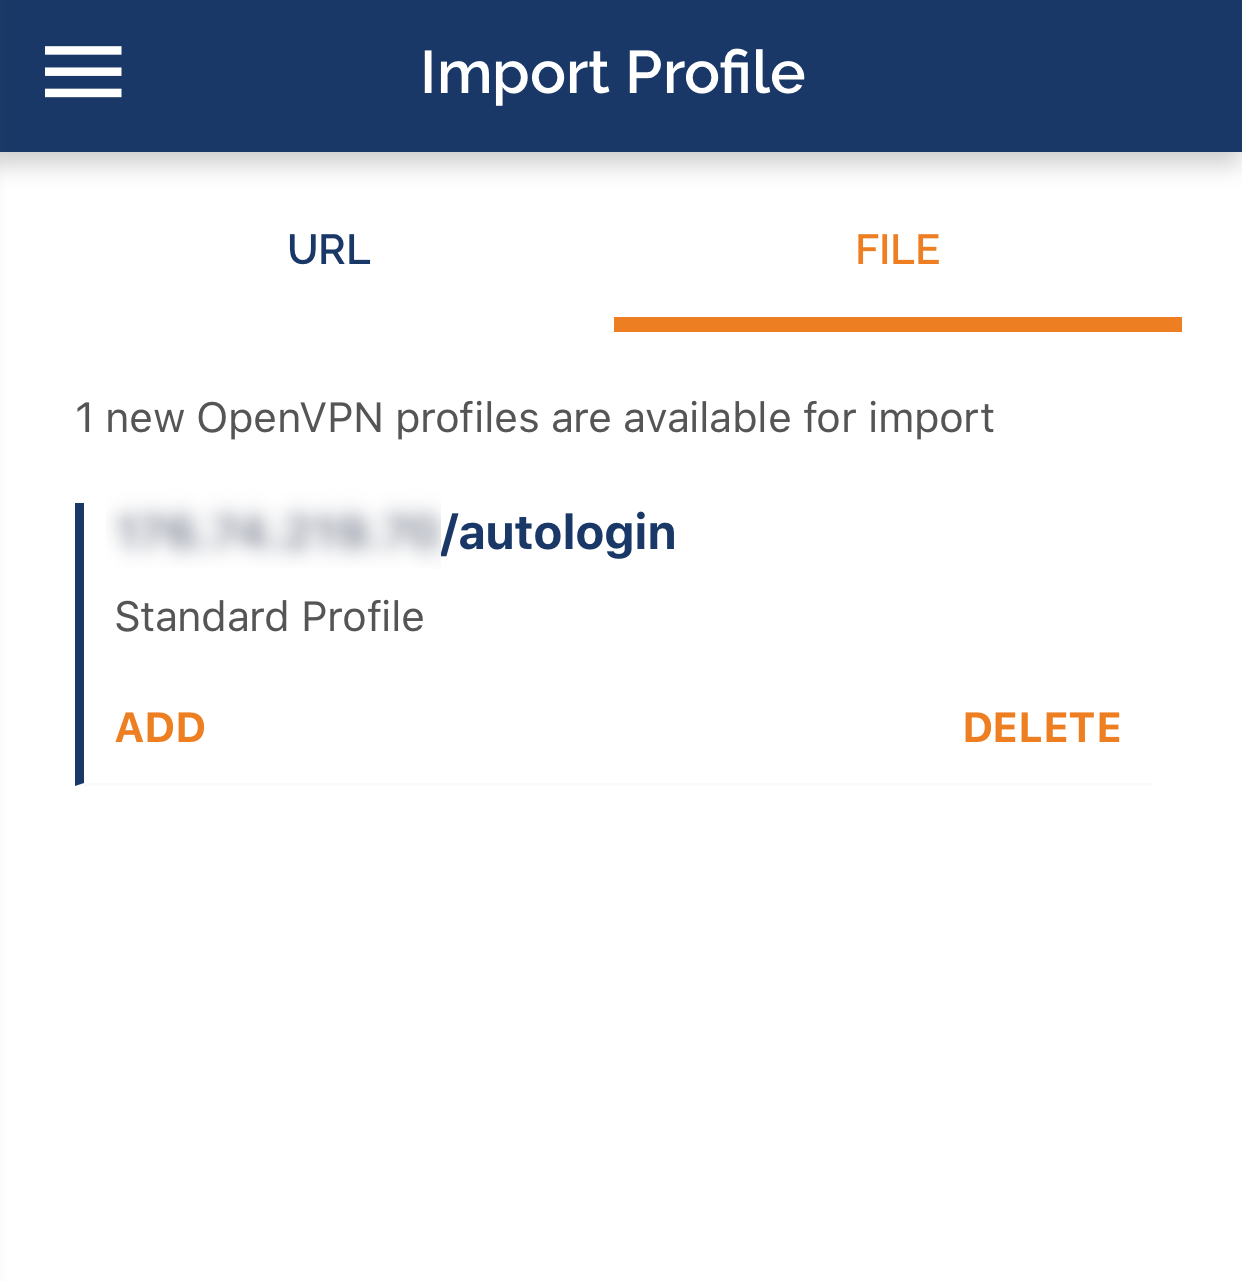
Step 4. Install the OpenVPN Connect app from the App Store on the smartphone.
Launch OpenVPN Connect and select OVPN Profile.
Then, specify the path to the client.ovpn file and establish a connection to the VPN server.
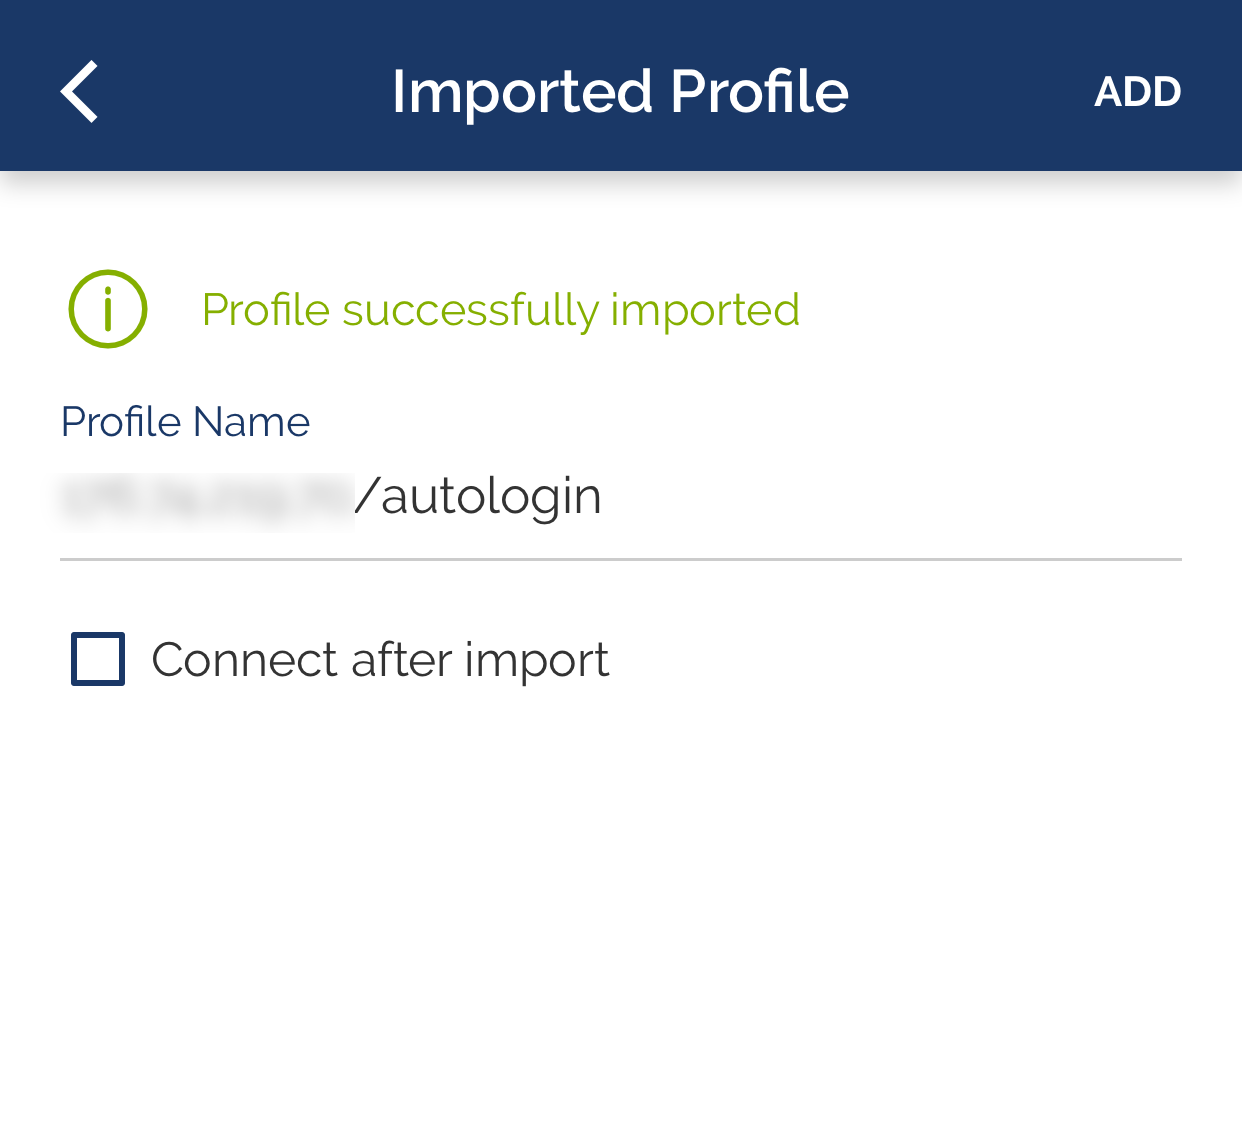
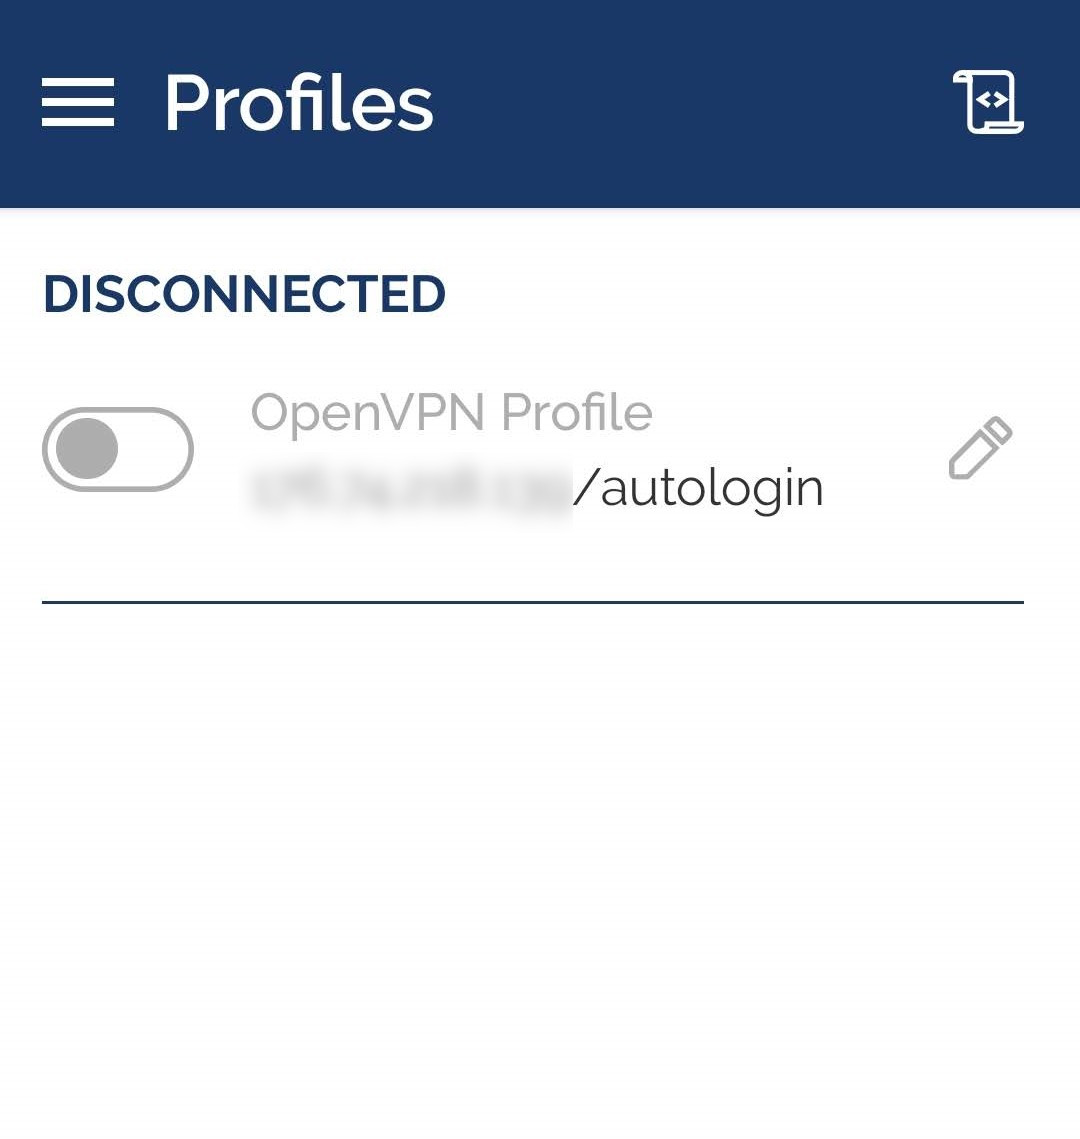
Make sure the connection is established correctly.
To do this, check your IP address on websites such as https://whatismyipaddress.com/ or https://www.whatismyip.com/. It must match the address of your server. When you disconnect from the VPN server, the address should change to the one assigned to you by your Internet service provider.

How to install and connect OpenVPN on iPhone
The procedure for installing a VPN client on your iOS smartphone is almost identical to Android. We will break it down step by step.
Step 1.
Download the VPN client configuration file created by the script to your device. In this regard, for example, save it first on your computer, copy it to iCloud, and then send it to your iPhone.
Step 2.
Install OpenVPN Connect and open it.
Step 3. Select OVPN Profile and specify the path to the client.ovpn file.
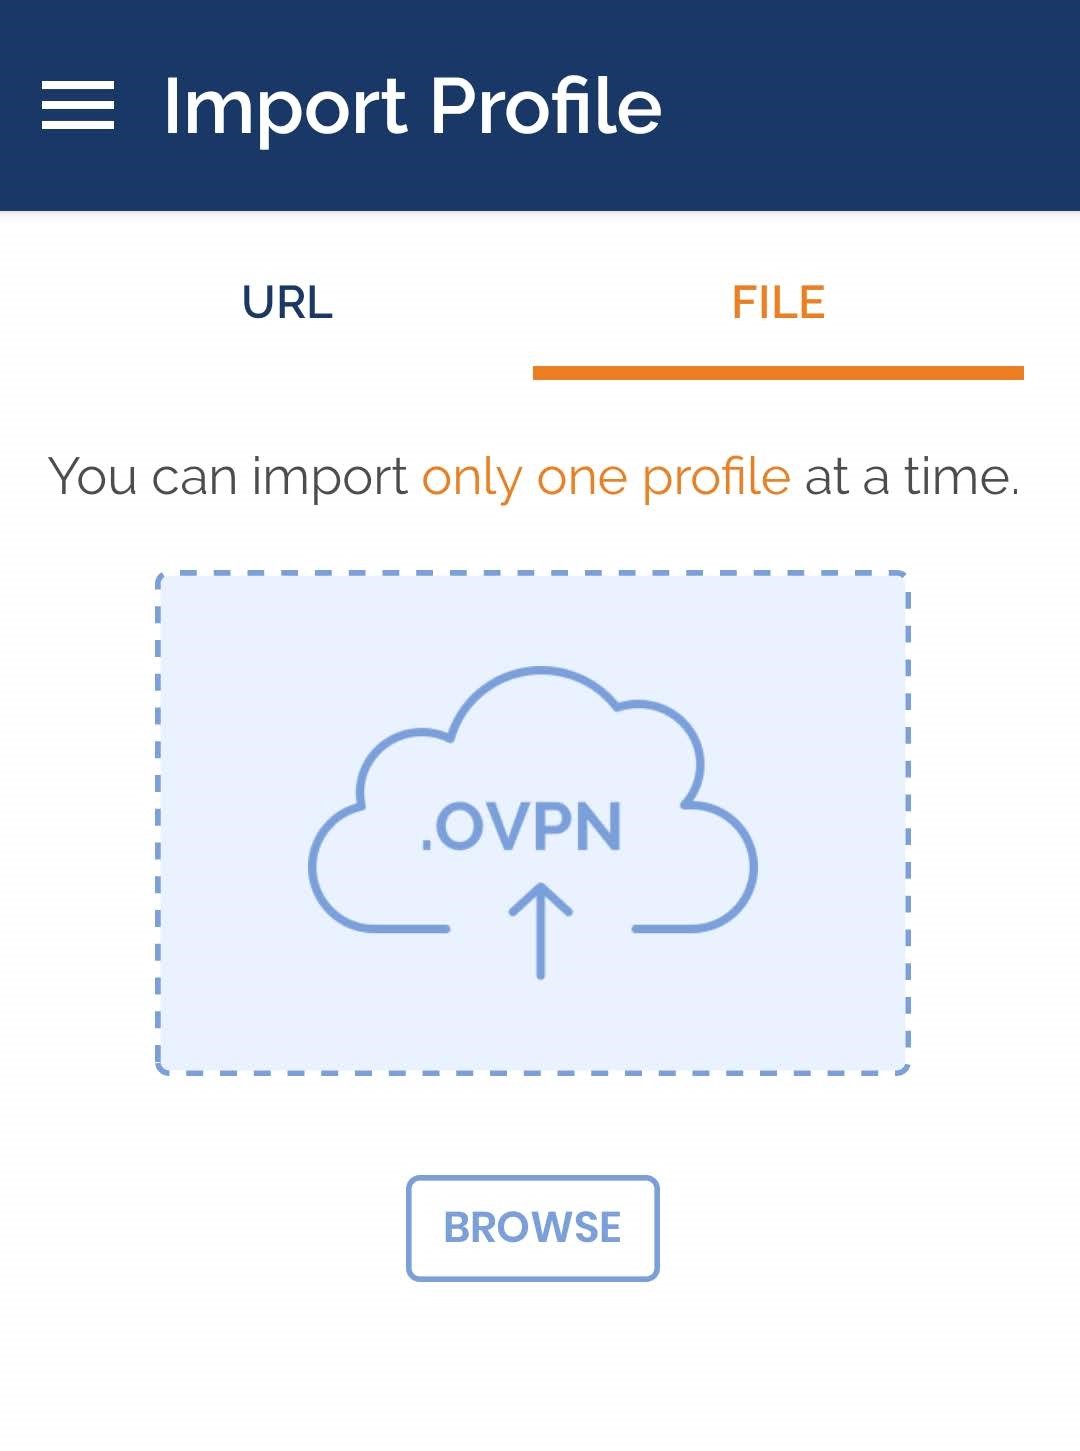

Step 4. Establish a connection to your VPN server.
Step 5. Make sure the connection is established correctly.
To do this, check your IP address on websites such as https://whatismyipaddress.com/ or https://www.whatismyip.com/. It must match the address of your server. When you disconnect from the VPN server, the address should change to the one assigned to you by your internet service provider.
Attention! These guidelines will help you to install VPN client software on your iOS or Android smartphone. The server side of the software is pre-installed on a virtual private server. You can read more about installing a VPN on servers in our guidelines:
- How to create VPN on a VPS with Ubuntu
- How to create VPN on a VPS with CentOS
VPN is a virtual private network. This technology is a closed and secure logical network in addition to an insecure network (the Internet). You can read more about VPN services and how to use them in our blog (“VPN technology for business: pros and cons”).
How to install and connect OpenVPN on Android
Step 1.
Install an SCP-enabled SFTP client on your smartphone from the App Store: andftp, mobilesftp, or similar apps.
Step 2.
Set up a connection to the server where the OpenVPN server-side is installed using the SCP protocol (port 22). For this purpose, enter the server IP address, your username, and password.
Step 3. Download the client.ovpn file to your smartphone.
Step 4. Install the OpenVPN Connect app from the App Store on the smartphone.
Launch OpenVPN Connect and select OVPN Profile.
Then, specify the path to the client.ovpn file and establish a connection to the VPN server.
Make sure the connection is established correctly.
To do this, check your IP address on websites such as https://whatismyipaddress.com/ or https://www.whatismyip.com/. It must match the address of your server. When you disconnect from the VPN server, the address should change to the one assigned to you by your Internet service provider.
How to install and connect OpenVPN on iPhone
The procedure for installing a VPN client on your iOS smartphone is almost identical to Android. We will break it down step by step.
Step 1.
Download the VPN client configuration file created by the script to your device. In this regard, for example, save it first on your computer, copy it to iCloud, and then send it to your iPhone.
Step 2.
Install OpenVPN Connect and open it.
Step 3. Select OVPN Profile and specify the path to the client.ovpn file.
Step 4. Establish a connection to your VPN server.
Step 5. Make sure the connection is established correctly.
To do this, check your IP address on websites such as https://whatismyipaddress.com/ or https://www.whatismyip.com/. It must match the address of your server. When you disconnect from the VPN server, the address should change to the one assigned to you by your internet service provider.
If you do not want to overpay for any third-party VPN services, we suggest you use these guidelines to install your own VPN server on a Linux virtual machine. Thus, your data will be completely under your control and protected from malicious attacks.
The server side of the software is installed on a VPS with Ubuntu 18.04. We will also show you how to install the client software for the OpenVPN protocol on your personal computer with Windows 10.
VPN (Virtual Private Network) is a closed and secure logical network in addition to an insecure network (the Internet). You can read more about VPN services and how to use them in our blog (“VPN technology for business: pros and cons”).
How to install the OpenVPN server-side from a script
Today, OpenVPN is one of the most stable and reliable open-source VPN technology protocols. OpenVPN is characterized by a large number of implementations for most of the platforms used.
To install the server-side of the VPN software on a virtual server, we use the openvpn-install open-source script.
The ready-made script makes it possible to install and configure any VPN easily. In this case, the installation process is a set of simple steps:
- connection to the server;
- preliminary update of the operating system, if required;
- downloading and activation of the installation script;
- making a copy of the configuration file;
- service performance check.
Attention! The script may be used with the following distributions: CentOS (from version 7), Debian (from version 9), Ubuntu (from version 17) (in case of version 16, use the vpn1604 script).
We will not begin to install the script on a VPS with Ubuntu 18.04.
Step 1. Connect to the server
When making the order, you receive an e-mail with the information necessary to connect to your virtual server: your server IP address, server administrator’s login and password (root), server control panel (URL), as well as login and password, to access it – here you can choose the required operating system.
In order to connect to the VPS, we recommend using any ssh client: PuTTY, Xshell, etc. Run the following command:
ssh root@ХХ.ХХХ.ХХХ.ХХ
where ХХ.ХХХ.ХХХ.ХХ – your server IP address.
If a non-privileged user is previously created on a virtual server for security purposes and allowed to temporarily
have a higher level of privileges running the sudo command, then do not forget to run this command
every time for all actions that require administrator rights.
In order to log in as a non-privileged user, run the following command:
ssh -l user ХХ.ХХХ.ХХХ.ХХ
where ХХ.ХХХ.ХХХ.ХХ – your server IP address, user – name of the non-privileged user.
Step 2. Update your operating system
You can skip this step if your server ensures the regular update of the operating system. If Ubuntu is recently installed, update it using the following commands for a root user:
apt-get update
apt-get upgrade -y
or a non-privileged user:
sudo apt-get update
sudo apt-get upgrade -y
Step 3. Download and launch the VPN server installation script
The following command allows you to download and launch the script:
wget https://git.io/vpn -O openvpn-install.sh && bash openvpn-install.sh
or
sudo wget https://git.io/vpn -O openvpn-install.sh && bash openvpn-install.sh
First of all, you will see a welcome screen and a few questions:
Welcome to this OpenVPN road warrior installer!
Which protocol should OpenVPN use?
1) UDP (recommended)
2) TCP
Protocol [1]:
What port should OpenVPN listen to?
Port [1194]:
Select a DNS server for the clients:
1) Current system resolvers
2) Google
3) 1.1.1.1
4) OpenDNS
5) Quad9
6) AdGuard
DNS server [1]:
Enter a name for the first client:
Name [client]:
OpenVPN installation is ready to begin.
Press any key to continue…
In our example, we run the script on a server with a single IP address, so all questions may be answered by pressing the Enter key. The first option out of all offered will be selected. Namely:
- IP address will be determined automatically. If there are several addresses on the server, then the script will offer to select one manually;
- Protocol: UDP;
- Connection port: 1194;
- Servery DNS: Current system resolvers;
- DNS servers: Current system resolvers;
Then, the script will install the repository and all necessary packages, generate RSA keys, install certificates and configuration files for both the server and the client, configure the network filter, and directly launch the openvpn-server service.
When the installation process is complete, the script will display a message about the location of the client configuration file. In case of an administrator user, the file will be installed in the root user's home directory: /root/client.ovpn. If the script is installed on behalf of an ordinary user with temporary sudo privileges, then the file will be located in the home directory of this user. This file must be transferred to the computer or other device that will be used to connect to the server. The server configuration file is located here: /etc/openvpn/server/server.conf.
Step 4. Copy the client configuration file
Then, you need to transfer the client configuration file, which is created by the script, to a PC or other device. In our case, we will be transferring it to our personal computer with Windows 10.
You may transfer the file using the WinSCP software or the pscp utility from Putty or ensure the built-in implementation of the OpenSSH protocol on your device.
You may learn more about the WinSCP software on the official website of the developer:
We will consider a command for the pscp utility from Putty. In the Windows command line with administrator rights, specify the path to the software, server, and client configuration directory, which looks like this:
C:\Program Files\PuTTY\pscp.exe root@ХХ.ХХХ.ХХХ.ХХ:/root/client.ovpn "C:\Program Files\OpenVPN\config"
where
- ХХ.ХХХ.ХХХ.ХХ – your server IP address,
/root/client.ovpn– home directory of the root user on the serve,- Documents
C:\Program Files\OpenVPN\config– path where the client configuration file will be saved.
Then, it may be required to accept the server fingerprint. Enter the root user’s password.
If OpenSSH is installed on your computer, then the following command is to be run:
scp root@ХХ.ХХХ.ХХХ.ХХ:/root/client.ovpn .
The dot at the end of the command indicates to the user that the file is transferred to the same folder from which the command is run.
Attention! If you run the script not as a root user, but as a privileged user, then in the command you must specify the directory of this user on the server, instead of the directory of the root user.
Step 5. Check the performance of the VPN server
Before establishing any connection to the VPN server, we recommend you to perform certain service performance checks. Namely:
-
Checking server status:
systemctl status openvpn-server@server -l
    ● openvpn-server@server.service - OpenVPN service for server
    Loaded: loaded (/usr/lib/systemd/system/openvpn-server@.service; enabled; vendor preset: disabled)
    Active: active (running) since Sat 2021-10-17 16:15:44 GMT; 3s ago
    ...
Attention! If you find the inactive (dead) value in the server status, run the specific command (systemctl restart openvpn) and check the status again.
-
Checking socket status:
ss -4nlup | grep 1194
UNCONN 24960 0 XX.XXX.XX.XX:1194 *:* users:(("openvpn",pid=481,fd=8)) -
Checking network filter condition:
iptables -nL | grep 1194
ACCEPT udp -- 0.0.0.0/0 0.0.0.0/0 udp dpt:1194
If, as a result of such checks, there are similar results of the executed commands, then we congratulate you, because you do everything right and now may connect to the OpenVPN server.
How to connect to the OpenVPN server
In order to establish the relevant connection to the VPN server, you need to perform the following tasks:
- install a VPN client on your personal computer, smartphone, or other devices;
- establish the required connection;
- check the quality of the established connection.
Step 1. Install the OpenVPN GUI client on Windows 10
In case of personal computers and laptops with the Windows operating system, the OpenVPN GUI client should be used. The installation process does not cause any difficulties. However, if they take place, you may familiarize yourself with the official instructions posted on the developer's website. By default, the path to the installed software is the following: C:\Program Files\OpenVPN\.
Step 2. Establish the connection to the server
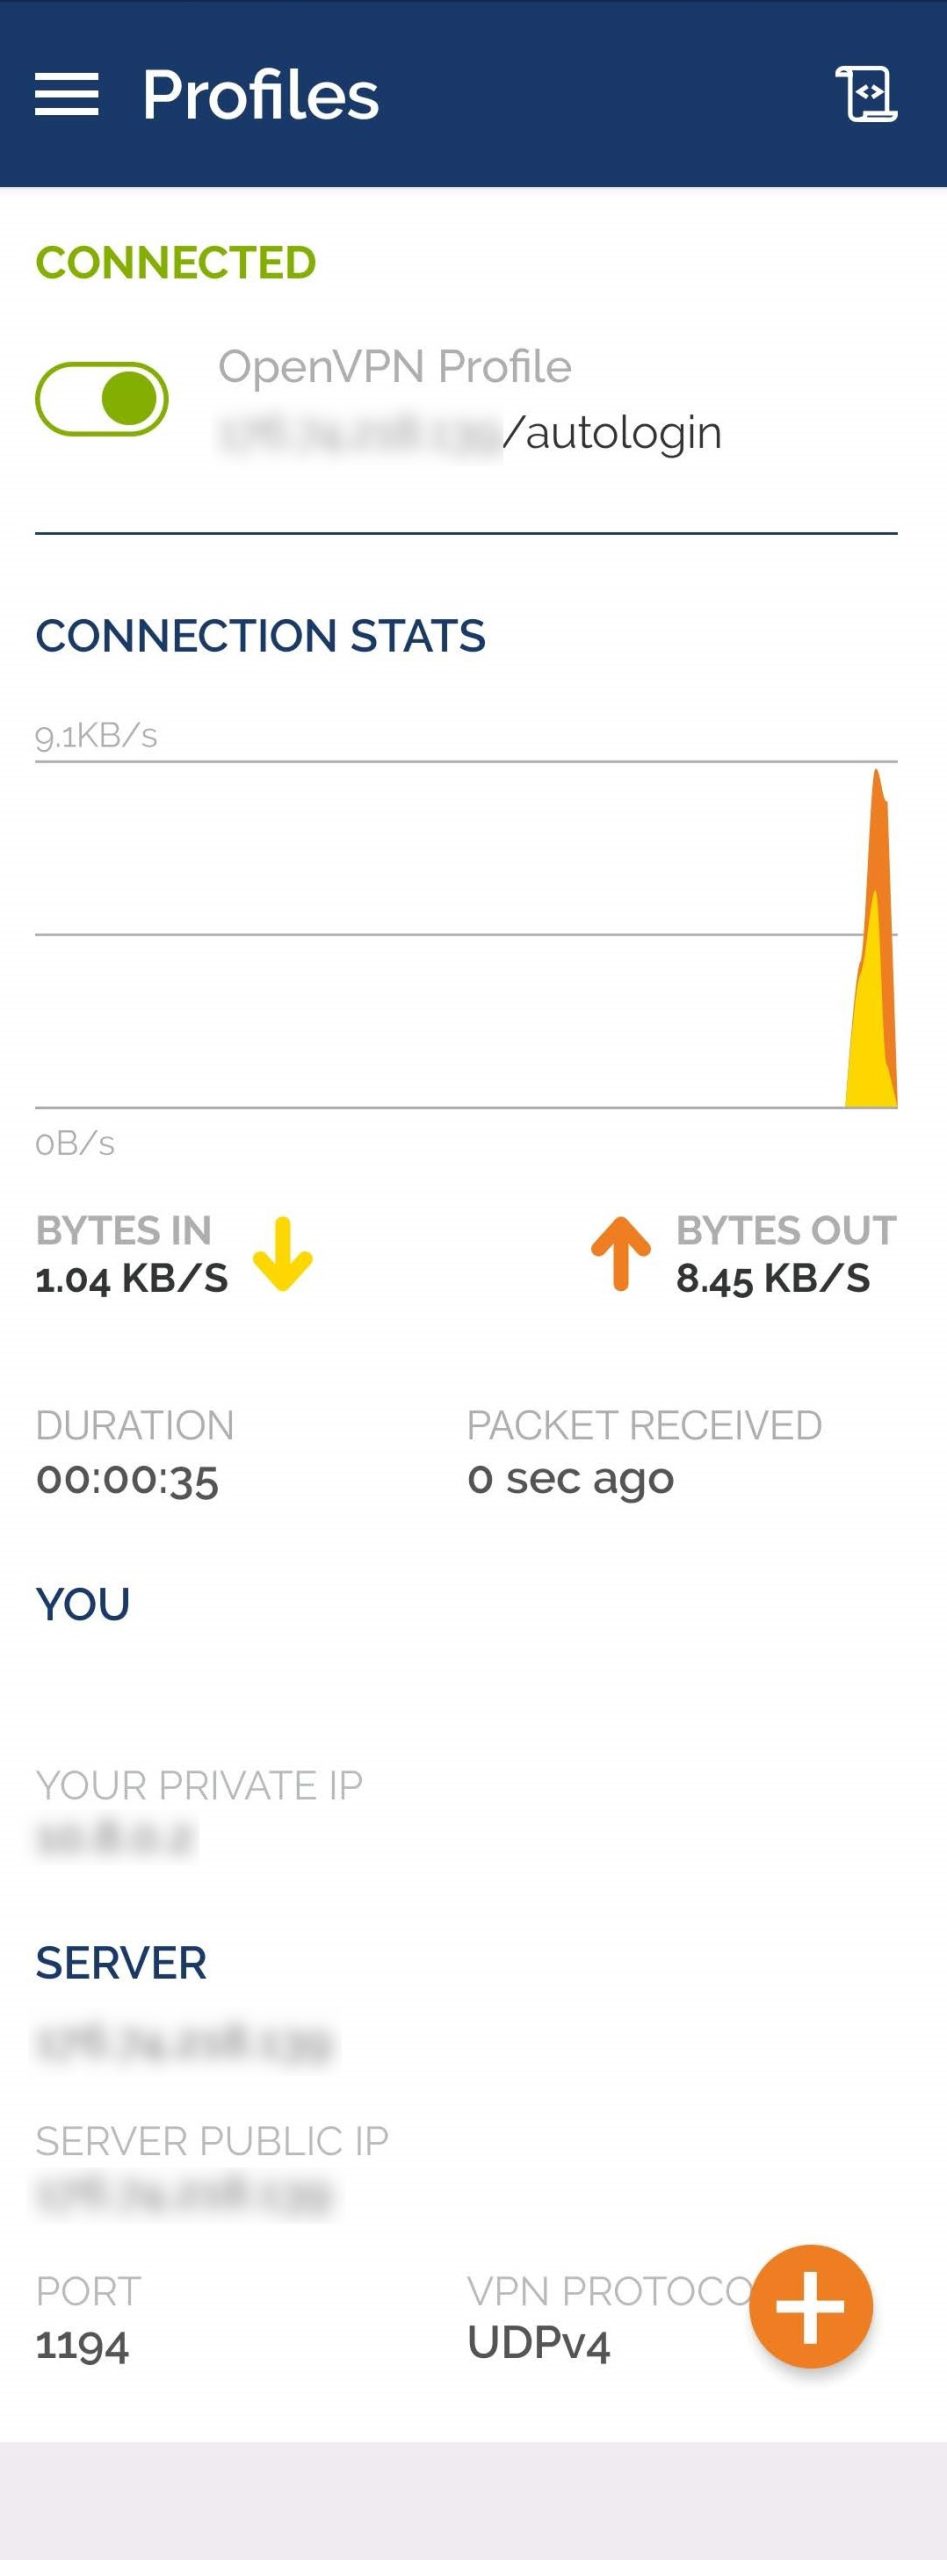
The installed client may be launched via the Start menu. The copied configuration file will be applied automatically, and the relevant connection will be established. If you already have the OpenVPN GUI software installed on your device and there are several VPN configuration files available, select the one you just created from the list and click on the “Connect” button.
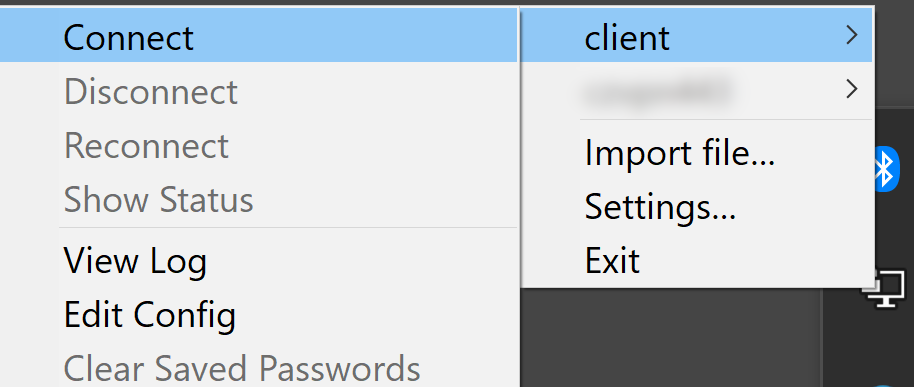
If the connection is successfully established, the icon will change its color to green.
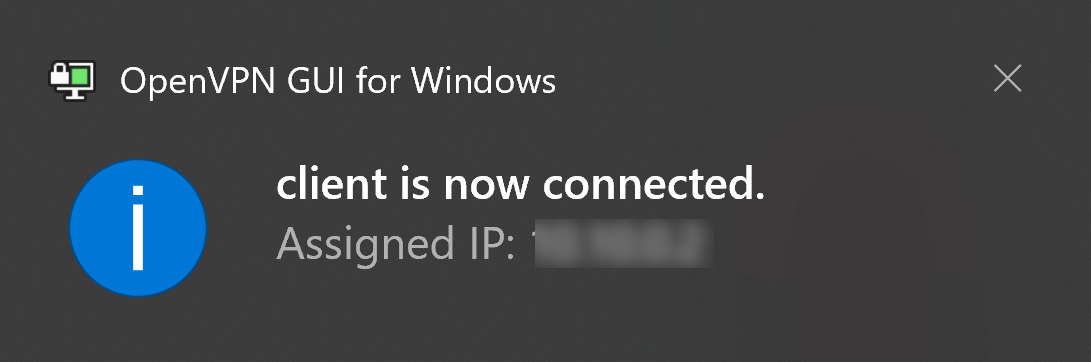
By clicking the icon in the taskbar, you may disable the connection, reestablish it, check the connection status, and much more.
Step 3. Check if the connection is correct
You can check whether you are really surfing the Internet using the VPN server by visiting https://whatismyipaddress.com/ or https://www.whatismyip.com/.
You should see your server IP address when the relevant VPN connection is enabled, as well as the IP address assigned to you by the Internet service provider when the connection is disabled.
To install any VPN client on MacOS, use the Tunnelblick software.
Official documents and detailed instructions on the OpenVPN protocol may be found on the developer's website:
Please find hereby our other VPN guidelines:
In these guidelines, we will install a VPN server on a CentOS 7.7 virtual server and configure the relevant connection to it on a user's device with Windows 10.
VPN (Virtual Private Network) is a closed and secure logical network in addition to an insecure network (the Internet). You can read more about VPN services and how to use them in our blog (“VPN technology for business: pros and cons”).
How to install the OpenVPN server-side from a script
OpenVPN is an open-source version of VPN. This protocol has many implementations for almost all platforms. It should be noted that this VPN protocol is currently considered the most secure and reliable.
To install the server-side of the VPN software on a virtual server, we use the openvpn-install open-source script.
The ready-made script makes it possible to install and configure any VPN easily. As a result, the whole installation process is the following mandatory steps:
- connection to the server;
- update of the operating system, if required;
- downloading and activation of the installation script;
- making a copy of the configuration file;
- service performance check.
Attention! The script may be used with the following distributions: CentOS (from version 7), Debian (from version 9), and Ubuntu (from version 17) (in case of version 16, use the vpn1604 script).
To install the script on the VPS with a CentOS 7.7 distribution, you need to take five steps.
Step 1. Connect to the server
When making the order, you receive an e-mail with the information necessary to connect to your virtual server: your server IP address, server administrator’s login and password (root), URL to the server control panel, as well as login and password, to access it – here you can choose the required operating system.
To connect to the VPS, we recommend using any SSH client: PuTTY, Xshell, etc. Run the following command:
ssh root@ХХ.ХХХ.ХХХ.ХХ
where ХХ.ХХХ.ХХХ.ХХ – your server IP address.
If a non-privileged user is previously created on a virtual server for security purposes and allowed to temporarily have a higher level of privileges running the sudo command, then do not forget to run this command every time for all actions that require administrator rights.
To log in as a non-privileged user, run the following command:
ssh -l user ХХ.ХХХ.ХХХ.ХХ
where ХХ.ХХХ.ХХХ.ХХ – your server IP address, user – the name of the non-privileged user.
Step 2. Update your operating system
The next step is to update the system (if necessary). You can skip this step if your server ensures such updates regularly. You may also need to install wget. Commands for a root user:
yum update -y
yum install wget -y
or a non-privileged user:
sudo yum update -y
sudo yum install wget -y
Step 3. Download and launch the VPN server installation script
Download and launch the installation script:
wget https://git.io/vpn -O openvpn-install.sh && bash openvpn-install.sh
First of all, you will see a welcome screen and a few questions:
Welcome to this OpenVPN road warrior installer!
Which protocol should OpenVPN use?
1) UDP (recommended)
2) TCP
Protocol [1]:
What port should OpenVPN listen to?
Port [1194]:
Select a DNS server for the clients:
1) Current system resolvers
2) Google
3) 1.1.1.1
4) OpenDNS
5) Quad9
6) AdGuard
DNS server [1]:
Enter a name for the first client:
Name [client]:
OpenVPN installation is ready to begin.
Press any key to continue…
In our example, we run the script on a server with a single IP address, so all questions may be answered by pressing the Enter key. The first option out of all offered will be selected. Namely:
- IP address will be determined automatically. If there are several addresses on the server, then the script will offer to select one manually;
- Protocol: UDP;
- Connection port: 1194;
- DNS servers: Current system resolvers;
- Certificate client name: client.
Then, the script will install the repository and all necessary packages, generate RSA keys, install certificates and configuration files for both the server and the client, configure the network filter, and directly launch the openvpn-server service.
When the installation process is complete, the script will display a message about the location of the client configuration file. In case of an administrator user, the file will be installed in the root user's home directory: /root/client.ovpn. If the script is installed on behalf of a non-privileged user with temporary sudo privileges, then the file will be located in the home directory of this user. This file must be transferred to the computer or other device that will be used to connect to the server. The server configuration file is located here: /etc/openvpn/server/server.conf.
Step 4. Copy the client configuration file
Then, you need to transfer the client configuration file, which is created by the script, to a PC or other device. In our case, we will be transferring it to our personal computer with Windows 10.
You may transfer the file using the WinSCP software or the pscp utility from Putty or ensure the built-in implementation of the OpenSSH protocol on your device.
You may learn more about the WinSCP software on the official website of the developer:
- How to install WinSCP
- How to connect to the server (File Protocol: SCP)
- Documents
We will consider a command for the pscp utility from Putty. In the Windows command line with administrator rights, specify the path to the software, server, and client configuration directory, which looks like this:
C:\Program Files\PuTTY\pscp.exe root@ХХ.ХХХ.ХХХ.ХХ:/root/client.ovpn "C:\Program Files\OpenVPN\config"
where
- ХХ.ХХХ.ХХХ.ХХ – your server IP address,
/root/client.ovpn– home directory of the root user on the server,- Documents
C:\Program Files\OpenVPN\config– the path where the client configuration file will be saved.
Then, it may be required to accept the server fingerprint. Enter the root user’s password.
If OpenSSH is installed on your computer, then the following command is to be run:
scp root@ХХ.ХХХ.ХХХ.ХХ:/root/client.ovpn .
The dot at the end of the command indicates to the user that the file is transferred to the same folder from which the command is run.
Attention! If you run the script not as a root user but as a privileged user, then in the command, you must specify the directory of this user on the server instead of the directory of the root user.
Step 5. Check the performance of the VPN server
Before establishing any connection to the VPN server, we recommend you perform certain service performance checks. Namely:
-
Checking server status:
systemctl status openvpn-server@server -l
● openvpn-server@server.service - OpenVPN service for server Loaded: loaded (/usr/lib/systemd/system/openvpn-server@.service; enabled; vendor preset: disabled) Active: active (running) since Sat 2021-10-17 16:15:44 GMT; 3s ago ... -
Checking socket status:
ss -4nlup | grep 1194
UNCONN 0 0 XX.XXX.XX.XX:1194 *:* users:(("openvpn",pid=27675,fd=6)) -
Checking network filter condition:
firewall-cmd --state
running
-
Check the open port for connection:
firewall-cmd --list-ports
1194/udp
If, as a result of such checks, there are similar results of the executed commands, then we congratulate you because you did everything right and now may connect to the OpenVPN server.
How to connect to the OpenVPN server
To connect to the VPN server, you need to perform three tasks:
- Install a VPN client on your personal computer.
- Establish the required connection.
- Check the quality of the established connection.
Step 1. Install the OpenVPN GUI client on Windows 10
In case of personal computers and laptops with the Windows operating system, the OpenVPN GUI client should be used. The installation process does not cause any difficulties. However, if they take place, you may familiarize yourself with the official instructions posted on the developer's website. By default, the path to the installed software is the following: C:\Program Files\OpenVPN\.
Step 2. Establish the connection to the server
The installed client may be launched via the Start menu. The copied configuration file will be applied automatically, and the relevant connection will be established. If you already have the OpenVPN GUI software installed on your device and there are several VPN configuration files available, select the one you just created from the list and click on the “Connect” button.
If the connection is successfully established, the icon will change its color to green.
By clicking the icon in the taskbar, you may disable the connection, reestablish it, check the connection status, and much more.
To install any VPN client on MacOS, use the Tunnelblick software.
Step 3. Check if the connection is correct
You can check whether you are really surfing the Internet using the VPN server by visiting https://whatismyipaddress.com/ or https://www.whatismyip.com/.
You should see your server IP address when the relevant VPN connection is enabled, as well as the IP address assigned to you by the Internet service provider when the connection is disabled.
Official documents and detailed instructions on the OpenVPN protocol may be found on the developer's website:
Please find hereby our other VPN guidelines:
Sometimes, connection to the server through the IPMI controller may work incorrectly, whereas you can still log into the operating system. In this case, you can reboot the IPMI controller from the OS, the so-called Cold Reset. You can also reset the IPMI password using the IPMICFG utility for Windows OS or the IPMItool package for Unix-like operating systems.
Instruction for WINDOWS
IPMI Controller Reboot Using Cold Reset
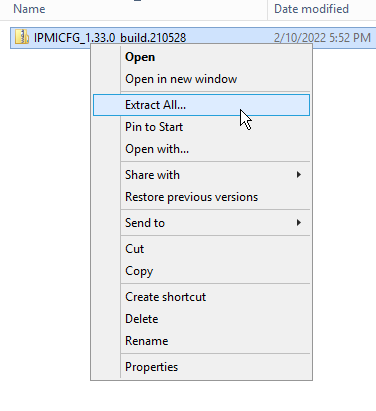
Log into the server operating system using your username and password. Then download the IPMICFG archive from the official Supermicro ftp server.
In this manual, the program version: 1.33.0 is used (archive name: IPMICFG_1.33.0_build.210528.zip).
The next step is to unzip the file to the drive C root: by expanding the context menu with the right mouse button and selecting the “Extract all ...” item.
As a result, a folder called IPMICFG_1.33.0_build.210528 will be created on the C:\ drive. For simplicity, it can be renamed to IPMICFG.
Attention! In this manual, the syntax of running commands is given with consideration to the rename of the folder using the IPMICFG utility.
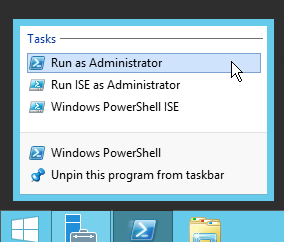
Next, run the command prompt as an administrator: on the taskbar, right-click on the Windows PowerShell icon and select “Run as administrator” from the context menu.
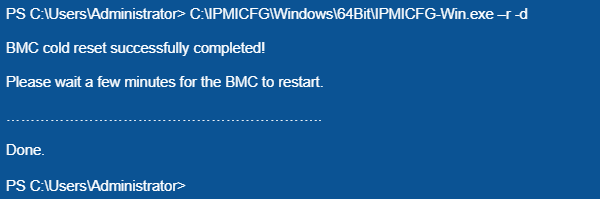
Run the command in the command prompt:
C:\IPMICFG\Windows\64Bit\IPMICFG-Win.exe –r -d
IPMI will reboot.
This process will take approximately one minute. When the task is completed, a “Done” notification will appear. After that you can connect to the server using IPMIview or web interface.
How to reset your password
You need a user ID to change your password. You can get it using the following command:
C:\IPMICFG\Windows\64Bit\IPMICFG-Win.exe –user list
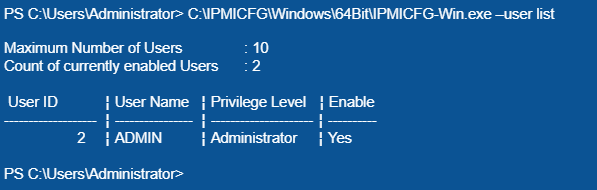
The User ID column contains the ADMIN user ID, equal to 2. If you need to change the password for another user, you must select the ID that belongs to this user.
The data received is used for the following command:
C:\IPMICFG\Windows\64Bit\IPMICFG-Win.exe –user setpwd 2 password
where the number 2 means the ADMIN user ID and password is the new password to be created.
The completion of the command and successful password change are indicated by the message “Done” that appears.
- The maximum password size in IPMI v1.5 is 16 characters
- The maximum password size in IPMI v2.0 is 20 characters.
Instruction for UNIX
IPMI Controller Reboot Using Cold Reset
It is possible to restart IPMI (Cold Reset) in UNIX-like operating systems by first installing the IPMItool package. Depending on the distribution, the installation of this package may vary, please check your OS documentation.
In the terminal, execute a Cold Reset with the following command:
# ipmitool mc reset cold
During the execution of the command, the following error may occur:
Could not open device at /dev/ipmi0 or /dev/ipmi/0 or /dev/ipmidev/0:
No such file or directory
To fix this, run the following commands:
# modprobe ipmi_msghandler

# modprobe ipmi_devintf

# modprobe ipmi_si
Then repeat Cold Reset:
# ipmitool mc reset cold
As a result, a message of successful completion will appear. It may look different depending on the operating system used on the server. The message might look like this:
Sent cold reset command to MC
Access should be provided within 5 minutes. Otherwise, please contact our technical support to help resolve this issue.
How to reset your password
You need a user ID to change your password. You can find it on UNIX-like systems using the following command:
# ipmitool user list
As a result, a table containing user ID will be shown:

ADMIN user ID is 2.
Change your password using the command:
# ipmitool user set password <userid> [<password[]
To reset the password for a user named “ADMIN”, run the following command:
# ipmitool user set password 2 ourpassword
The number “2” in this case is the user ID, and “ourpassword” is the new password.
Task completed, password updated.
Sometimes, the described methods may not work. In this case, you will need to turn it off for a while and turn on the server or roll back IPMI to factory settings. To do this, please contact our technical support. We work twenty-four-hour, and we are always ready to provide you with qualified assistance.
When creating a VM, in addition to selecting from the list of ready-made operating system images, you can also import your own image. The main requirement is that it must contain installed drivers that support OpenStack virtualization.
Detailed information about preparing images and a list of ready-made images of the most frequently used operating systems is available here.
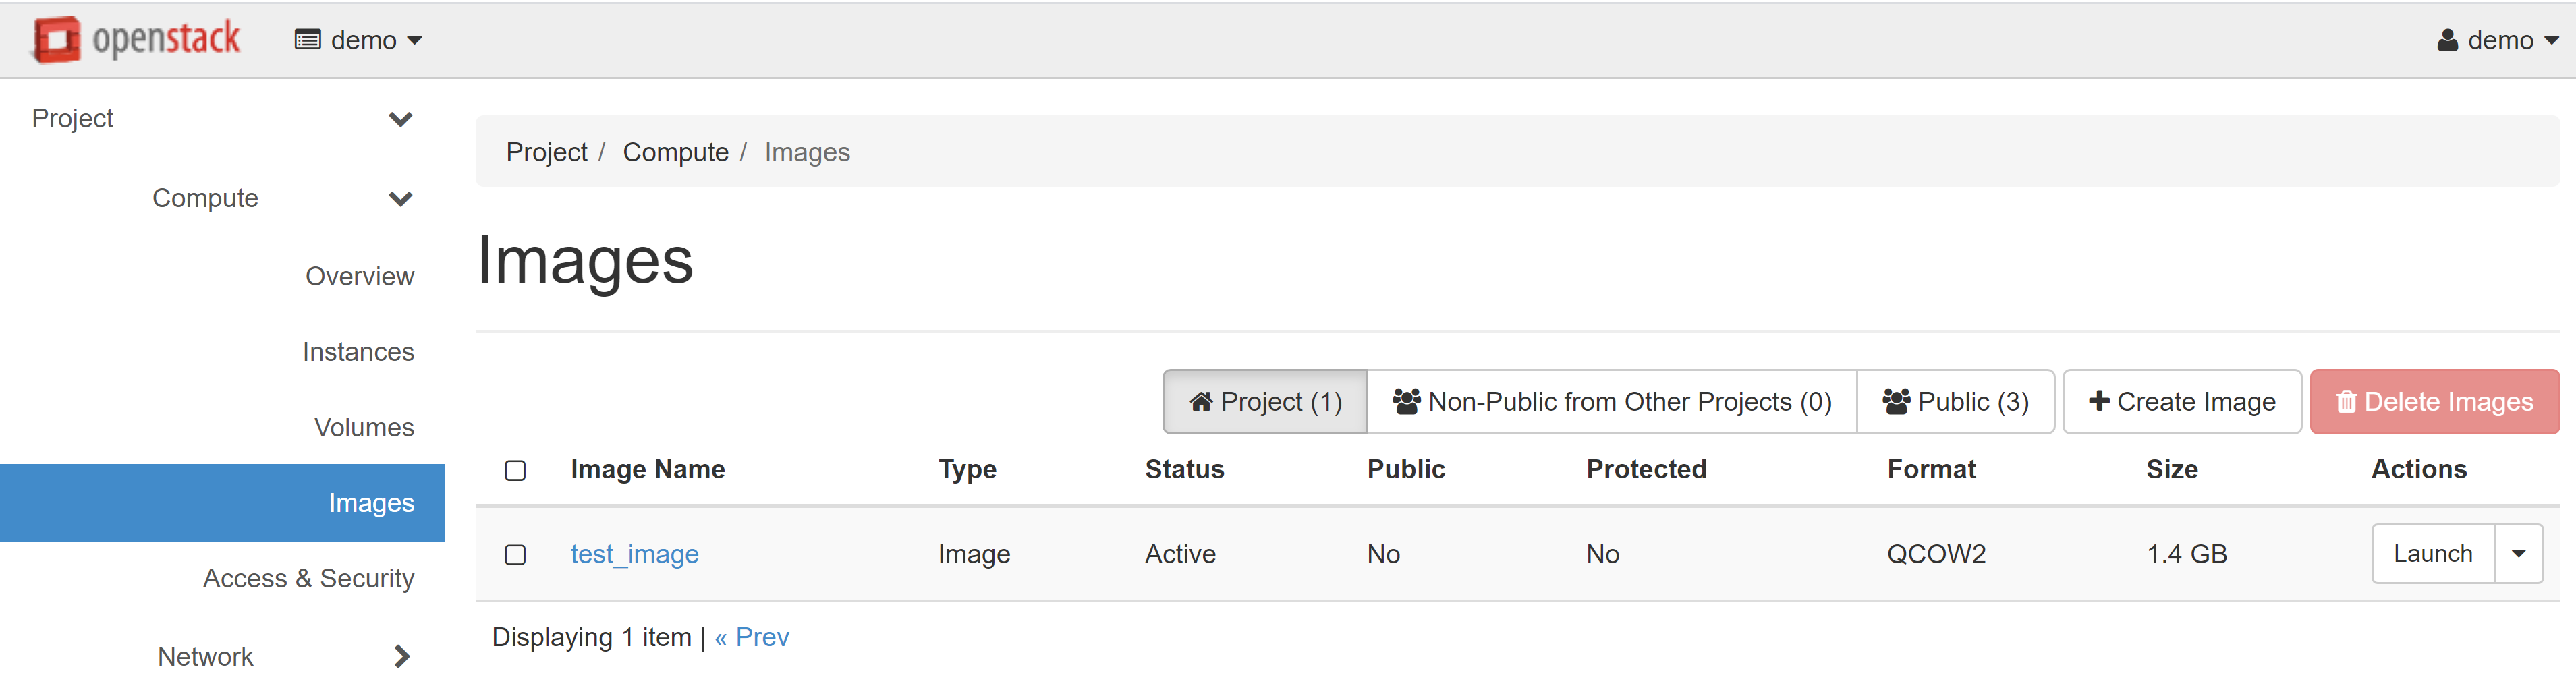
In order to import your OS image, go to the COMPUTE > IMAGES section, and click CREATE IMAGE.
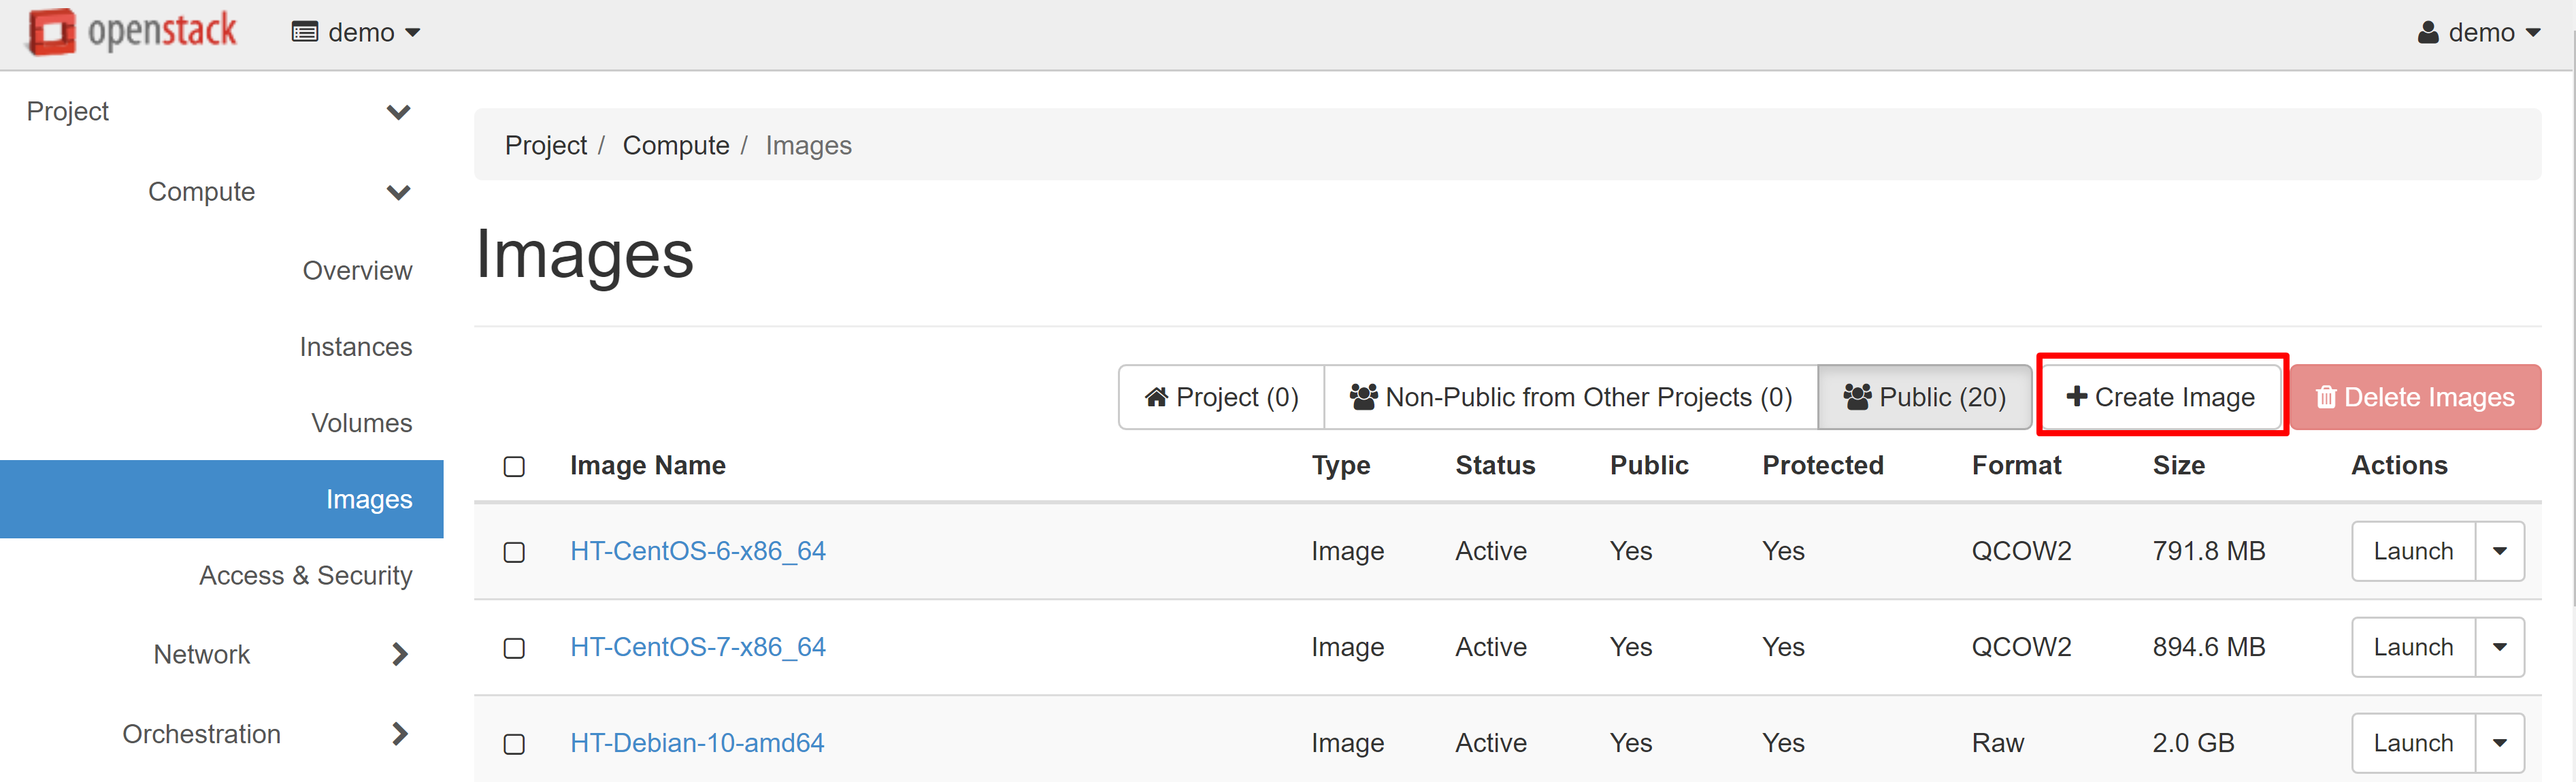
In the window that opens, enter the image's name. Then click CHOOSE FILE to download the image file from your device.
We recommend that you choose QCOW2 — QEMU EMULATOR as the format of the uploaded image, in order to save space in your image storage.
You don’t have to specify the software design, but we suggest that you set the minimum system requirements — the size of the disk and RAM.
We recommend that you don't check the PUBLIC box — this option means that your image will appear in the list of public images and other cloud users will be able to use it.
The PROTECTED option means that the image cannot be deleted from the system. If you are worried about the accidental deletion of the image, you can check this option. If you need to protect or delete this image in the future, you will be able to check or uncheck this option in the image editing menu at any time.
After filling in all the required fields, click CREATE IMAGE to upload your own operating system image to the OpenStack environment.

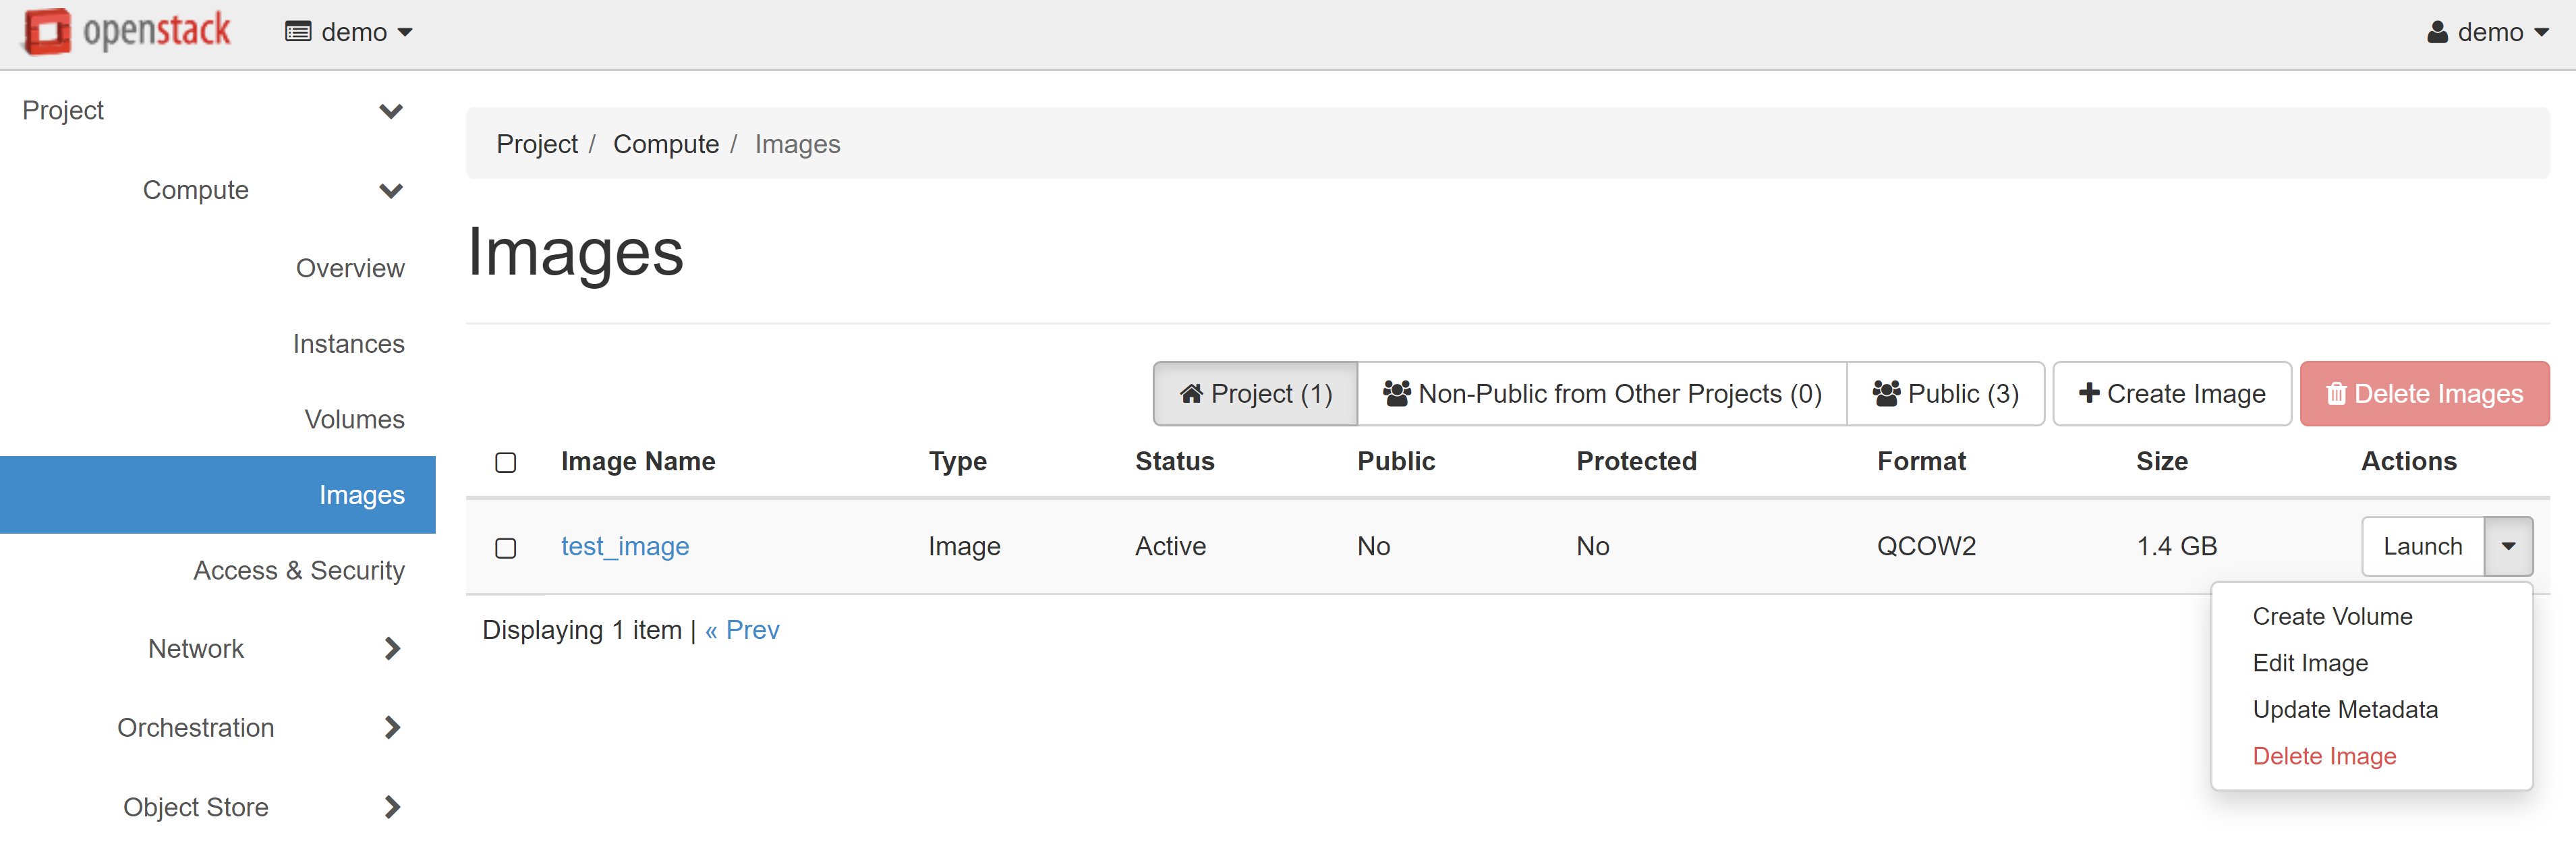
The downloaded image will appear in the COMPUTE > IMAGES section on the PROJECT tab.
For more information about creating instances from images, see our guide “Virtual Data Center: Getting Started”.
Console connection to a cloud instance on the OpenStack platform is made using the VNC (Virtual Network Computing) system.
In order to open the VNC console, go to the COMPUTE — INSTANCES section, then select CONSOLE in the drop-down menu next to the desired instance.
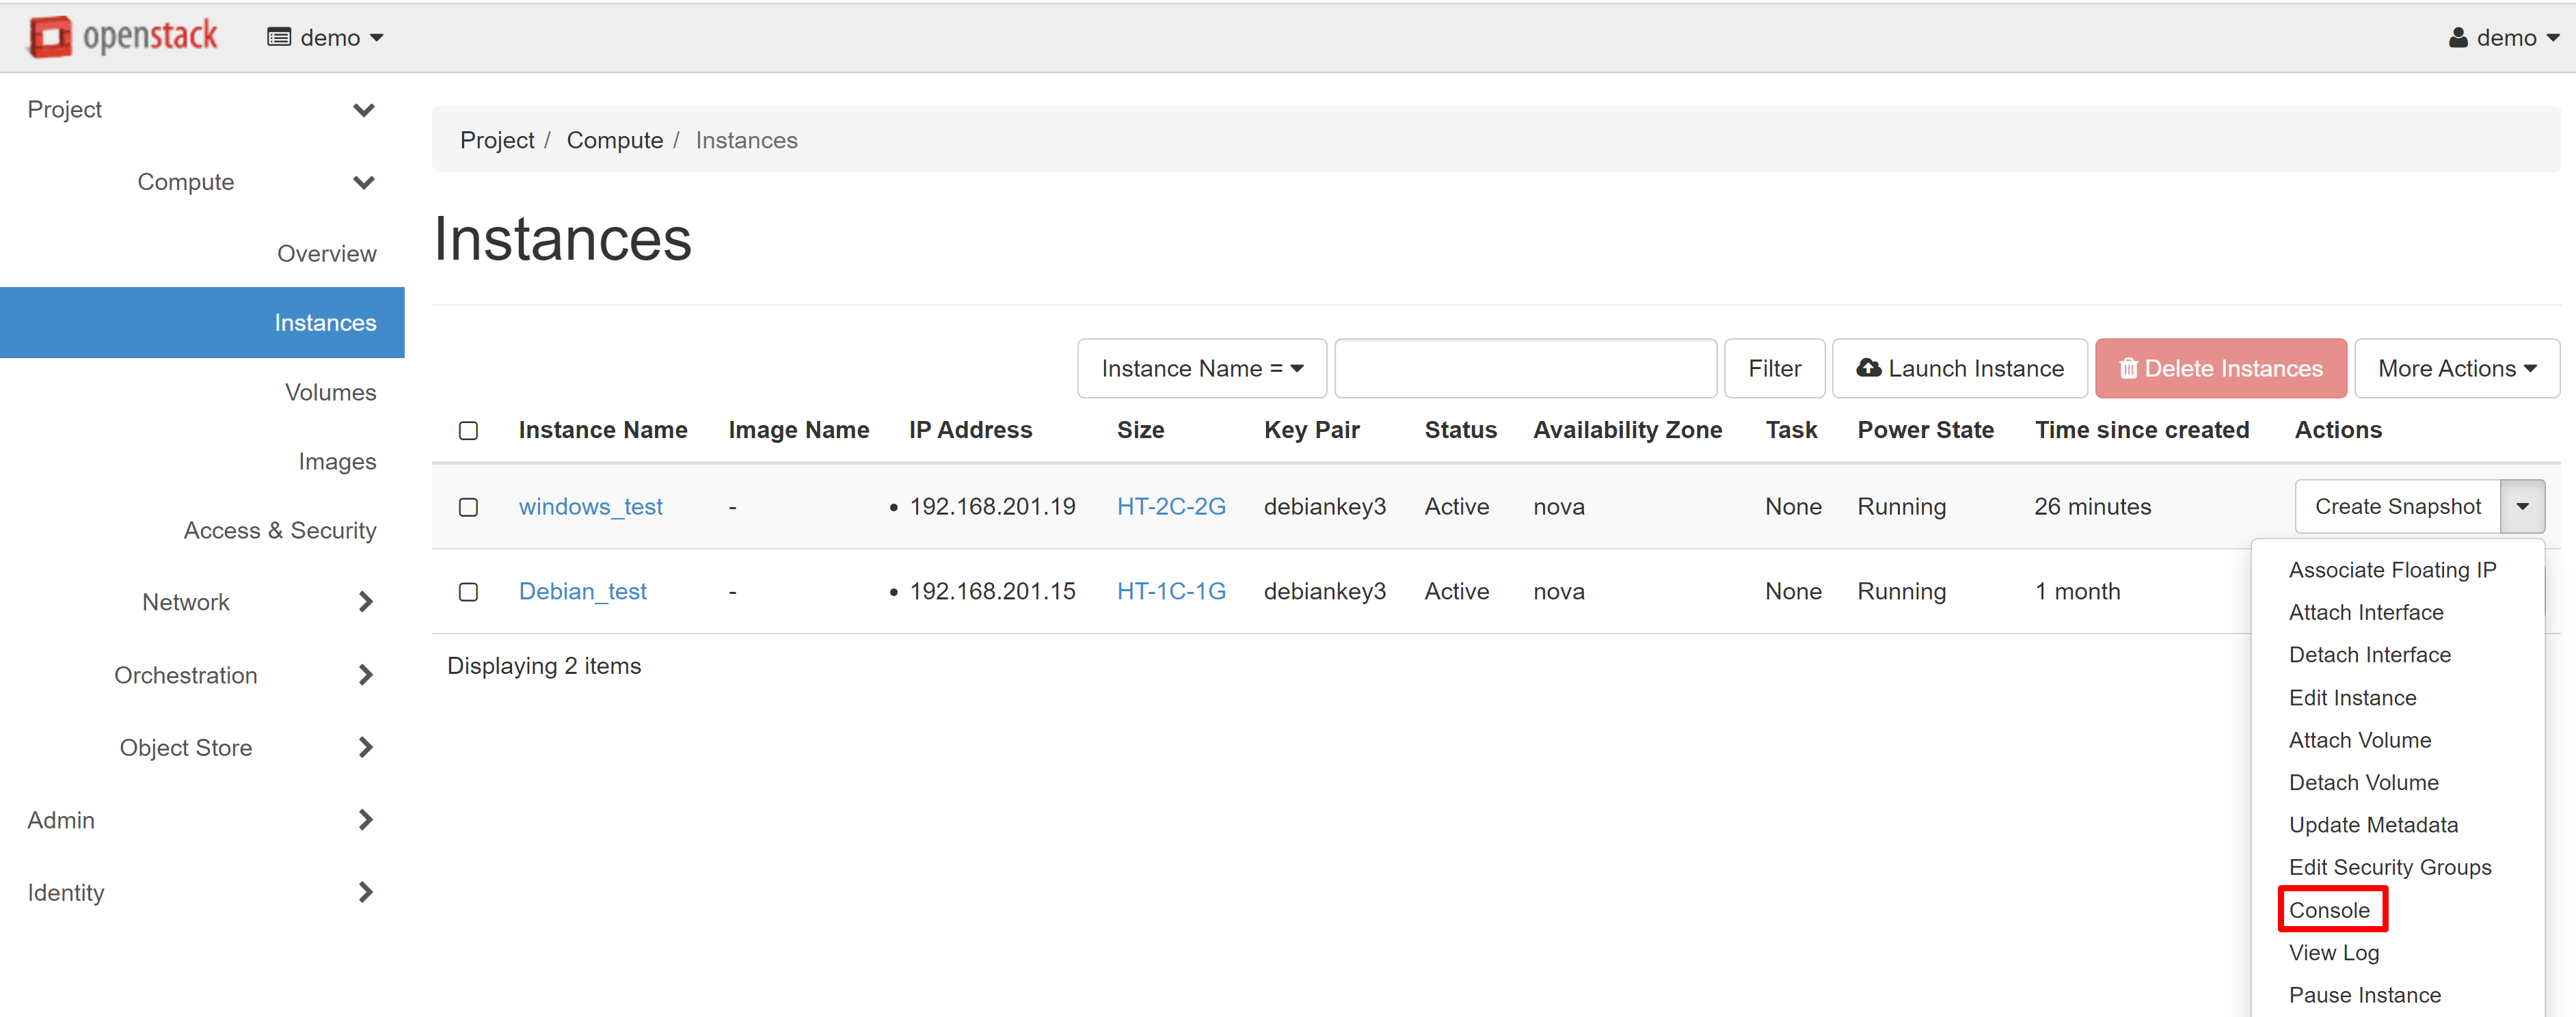
This will transfer you to the CONSOLE tab of your instance, where the remote access screen opens. Alternatively, you can click on the name of the required instance and then go to the CONSOLE tab on the page that opens.
In order to make it easier to work with the console, you can open it in a separate window. To do this, follow the link CLICK HERE TO SHOW ONLY CONSOLE. In order to exit the full-screen mode, click the BACK arrow in your browser.

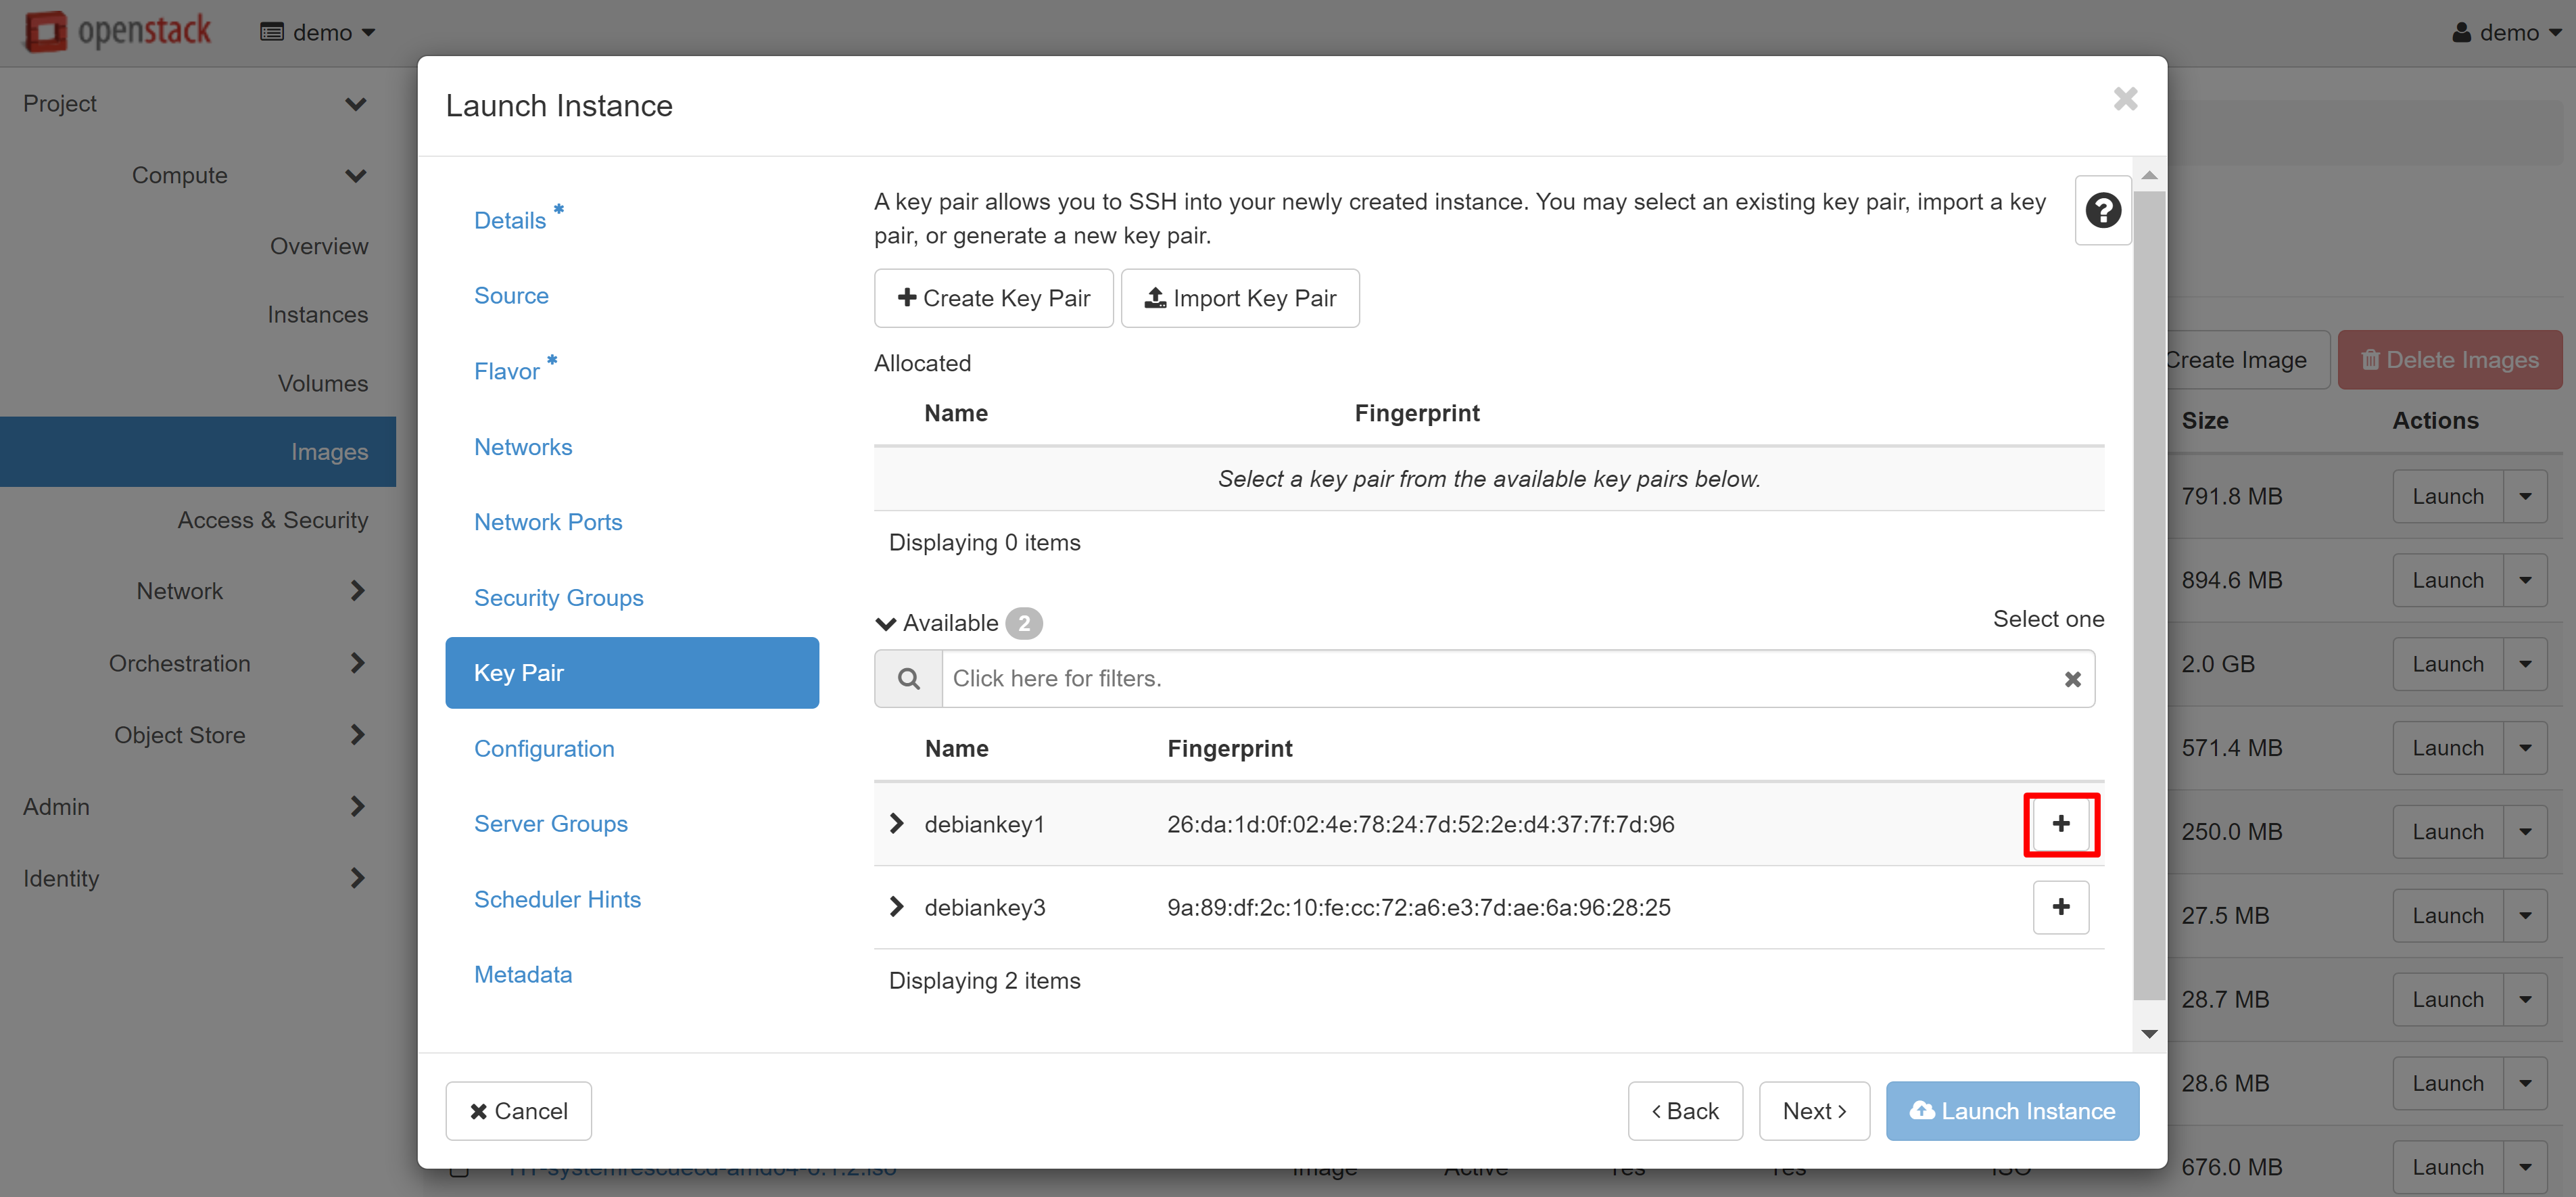
If you wish to connect to an instance with a Linux/Unix-based operating system, keep in mind that there is no password access in standard images, and for login, the SSH protocol with the creation of a key pair is used.
You can only link SSH keys to a specific instance at the VM creation stage, and this cannot be changed later. This is why it is highly recommended to keep your private key safe and secure.
In order to create an SSH key pair, go to COMPUTE — ACCESS & SECURITY and open the KEY PAIRS tab. Click CREATE KEY PAIR.
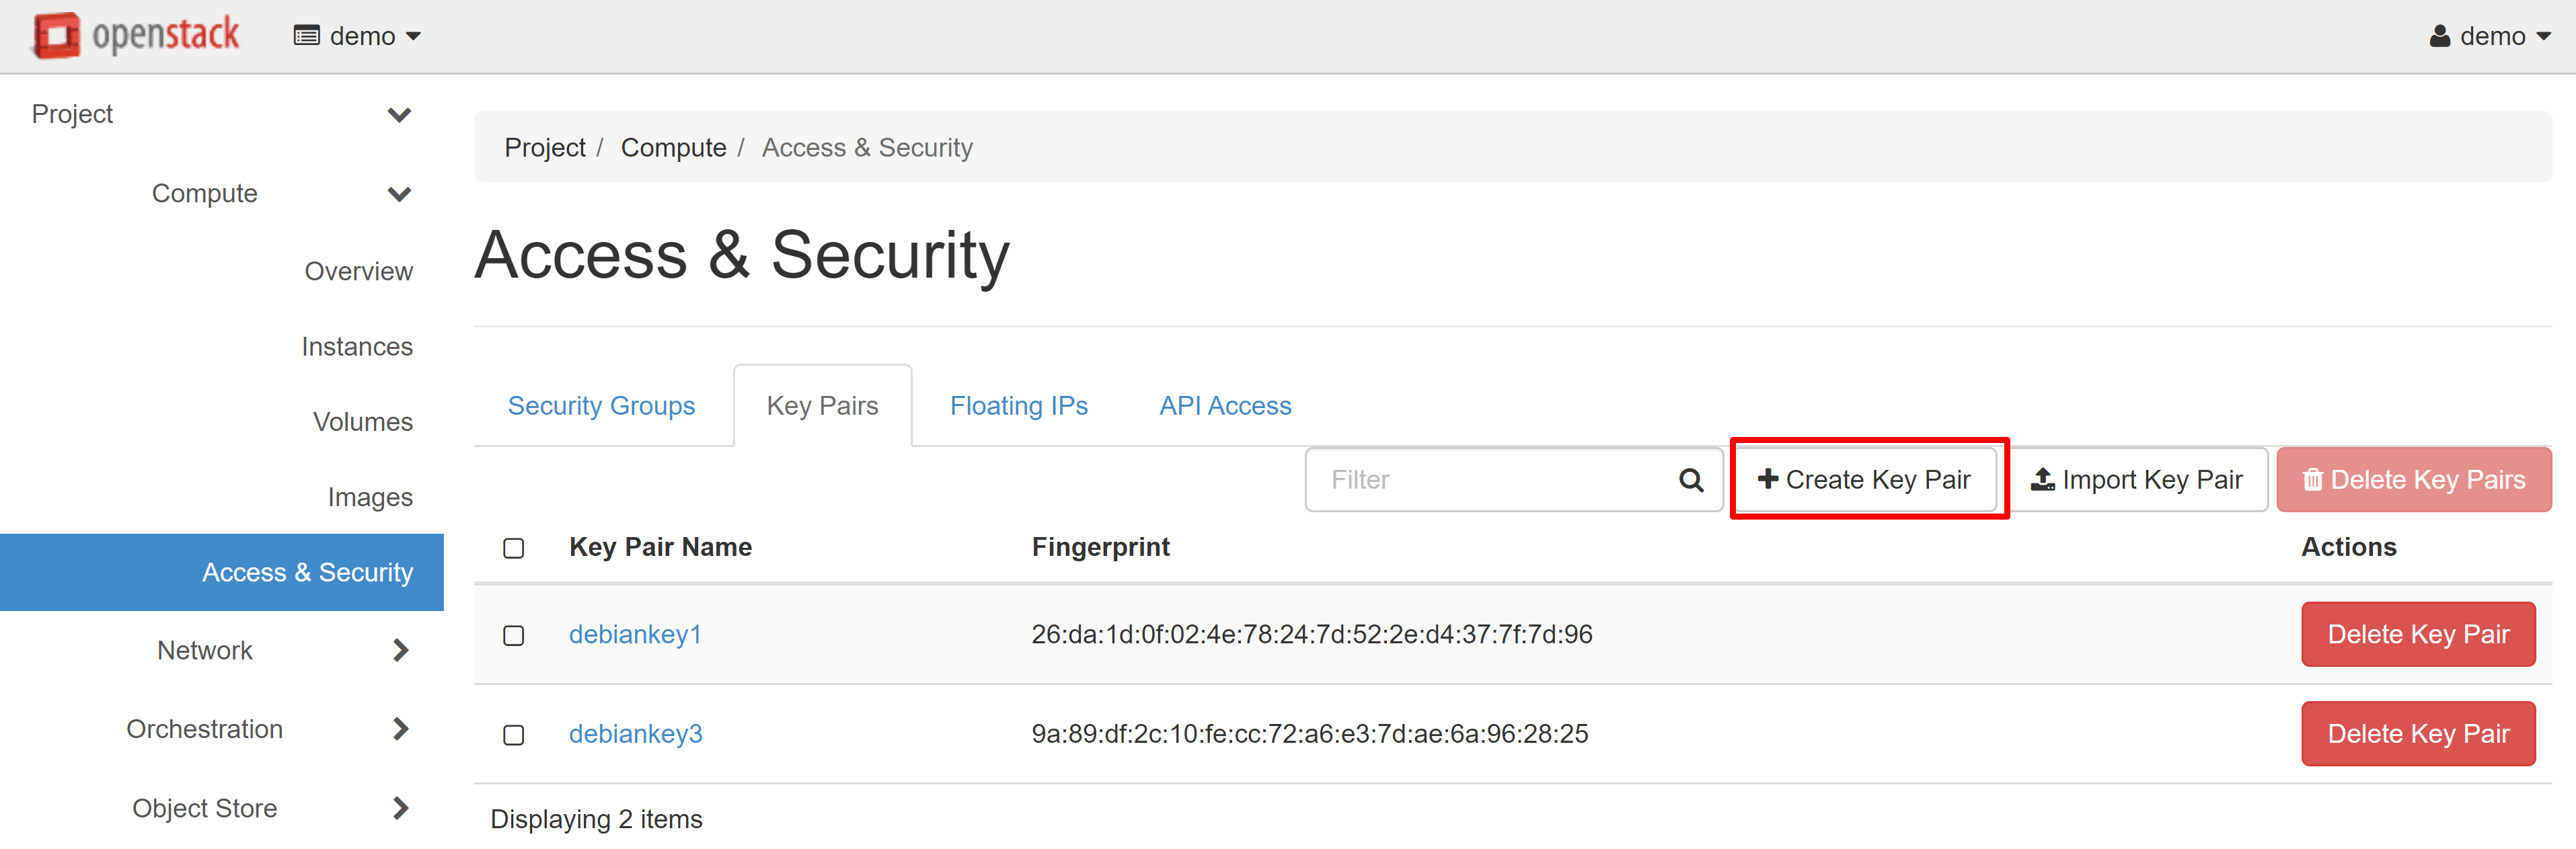
In the window that opens, enter a name for your key pair and confirm its creation.
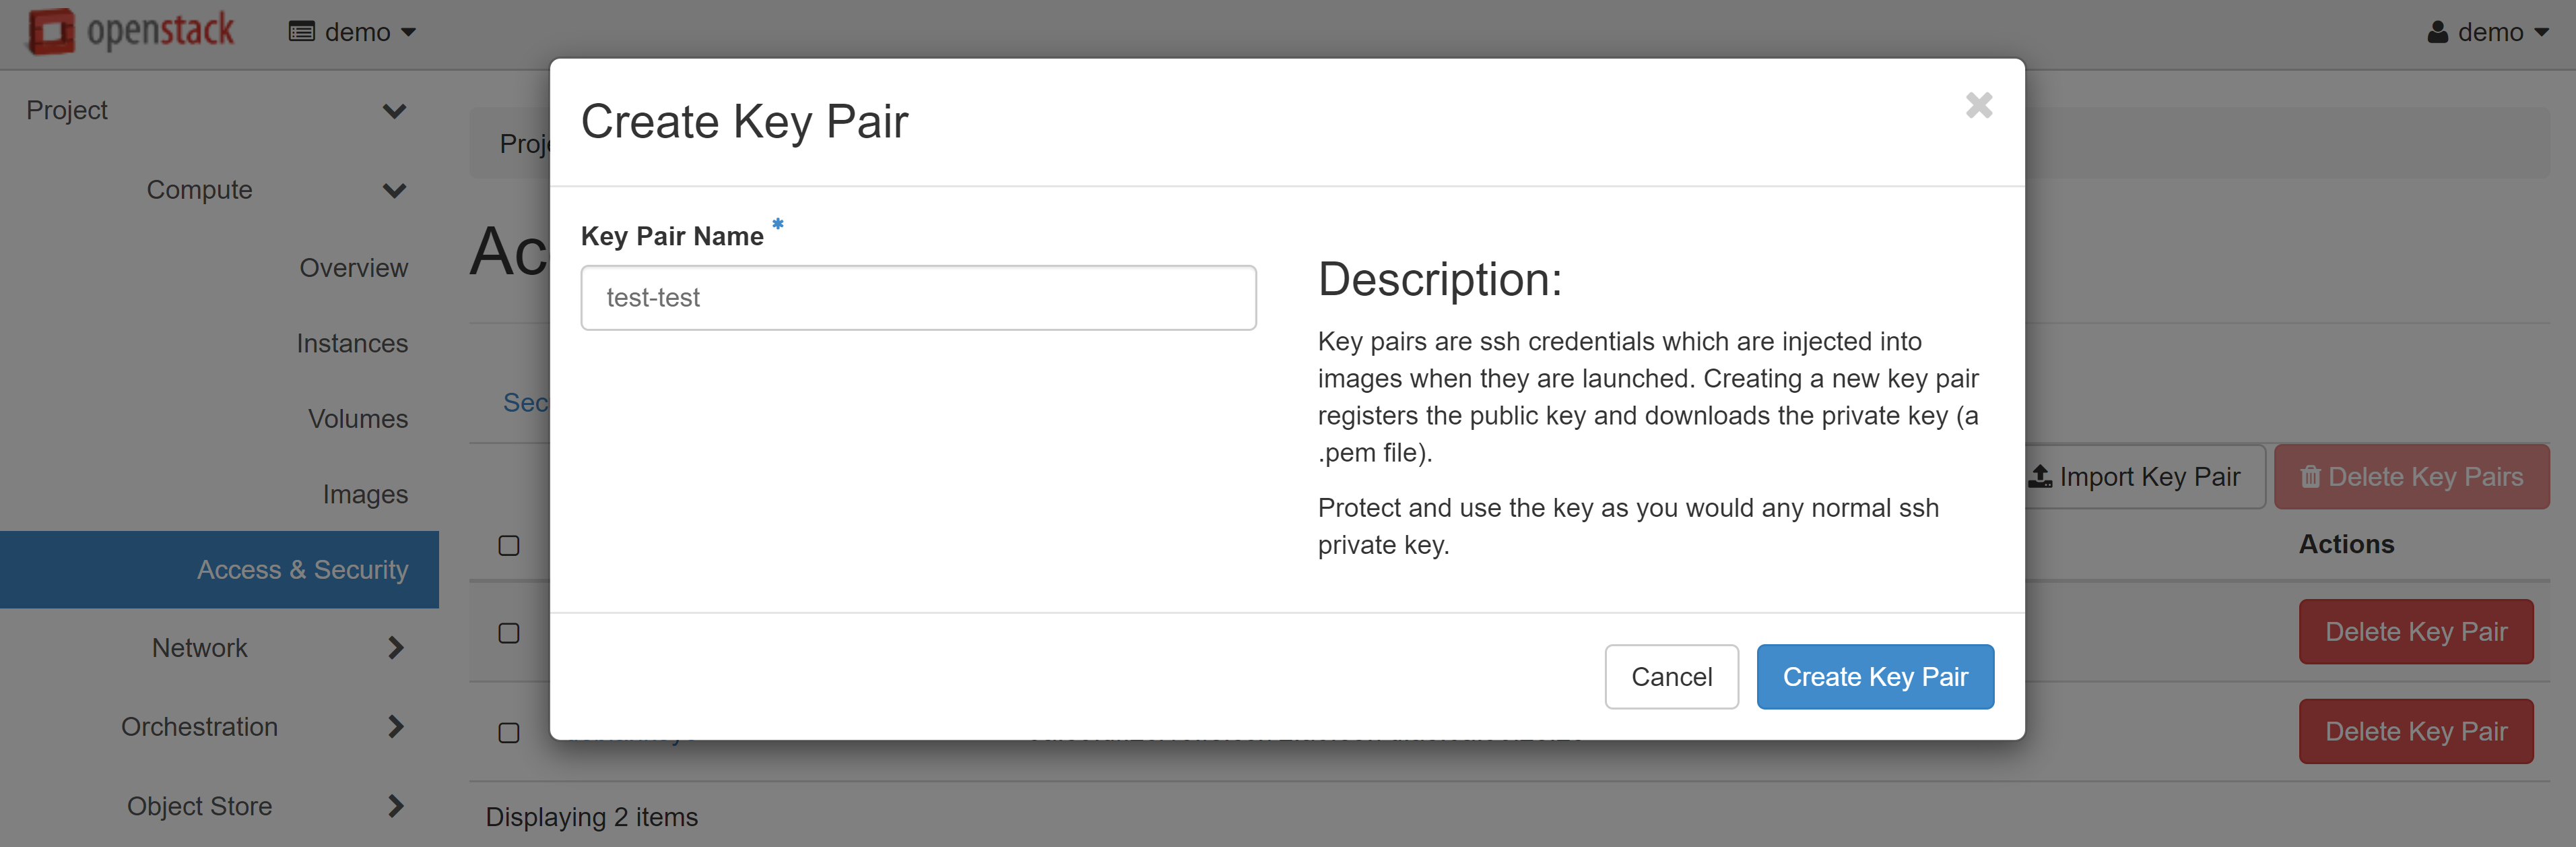
The browser will prompt you to automatically download the SSH private key.
In order to assign keys already created to an instance, when creating a new VM, go to the KEY PAIR menu section and click ‘+’ next to the desired key pair in the list of available ones. You can also import a key pair from your device here.
New key pairs may also be added directly when creating the instance. Read more about this in our manual “Virtual Data Center: Getting Started”.
You can clone your cloud VM without stopping it. There are several ways to do this.
1. Take A Snapshot
This method is suitable for cases where you do not need to delete the source instance.
To create a snapshot, select CREATE SNAPSHOT in the drop-down menu next to the VM being cloned.
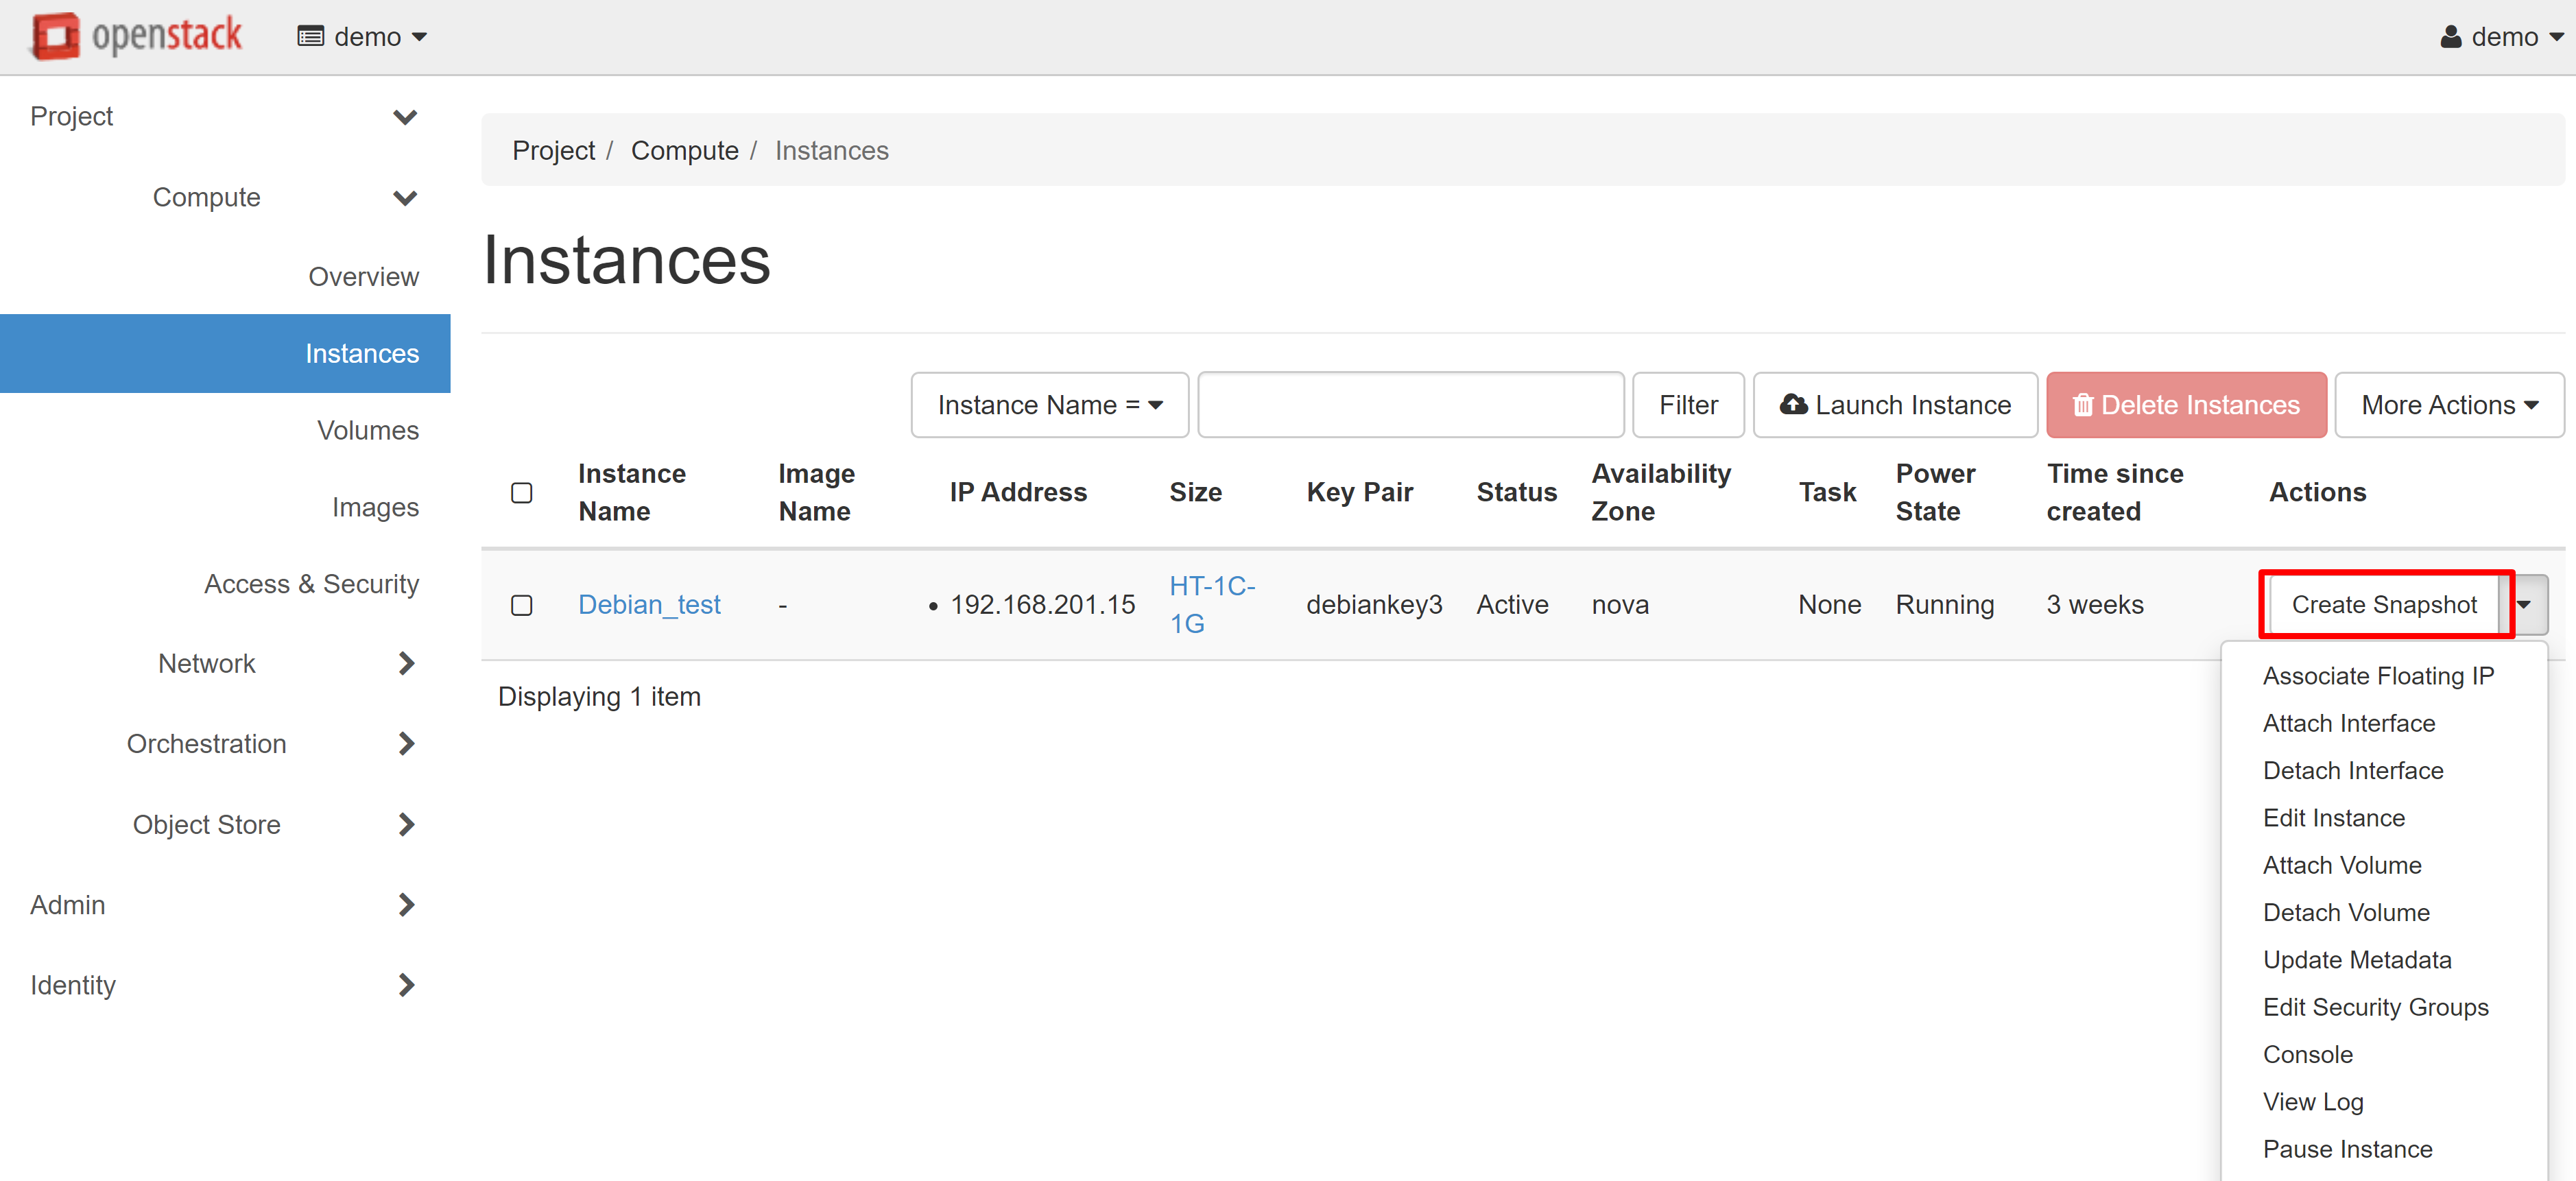
In the window that opens, enter the name of the snapshot, then click CREATE SNAPSHOT.

This will automatically redirect you to COMPUTE — IMAGES. A snapshot of your instance will appear on the PROJECT tab. Select LAUNCH in the drop-down menu next to the instance name.
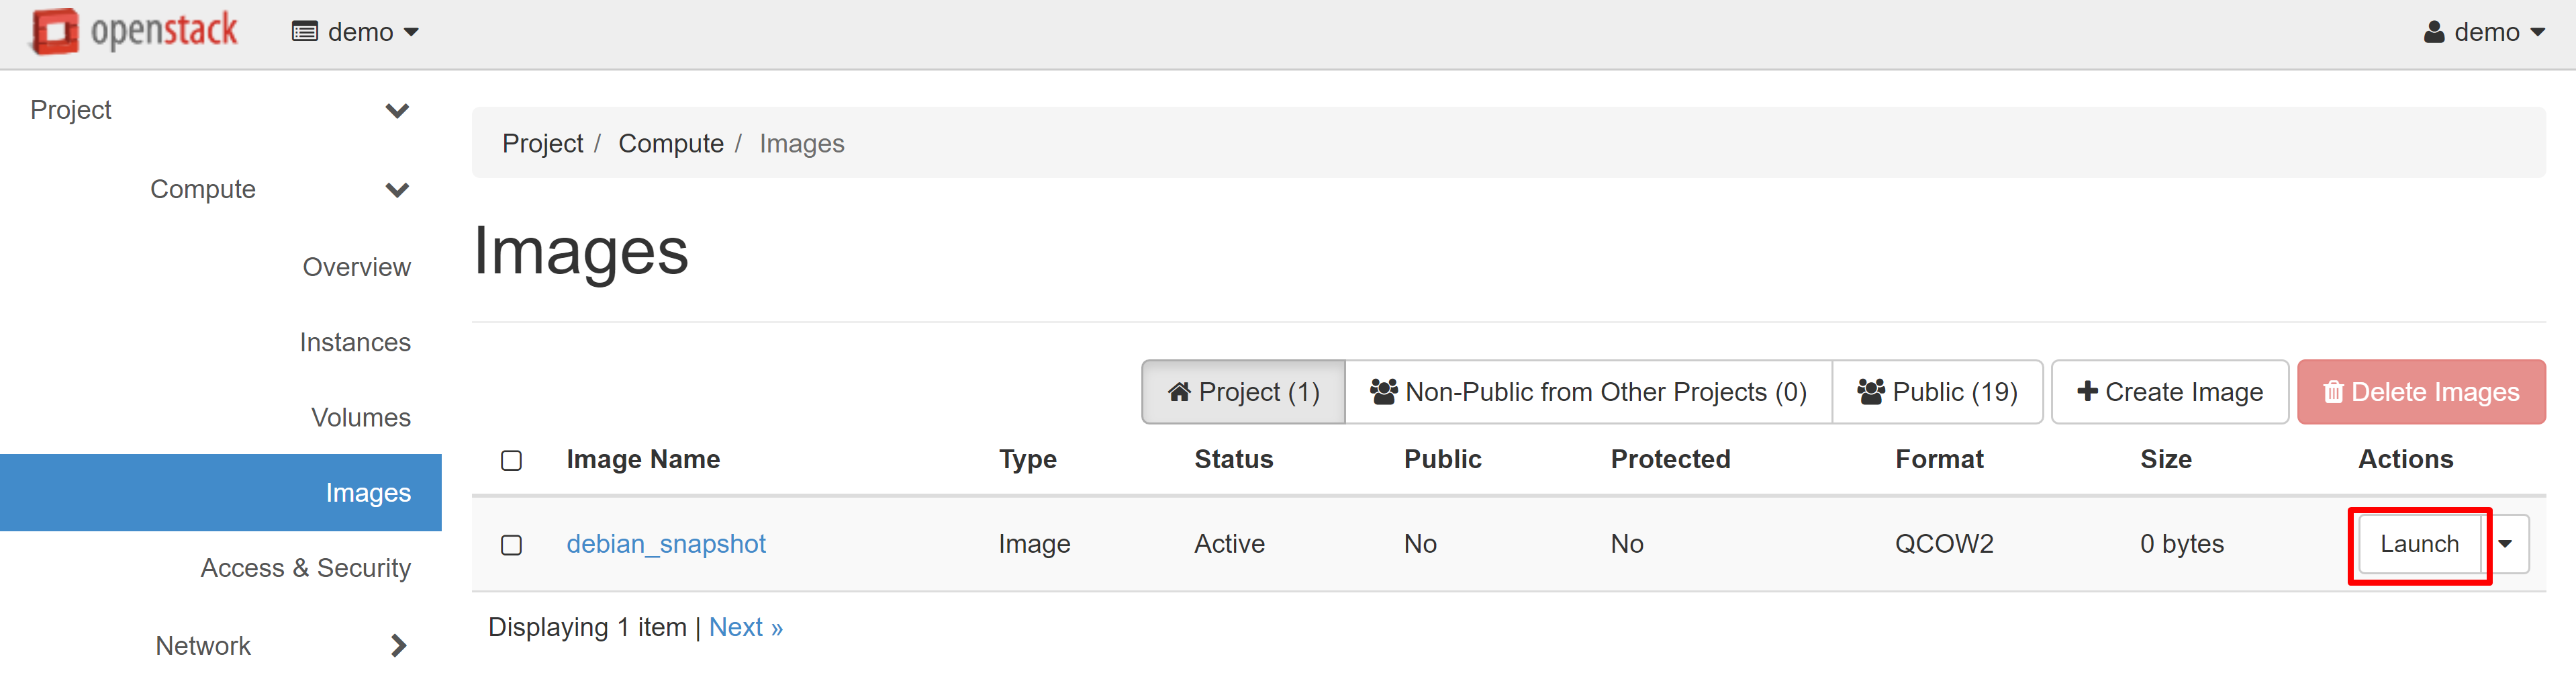
The Launch Instance window will open, where you can create a VM based on the snapshot you just took.
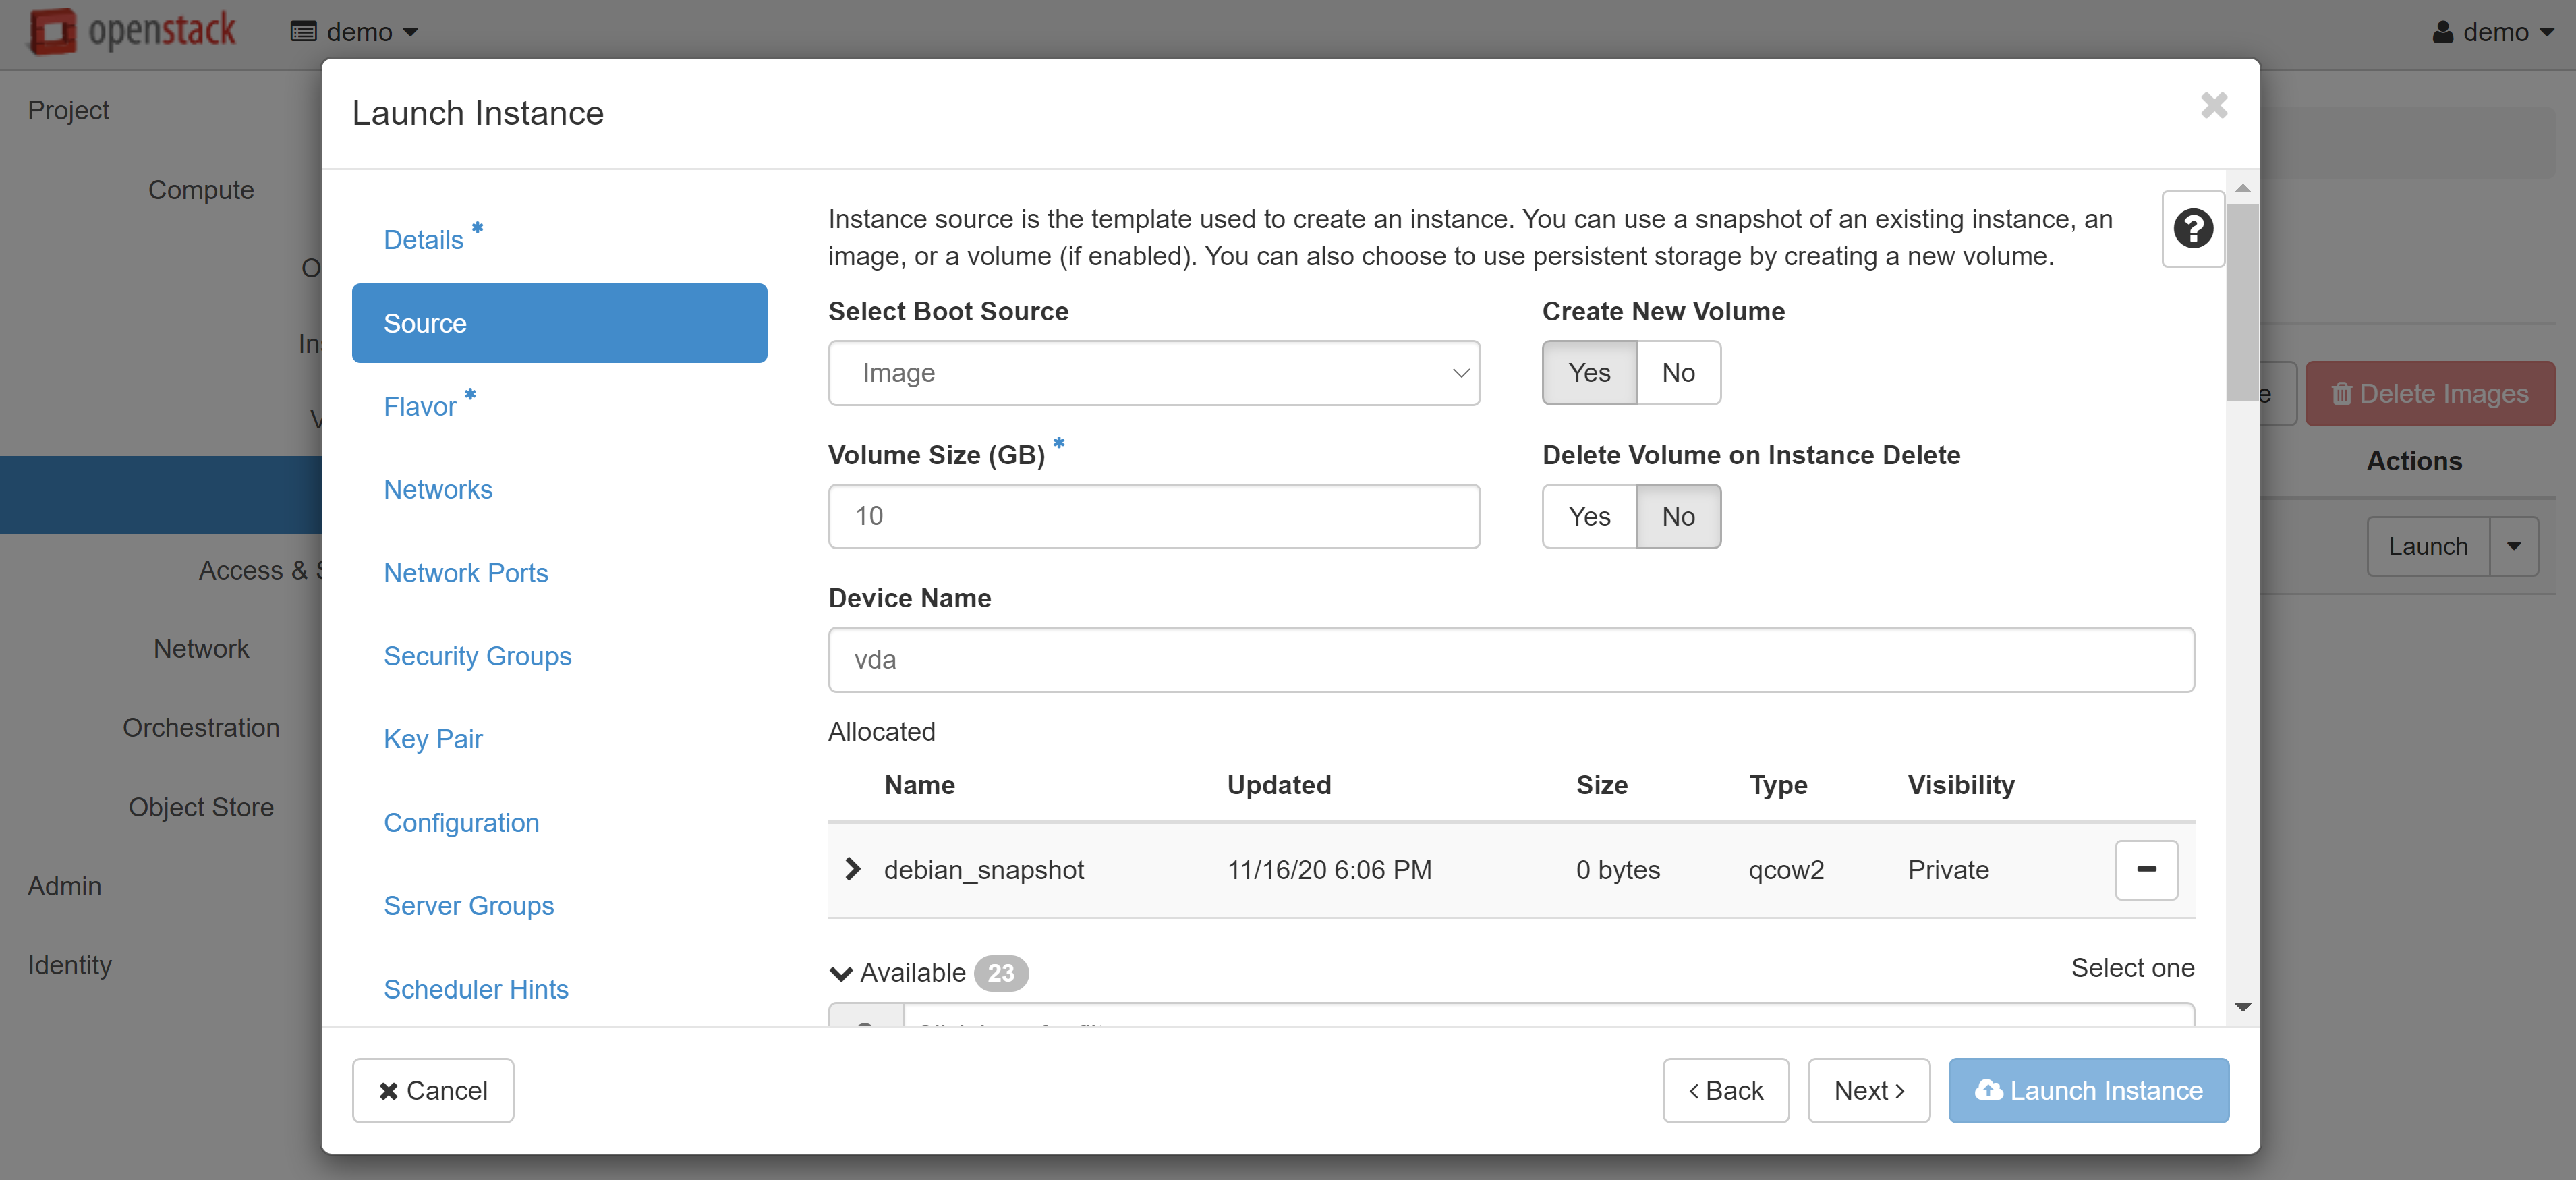
Read more about creating and configuring instances from images here.
Attention! You will not be able to delete the source volume and the snapshot itself whilst there are other volumes based on this snapshot. If you wish to delete the source volume, use the following method.
2. Using The Image
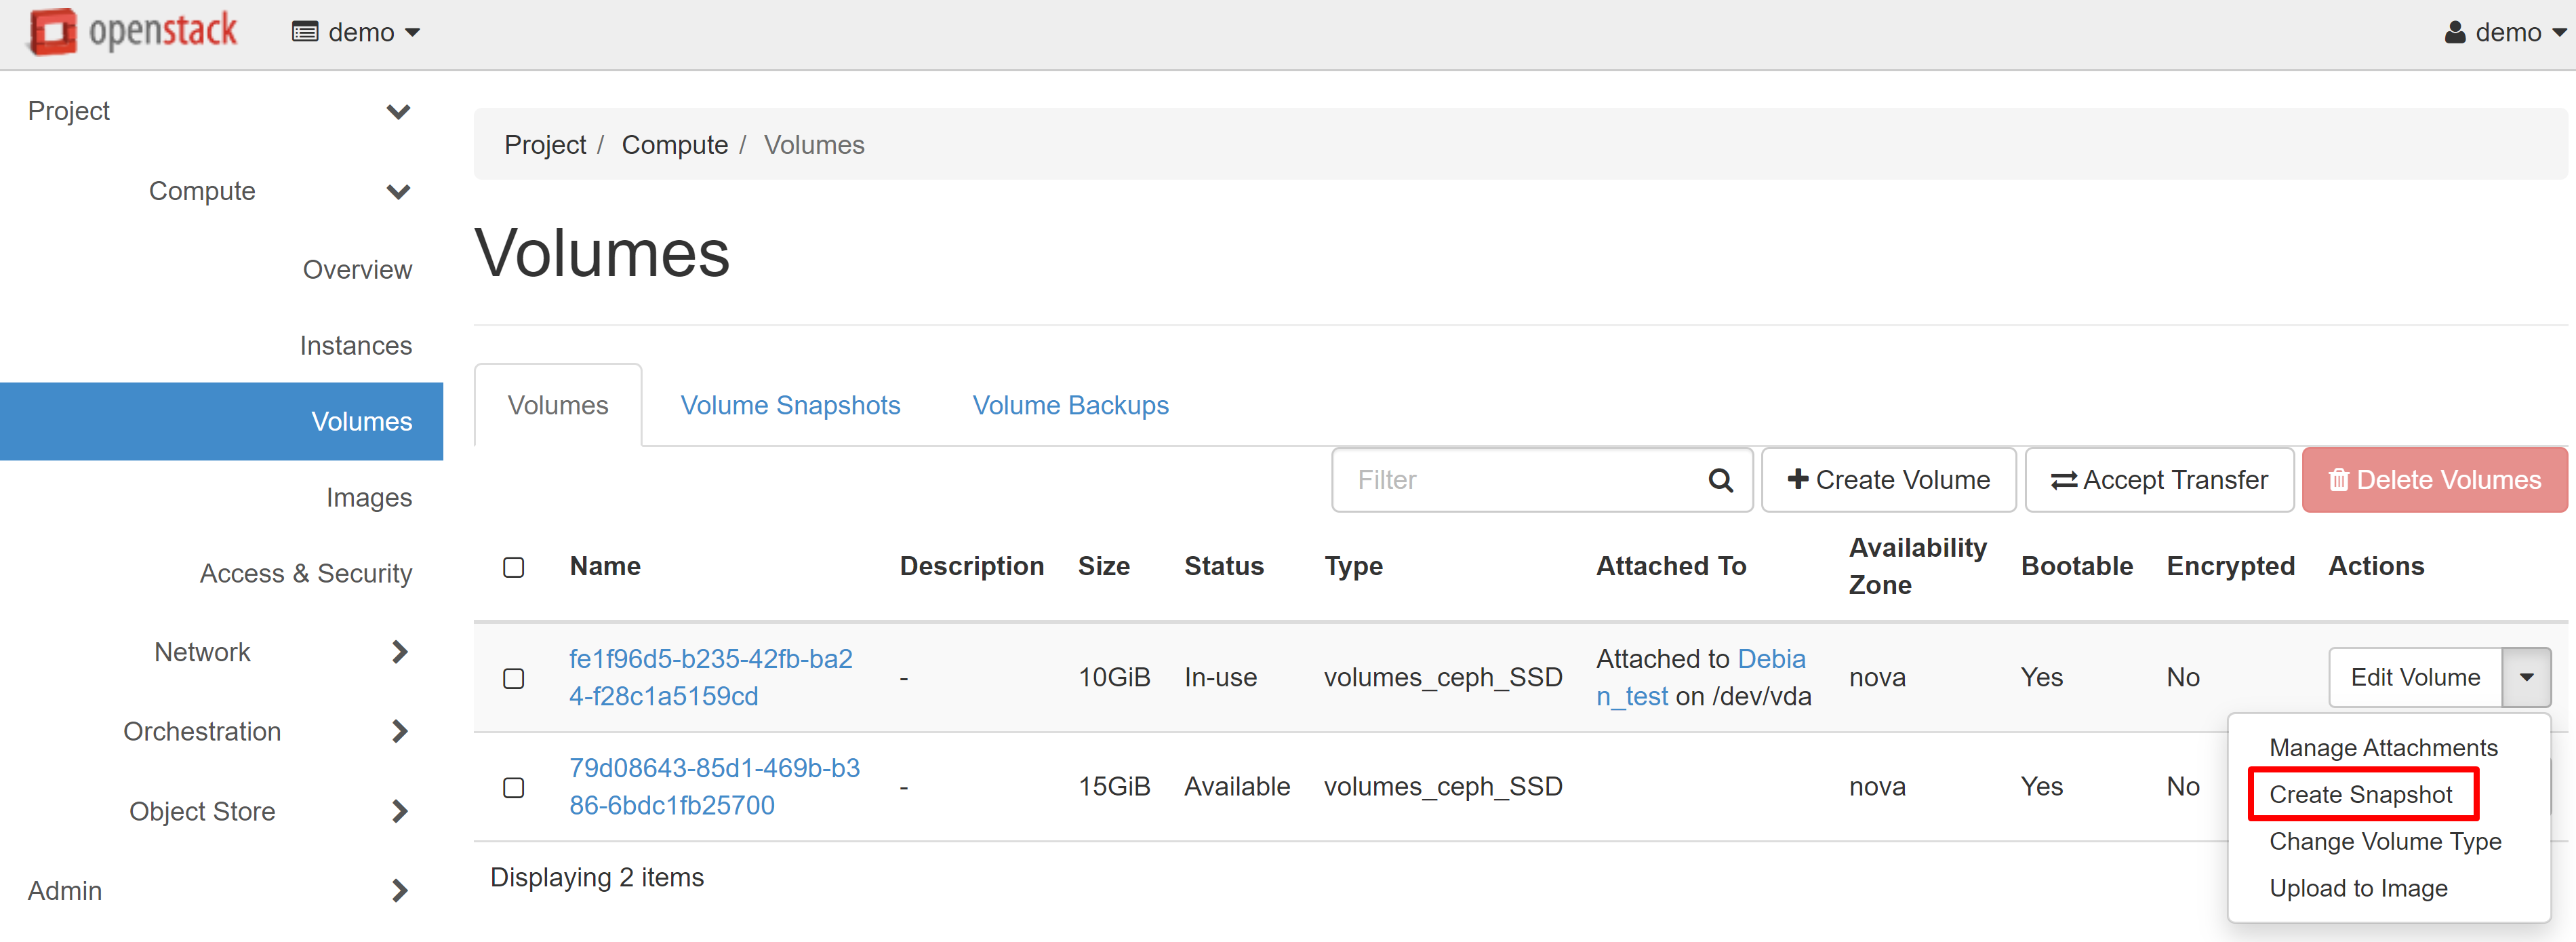
This method is suitable for cases when you need to delete the original VM. It involves unloading the volume as an image or backup.
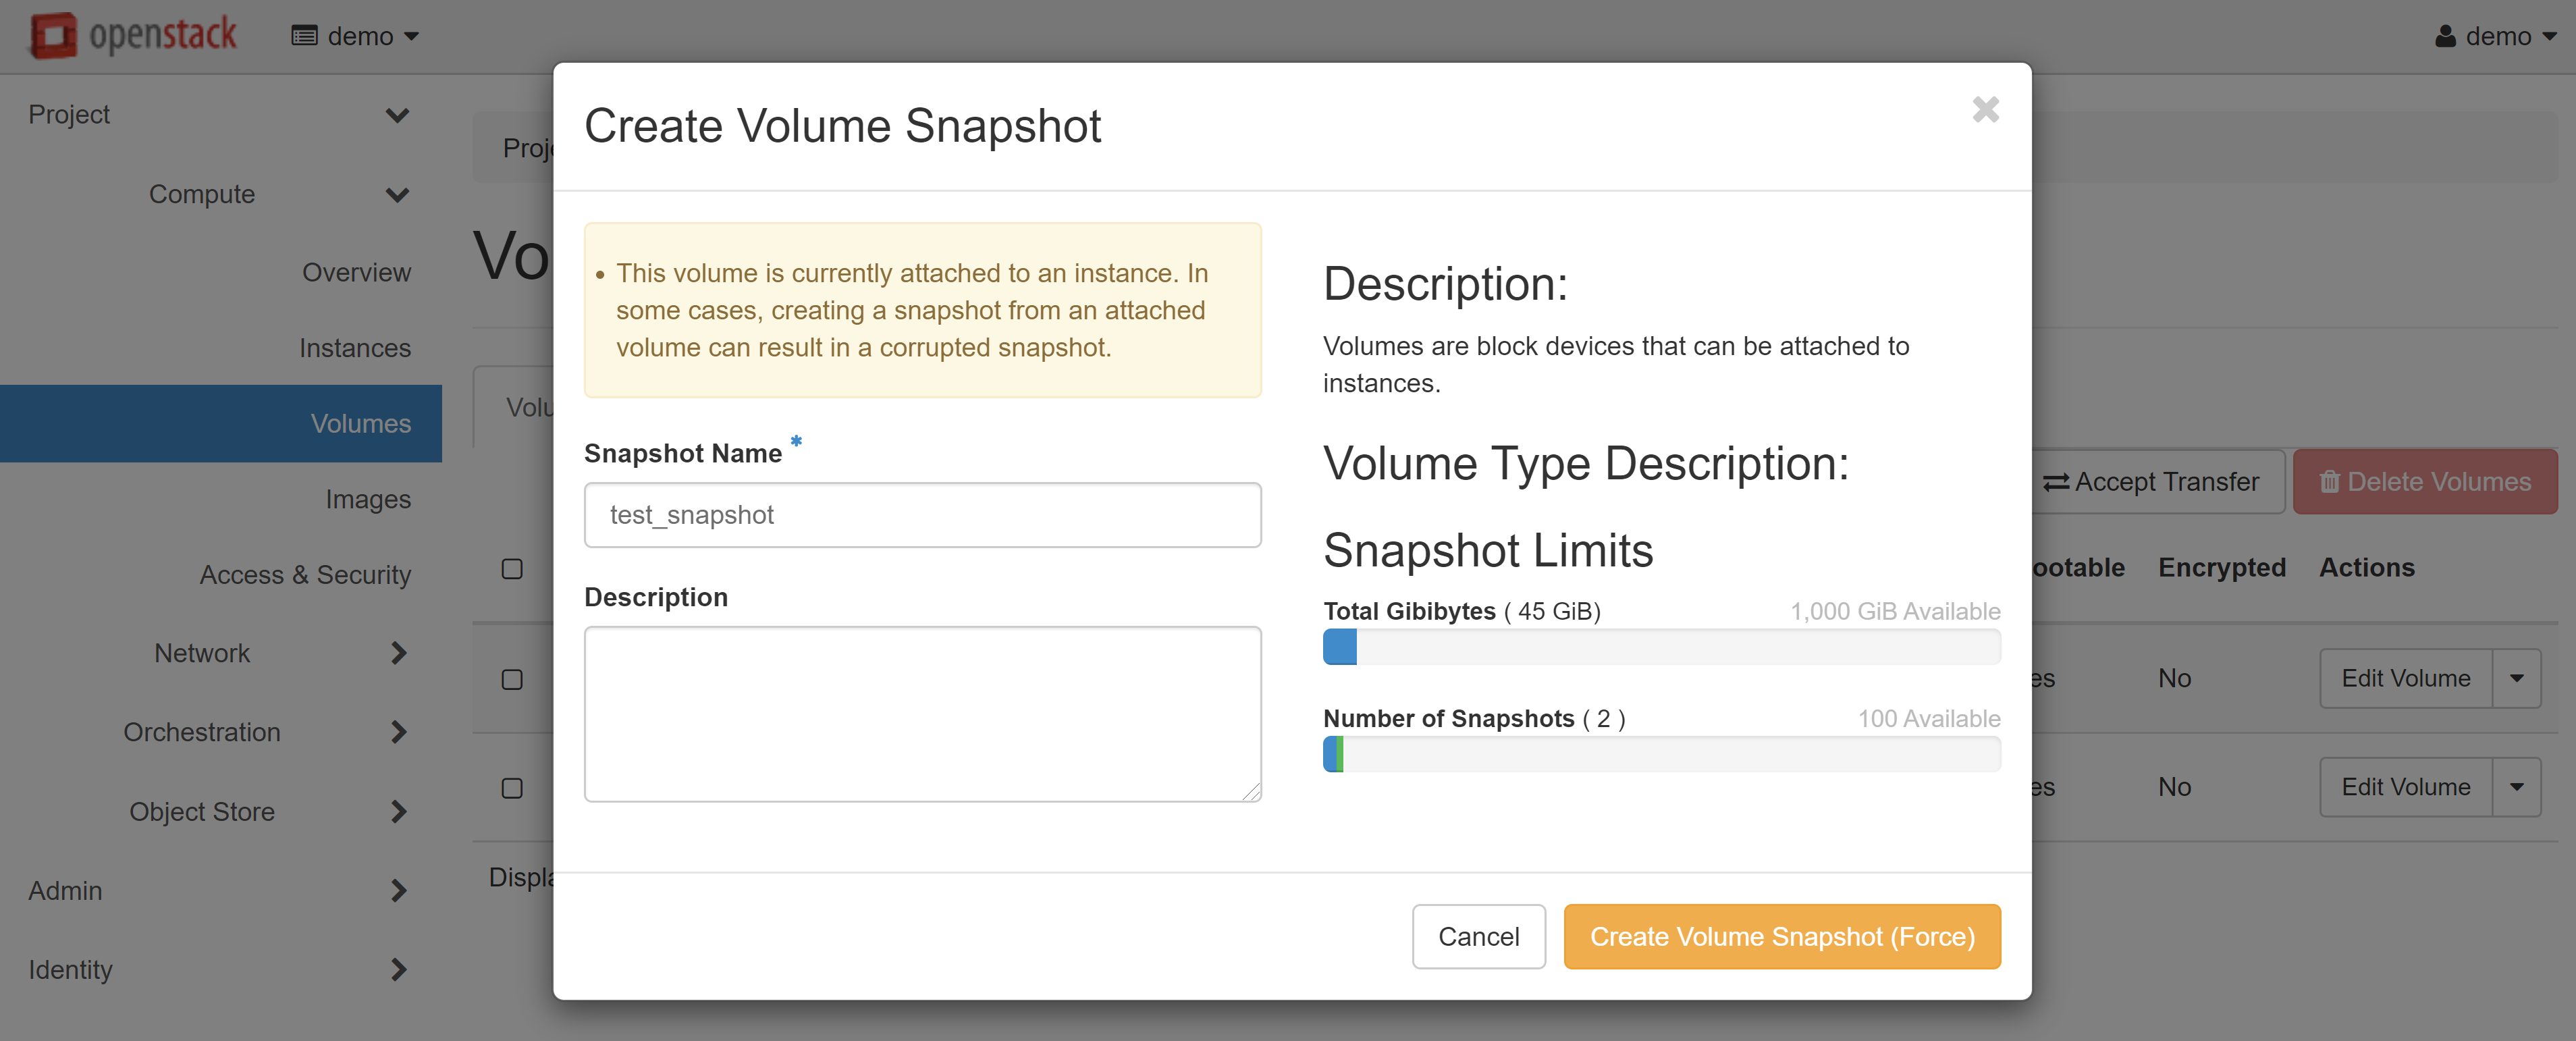
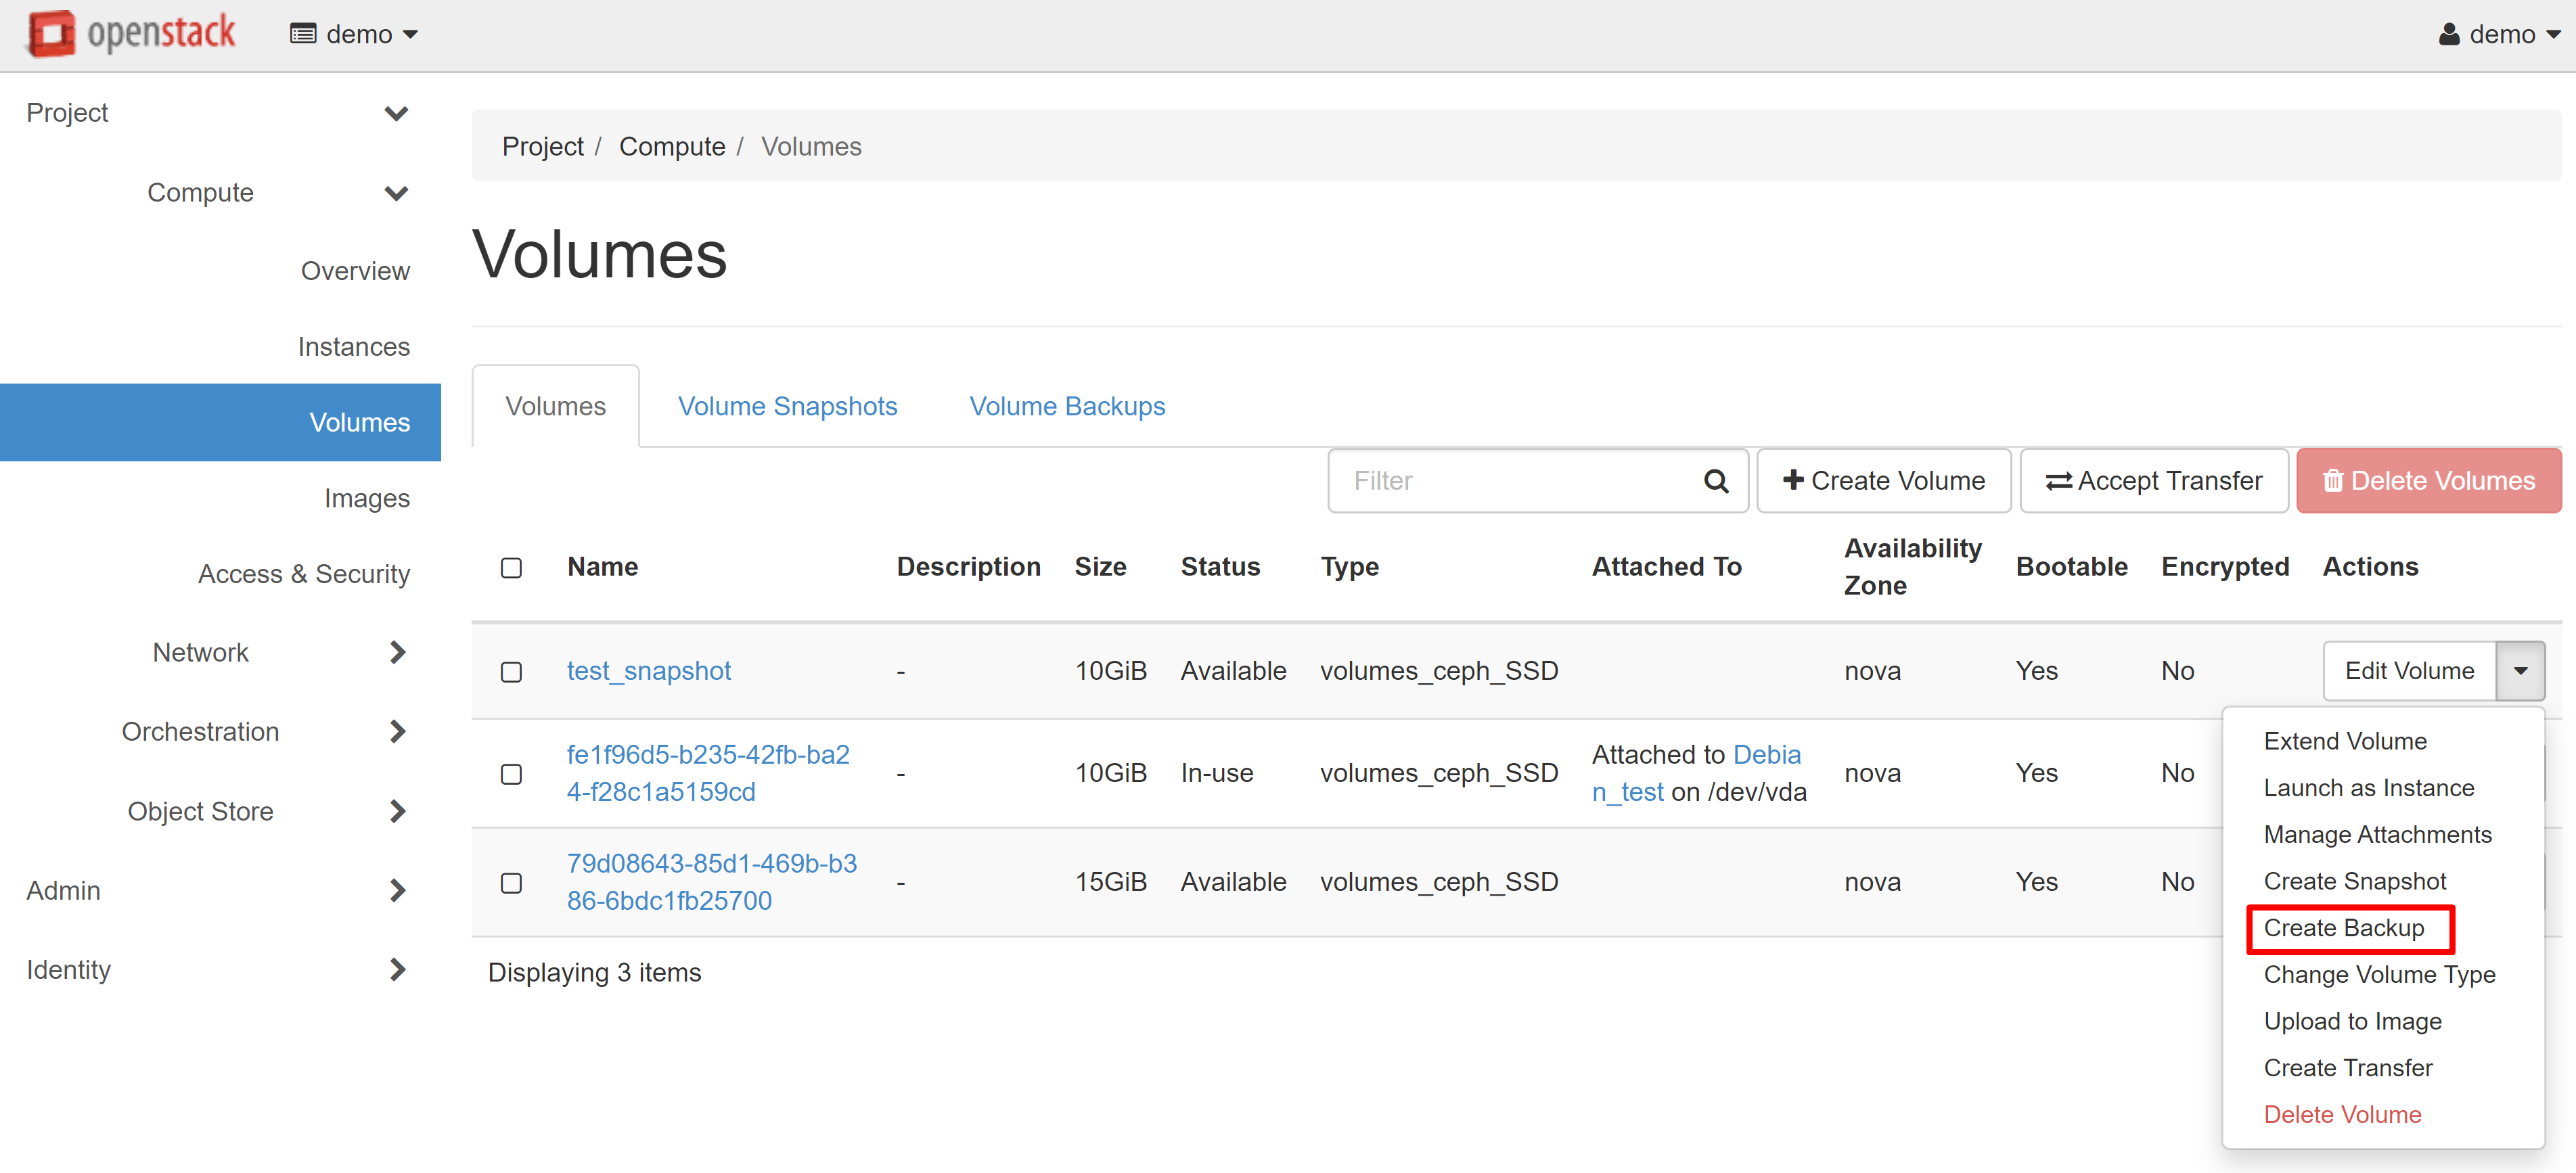
Go to COMPUTE — VOLUMES, next to the desired volume in the drop-down menu, then select CREATE SNAPSHOT.
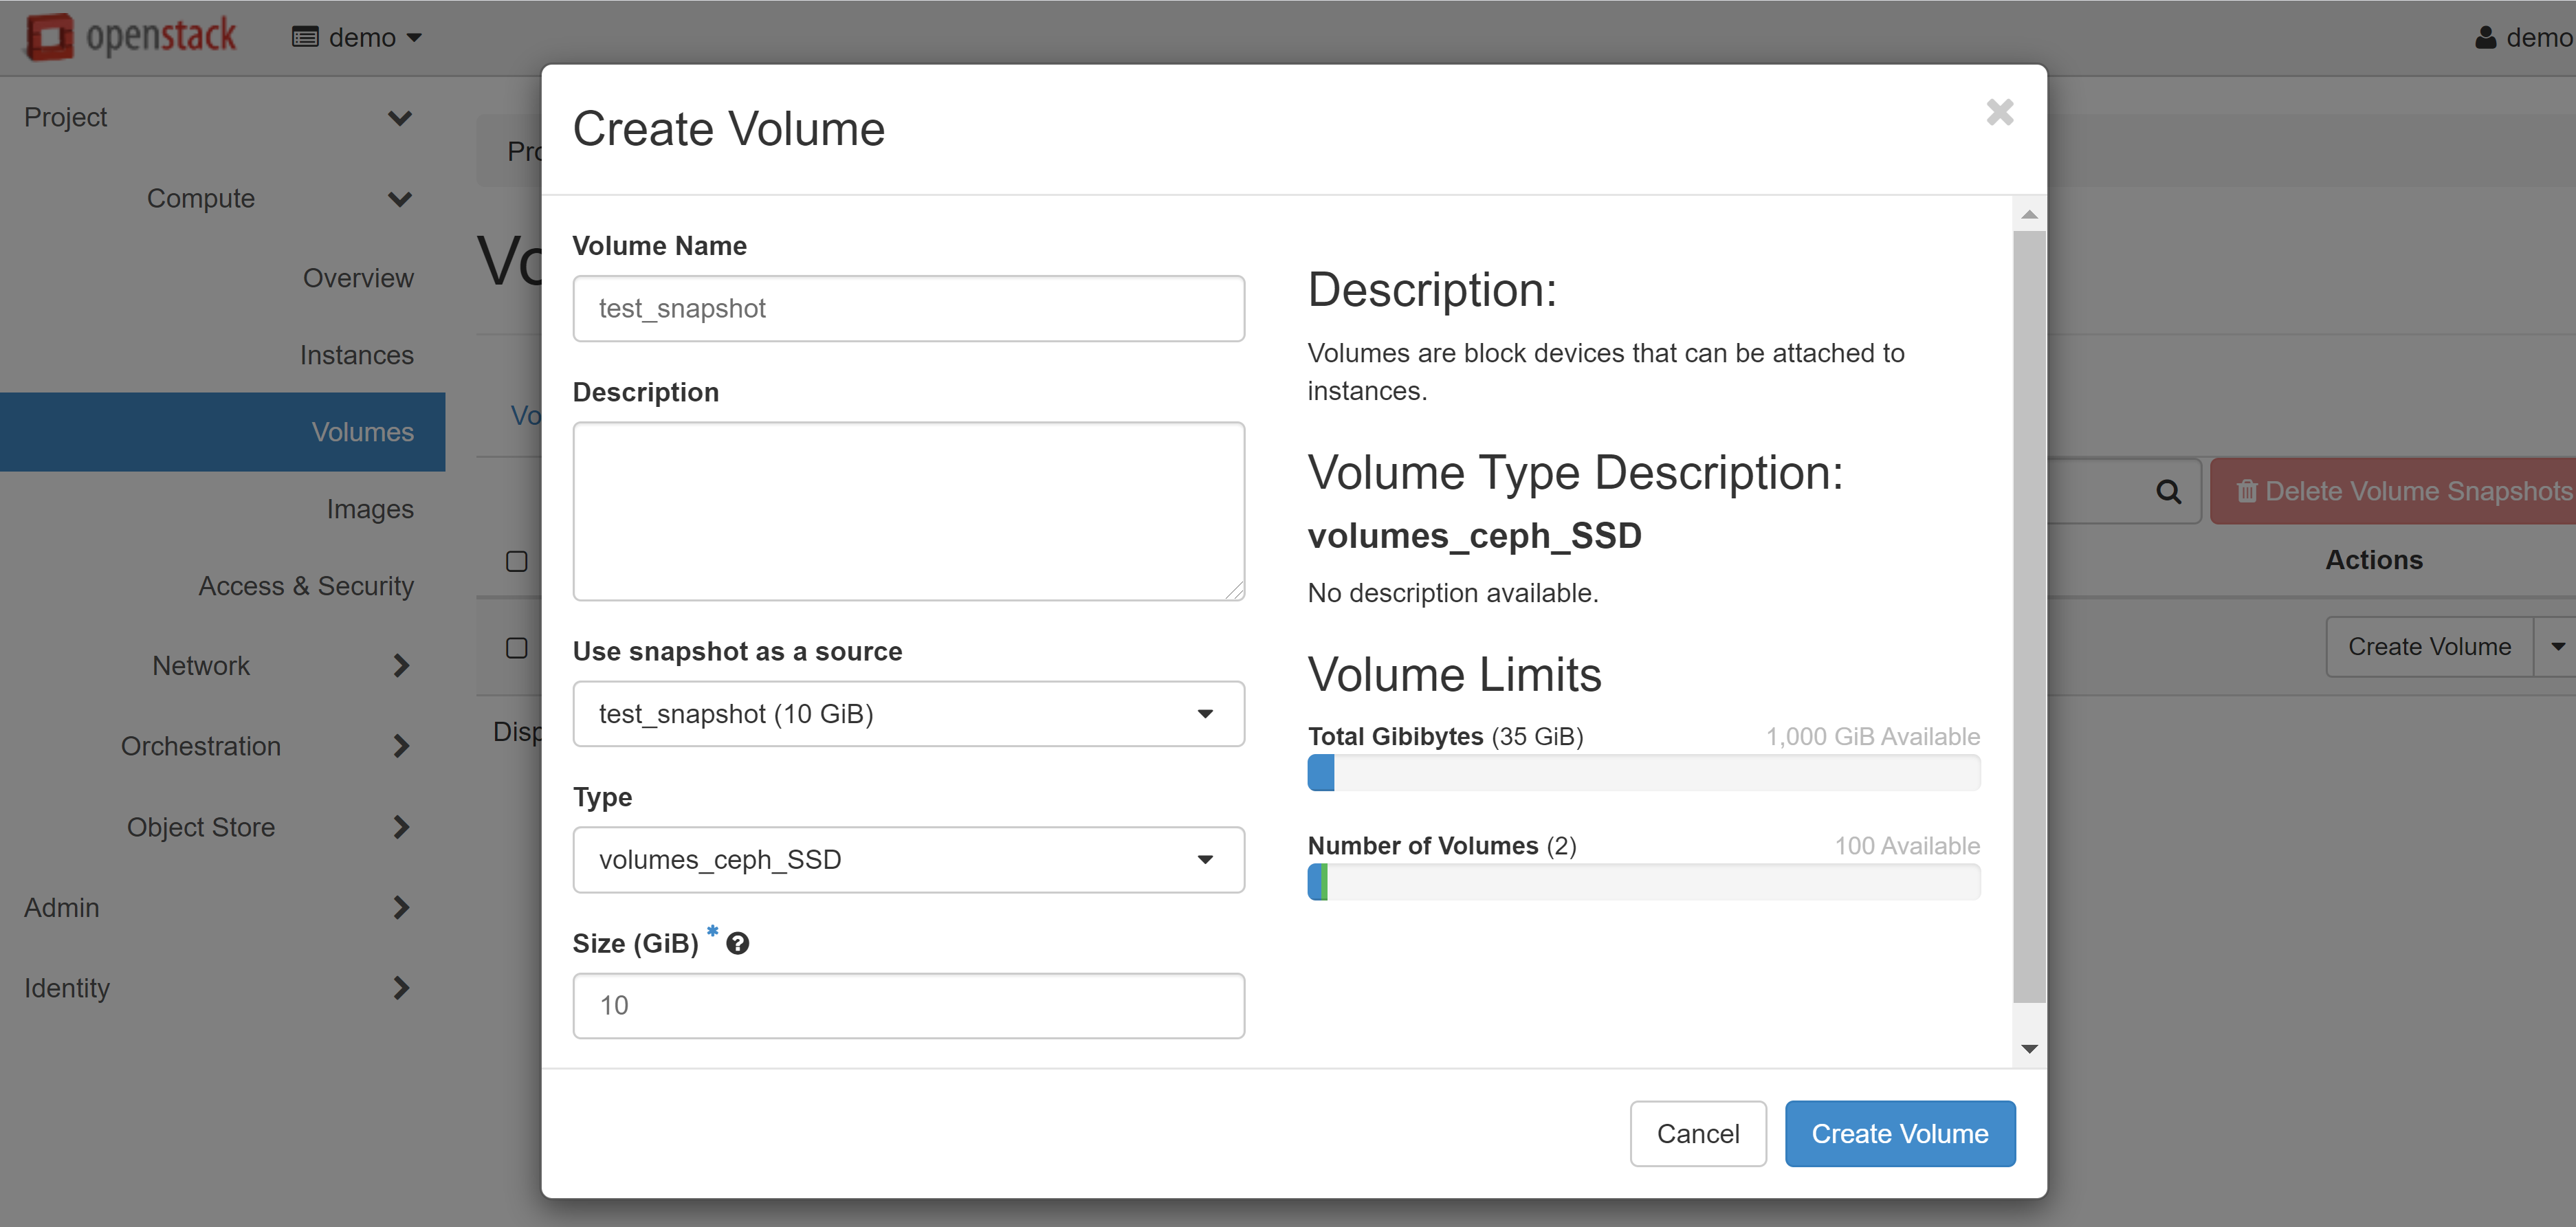
In the window that opens, enter the name of the volume and click CREATE VOLUME SNAPSHOT (FORCE).
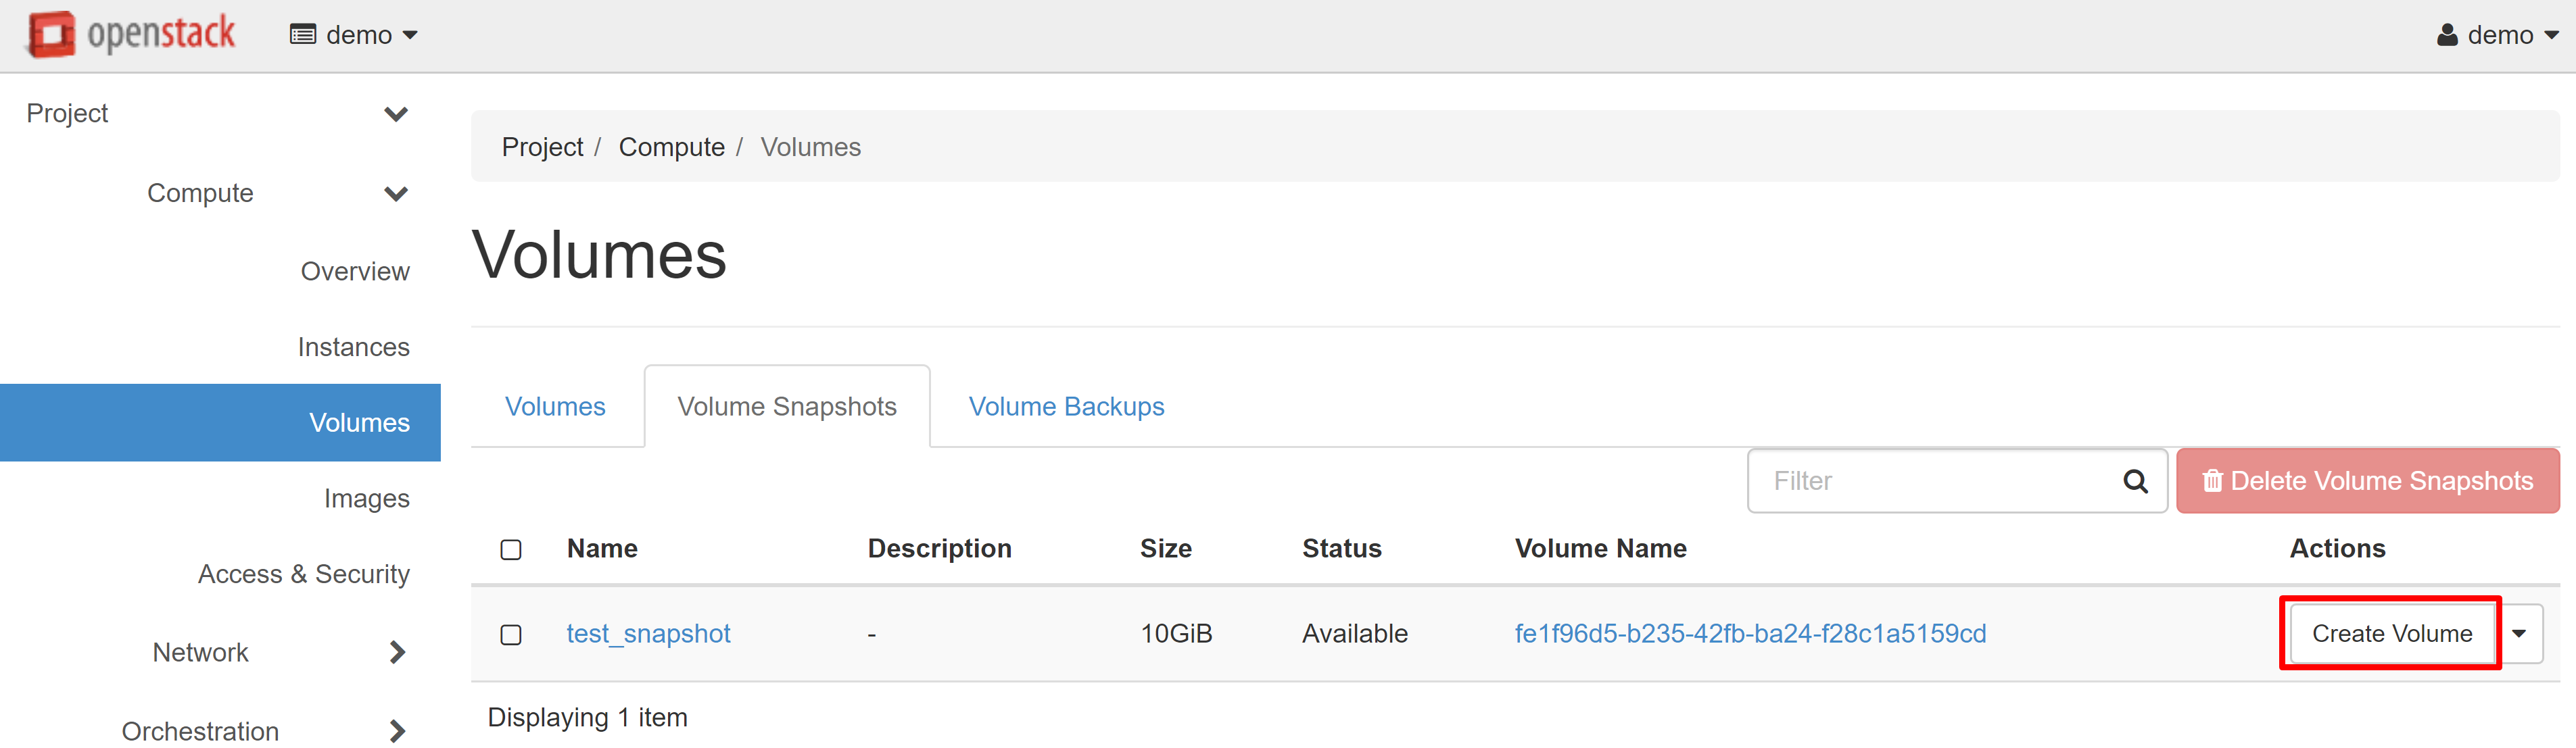
You will automatically be referred to the VOLUME SNAPSHOTS tab in COMPUTE — VOLUMES and the snapshot you have just created will appear in the list. Select CREATE VOLUME in the drop-down menu next to your snapshot.
In the window that opens, fill in the required fields, and click CREATE VOLUME.
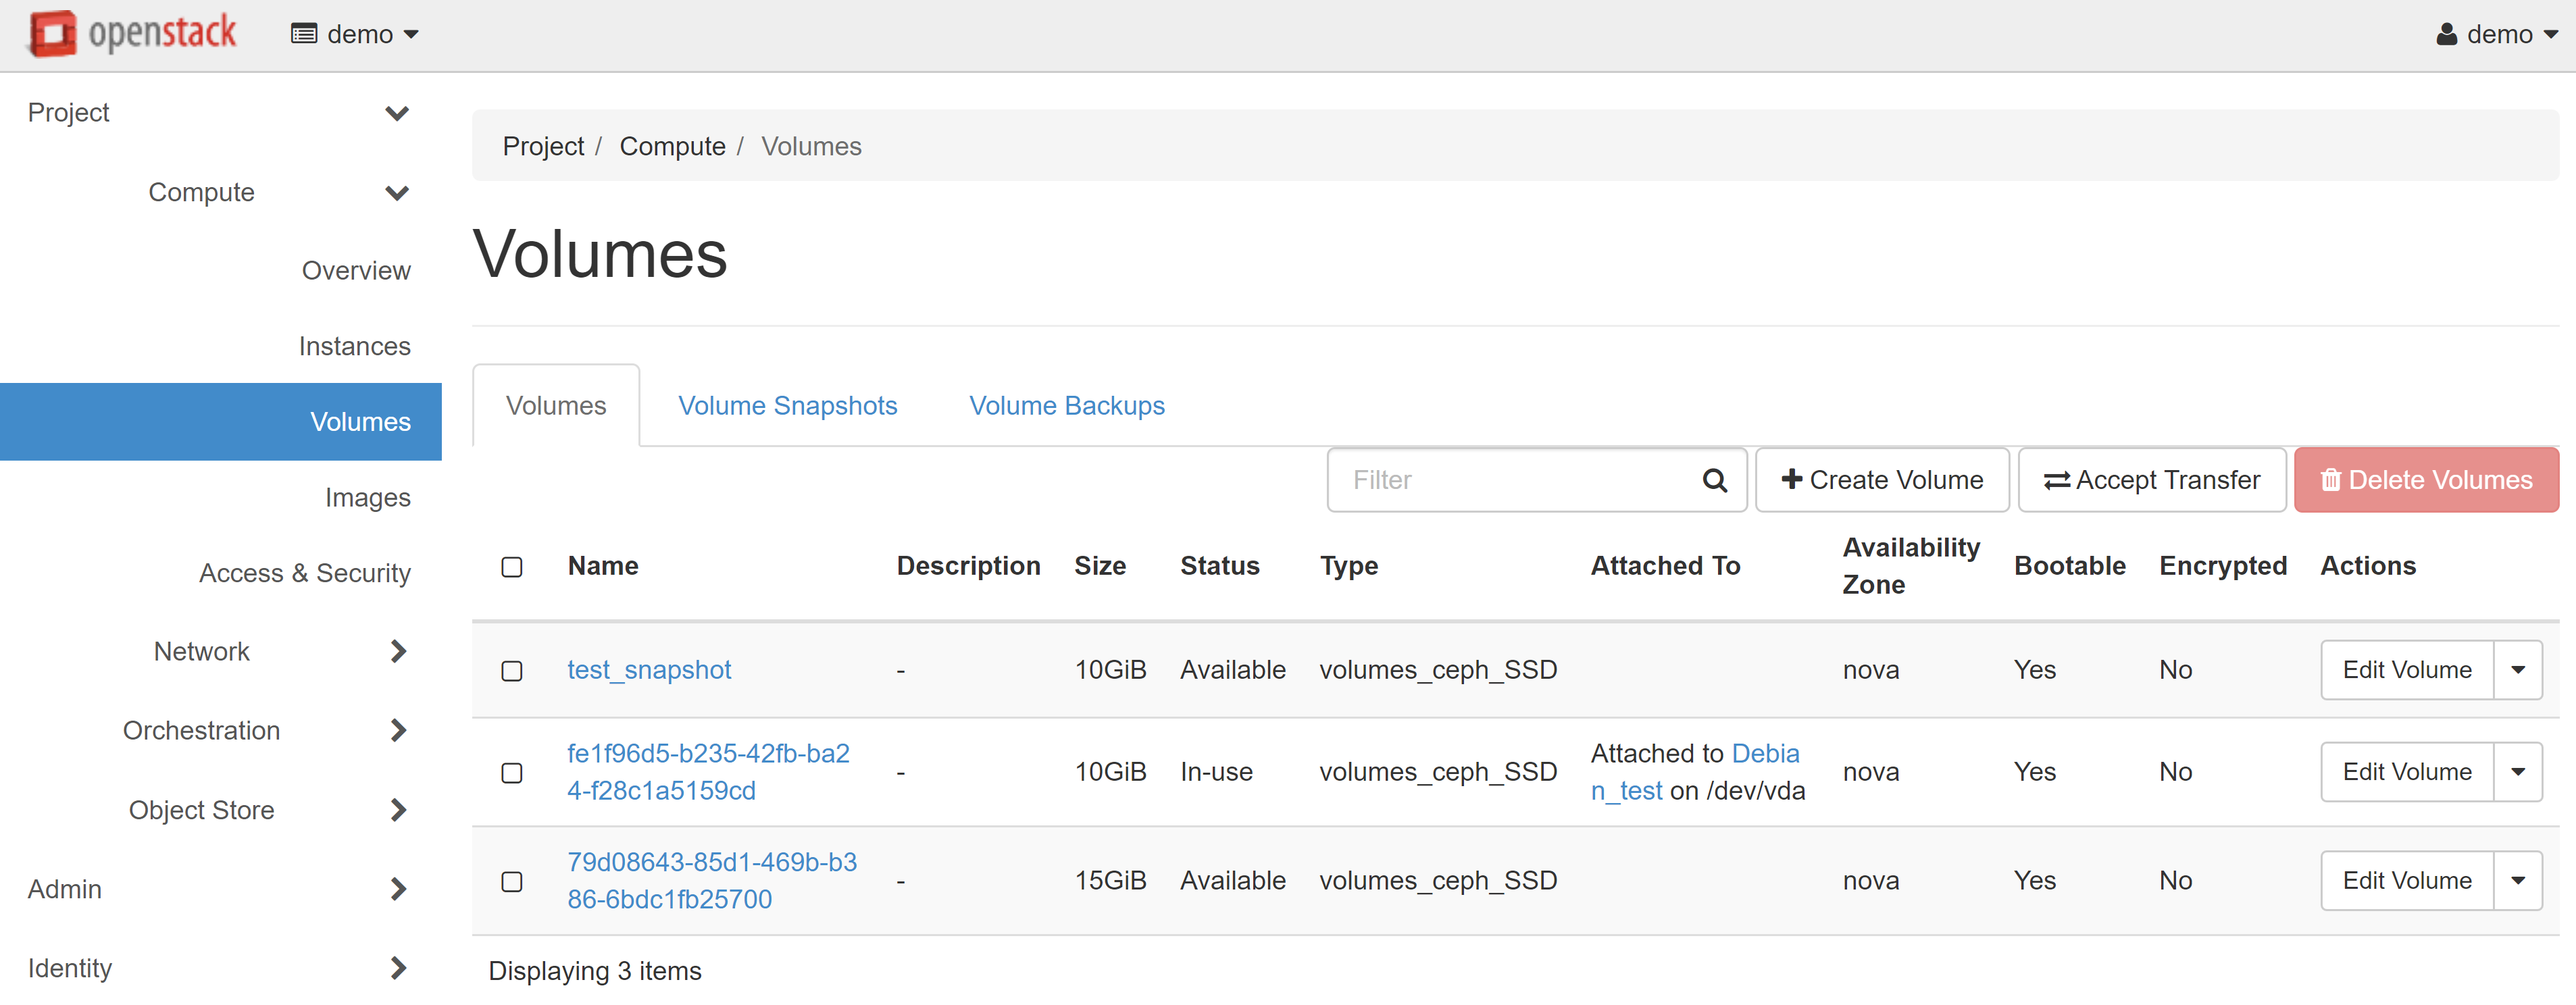
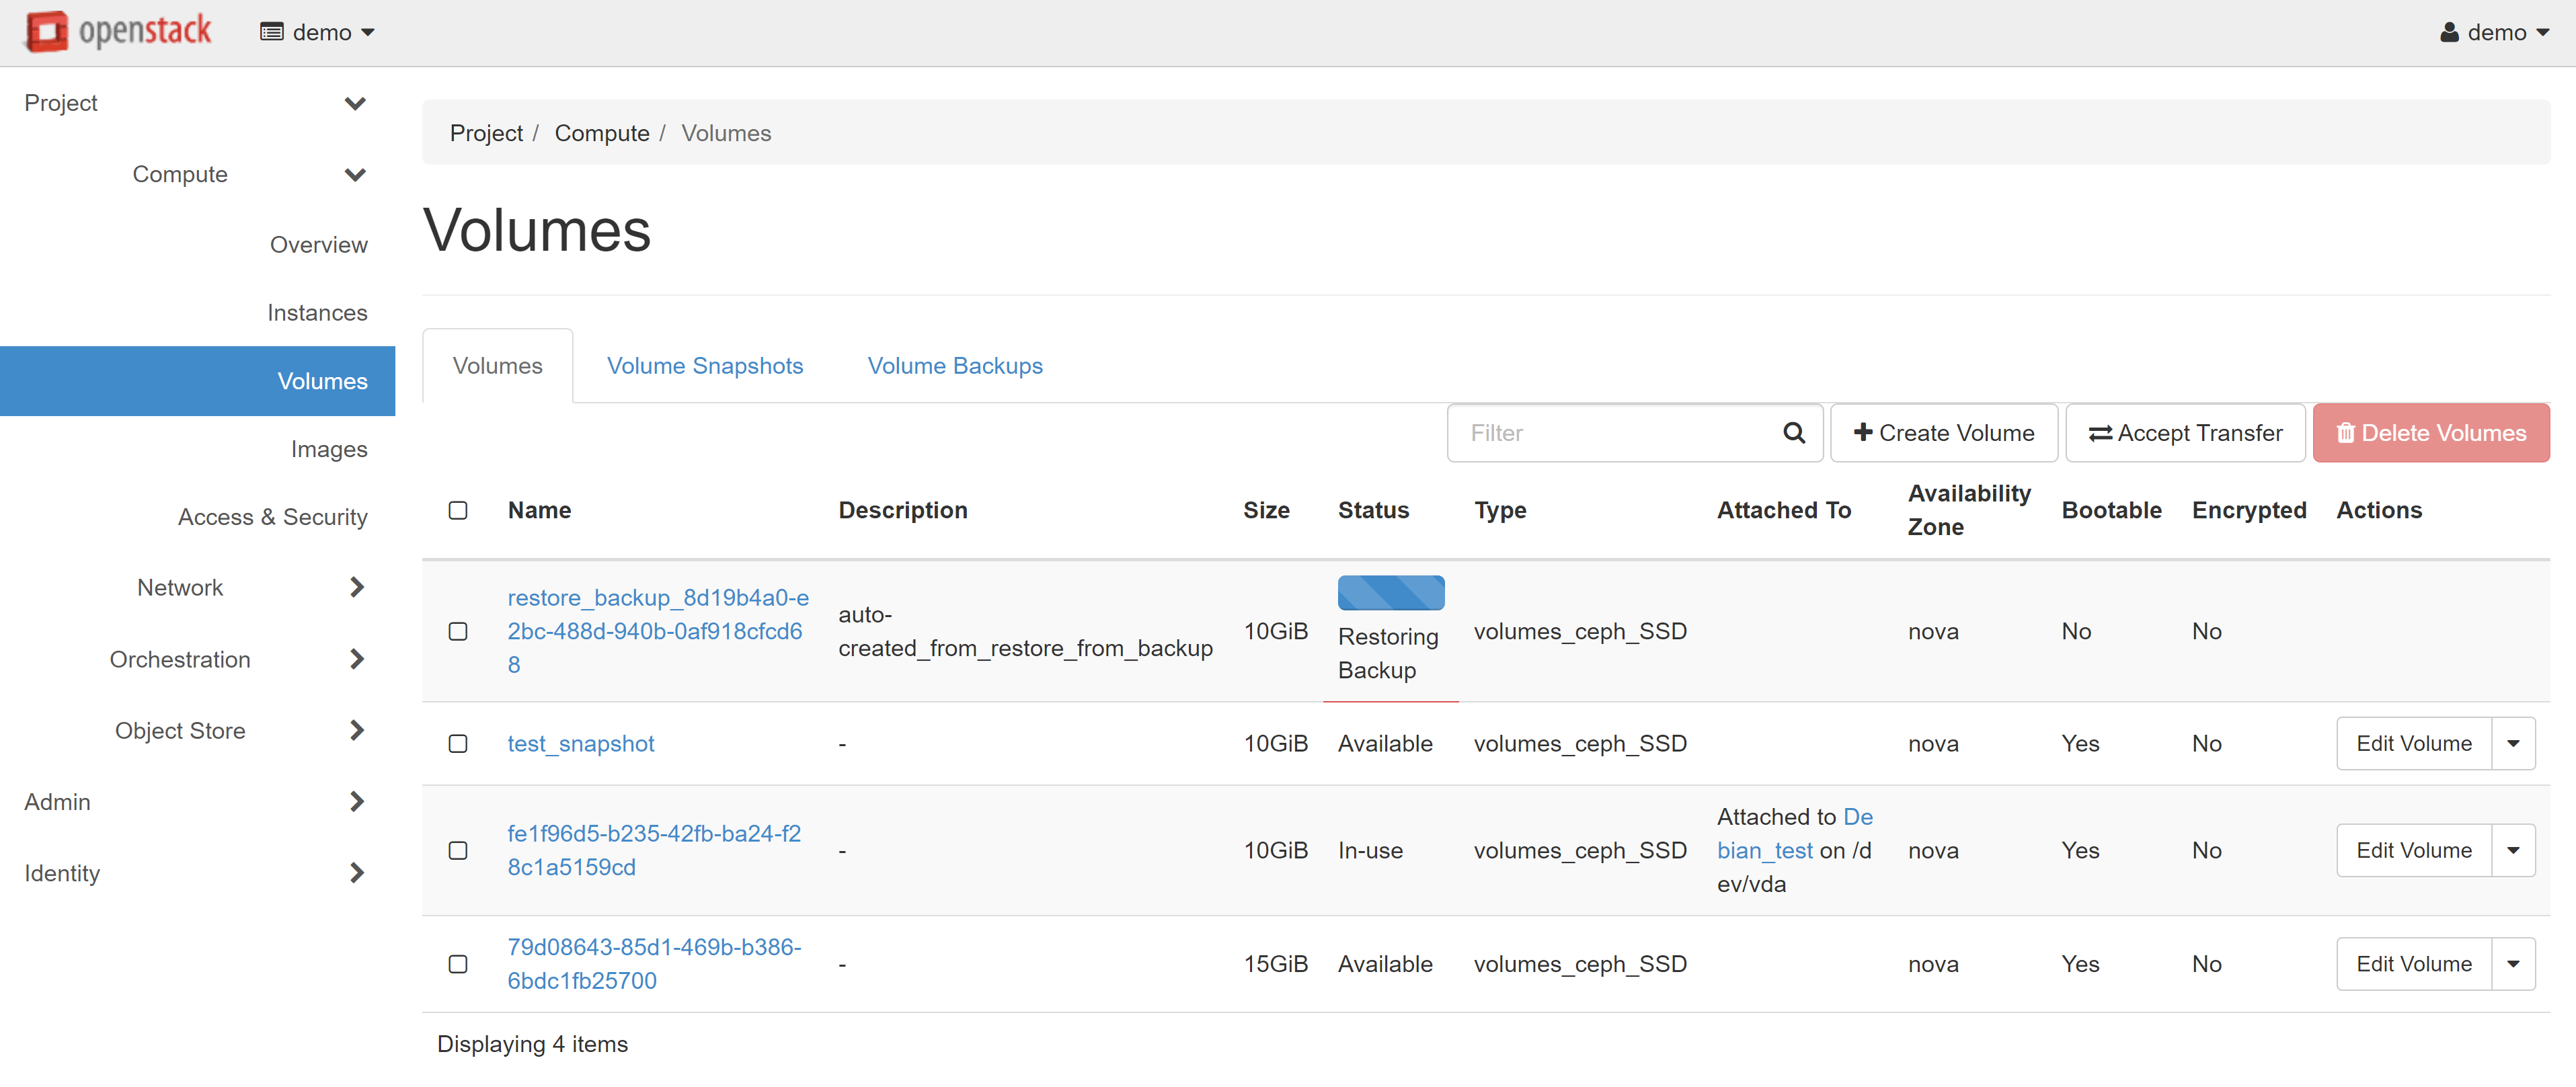
The volume you created will appear on the VOLUMES tab with the AVAILABLE status.
If you wish to create a large number of clones, you must save the created volume as an image. To do this, select the UPLOAD TO IMAGE drop-down menu item next to the selected volume.
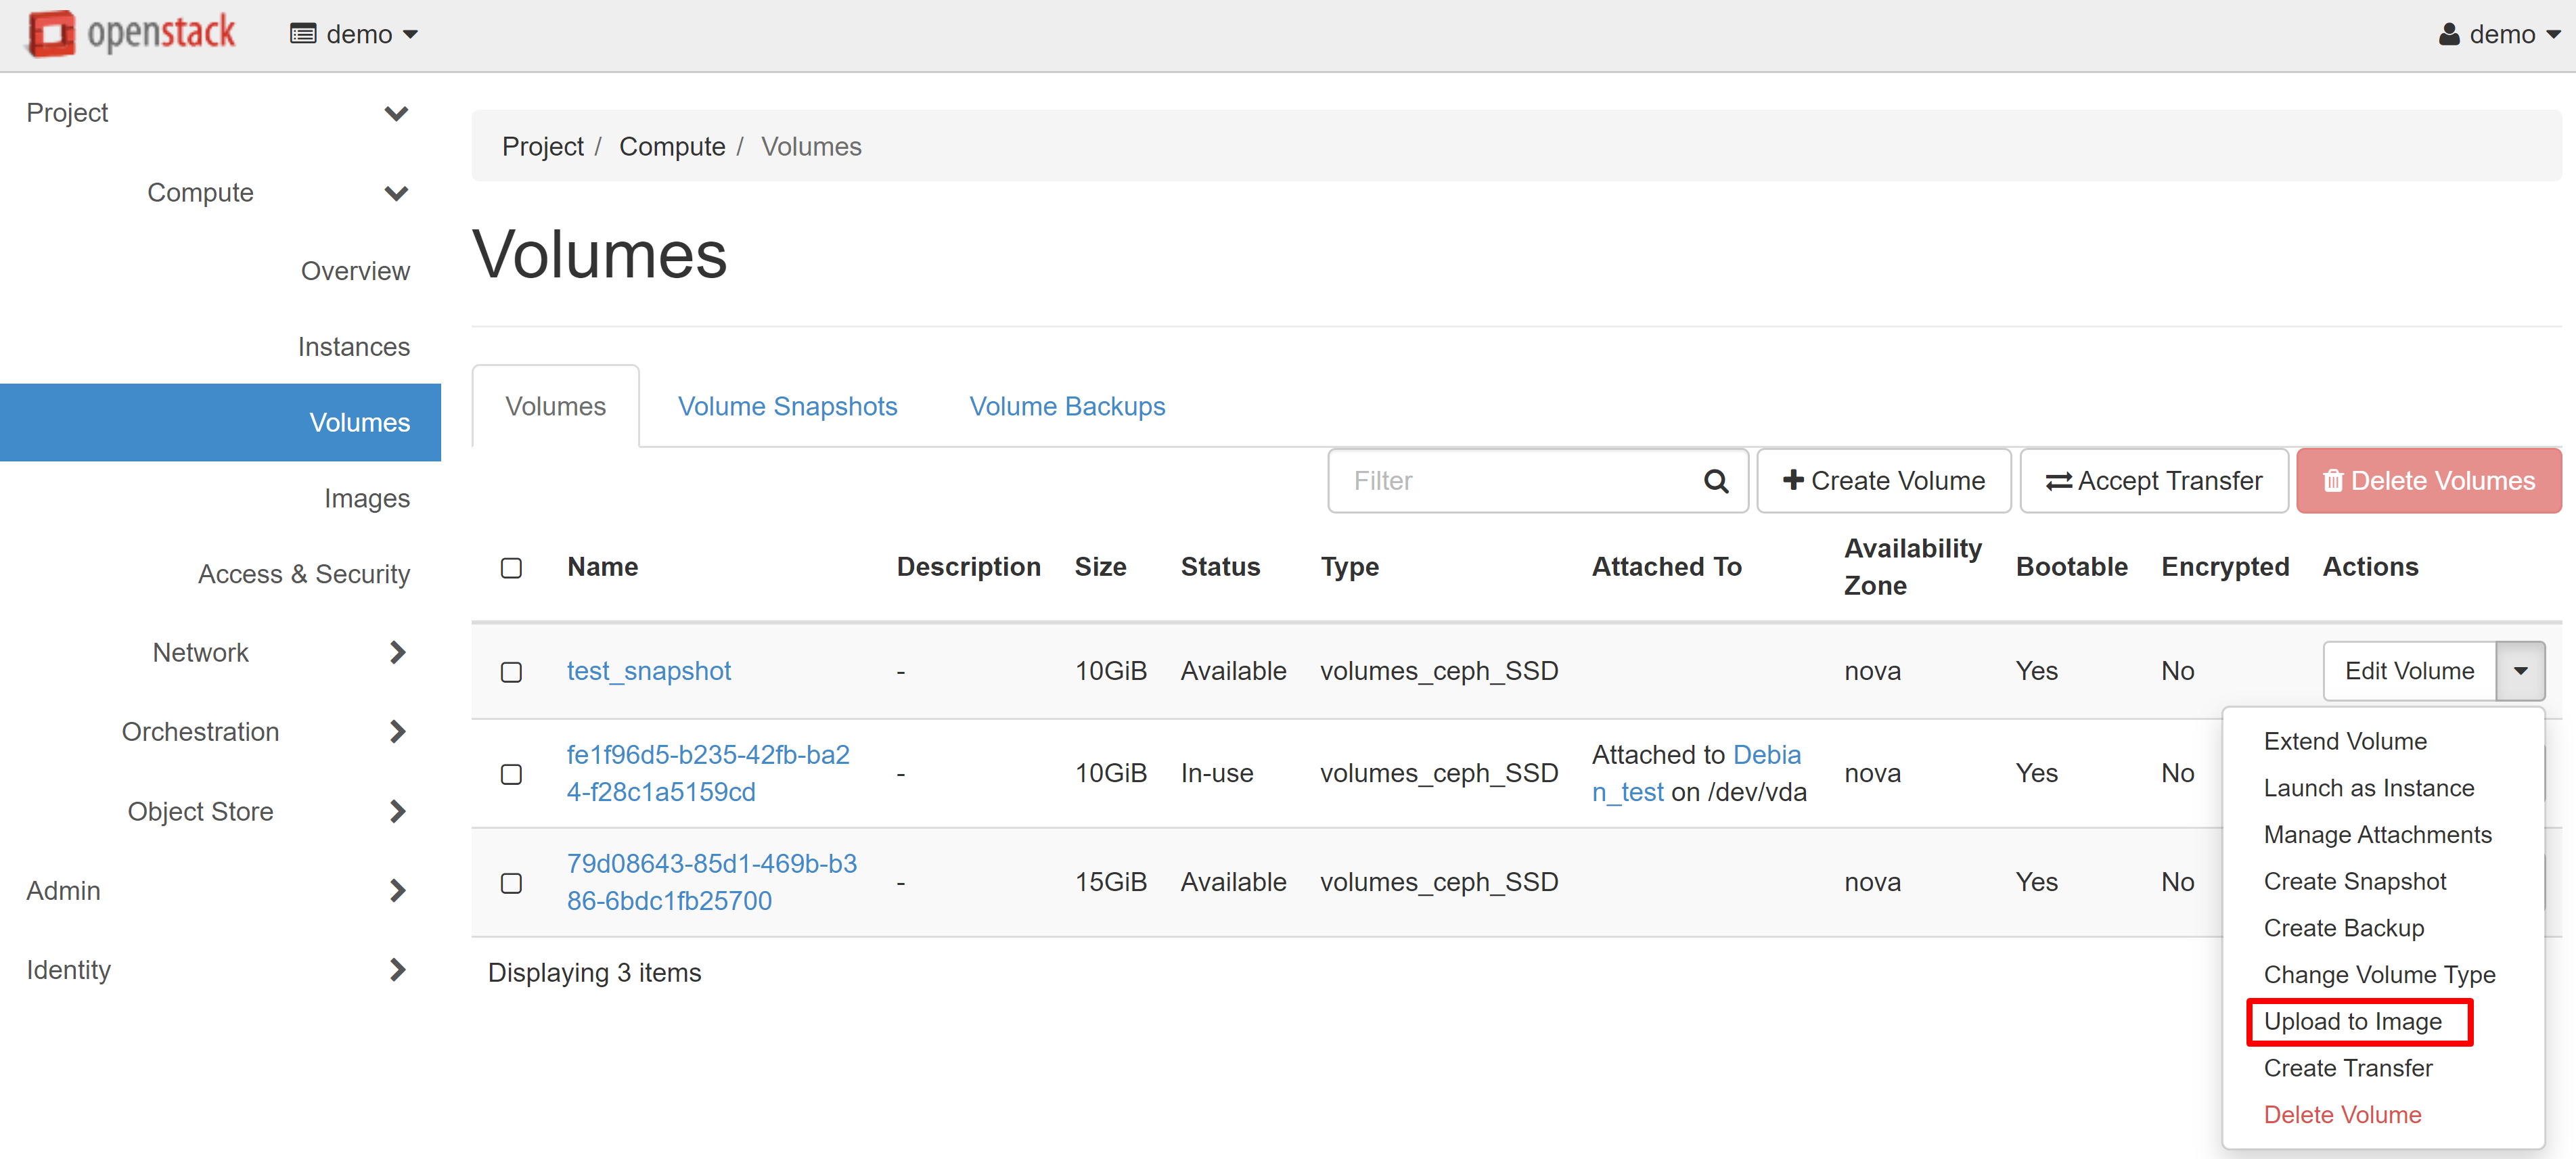
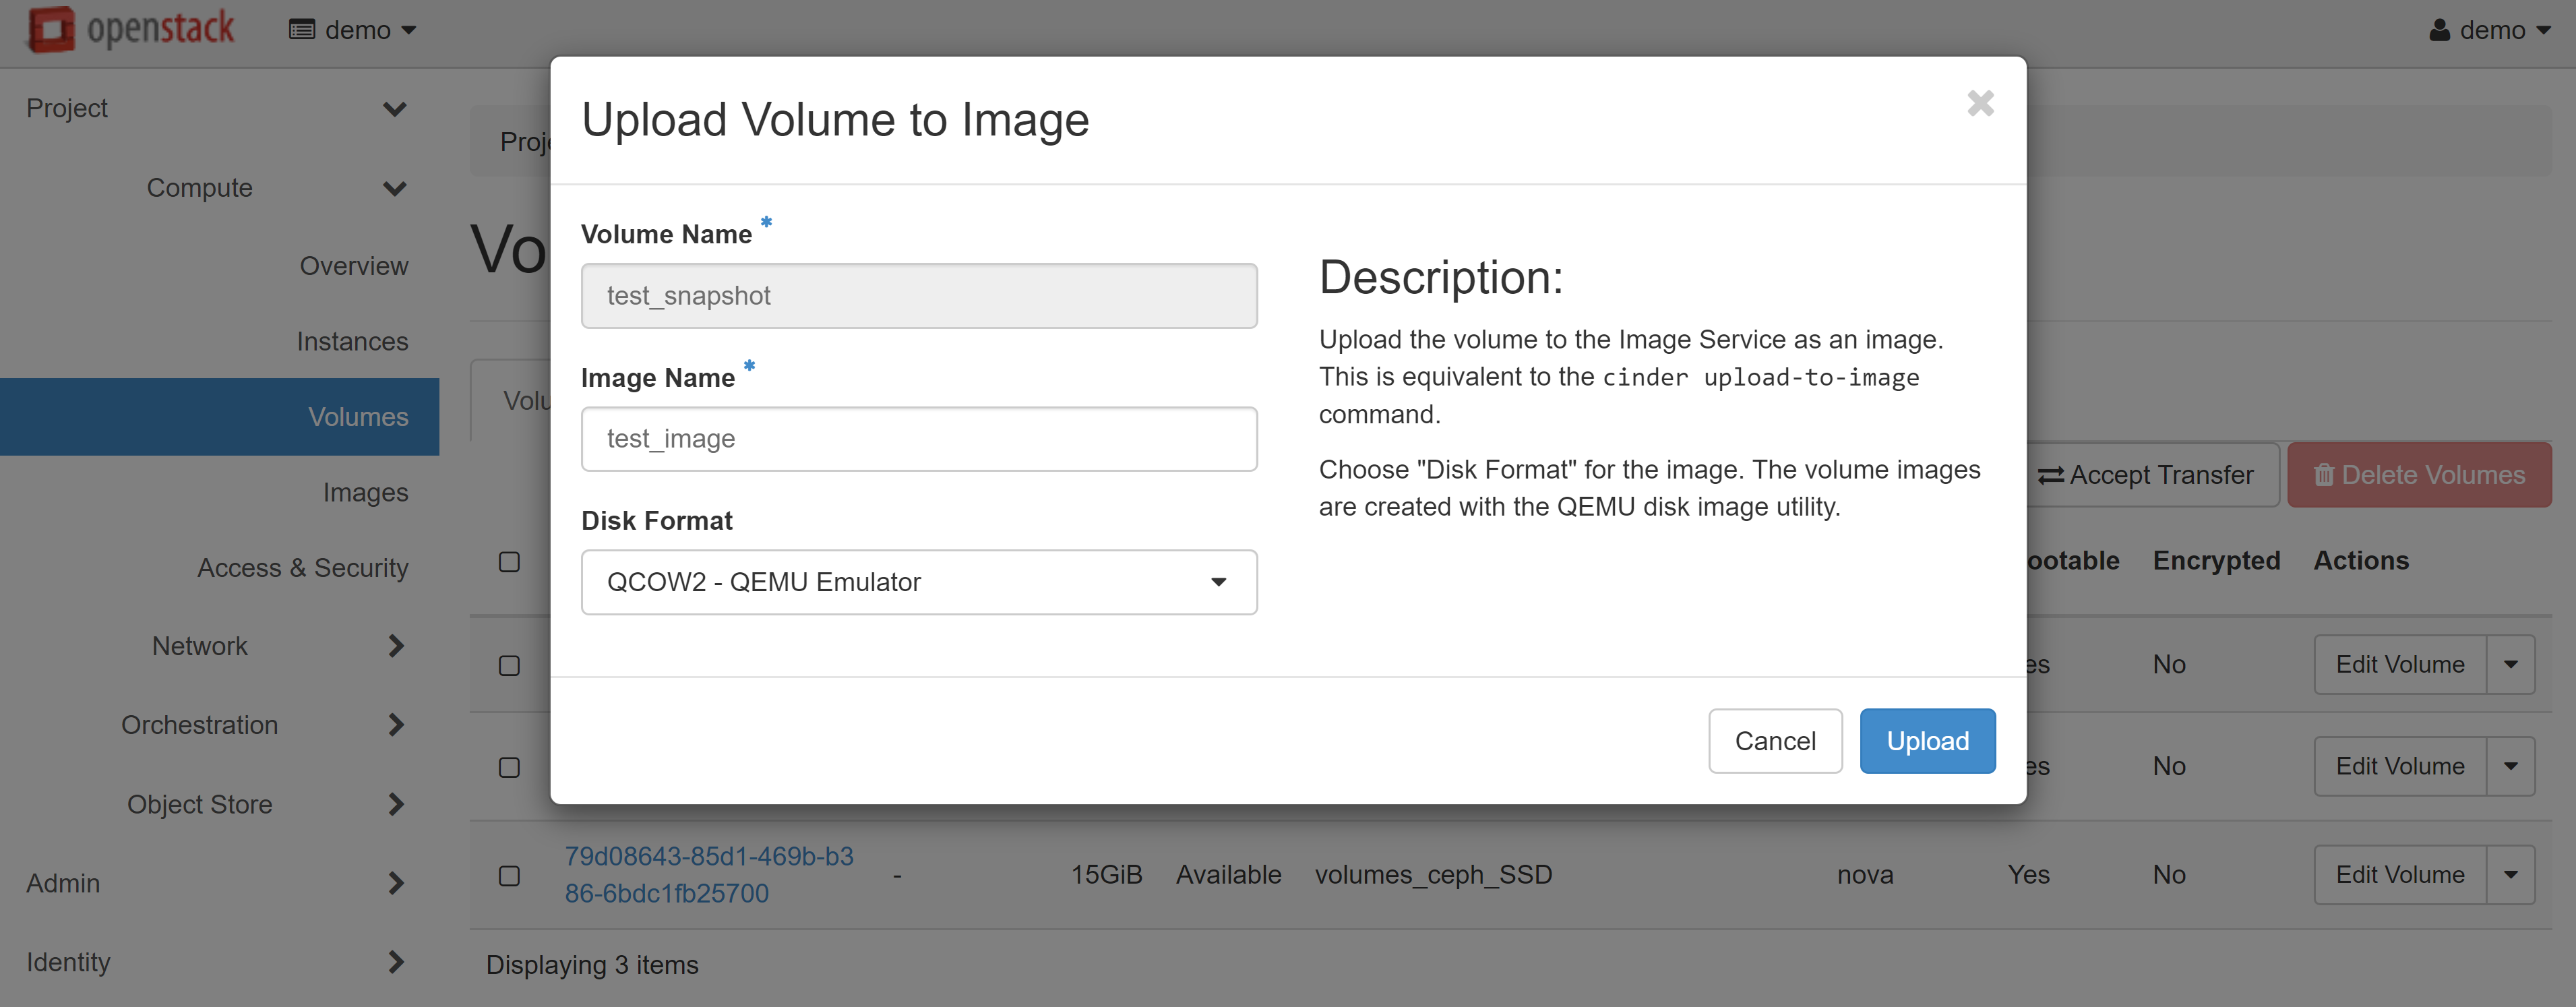
In the image upload window that opens, enter the image name and specify the volume format. We recommend that you choose the QCOW2 — QEMU Emulator disk format — in order to slightly reduce the space used in your image storage.
In COMPUTE — IMAGES, within the PROJECT tab, you will see an image of your instance that you can use to create your VMs. Read more about creating instances from images in our guide.
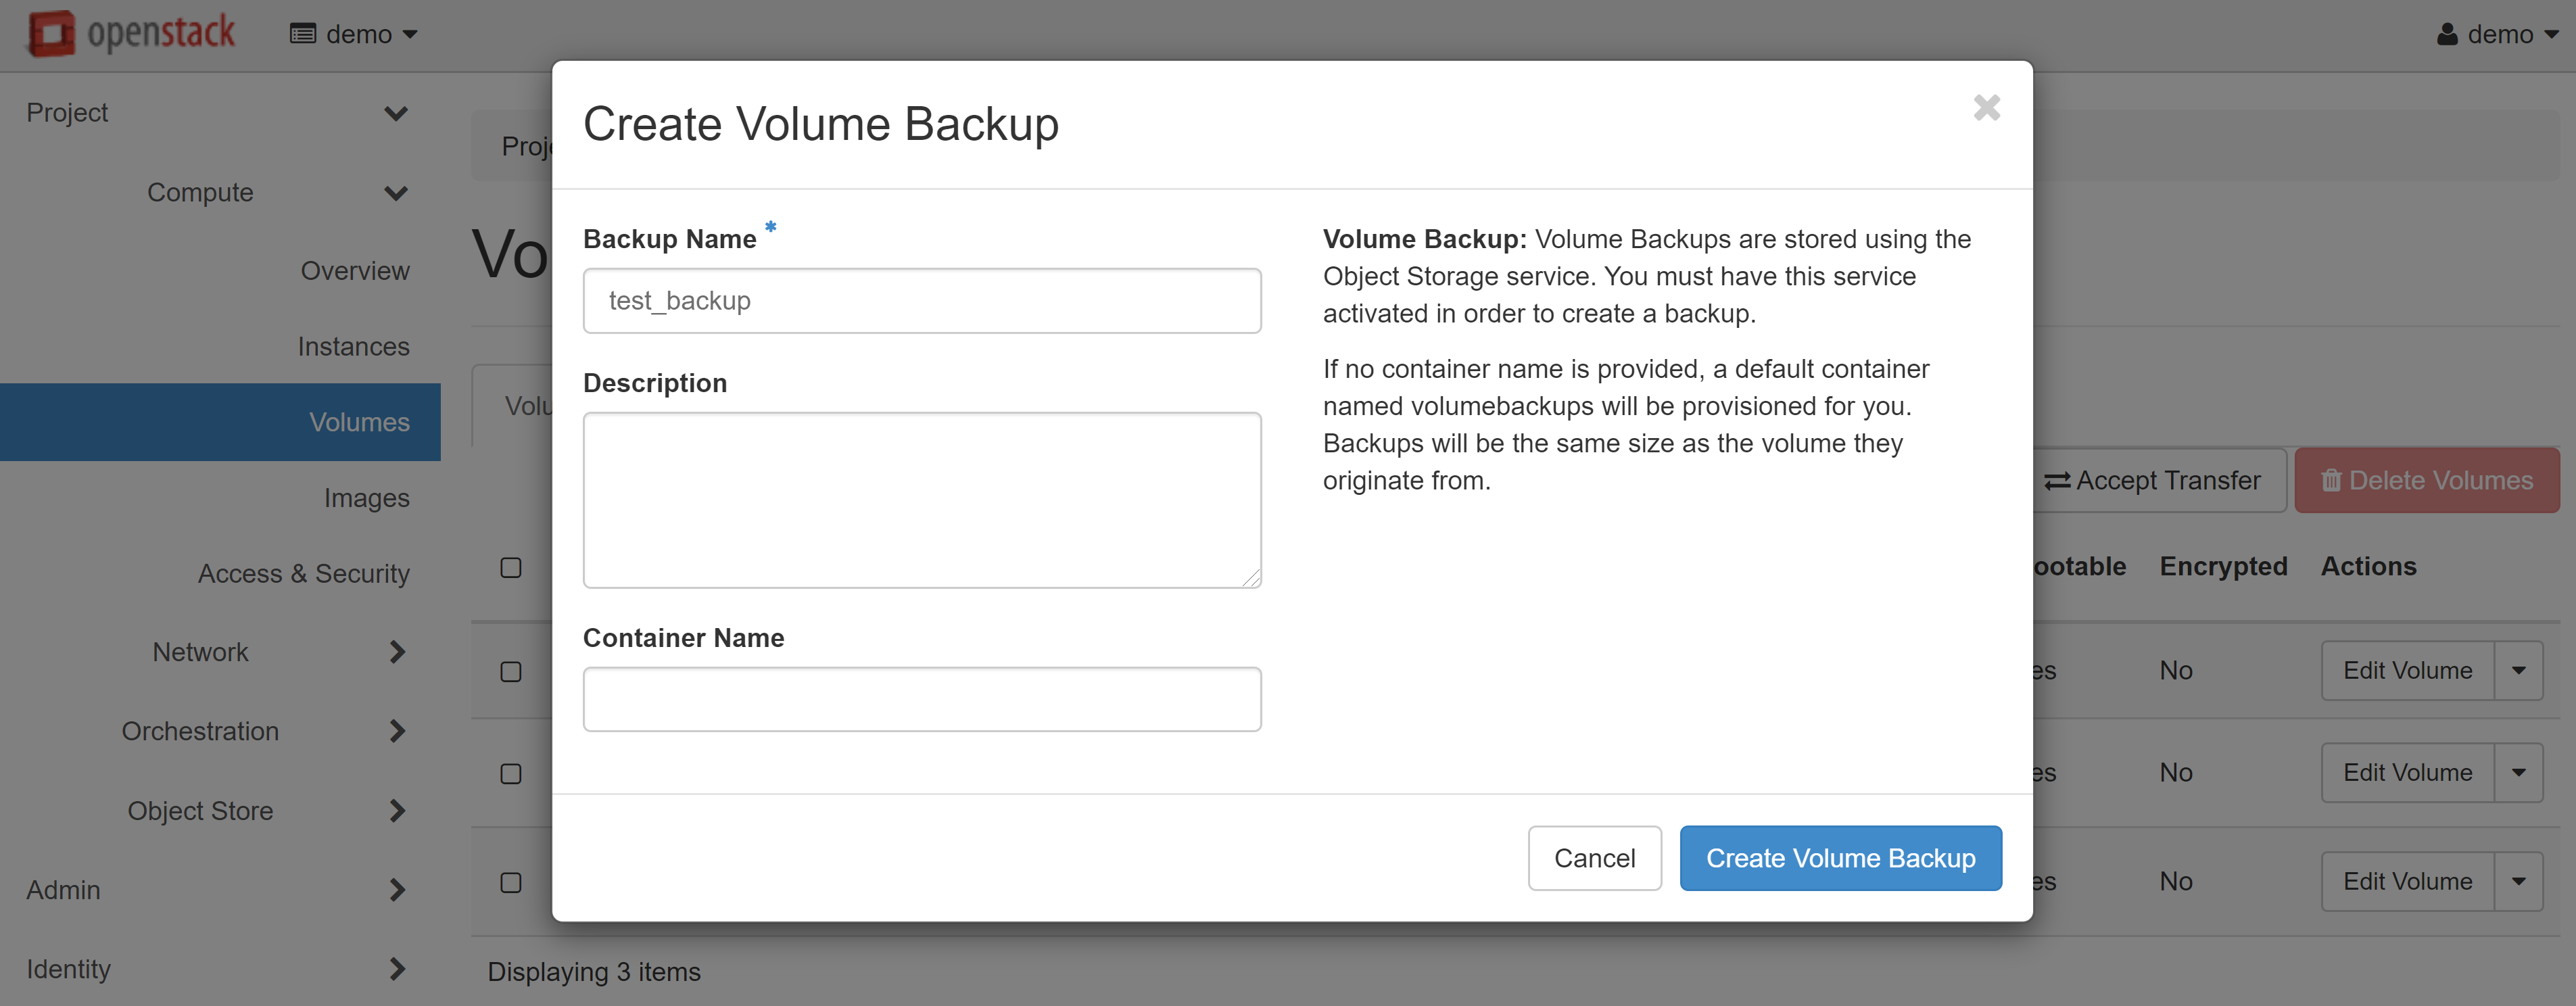
You can also create a backup through the CREATE BACKUP menu item opposite the volume you created.
In the window that opens, enter the name of the backup and click CREATE VOLUME BACKUP.
The created backup will appear on the VOLUME BACKUPS tab. To create one or several volumes from this copy, click RESTORE BACKUP in the drop-down menu opposite the required copy.
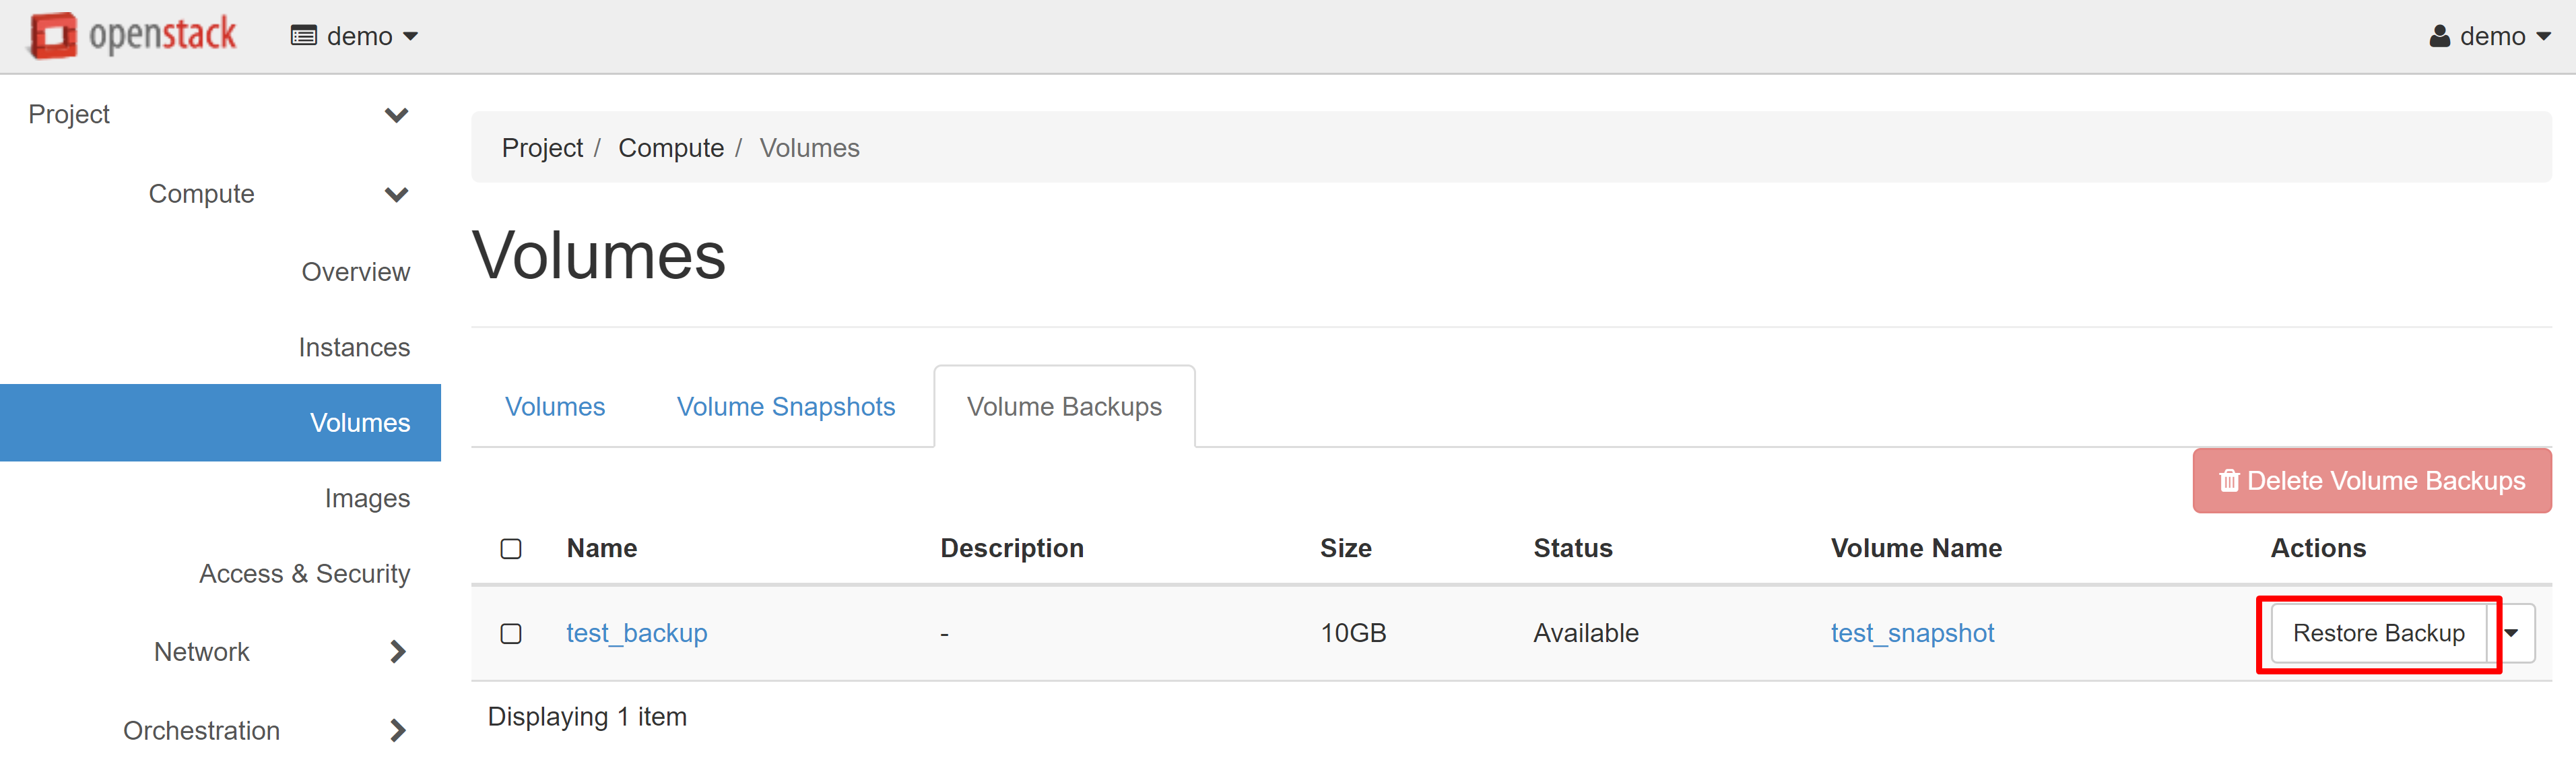
In the window that opens, select CREATE A NEW VOLUME in the SELECT VOLUME drop-down menu, then click RESTORE BACKPUP TO VOLUME.
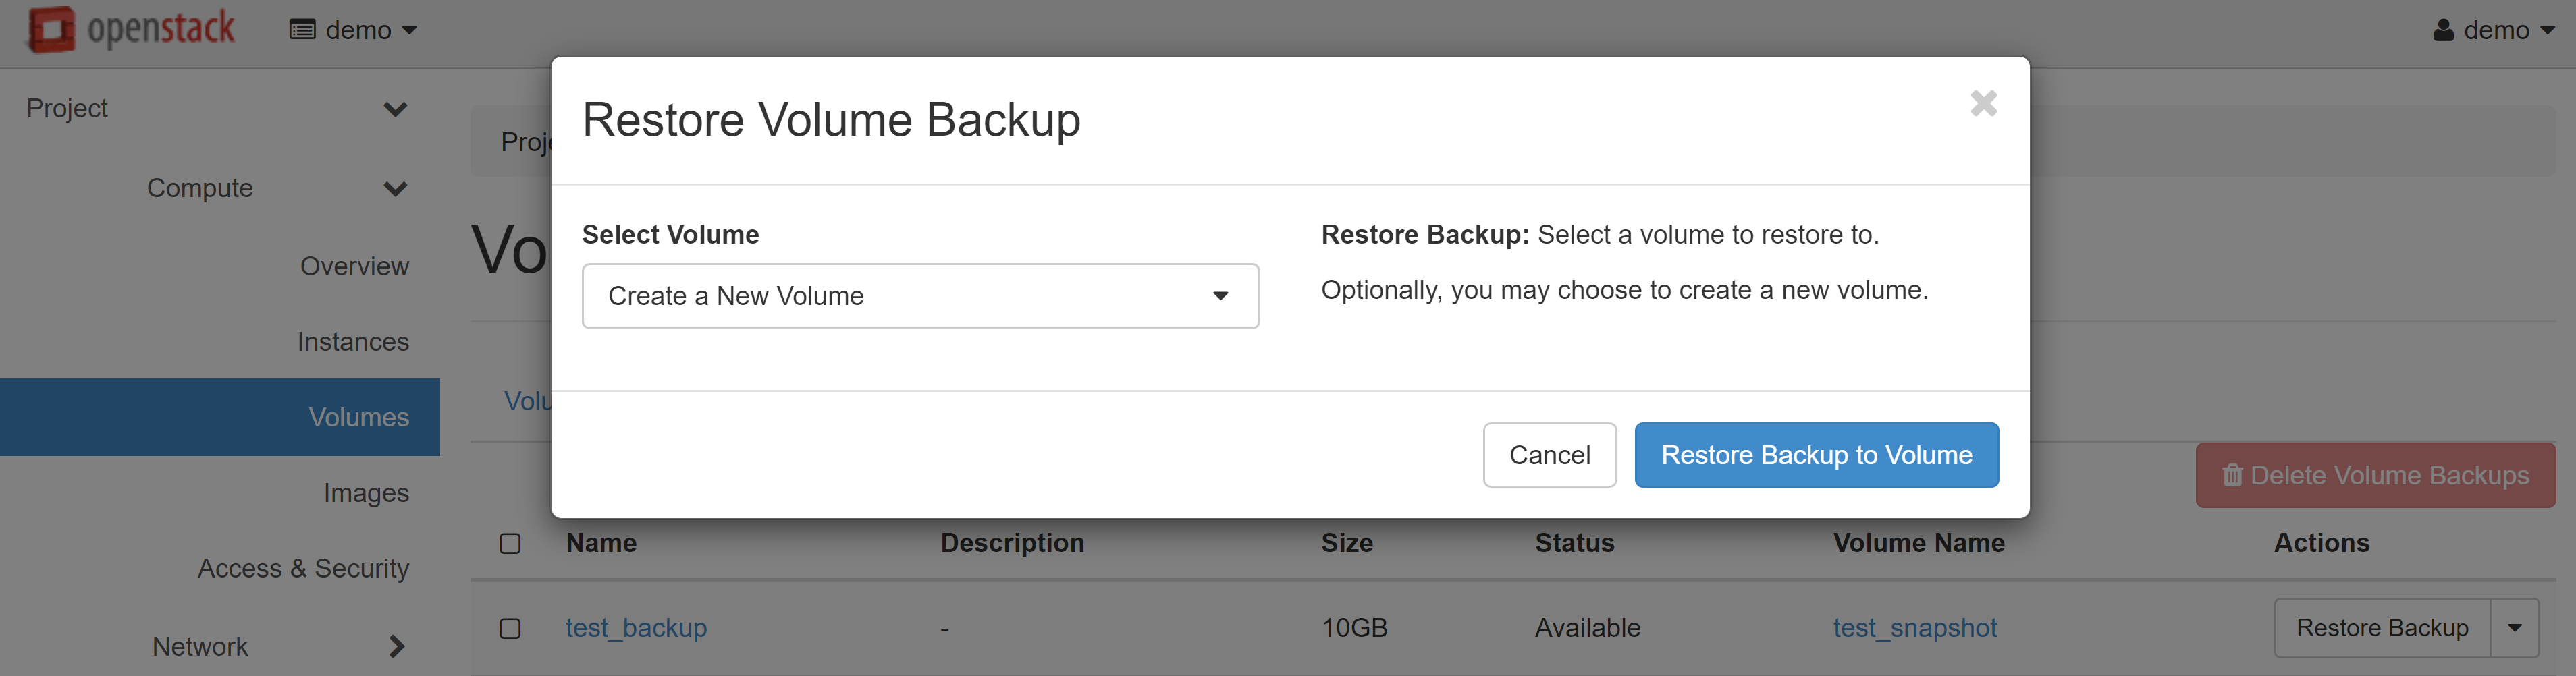
The new volume will appear in the list. You can connect it with an additional volume to another VM, or create a new instance on its basis.
After you've uploaded the image or created a backup, you can delete the snapshot and the source volume for the backup and image, if needed.
The source instance and its source volume are independent of backups and images and can also be deleted if required.