
In these guidelines, we will install a VPN server on a CentOS 7.7 virtual server and configure the relevant connection to it on a user's device with Windows 10.
VPN (Virtual Private Network) is a closed and secure logical network in addition to an insecure network (the Internet). You can read more about VPN services and how to use them in our blog (“VPN technology for business: pros and cons”).
How to install the OpenVPN server-side from a script
OpenVPN is an open-source version of VPN. This protocol has many implementations for almost all platforms. It should be noted that this VPN protocol is currently considered the most secure and reliable.
To install the server-side of the VPN software on a virtual server, we use the openvpn-install open-source script.
The ready-made script makes it possible to install and configure any VPN easily. As a result, the whole installation process is the following mandatory steps:
- connection to the server;
- update of the operating system, if required;
- downloading and activation of the installation script;
- making a copy of the configuration file;
- service performance check.
Attention! The script may be used with the following distributions: CentOS (from version 7), Debian (from version 9), and Ubuntu (from version 17) (in case of version 16, use the vpn1604 script).
To install the script on the VPS with a CentOS 7.7 distribution, you need to take five steps.
Step 1. Connect to the server
When making the order, you receive an e-mail with the information necessary to connect to your virtual server: your server IP address, server administrator’s login and password (root), URL to the server control panel, as well as login and password, to access it – here you can choose the required operating system.
To connect to the VPS, we recommend using any SSH client: PuTTY, Xshell, etc. Run the following command:
ssh root@ХХ.ХХХ.ХХХ.ХХ
where ХХ.ХХХ.ХХХ.ХХ – your server IP address.
If a non-privileged user is previously created on a virtual server for security purposes and allowed to temporarily have a higher level of privileges running the sudo command, then do not forget to run this command every time for all actions that require administrator rights.
To log in as a non-privileged user, run the following command:
ssh -l user ХХ.ХХХ.ХХХ.ХХ
where ХХ.ХХХ.ХХХ.ХХ – your server IP address, user – the name of the non-privileged user.
Step 2. Update your operating system
The next step is to update the system (if necessary). You can skip this step if your server ensures such updates regularly. You may also need to install wget. Commands for a root user:
yum update -y
yum install wget -y
or a non-privileged user:
sudo yum update -y
sudo yum install wget -y
Step 3. Download and launch the VPN server installation script
Download and launch the installation script:
wget https://git.io/vpn -O openvpn-install.sh && bash openvpn-install.sh
First of all, you will see a welcome screen and a few questions:
Welcome to this OpenVPN road warrior installer!
Which protocol should OpenVPN use?
1) UDP (recommended)
2) TCP
Protocol [1]:
What port should OpenVPN listen to?
Port [1194]:
Select a DNS server for the clients:
1) Current system resolvers
2) Google
3) 1.1.1.1
4) OpenDNS
5) Quad9
6) AdGuard
DNS server [1]:
Enter a name for the first client:
Name [client]:
OpenVPN installation is ready to begin.
Press any key to continue…
In our example, we run the script on a server with a single IP address, so all questions may be answered by pressing the Enter key. The first option out of all offered will be selected. Namely:
- IP address will be determined automatically. If there are several addresses on the server, then the script will offer to select one manually;
- Protocol: UDP;
- Connection port: 1194;
- DNS servers: Current system resolvers;
- Certificate client name: client.
Then, the script will install the repository and all necessary packages, generate RSA keys, install certificates and configuration files for both the server and the client, configure the network filter, and directly launch the openvpn-server service.
When the installation process is complete, the script will display a message about the location of the client configuration file. In case of an administrator user, the file will be installed in the root user's home directory: /root/client.ovpn. If the script is installed on behalf of a non-privileged user with temporary sudo privileges, then the file will be located in the home directory of this user. This file must be transferred to the computer or other device that will be used to connect to the server. The server configuration file is located here: /etc/openvpn/server/server.conf.
Step 4. Copy the client configuration file
Then, you need to transfer the client configuration file, which is created by the script, to a PC or other device. In our case, we will be transferring it to our personal computer with Windows 10.
You may transfer the file using the WinSCP software or the pscp utility from Putty or ensure the built-in implementation of the OpenSSH protocol on your device.
You may learn more about the WinSCP software on the official website of the developer:
- How to install WinSCP
- How to connect to the server (File Protocol: SCP)
- Documents
We will consider a command for the pscp utility from Putty. In the Windows command line with administrator rights, specify the path to the software, server, and client configuration directory, which looks like this:
C:\Program Files\PuTTY\pscp.exe root@ХХ.ХХХ.ХХХ.ХХ:/root/client.ovpn "C:\Program Files\OpenVPN\config"
where
- ХХ.ХХХ.ХХХ.ХХ – your server IP address,
/root/client.ovpn– home directory of the root user on the server,- Documents
C:\Program Files\OpenVPN\config– the path where the client configuration file will be saved.
Then, it may be required to accept the server fingerprint. Enter the root user’s password.
If OpenSSH is installed on your computer, then the following command is to be run:
scp root@ХХ.ХХХ.ХХХ.ХХ:/root/client.ovpn .
The dot at the end of the command indicates to the user that the file is transferred to the same folder from which the command is run.
Attention! If you run the script not as a root user but as a privileged user, then in the command, you must specify the directory of this user on the server instead of the directory of the root user.
Step 5. Check the performance of the VPN server
Before establishing any connection to the VPN server, we recommend you perform certain service performance checks. Namely:
-
Checking server status:
systemctl status openvpn-server@server -l
● openvpn-server@server.service - OpenVPN service for server Loaded: loaded (/usr/lib/systemd/system/openvpn-server@.service; enabled; vendor preset: disabled) Active: active (running) since Sat 2021-10-17 16:15:44 GMT; 3s ago ... -
Checking socket status:
ss -4nlup | grep 1194
UNCONN 0 0 XX.XXX.XX.XX:1194 *:* users:(("openvpn",pid=27675,fd=6)) -
Checking network filter condition:
firewall-cmd --state
running
-
Check the open port for connection:
firewall-cmd --list-ports
1194/udp
If, as a result of such checks, there are similar results of the executed commands, then we congratulate you because you did everything right and now may connect to the OpenVPN server.
How to connect to the OpenVPN server
To connect to the VPN server, you need to perform three tasks:
- Install a VPN client on your personal computer.
- Establish the required connection.
- Check the quality of the established connection.
Step 1. Install the OpenVPN GUI client on Windows 10
In case of personal computers and laptops with the Windows operating system, the OpenVPN GUI client should be used. The installation process does not cause any difficulties. However, if they take place, you may familiarize yourself with the official instructions posted on the developer's website. By default, the path to the installed software is the following: C:\Program Files\OpenVPN\.
Step 2. Establish the connection to the server
The installed client may be launched via the Start menu. The copied configuration file will be applied automatically, and the relevant connection will be established. If you already have the OpenVPN GUI software installed on your device and there are several VPN configuration files available, select the one you just created from the list and click on the “Connect” button.
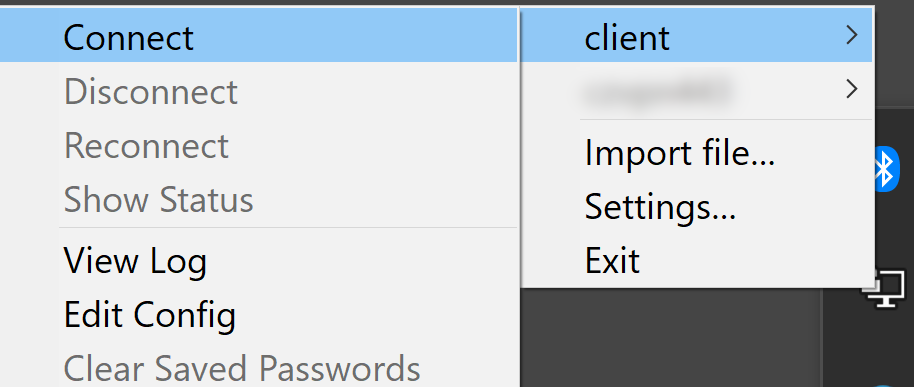
If the connection is successfully established, the icon will change its color to green.

By clicking the icon in the taskbar, you may disable the connection, reestablish it, check the connection status, and much more.
To install any VPN client on MacOS, use the Tunnelblick software.
Step 3. Check if the connection is correct
You can check whether you are really surfing the Internet using the VPN server by visiting https://whatismyipaddress.com/ or https://www.whatismyip.com/.
You should see your server IP address when the relevant VPN connection is enabled, as well as the IP address assigned to you by the Internet service provider when the connection is disabled.
Official documents and detailed instructions on the OpenVPN protocol may be found on the developer's website:
Please find hereby our other VPN guidelines: